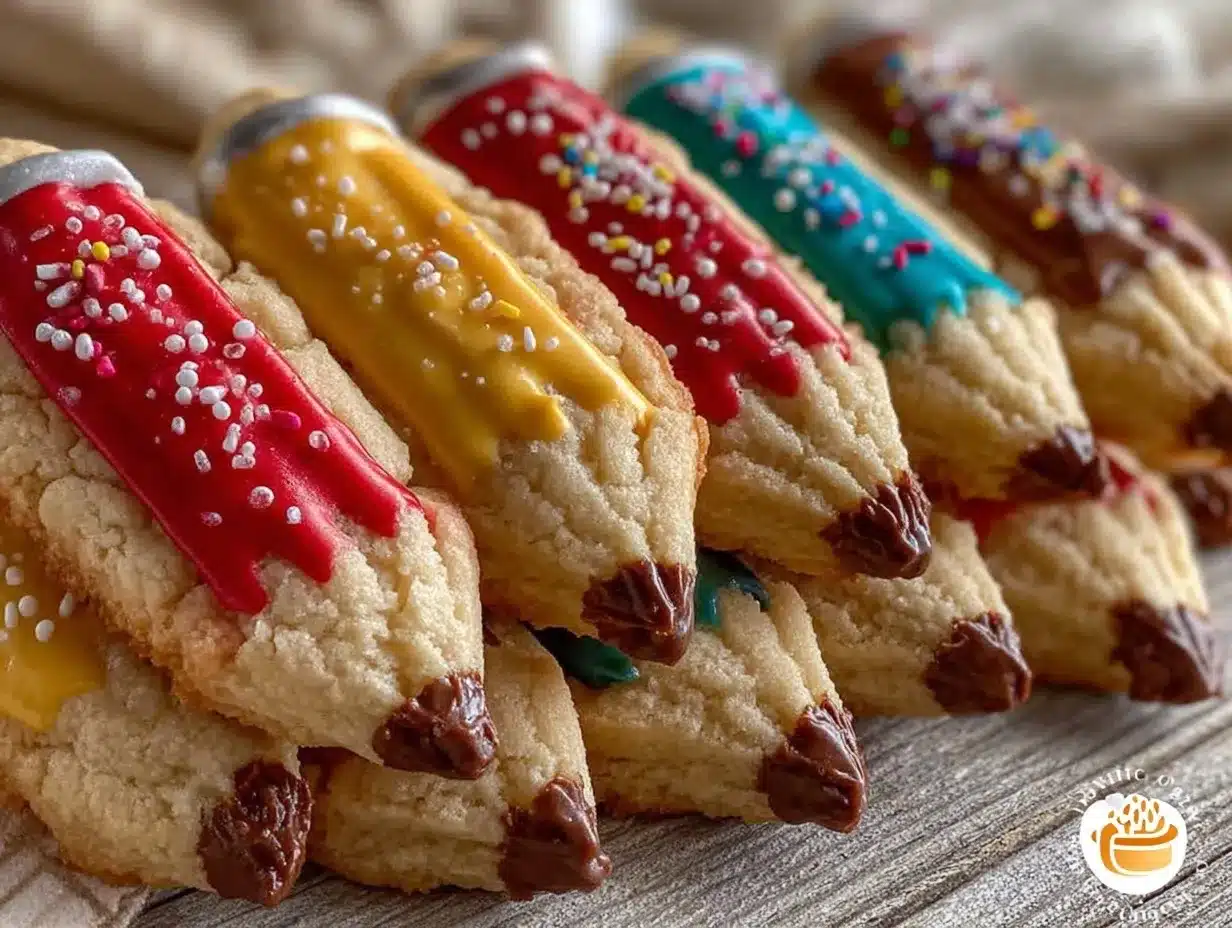
For a while, I just accepted that sugar cookies shaped like pencils would never quite capture that crisp, clean edge and perfect bite I imagined. I mean, sure, you can roll out dough and cut shapes, but getting those pencil-shaped sugar cookies to hold their form and actually taste like something special? That was another story. I remember one afternoon, the kitchen smelled of vanilla and butter, but the cookies were more floppy than firm, and the royal icing? A bit too runny and sad-looking on top.
It wasn’t about fancy techniques or complicated ingredients—just wanting pencil-shaped sugar cookies with a crisp snap, smooth royal icing that sets just right, and a look that says ‘school days’ without tasting like cardboard. The search wasn’t urgent, more like a quiet persistence, baking batch after batch, tweaking flour ratios, chilling times, and icing consistencies.
One rainy afternoon, after letting the dough chill overnight and mixing up a royal icing that wasn’t too thin or thick, those pencil-shaped sugar cookies finally came out of the oven with clean edges, a tender crumb, and a glossy icing that held its shape like a charm. It wasn’t a big kitchen breakthrough or anything—just a steady, no-frills recipe that I found myself coming back to again and again.
That little discovery, the one that wasn’t flashy but reliable, is why this recipe stuck. It’s the kind of cookie that feels just right on a busy morning or an impromptu get-together. The kind you can decorate while chatting and not worry if the icing runs or the cookies puff up. So, if you’ve ever wanted perfect pencil-shaped sugar cookies with royal icing that behave, well, this recipe quietly waits for you.
Why You’ll Love This Recipe
Honestly, these pencil-shaped sugar cookies are pretty special—here’s why I keep reaching for this recipe when I want a no-fuss, dependable cookie that looks cute and tastes even better:
- Quick & Easy: The dough comes together in about 15 minutes, and you can chill it while finishing other tasks. Perfect for last-minute baking sessions.
- Simple Ingredients: Nothing fancy here—just pantry staples like flour, sugar, butter, and eggs. No weird extracts or specialty flours needed.
- Perfect for Back-to-School or Parties: These cookies are a hit at classroom events, teacher gifts, or casual celebrations.
- Crowd-Pleaser: Kids love the fun pencil shape, and adults appreciate the buttery, tender crumb with just the right sweetness.
- Unbelievably Delicious: The royal icing dries smooth and glossy, making decorating a breeze without the frustration of cracking or bleeding colors.
What sets this recipe apart? The dough includes a touch of cornstarch to keep the cookies tender yet firm enough to hold their pencil shape. The royal icing uses a simple meringue powder base that dries hard but stays smooth. I’ve tested this recipe through several school years, tweaking the chilling time and baking temperature until it felt just right. It’s not fancy, but it’s reliable—and that’s what makes it the best version for these pencil-shaped sugar cookies.
It’s the kind of recipe that makes you smile quietly when the cookies come out just right—not too thick, not too thin, and the icing that doesn’t blob but stays put. There’s a subtle satisfaction in that kind of success, and that’s why this recipe stuck around in my rotation.
What Ingredients You Will Need
This recipe uses simple, wholesome ingredients to deliver pencil-shaped sugar cookies with a tender bite and smooth royal icing without fuss. Most are pantry staples, making it easy to bake these anytime you want.
- For the Sugar Cookies:
- 2 ¾ cups (345g) all-purpose flour (I prefer King Arthur for consistent texture)
- 1 teaspoon baking powder
- ½ teaspoon salt
- 1 tablespoon cornstarch (helps keep cookies tender)
- 1 cup (227g) unsalted butter, softened (room temperature for easy creaming)
- 1 ½ cups (300g) granulated sugar
- 1 large egg (room temperature)
- 2 teaspoons pure vanilla extract (or almond extract for a subtle twist)
- For the Royal Icing:
- 3 tablespoons meringue powder
- 4 cups (480g) powdered sugar, sifted
- 5-6 tablespoons warm water (adjust for consistency)
- Food coloring gels (yellow, pink, green, black for pencil details)
Substitution tips: Use gluten-free all-purpose flour blend if you need a gluten-free version. For the royal icing, if you can’t find meringue powder, pasteurized egg whites work but require careful handling.
Seasonal note: While these cookies are perfect year-round, adding a hint of lemon zest to the dough gives a fresh touch in spring or summer. Just a teaspoon will do.
Equipment Needed
- Mixing bowls (medium and large)
- Electric mixer (stand or hand-held) for creaming butter and mixing icing
- Rolling pin (a non-stick or silicone one works well to prevent sticking)
- Pencil-shaped cookie cutter (about 3-4 inches long; if unavailable, a small rectangular cutter with angled edges can be improvised)
- Baking sheets lined with parchment paper or silicone mats for even baking
- Cooling racks to let cookies cool completely before icing
- Small piping bags or zip-top bags with tiny corner snipped for icing application
- Food-safe paintbrush for blending icing details (optional but helpful)
If you don’t have a cookie cutter in the pencil shape, I’ve found that cutting rectangles and trimming corners with a knife works just fine. Also, piping bags can be swapped for small plastic sandwich bags in a pinch. For royal icing, a stiff plastic spatula is handy for mixing.
Preparation Method
- Mix Dry Ingredients: In a bowl, whisk together the all-purpose flour, baking powder, salt, and cornstarch. Set aside. This keeps the dry ingredients well combined and ensures even distribution.
- Cream Butter and Sugar: Using an electric mixer, beat the softened butter and granulated sugar on medium speed until light and fluffy—about 3-4 minutes. You’ll know it’s ready when the mixture looks pale and slightly airy.
- Add Egg and Vanilla: Crack in the room temperature egg and add vanilla extract. Beat on medium speed until fully incorporated, scraping down the sides as needed.
- Combine Dry and Wet: Gradually add the dry ingredients to the butter mixture on low speed. Mix just until the dough comes together. Avoid over-mixing to keep cookies tender.
- Chill the Dough: Shape the dough into a flat disc, wrap tightly in plastic wrap, and chill for at least 1 hour (overnight is even better). The dough firms up, making it easier to roll and cut precise pencil shapes.
- Roll Out and Cut: Lightly flour your work surface and rolling pin. Roll dough to about ¼-inch (6 mm) thickness. Cut out pencil shapes with your cutter or knife. Transfer cookies to lined baking sheets about 1 inch apart.
- Bake: Preheat oven to 350°F (175°C). Bake cookies for 9-11 minutes, until edges are just starting to turn light golden. Avoid overbaking for tender centers.
- Cool Thoroughly: Let cookies cool on the baking sheet for 5 minutes, then transfer to wire racks. Completely cool before icing—warm cookies will melt the royal icing.
- Prepare Royal Icing: In a bowl, combine meringue powder, powdered sugar, and 5 tablespoons warm water. Beat on high for 5-7 minutes until stiff peaks form. Adjust consistency with more water for flooding (thin) or less for outlining (thick).
- Color and Decorate: Divide icing into separate bowls, tint with gel colors for the pencil body, eraser, and tip. Use piping bags for outlines and flooding techniques. Let each layer dry a bit before adding details like black lead tip or eraser bands.
- Dry and Store: Allow decorated cookies to dry at room temperature for several hours or overnight. Store in an airtight container when set.
Pro tip: If your dough feels sticky after chilling, sprinkle a little flour while rolling. Also, use a toothpick to smooth icing edges and pop small air bubbles before drying for flawless finishes.
Cooking Tips & Techniques
Getting the perfect pencil-shaped sugar cookies with royal icing comes down to a few little tricks I picked up along the way. First, chilling the dough is non-negotiable. It keeps the butter firm so cookies don’t spread and lose that crisp shape during baking.
When rolling, flour your surface lightly but avoid over-flouring—the dough should still feel a bit tacky. That helps the cookies hold their shape while baking. I’ve learned that baking sheets with parchment paper or silicone mats make a difference; they prevent the bottoms from browning too fast.
For royal icing, consistency is everything. I mix until stiff peaks form, then thin the icing carefully with small amounts of water for flooding. Too thin, and it runs off the cookie; too thick, and it’s hard to spread smoothly. Using gel food colors instead of liquid helps keep the icing firm.
One mistake I made early on was icing warm cookies—big no-no. It causes the icing to melt and slide off. Always wait until cookies are completely cool. Also, layering colors means waiting between steps; patience pays off with neat, vibrant designs.
Lastly, I keep toothpicks or a small needle handy to fix any icing mistakes before it dries. It’s a small step but saves so much frustration. Multitasking by prepping dough and icing at the same time helps speed up the process without rushing.
Variations & Adaptations
You can tailor these pencil-shaped sugar cookies with royal icing for different tastes or occasions. Here are a few ideas I’ve tried or thought about:
- Gluten-Free Version: Swap all-purpose flour with a 1:1 gluten-free baking flour blend. The texture is slightly different but still delightful.
- Vegan Alternative: Use vegan butter and a flax egg (1 tablespoon ground flaxseed + 3 tablespoons water) instead of regular butter and egg. Royal icing can be made with aquafaba (chickpea water) instead of meringue powder.
- Seasonal Colors: Change icing colors for holidays—orange and black for Halloween pencils or red and green for Christmas-themed treats.
- Flavor Twists: Add a teaspoon of almond extract or lemon zest to the dough for a subtle flavor boost.
- Alternative Decorating: Instead of royal icing, dip cookies halfway in melted chocolate for a fast, less fussy finish.
One time, I swapped the royal icing for a simple cream cheese glaze and decorated with sprinkles—kids loved the softer texture, and it was a fun twist for a casual afternoon snack.
Serving & Storage Suggestions
Serve these pencil-shaped sugar cookies at room temperature for the best texture and flavor. They’re perfect alongside a cup of hot tea or a cold glass of milk—makes me think of school lunch memories, you know?
For presentation, try stacking them on a colorful plate or placing them in a clear cellophane bag tied with a ribbon for teacher gifts or party favors. They also pair nicely with lighter desserts like the nectarine blueberry galette for a fresh contrast.
Store baked and decorated cookies in an airtight container at room temperature for up to 5 days. If your kitchen is humid, refrigerate but bring back to room temp before serving to keep icing from sweating.
For longer storage, freeze undecorated cookies in a single layer on a baking sheet, then transfer to a freezer bag. Thaw completely before icing. Decorated cookies freeze best when hardened, wrapped individually with plastic wrap and kept in airtight containers.
Flavors tend to mellow and become richer after a day or two, making these pencil-shaped sugar cookies even more enjoyable if you can wait that long!
Nutritional Information & Benefits
Each pencil-shaped sugar cookie (without icing) contains approximately 150-180 calories, with about 7 grams of fat and 20 grams of carbohydrates. The royal icing adds a bit more sugar and calories, so treat these as an occasional sweet.
Key ingredients like butter provide some fat-soluble vitamins, and the simple flour and sugar combo keeps things straightforward—no preservatives or artificial flavors.
Gluten and egg are present, so not suitable for those with allergies unless you try the substitutions mentioned earlier. This recipe can be adapted for various dietary needs with some tweaks.
From a wellness perspective, making these cookies at home means you control the quality of ingredients and avoid the additives found in many store-bought options. Plus, baking itself is a nice way to unwind—call that a bonus benefit!
Conclusion
These perfect pencil-shaped sugar cookies with royal icing aren’t about flash or fancy tricks. They’re about getting that crisp edge, tender bite, and smooth, glossy icing that actually behaves. Whether you’re baking for a back-to-school event, a casual gathering, or just because, this recipe makes it easy to get it right.
I love how customizable it is—you can tweak flavors, colors, and decorating styles to suit your mood or occasion. And honestly, there’s something quietly satisfying about a cookie that looks good and tastes even better without drama.
Give this recipe a try and see if it becomes your go-to pencil cookie too. I’d love to hear what decorating ideas or personal touches you add, so feel free to share your thoughts or photos. Baking is more fun when we share the joy, after all!
FAQs
- Can I make this dough ahead of time? Absolutely. The dough can be chilled for up to 3 days or frozen for up to 1 month. Just thaw in the fridge before rolling out.
- What if I don’t have a pencil-shaped cookie cutter? You can use a small rectangular cutter and trim corners with a knife to mimic the pencil shape.
- How do I fix royal icing that’s too runny? Add more powdered sugar a tablespoon at a time until it reaches the desired consistency.
- Can I use liquid food coloring instead of gel? Gel food coloring is best as it doesn’t alter the icing consistency. Liquid colors may thin the icing.
- How long does royal icing take to dry? Usually, it sets to the touch within 2 hours but drying completely can take 8-12 hours at room temperature.
Pin This Recipe!
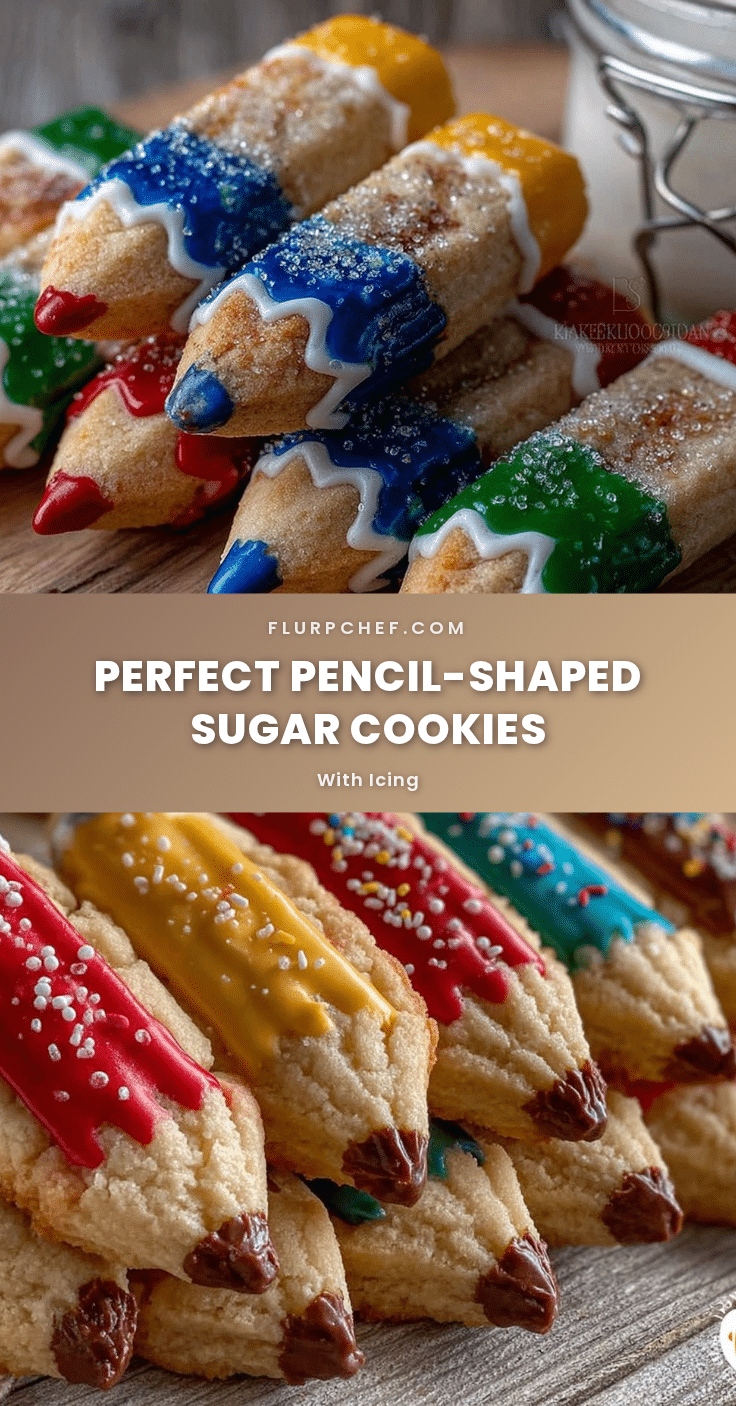
Perfect Pencil-Shaped Sugar Cookies Recipe with Easy Royal Icing Tutorial
This recipe delivers crisp, tender pencil-shaped sugar cookies with smooth, glossy royal icing that holds its shape perfectly. Ideal for back-to-school events, parties, or casual gatherings.
- Prep Time: 15 minutes
- Cook Time: 10 minutes
- Total Time: 1 hour 25 minutes
- Yield: 24 cookies 1x
- Category: Dessert
- Cuisine: American
Ingredients
- 2 ¾ cups (345g) all-purpose flour
- 1 teaspoon baking powder
- ½ teaspoon salt
- 1 tablespoon cornstarch
- 1 cup (227g) unsalted butter, softened
- 1 ½ cups (300g) granulated sugar
- 1 large egg
- 2 teaspoons pure vanilla extract (or almond extract)
- 3 tablespoons meringue powder
- 4 cups (480g) powdered sugar, sifted
- 5–6 tablespoons warm water
- Food coloring gels (yellow, pink, green, black)
Instructions
- Mix dry ingredients: whisk together flour, baking powder, salt, and cornstarch in a bowl; set aside.
- Cream butter and sugar: beat softened butter and granulated sugar on medium speed until light and fluffy, about 3-4 minutes.
- Add egg and vanilla: beat in the egg and vanilla extract until fully incorporated.
- Combine dry and wet ingredients: gradually add dry ingredients to butter mixture on low speed; mix just until dough forms.
- Chill dough: shape dough into a flat disc, wrap in plastic wrap, and chill for at least 1 hour or overnight.
- Roll out and cut: lightly flour surface and rolling pin; roll dough to ¼-inch thickness; cut pencil shapes with cutter or knife; place on lined baking sheets 1 inch apart.
- Bake: preheat oven to 350°F (175°C); bake cookies for 9-11 minutes until edges are lightly golden.
- Cool thoroughly: cool on baking sheet for 5 minutes, then transfer to wire racks; cool completely before icing.
- Prepare royal icing: combine meringue powder, powdered sugar, and 5 tablespoons warm water; beat on high for 5-7 minutes until stiff peaks form; adjust consistency with water as needed.
- Color and decorate: divide icing into bowls; tint with gel colors; use piping bags for outlines and flooding; let layers dry before adding details.
- Dry and store: allow decorated cookies to dry at room temperature for several hours or overnight; store in airtight container.
Notes
Chill dough for at least 1 hour or overnight for best shape retention. Use gel food coloring to maintain icing consistency. Avoid icing warm cookies to prevent melting. Use toothpicks to smooth icing edges and pop air bubbles. Dough can be chilled up to 3 days or frozen for 1 month. For gluten-free, substitute flour with gluten-free blend. For vegan, use vegan butter, flax egg, and aquafaba for icing.
Nutrition
- Serving Size: 1 cookie
- Calories: 180
- Sugar: 12
- Sodium: 90
- Fat: 7
- Saturated Fat: 4
- Carbohydrates: 20
- Protein: 2
Keywords: sugar cookies, pencil-shaped cookies, royal icing, back-to-school cookies, easy sugar cookies, decorated cookies, party cookies


