The neighborhood potluck was in three hours and I’d completely forgotten. Not just forgotten—I’d blocked it out, apparently. My phone buzzed with a reminder notification and I actually groaned out loud. Everyone else would be bringing their signature dishes. Martha from three doors down always shows up with those perfect little beef wellingtons that look like they came from a catering company. Dave brings his smoked brisket that he babied for fourteen hours. And me? I had a bubbly, neglected sourdough starter in the fridge and a vague sense of panic.
I yanked open the pantry, hoping for a miracle. There was flour, olive oil, a bundle of rosemary that was starting to look sad, and some sea salt that had clumped together because of humidity. Not exactly potluck gold. But then I remembered this golden sourdough focaccia I’d been tinkering with on lazy Sundays. It was forgiving. It was fast—well, fast for bread. And honestly, it looked fancy even when I’d rushed it. I mean, the dimples alone make people think you did something complicated.
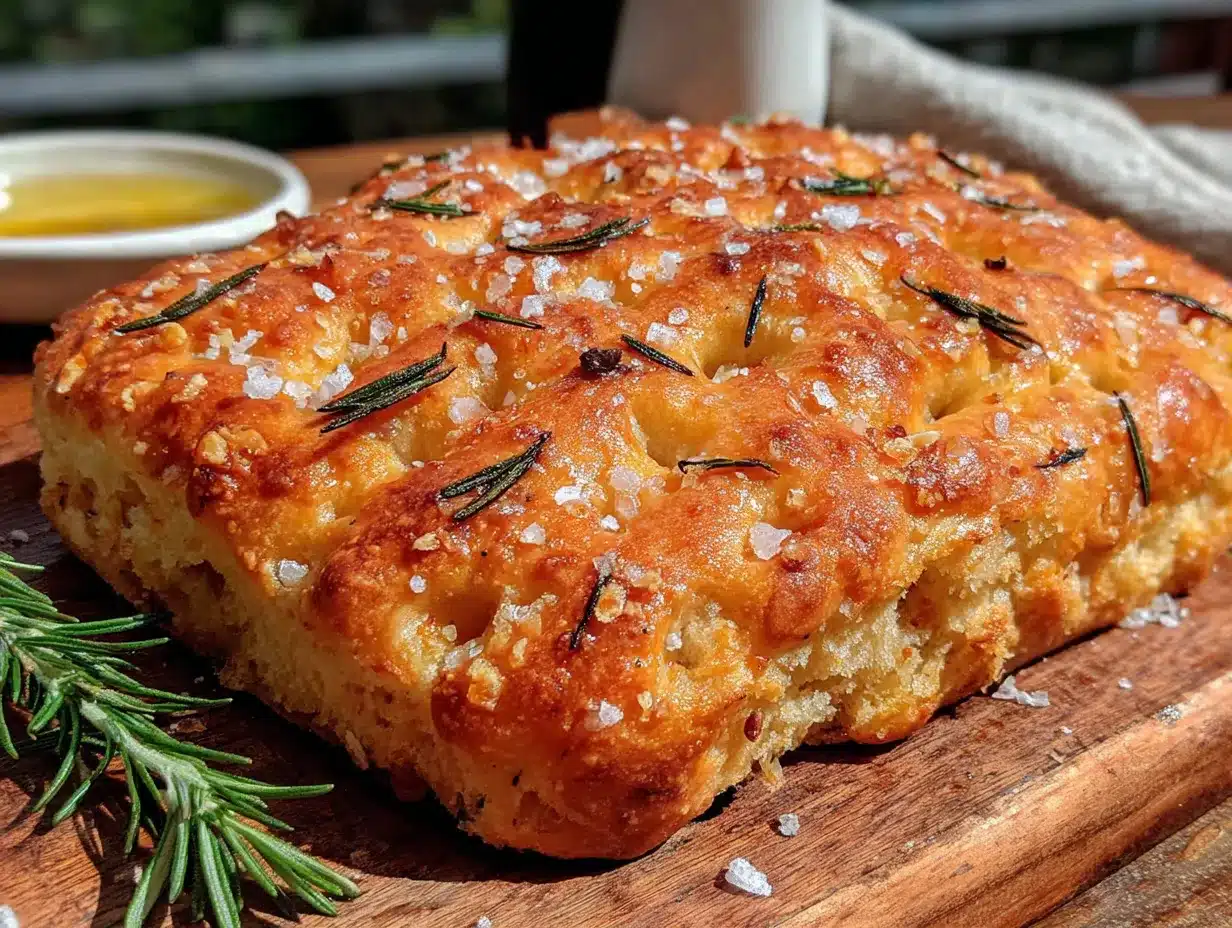
I started mixing, and let me tell you, I was not graceful about it. Flour ended up on my jeans. I accidentally used the measuring cup I’d just used for coffee—thankfully it was empty. But the dough came together, sticky and alive, and I let it do its first rise while I frantically cleaned the kitchen. By the time I walked into that potluck with my golden sourdough focaccia, warm and glistening with olive oil, rosemary scattered across the top like little green trees, I was still wiping flour off my ear.
It disappeared in twelve minutes. People kept coming back to the table, tearing off pieces, making those happy noises. Someone asked for the recipe before they’d even swallowed. And that’s how I learned that sometimes the best things happen when you’re totally unprepared. This golden sourdough focaccia with rosemary and sea salt has saved me more times than I can count now. It’s the recipe that looks like you spent all day on it when really, the dough did most of the work. You just have to show up and push some dimples in.
Why You’ll Love This Recipe
Let me be honest with you—I’ve tested a lot of focaccia recipes over the years. Some were too dense. Some were so oily they left your fingers slick for an hour. Others just didn’t have that crust-to-crumb ratio that makes focaccia actually worth eating. This golden sourdough focaccia is the one I kept coming back to, and here’s why I think you’ll feel the same way.
- Fermented Flavor Without the Fuss : Using sourdough starter gives this bread a tangy depth that instant yeast just can’t replicate. It’s that subtle sourness that makes you take another bite before you’ve finished the first one.
- Incredibly Forgiving Dough : This isn’t the kind of bread that punishes you for being five minutes late on a fold. The high hydration means the dough is relaxed and cooperative, even if you’re distracted.
- Pantry-Friendly Ingredients : Flour, water, salt, olive oil, and your sourdough starter. That’s it. No special trips to the store for obscure ingredients.
- Visually Stunning : Those golden dimples, the crispy edges, the green rosemary against the pale dough—this bread is genuinely beautiful. It makes you look like you know what you’re doing.
- Perfect for Any Occasion : Potlucks, dinner parties, soup nights, or just eating half the pan yourself with a glass of wine while standing in the kitchen. I don’t judge.
What makes this version different from all the other focaccia recipes out there? It’s the sourdough. The long, slow fermentation develops complex flavors that flat-out taste more interesting. And the technique I’m sharing—with the olive oil pooling in the dimples and the flaky salt catching on the rosemary—creates a crust that shatters when you bite into it while the inside stays soft and airy. It’s not just another focaccia. It’s the one you’ll make again and again until you don’t need the recipe anymore. That kind of confidence comes from a recipe that works every single time.
Ingredients You Will Need
This golden sourdough focaccia uses simple ingredients that work together to create something genuinely special. The magic happens through fermentation and technique, not through a long list of exotic items. Here’s what you’ll need and why each ingredient matters.
For the Dough
- 500 grams (4 cups) bread flour : I prefer King Arthur bread flour for its higher protein content, which gives the focaccia better structure and chew. All-purpose flour works in a pinch, but the crumb will be slightly less airy.
- 400 grams (1 2/3 cups) warm water : About 80°F. Too hot and you’ll kill the good bacteria in your starter. Too cold and fermentation will crawl along. Think bath water temperature—comfortably warm on your wrist.
- 150 grams (3/4 cup) active sourdough starter : This should be bubbly and doubled in size. Feed your starter 4-6 hours before you plan to mix the dough. If it passes the float test (a spoonful drops in water and floats), you’re golden.
- 10 grams (2 teaspoons) fine sea salt : Salt controls fermentation and strengthens the gluten structure. Don’t skip it or reduce it too much, or your dough will be slack and flat.
- 30 grams (2 tablespoons) olive oil : Use a good quality extra virgin olive oil here. It adds flavor to the dough itself, not just the topping. I like California Olive Ranch for a balanced, buttery flavor that doesn’t overpower.
For the Topping
- 60-80 grams (1/4 to 1/3 cup) olive oil : This goes into the pan and gets drizzled on top. Don’t skimp—focaccia needs olive oil the way the ocean needs water. It’s what creates that crispy, almost fried bottom crust.
- 2-3 tablespoons fresh rosemary, roughly chopped : Fresh is non-negotiable here. Dried rosemary is woody and sharp. Look for rosemary that’s bright green and fragrant, not sad and droopy from sitting in the fridge too long.
- 1-2 teaspoons flaky sea salt : Maldon is my go-to. The big, delicate flakes create little bursts of saltiness that contrast beautifully with the olive oil. Regular table salt will just dissolve and you’ll lose that effect.
- Optional: Freshly cracked black pepper or red pepper flakes : I sometimes add a pinch for warmth. It’s not traditional, but it’s delicious.
Equipment Needed
You don’t need a professional bakery setup for this golden sourdough focaccia. Most of these tools are probably already in your kitchen. But a few specific items make the process smoother and the results more consistent.
- Digital kitchen scale : Honestly, this is the most important tool. Measuring flour by volume is wildly inconsistent. A $15 scale will transform your baking. I use my Escali every single day.
- Large mixing bowl : Glass or ceramic works best. Plastic can retain odors and metal can react with the dough over long fermentation. I use a big Pyrex bowl that lets me see the bubbles forming.
- 10×15-inch baking pan or 9×13-inch pan : A half-sheet pan gives you thinner, crispier focaccia with more surface area for those crispy edges. A 9×13 gives you taller, softer focaccia. Both work—it’s personal preference.
- Bench scraper : This little tool is invaluable for folding the dough and scraping it out of the bowl without destroying the air bubbles. A plastic one costs about five dollars.
- Plastic bowl scraper : Similar to the bench scraper but flexible. Great for getting every last bit of dough out of the bowl without making a mess.
- Clean kitchen towel or plastic wrap : For covering the dough during bulk fermentation. I prefer a lint-free towel because it’s more sustainable, but plastic wrap works fine if you’re careful not to let it touch the dough.
- Cooling rack : Essential for letting the focaccia cool without the bottom getting soggy from trapped steam. Don’t skip this step unless you like sad, wet-bottomed bread.
Preparation Method
Making this golden sourdough focaccia is a process, but it’s a relaxing one. There’s no frantic kneading or precise shaping. The dough tells you what it needs if you pay attention. Here’s how it all comes together.
- Mix the dough (10 minutes) : In your large mixing bowl, combine the warm water and active sourdough starter. Stir until the starter mostly dissolves—it doesn’t need to be perfect. Add the bread flour and mix with your hand or a dough whisk until no dry bits remain. The dough will look shaggy and rough. That’s fine. Cover the bowl with a towel and let it rest for 30 minutes. This is called autolyse, and it lets the flour absorb the water and start developing gluten without you doing any work.
- Add the salt and oil : After the rest, sprinkle the salt over the dough and pour in the 30 grams of olive oil. Pinch and squeeze the dough with your hand to incorporate everything. It will feel messy and the dough might break apart at first. Keep going. After a minute or two, it will come back together into a smooth, elastic ball. This takes patience—don’t rush it.
- Bulk fermentation with folds (2.5 to 3.5 hours) : This is where the magic happens. Cover the bowl and let the dough rest for 30 minutes. Then, wet your hand slightly and perform a coil fold: reach under the dough, grab a section from the bottom, lift it up, and fold it over the top. Rotate the bowl and repeat 3-4 times until the dough feels tighter. Do this every 30 minutes for the first 2 hours (4 folds total). After the last fold, let the dough rest undisturbed for another 30-60 minutes. You’ll know it’s ready when the dough is puffy, jiggly, and dotted with bubbles on the surface.
- Prepare the pan (5 minutes) : While the dough rests, pour about 3-4 tablespoons of olive oil into your baking pan. Use your fingers to spread it evenly across the bottom and up the sides. The oil should pool slightly—this is what creates that golden, crispy bottom crust.
- Transfer and stretch (5 minutes) : Gently scrape the dough out of the bowl and into the oiled pan. Don’t deflate it if you can help it. Let it sit for 10 minutes to relax, then gently stretch it toward the corners of the pan. The dough will resist and spring back. That’s normal. Let it rest another 10 minutes, then stretch again. Repeat until the dough fills the pan evenly. It might take 3-4 rounds, but don’t force it—let time do the work.
- Final proof (1.5 to 2 hours) : Cover the pan with a towel or plastic wrap and let the dough rise until it’s puffy and nearly doubled in height. The surface should look alive with small bubbles. This timing depends on your starter’s strength and your kitchen temperature. In a warm kitchen (75°F), it might take less time. In a cooler kitchen, it could take longer. Watch the dough, not the clock.
- Dimple and top (5 minutes) : Preheat your oven to 425°F (220°C) about 30 minutes before baking. When the dough is ready, drizzle another 2-3 tablespoons of olive oil over the surface. Then, using oiled fingertips, press deep dimples all across the dough—all the way to the bottom of the pan. Don’t be shy. These dimples hold the oil and create those signature focaccia craters. Sprinkle the chopped rosemary and flaky sea salt evenly over the top.
- Bake (25-30 minutes) : Place the pan on the middle rack and bake until the focaccia is deep golden brown on top and the bottom is crispy when you lift an edge with a spatula. Rotate the pan halfway through for even browning. If the top is browning too fast but the bottom isn’t done, tent loosely with foil for the last 5-10 minutes.
- Cool (20 minutes minimum) : Transfer the focaccia to a cooling rack. Let it cool for at least 20 minutes before cutting. I know it’s hard to wait, but cutting too early will crush the airy crumb and make the bread gummy. The wait is worth it. The crust will stay crispy and the inside will be perfectly soft.
Cooking Tips & Techniques
I’ve made this golden sourdough focaccia probably fifty times now, and I’ve made every mistake you can imagine. Here’s what I’ve learned so you don’t have to repeat my failures.
Don’t skip the folds. I made a batch once where I got distracted and only did two folds instead of four. The focaccia came out flat and dense, like a sad pancake. Those folds build the gluten network that traps the gas bubbles and gives you that airy crumb. Set a timer on your phone. It’s only 30 seconds of work every half hour.
Watch your water temperature. The first time I made this in winter, I used cold tap water and my dough barely moved for hours. I ended up waiting six hours for the bulk fermentation. Now I use warm water—around 80°F—and my fermentation is consistent year-round. If your kitchen is cold (below 68°F), use slightly warmer water. If it’s hot, use cooler water. The dough should feel pleasantly warm, not hot.
Trust the jiggle test. When your dough is ready for the pan, it should wobble like Jell-O when you gently shake the bowl. If it’s stiff and doesn’t move, it needs more time. If it’s spreading into a puddle, you’ve over-fermented it (which happens, and the focaccia will still taste good, just denser).
Oil your fingers before dimpling. This is one of those small tips that makes a huge difference. If you try to dimple with dry fingers, the dough will stick to you and pull up, deflating those beautiful bubbles. Dip your fingertips in olive oil first, then press down firmly. The oil creates a barrier and also deposits flavor right into those craters.
Let it cool completely for best texture. I know, I know. But here’s the thing: when bread is hot, the internal structure is still setting. Cutting into it while it’s warm releases steam that should stay inside, and you end up with a gummy, compressed crumb. If you absolutely must eat it warm (and I get it), tear it with your hands instead of cutting it with a knife. The tearing preserves more of the air pockets.
Variations & Adaptations
Once you’ve mastered the basic golden sourdough focaccia, the possibilities open up. Here are some variations I’ve tried and loved.
Roasted Garlic and Thyme : Roast a whole head of garlic until it’s soft and caramelized, then mash it into the olive oil before adding it to the pan. Scatter fresh thyme leaves over the top instead of rosemary. The sweetness of the roasted garlic pairs beautifully with the tangy sourdough. I made this for a dinner party and someone asked if they could buy a whole loaf from me.
Everything Bagel Focaccia : After dimpling and adding the oil, sprinkle the top with everything bagel seasoning (sesame seeds, poppy seeds, dried garlic, dried onion, and salt). The seeds toast in the oven and get wonderfully crunchy. This version is incredible with cream cheese or as a sandwich base for smoked salmon.
Sun-Dried Tomato and Olive : Press halved cherry tomatoes and sliced Kalamata olives into the dimples before baking. The tomatoes burst and create little pockets of acidity that cut through the richness of the olive oil. I use oil-packed sun-dried tomatoes for extra flavor. Drain them well first or they’ll make the dough soggy.
Cheese and Herb : Sprinkle 1/2 cup of freshly grated Parmesan or pecorino over the top during the last 5 minutes of baking. The cheese melts and crisps, creating a savory crust that’s absolutely addictive. Add some fresh oregano or marjoram along with the rosemary for a more complex herb profile.
Gluten-Free Adaptation : I’ve tested this with a 1:1 gluten-free flour blend (the one from King Arthur works best) and it actually works surprisingly well. The dough will be more like a batter—don’t try to fold it. Instead, mix it thoroughly, let it rest for an hour, then pour it into the oiled pan and proceed. It won’t have the same airy crumb, but the flavor and crispy edges are still there.
Serving & Storage Suggestions
This golden sourdough focaccia is at its absolute best on the day it’s baked, still slightly warm from the oven. The contrast between the crispy, oil-slicked crust and the soft, airy interior is something you have to experience. But it’s still wonderful the next day—you just need to know how to handle it.
Serving Temperature : Serve warm or at room temperature. If it’s been sitting for a few hours, pop it in a 350°F oven for 5-7 minutes to re-crisp the crust. Don’t microwave it—that turns the crust rubbery and the interior soggy.
How to Serve : Tear it into irregular pieces for a rustic look, or cut it into squares or rectangles for a more polished presentation. It’s perfect alongside a bowl of tomato soup, as part of an antipasto platter with cured meats and cheeses, or simply drizzled with a little more olive oil and a sprinkle of salt. I’ve also used it as the base for sandwiches—split it horizontally and fill it with prosciutto, fresh mozzarella, and arugula.
Storage : Store leftover focaccia in an airtight container at room temperature for up to 2 days. Don’t refrigerate it—the cold will stale the bread and make it tough. If you have more than you can eat in 2 days, freeze it.
Freezing Instructions : Wrap the cooled focaccia tightly in plastic wrap, then in aluminum foil, and freeze for up to 3 months. To reheat, unwrap and place directly in a 350°F oven for 10-12 minutes (no need to thaw first). The texture comes back remarkably well. I always freeze half the batch for emergencies—it’s saved me more than once.
Flavor Development : Interestingly, the sourdough flavor actually deepens overnight. If you can resist eating the whole pan on day one, day two brings a more pronounced tanginess. The texture won’t be as crispy, but the flavor is arguably better.
Nutritional Information & Benefits
Let’s be real—focaccia is bread with a lot of olive oil. It’s not health food, but it’s also not something to feel guilty about. Made with simple, whole ingredients, it’s a nourishing food that satisfies both body and soul.
Per serving (1/8 of the recipe):
- Calories: Approximately 280-320
- Carbohydrates: 38g
- Protein: 7g
- Fat: 12g (mostly from heart-healthy olive oil)
- Fiber: 2g
- Sodium: 450mg (varies with salt topping)
Health Benefits : The sourdough fermentation process breaks down phytic acid in the flour, making the minerals more bioavailable. This means your body can actually absorb more of the nutrients in the wheat. The olive oil provides monounsaturated fats that support heart health. Rosemary contains antioxidants like rosmarinic acid that have anti-inflammatory properties. And the fermentation also produces beneficial bacteria that support gut health—though most of them are killed during baking, the prebiotic fibers remain.
Dietary Considerations : This recipe contains gluten from the wheat flour. For a gluten-free version, use the adaptation I mentioned above. It’s naturally vegan and contains no dairy or eggs. The main allergens to be aware of are wheat and gluten.
Frequently Asked Questions
Can I use active dry yeast instead of sourdough starter?
You can, but it won’t be the same bread. If you need a yeast version, use 1 teaspoon of active dry yeast dissolved in the warm water, and skip the starter. Reduce the water slightly (to about 380 grams) since you won’t have the hydration from the starter. The fermentation will be faster—about 1.5 hours for bulk fermentation—and the flavor will be milder. It’s still good focaccia, just not sourdough focaccia.
Why is my focaccia dense and not airy?
This usually happens for one of three reasons: your starter wasn’t active enough, you didn’t do enough folds during bulk fermentation, or you cut into it while it was still hot. Make sure your starter is doubling in 4-6 hours after feeding. Do all four folds. And let it cool completely before cutting. If you’re still having trouble, try using slightly warmer water (around 85°F) to speed up fermentation.
Can I refrigerate the dough overnight?
Absolutely. After the bulk fermentation and folds, cover the bowl tightly and put it in the refrigerator for 8-12 hours. The next day, take it out, let it warm up for about an hour, then proceed with the pan stretch and final proof. The cold fermentation actually develops more complex sourdough flavor. This is my preferred method when I’m planning ahead.
How do I know when my starter is ready to use?
Your starter should be bubbly, doubled in size, and smell pleasantly sour—like yogurt or ripe fruit. The float test is a good indicator: drop a small spoonful of starter into a glass of water. If it floats, it’s ready. If it sinks, it needs more time. I usually feed my starter the night before I plan to bake, and it’s ready by morning.
Can I use whole wheat flour instead of bread flour?
You can substitute up to 50% whole wheat flour without major issues. The focaccia will be denser and have a nuttier flavor. If you use 100% whole wheat, increase the water by about 25-30 grams because whole wheat flour absorbs more liquid. The texture won’t be as light and airy, but it’s still delicious and more nutritious.
Conclusion
This golden sourdough focaccia with rosemary and sea salt has become my most-requested recipe for a reason. It’s the bread that looks like you spent hours perfecting it when really, you just followed the dough’s lead. It’s forgiving enough for a Tuesday night and impressive enough for a holiday table. And honestly, there’s something deeply satisfying about pulling a pan of golden, bubbly bread out of the oven and watching people’s faces light up.
I hope you make this recipe your own. Maybe you’ll add more rosemary, or swap in thyme, or press some cherry tomatoes into the top. Maybe you’ll serve it with soup, or make sandwiches, or just eat it standing over the counter with a glass of wine (no judgment here). However you make it, I’d love to hear how it turns out. Drop a comment below and let me know what you think—did you make any changes? Did it disappear as fast as mine always does?
Happy baking, friend. Your kitchen is about to smell incredible.
Pin This Recipe!

Golden Sourdough Focaccia: Best Rosemary & Sea Salt Recipe
This golden sourdough focaccia with rosemary and sea salt is a forgiving, impressive bread that looks like you spent all day on it. The tangy sourdough flavor, crispy olive oil crust, and soft airy interior make it perfect for potlucks, dinner parties, or any occasion.
- Prep Time: 20 minutes
- Cook Time: 30 minutes
- Total Time: 4 hours 30 minutes (including fermentation and proofing)
- Yield: 8 servings 1x
- Category: Bread
- Cuisine: Italian
Ingredients
- 500 grams (4 cups) bread flour
- 400 grams (1 2/3 cups) warm water (about 80°F)
- 150 grams (3/4 cup) active sourdough starter
- 10 grams (2 teaspoons) fine sea salt
- 30 grams (2 tablespoons) olive oil
- 60–80 grams (1/4 to 1/3 cup) olive oil (for pan and topping)
- 2–3 tablespoons fresh rosemary, roughly chopped
- 1–2 teaspoons flaky sea salt (e.g., Maldon)
- Optional: freshly cracked black pepper or red pepper flakes
Instructions
- Mix the dough: In a large mixing bowl, combine warm water and active sourdough starter. Stir until the starter mostly dissolves. Add bread flour and mix with your hand or a dough whisk until no dry bits remain. The dough will look shaggy. Cover with a towel and let rest for 30 minutes (autolyse).
- Add the salt and oil: After the rest, sprinkle salt over the dough and pour in 30 grams of olive oil. Pinch and squeeze the dough to incorporate everything. It will feel messy at first but will come together into a smooth, elastic ball after a minute or two.
- Bulk fermentation with folds: Cover the bowl and let rest for 30 minutes. Perform a coil fold: wet your hand, reach under the dough, lift a section from the bottom, and fold it over the top. Rotate the bowl and repeat 3-4 times. Do this every 30 minutes for the first 2 hours (4 folds total). After the last fold, let rest undisturbed for another 30-60 minutes until puffy, jiggly, and dotted with bubbles.
- Prepare the pan: Pour 3-4 tablespoons of olive oil into a 10×15-inch or 9×13-inch baking pan. Spread evenly across the bottom and up the sides.
- Transfer and stretch: Gently scrape the dough into the oiled pan. Let sit for 10 minutes to relax, then gently stretch toward the corners. The dough will resist; let rest another 10 minutes and repeat until the dough fills the pan evenly (3-4 rounds).
- Final proof: Cover the pan and let rise for 1.5 to 2 hours until puffy and nearly doubled in height, with small bubbles on the surface.
- Dimple and top: Preheat oven to 425°F (220°C). Drizzle 2-3 tablespoons of olive oil over the surface. Using oiled fingertips, press deep dimples all across the dough to the bottom of the pan. Sprinkle chopped rosemary and flaky sea salt evenly over the top.
- Bake: Place pan on the middle rack and bake for 25-30 minutes until deep golden brown on top and crispy on the bottom. Rotate the pan halfway through. If top browns too fast, tent loosely with foil for the last 5-10 minutes.
- Cool: Transfer to a cooling rack and let cool for at least 20 minutes before cutting. Tear with hands for best texture if eating warm.
Notes
Don’t skip the folds—they build gluten for an airy crumb. Use warm water (80°F) for consistent fermentation. Trust the jiggle test: dough should wobble like Jell-O when ready. Oil your fingers before dimpling to prevent sticking. Let cool completely for best texture; if eating warm, tear with hands instead of cutting. For overnight preparation, refrigerate dough after bulk fermentation and folds for 8-12 hours, then warm up for 1 hour before proceeding.
Nutrition
- Serving Size: 1/8 of recipe
- Calories: 300
- Sodium: 450
- Fat: 12
- Saturated Fat: 2
- Carbohydrates: 38
- Fiber: 2
- Protein: 7
Keywords: sourdough focaccia, rosemary focaccia, sea salt focaccia, homemade bread, sourdough bread, Italian bread, focaccia recipe