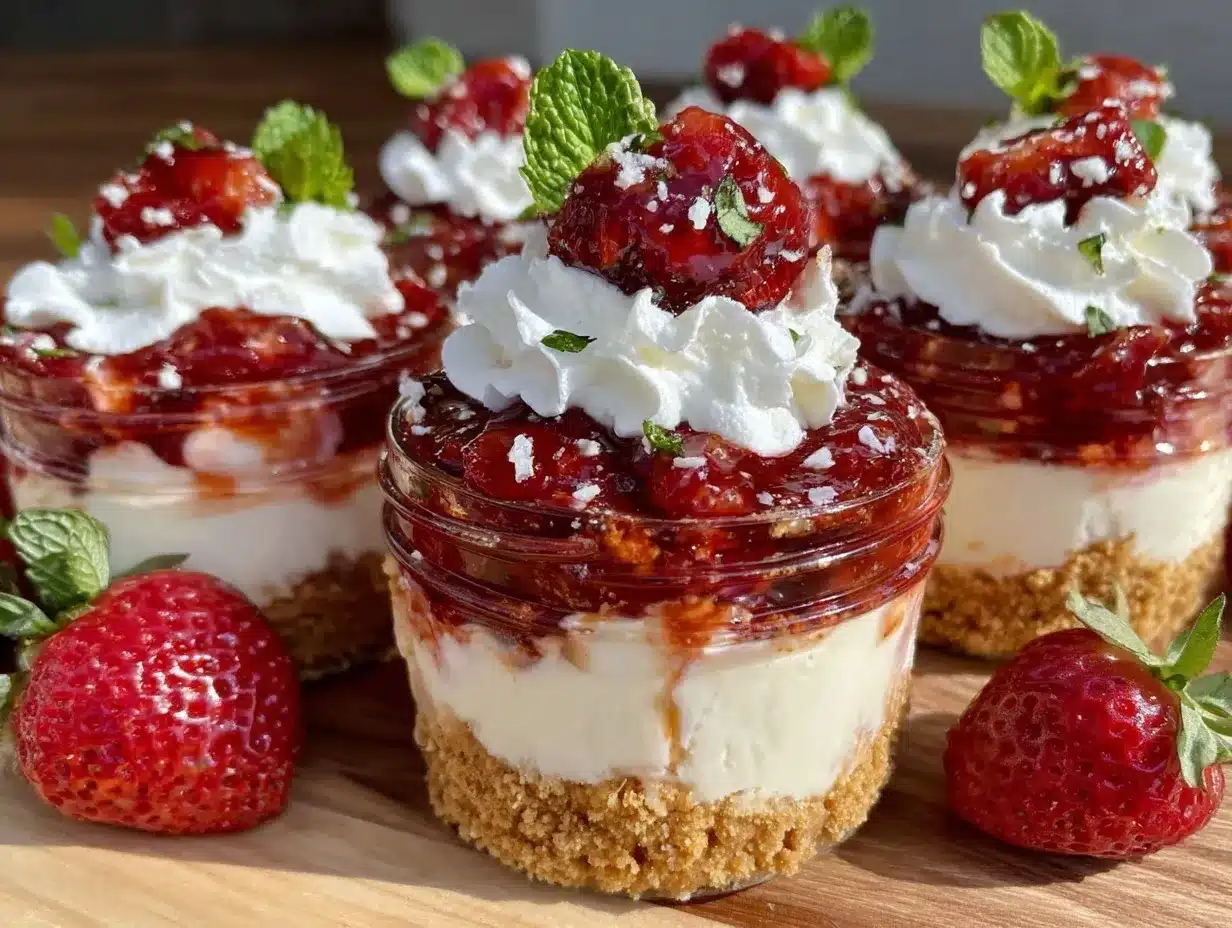
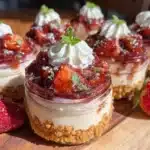
“You really have to try this,” my neighbor had said, sliding over a tiny jar with a suspiciously perfect layer of pink and cream. I was skeptical—after all, who has the patience or the skill for fancy desserts these days? But honestly, that Easy No-Bake Strawberry Cheesecake Jars recipe surprised me. The first spoonful was like a little summer day trapped in a jar—light, creamy, and bursting with fresh strawberry flavor without the fuss of an oven or hours of waiting.
I’d been juggling work deadlines and last-minute dinner plans, so the idea of whipping up something impressive yet fuss-free felt like a dream. It wasn’t just about convenience; there was a quiet joy in layering crumbly graham crust, smooth cheesecake filling, and glossy strawberry topping in clear jars. No mess, no stress, just pure, simple pleasure. Now, I find myself making these jars multiple times a week—sometimes for a quick solo treat, sometimes to impress friends without sweating over complicated recipes.
It’s funny how the smallest things—a hint of vanilla, a zesty lemon twist, the crunch of buttery crust—can turn a simple dessert into a staple. This recipe stuck with me because it’s not just easy; it’s honest, approachable, and genuinely satisfying. It’s the kind of dessert that feels like a little celebration in every bite, perfect for when you want to treat yourself without turning your kitchen upside down.
Why You’ll Love This Recipe
After testing and tweaking this Easy No-Bake Strawberry Cheesecake Jars recipe several times, I can say it’s a keeper for so many reasons. Here’s why it’s become a favorite in my recipe arsenal:
- Quick & Easy: Ready in under 30 minutes, no oven required—ideal for those busy summer evenings or last-minute dessert emergencies.
- Simple Ingredients: Uses pantry staples and fresh strawberries—no complicated or exotic items needed.
- Perfect for Entertaining: These jars are fantastic for potlucks, picnics, or casual get-togethers where you want to impress without stress.
- Crowd-Pleaser: Kids and adults alike rave about the creamy texture paired with the sweet-tart strawberry topping.
- Unbelievably Delicious: The balance of buttery crust, silky cheesecake, and fresh fruit keeps you coming back for more.
What sets this recipe apart is the layering technique and the no-bake approach that keeps the cheesecake filling ultra-smooth and light. The addition of a splash of lemon juice in the strawberry topping adds that subtle tang that cuts through the richness, making every spoonful feel fresh and vibrant. Honestly, it’s the kind of dessert that makes you close your eyes after the first bite and savor the moment.
This recipe isn’t just a sweet treat; it’s a way to make summer memories that stick—whether you’re chilling solo or hosting friends. And if you’re curious about other easy, crowd-pleasing recipes that bring global flavors to your table, you might find the spicy Korean tteokbokki or the crispy Vietnamese banh mi sandwich just as exciting for your next meal adventure.
What Ingredients You Will Need
This recipe uses simple, wholesome ingredients to deliver a bold flavor and satisfying texture without any fuss. Most are pantry staples, with fresh strawberries bringing that summery pop. Here’s what you’ll gather:
- For the Crust:
- Graham cracker crumbs (about 1 ½ cups / 150g) – I prefer using Honey Maid for the perfect buttery crunch.
- Unsalted butter, melted (6 tablespoons / 85g) – this binds the crust and adds richness.
- Granulated sugar (2 tablespoons / 25g) – just a touch to balance the buttery crumbs.
- For the Cheesecake Filling:
- Cream cheese, softened (16 ounces / 450g) – room temperature ensures a smooth mix.
- Powdered sugar (¾ cup / 90g) – for sweetness without grit.
- Heavy cream (1 cup / 240ml) – whipped to soft peaks, it makes the filling light and fluffy.
- Pure vanilla extract (1 teaspoon) – adds warm flavor depth.
- Zest of one lemon – adds subtle brightness to the filling.
- For the Strawberry Topping:
- Fresh strawberries (2 cups / 300g), chopped – ripe and fragrant are best.
- Granulated sugar (2 tablespoons / 25g) – helps macerate the berries.
- Lemon juice (1 tablespoon) – balances the sweetness with a little zing.
If fresh strawberries aren’t in season, frozen work well too—just thaw and drain excess liquid. For a gluten-free twist, try almond flour or crushed gluten-free cookies for the crust. If you want to swap heavy cream for a lighter option, full-fat coconut cream is a nice dairy-free alternative, lending a subtle coconut note that pairs surprisingly well with strawberries.
Equipment Needed
Good news: this dessert doesn’t demand fancy gear. Here’s what I used and recommend:
- Mixing bowls – at least two: one for the crust and one for the filling.
- Electric mixer or stand mixer – not mandatory but makes whipping cream and cream cheese a breeze.
- Spatula – for folding the whipped cream into the filling without deflating it.
- Measuring cups and spoons – for accuracy.
- Spoons or piping bag – to layer the cheesecake filling neatly into jars.
- Small jars or clear glasses (about 8-ounce / 240ml capacity) – presentation is part of the fun here.
If you don’t have an electric mixer, a strong whisk and some patience will do. For layering, a piping bag (or a plastic bag with a corner snipped off) helps keep things tidy, but you can also spoon it in carefully. I’ve found that using jars with wide mouths makes assembly and eating easier, and they’re great for storing leftovers too.
Preparation Method
- Prepare the Crust: In a medium bowl, combine 1 ½ cups (150g) graham cracker crumbs with 2 tablespoons (25g) sugar. Pour in 6 tablespoons (85g) melted unsalted butter and stir until the mixture is evenly moistened and resembles wet sand. This usually takes about 3 minutes.
- Assemble the Crust: Divide the crust evenly into 6 small jars (about 8 ounces / 240ml each). Press down gently with the back of a spoon or your fingers to create a firm, even base. Chill in the refrigerator while you prepare the filling; this helps the crust set and hold together better.
- Make the Cheesecake Filling: In a large mixing bowl, beat 16 ounces (450g) softened cream cheese with ¾ cup (90g) powdered sugar until smooth and creamy—about 2-3 minutes with an electric mixer on medium speed. Add 1 teaspoon vanilla extract and the zest of one lemon, then mix again.
- Whip the Cream: In a separate bowl, whip 1 cup (240ml) heavy cream until soft peaks form, which usually takes around 4-5 minutes. Be careful not to overwhip—it should still be light and fluffy, not grainy.
- Fold Cream into Cream Cheese: Gently fold the whipped cream into the cream cheese mixture using a spatula. This step is crucial to keep the filling airy and smooth; fold until just combined, no more.
- Fill the Jars: Spoon or pipe the cheesecake filling over the chilled crust in each jar, filling about ¾ full. Smooth the tops with the back of a spoon for a clean finish.
- Prepare the Strawberry Topping: In a small bowl, combine 2 cups (300g) chopped fresh strawberries with 2 tablespoons (25g) sugar and 1 tablespoon lemon juice. Stir gently and let sit for 10-15 minutes to macerate. You’ll notice the berries release their juices and become glossy.
- Add the Strawberry Layer: Spoon the macerated strawberries evenly over each cheesecake jar. If you want, reserve a few for garnish.
- Chill: Refrigerate the jars for at least 2 hours to let the flavors meld and the filling set properly. Overnight is even better if you have time.
- Serve: Garnish with fresh mint leaves or a whole strawberry on top for a pretty touch before serving.
Pro tip: If the filling feels too soft after chilling, let the jars sit at room temperature for 10 minutes before serving to soften slightly. Also, if your strawberries are very juicy, drain excess liquid before topping the jars to avoid soggy crusts.
Cooking Tips & Techniques
One of the trickiest parts is getting that perfect, creamy texture without baking. Here’s what I’ve learned from trial and error:
- Softening the Cream Cheese: Don’t rush this step. Let the cream cheese sit out for at least 30 minutes before mixing. Cold cream cheese leads to lumps and a grainy texture.
- Whipping Cream: Watch the cream like a hawk—you want soft peaks, not stiff. Overwhipping can break the cream and ruin the texture.
- Folding Technique: Folding is key. Stirring vigorously deflates the whipped cream, making the filling dense. Use a gentle hand and a spatula in a slow, sweeping motion.
- Crust Compaction: Press the graham cracker crust firmly but not too hard. Too loose, and it falls apart; too tight, and it’s hard to dig into.
- Strawberry Prep: Slice uniform pieces for even layering. Macerating strawberries brings out their natural sweetness and softens them, but don’t overdo it or the topping turns watery.
- Chilling Time: Resist the urge to dive in immediately. The cheesecake filling firms up nicely after chilling, improving both texture and flavor.
Variations & Adaptations
This recipe is quite flexible, so feel free to make it your own:
- Flavor Twists: Add a swirl of strawberry jam or a layer of lemon curd inside the jar for extra zing. I once tried a touch of balsamic vinegar in the strawberry topping, which gave a surprisingly sophisticated depth.
- Dietary Adaptations: Use gluten-free graham crackers or crushed gluten-free cookies for the crust. Substitute cream cheese with dairy-free alternatives and use coconut cream whipped for a vegan version.
- Seasonal Fruit Options: Swap strawberries for raspberries, blueberries, or even mango chunks during different seasons. Frozen berries work well, too, just thaw and drain.
- Different Bases: For a nutty twist, try crushed pecans or almonds mixed with the crust crumbs. Or use crushed vanilla wafers for a sweeter base.
Personally, I once layered a bit of crushed crispy pani puri shells crushed finely on top for a fun crunch contrast at a summer party—unexpected but a hit!
Serving & Storage Suggestions
These jars are best served chilled, straight from the refrigerator. I like to let them sit out for 5-10 minutes to soften slightly—makes the texture just perfect for spooning. Presentation-wise, clear jars show off the layers beautifully, making them Instagram-ready desserts without extra fuss.
They pair wonderfully with a light herbal tea or a sparkling rosé for adult gatherings, or a cold glass of milk for a cozy family treat. If you want to make a full summer spread, consider complementing these jars with a fresh salad or a savory dish like spicy Thai pad krapow basil stir-fry for a balance of flavors.
Store leftovers in the refrigerator with lids on the jars or covered tightly with plastic wrap. They keep well for up to 3 days. Freezing is possible but may alter texture; if you freeze, thaw overnight in the fridge and stir gently before serving. Over time, the strawberry topping’s juices may seep into the cheesecake layer, intensifying the flavor—a delicious development if you like a more infused taste.
Nutritional Information & Benefits
Each jar yields a moderate portion of creamy indulgence without going overboard. Estimated per serving:
| Calories | 320 kcal |
|---|---|
| Fat | 22g (mostly from cream cheese and butter) |
| Carbohydrates | 25g |
| Sugar | 18g (mostly from strawberries and added sugar) |
| Protein | 5g |
The fresh strawberries provide a boost of vitamin C and antioxidants, while the cream cheese and heavy cream offer calcium and protein. For those watching carbs, reducing the sugar or swapping the crust for a nut-based one helps lower the glycemic load. Be mindful of dairy allergens, but many dairy-free cream cheese brands are available if needed.
From a wellness viewpoint, this dessert is a satisfying way to enjoy treats made from quality ingredients without artificial additives—something I personally appreciate when balancing indulgence and health.
Conclusion
If you’re looking for a dessert that’s both effortless and impressive, these Easy No-Bake Strawberry Cheesecake Jars fit the bill perfectly. They’re simple to assemble, bursting with fresh flavor, and admit no shortcuts in taste or texture. Customizing them to your liking—whether with seasonal fruit swaps or dietary tweaks—makes them a versatile staple.
This recipe holds a special spot in my kitchen because it reminds me that good food doesn’t have to be complicated. It’s the kind of sweet treat that invites you to slow down and savor the moment, whether you’re sharing with loved ones or indulging solo. I hope you enjoy making (and eating!) them as much as I do. Feel free to leave a comment sharing your favorite twists or how this recipe fits into your summer dessert lineup.
Here’s to many creamy, fruity jars of happiness ahead!
FAQs
- Can I make these cheesecake jars ahead of time?
Yes! They can be assembled and refrigerated up to 24 hours before serving, which actually helps the flavors meld beautifully. - What can I use instead of graham cracker crumbs for the crust?
You can substitute crushed digestive biscuits, vanilla wafers, or gluten-free cookie crumbs depending on your preference. - How do I prevent the crust from getting soggy?
Press the crust firmly and chill it well before adding the filling. Also, drain excess juice from the strawberries before topping the jars. - Can I use frozen strawberries for the topping?
Absolutely. Just thaw them completely and drain any excess liquid before using. - Is there a vegan version of this recipe?
Yes, swap cream cheese and heavy cream for plant-based alternatives like cashew cream cheese and coconut cream, and use a vegan-friendly crust.
Pin This Recipe!
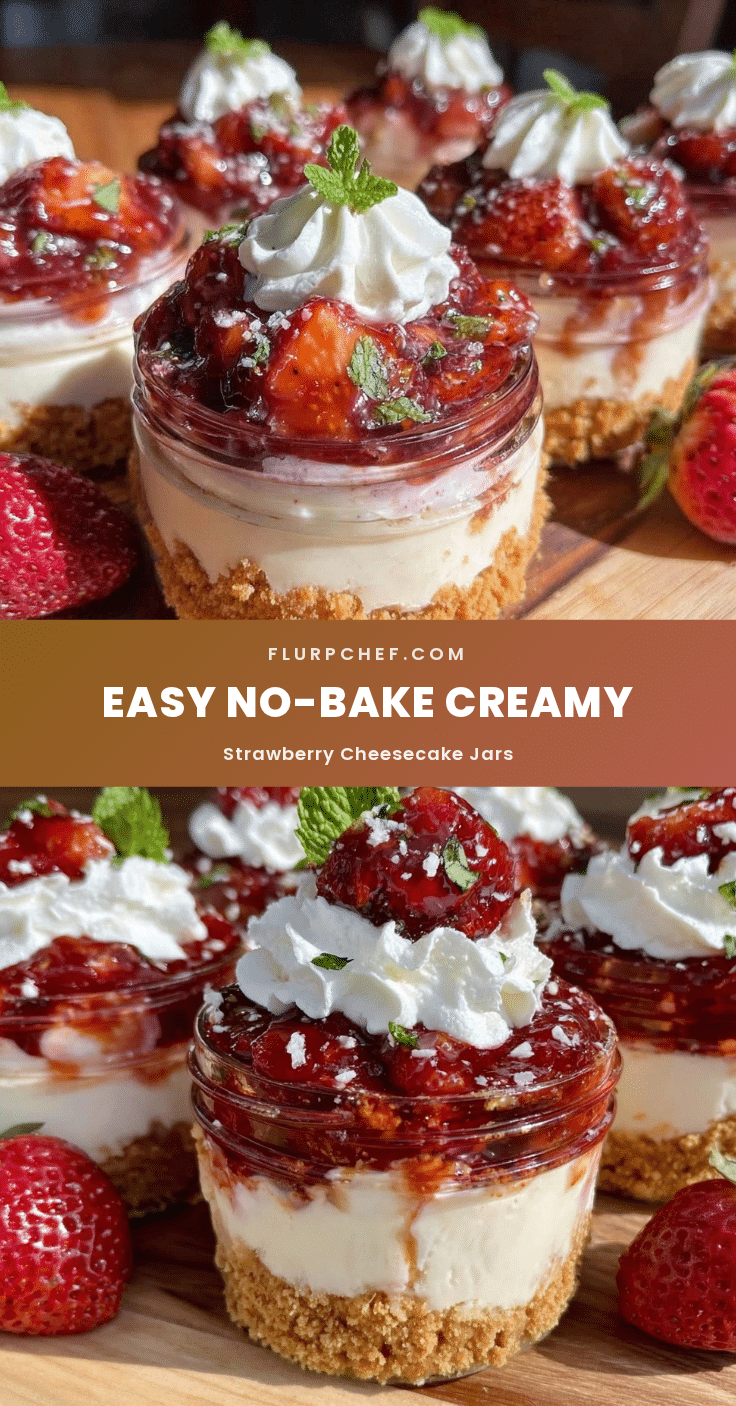
Easy No-Bake Strawberry Cheesecake Jars
A quick and easy no-bake dessert featuring layers of buttery graham cracker crust, light and creamy cheesecake filling, and fresh strawberry topping, perfect for summer.
- Prep Time: 15 minutes
- Cook Time: 0 minutes
- Total Time: 2 hours 15 minutes
- Yield: 6 servings 1x
- Category: Dessert
- Cuisine: American
Ingredients
- 1 ½ cups (150g) graham cracker crumbs
- 6 tablespoons (85g) unsalted butter, melted
- 2 tablespoons (25g) granulated sugar (for crust)
- 16 ounces (450g) cream cheese, softened
- ¾ cup (90g) powdered sugar
- 1 cup (240ml) heavy cream
- 1 teaspoon pure vanilla extract
- Zest of one lemon
- 2 cups (300g) fresh strawberries, chopped
- 2 tablespoons (25g) granulated sugar (for topping)
- 1 tablespoon lemon juice
Instructions
- In a medium bowl, combine graham cracker crumbs and 2 tablespoons sugar. Pour in melted butter and stir until mixture resembles wet sand, about 3 minutes.
- Divide crust evenly into 6 small jars (8-ounce/240ml each). Press down gently to create a firm base. Chill in refrigerator.
- In a large bowl, beat softened cream cheese with powdered sugar until smooth, about 2-3 minutes. Add vanilla extract and lemon zest, mix again.
- In a separate bowl, whip heavy cream until soft peaks form, about 4-5 minutes.
- Gently fold whipped cream into cream cheese mixture until just combined.
- Spoon or pipe cheesecake filling over chilled crust in jars, filling about ¾ full. Smooth tops.
- In a small bowl, combine chopped strawberries, 2 tablespoons sugar, and lemon juice. Stir and let macerate for 10-15 minutes.
- Spoon macerated strawberries evenly over cheesecake filling in jars.
- Refrigerate jars for at least 2 hours or overnight to set.
- Before serving, optionally garnish with fresh mint leaves or whole strawberry.
Notes
Let cream cheese soften at room temperature for at least 30 minutes before mixing to avoid lumps. Whip cream to soft peaks only to maintain light texture. Press crust firmly but not too hard to avoid it being too dense. Macerate strawberries to bring out sweetness but avoid over-macerating to prevent watery topping. Chill jars for at least 2 hours or overnight for best texture. If filling is too soft after chilling, let sit at room temperature for 10 minutes before serving. Drain excess juice from strawberries to prevent soggy crust.
Nutrition
- Serving Size: 1 jar (about 8 ounce
- Calories: 320
- Sugar: 18
- Fat: 22
- Carbohydrates: 25
- Protein: 5
Keywords: no-bake cheesecake, strawberry cheesecake, summer dessert, easy dessert, cheesecake jars, no oven dessert


