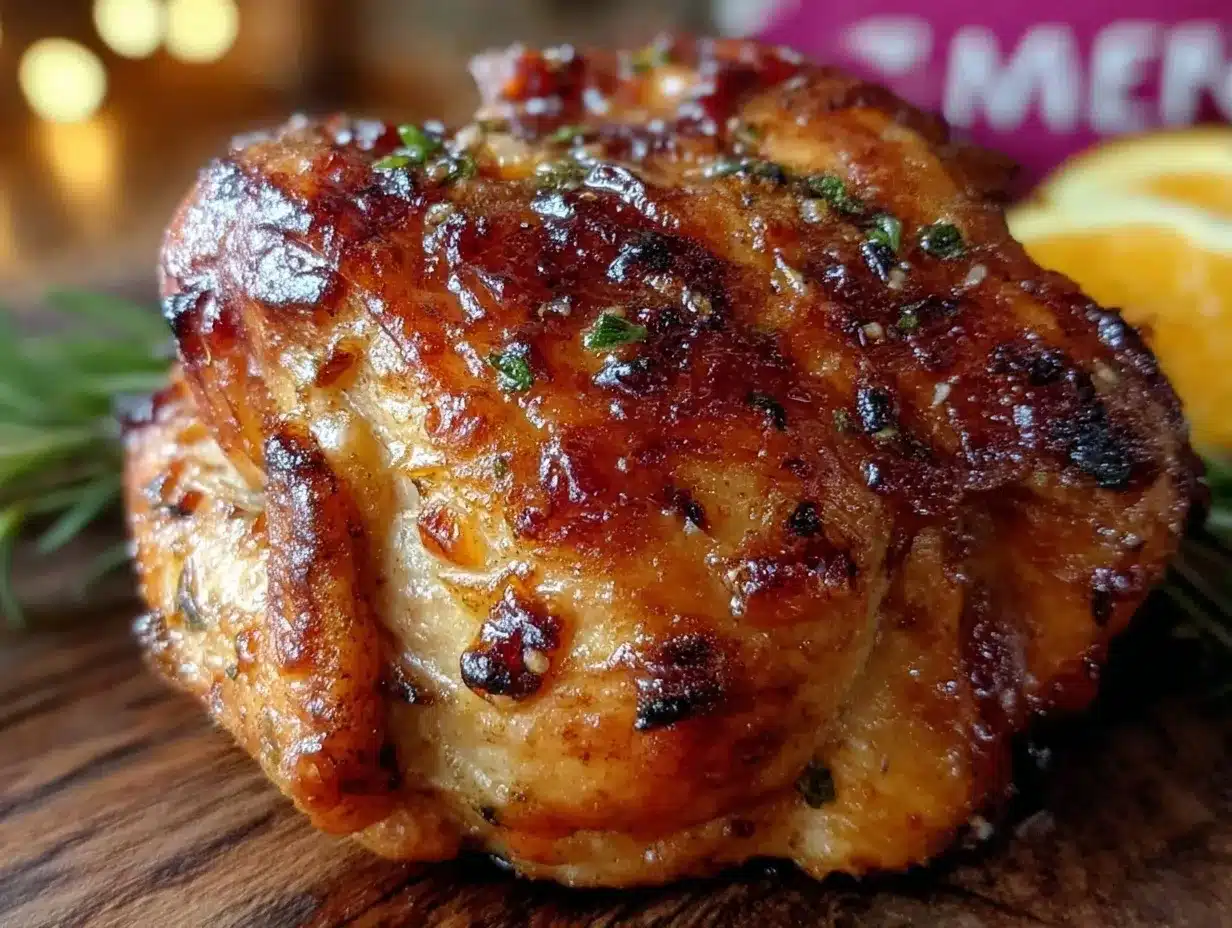
“You just gotta try this,” my buddy shouted over the crackle of the grill, holding up a can half-full of beer next to a plump chicken perched precariously like some kind of culinary daredevil. I had my doubts—beer can chicken? On the grill? It sounded like a backyard myth turned reality TV stunt. But honestly, the scent that hit me as the skin crisped over flames was enough to make me pause and reconsider. The first bite was a game-changer: juicy meat that fell apart, with skin so crispy it practically sang with every chew. Turns out, that quirky method is a keeper, especially after a long day when dinner needs to be both impressive and low-effort.
What surprised me most was how this recipe grew on me. I found myself making it over and over—weekends, impromptu get-togethers, even solo dinners when I wanted something special but didn’t want to fuss. It’s not just about the beer or the grill; it’s the way the chicken steams from the inside while roasting outside, locking in juices that you usually only get from slow cooking. And that crispy skin? Honestly, it’s addictive.
There’s something deeply satisfying about balancing that rich, savory flavor with the ease of throwing it all together and letting the grill do its magic. The recipe stuck because it’s a little bit rustic, a little bit showy, but totally doable. And if you’re like me—someone who likes to impress without a kitchen full of gadgets—this is a perfect no-fail move. So, if you’re craving crispy beer can chicken on the grill with juicy, tender meat, you’re in the right place. Let me share what makes this recipe my go-to, and maybe yours too.
Why You’ll Love This Recipe
After testing this crispy beer can chicken recipe multiple times, honestly, it’s become one of my top picks for outdoor cooking. Here’s why it stands out:
- Quick & Easy: From prep to plate in about 1.5 hours, with minimal hands-on time—perfect for busy summer afternoons or last-minute BBQs.
- Simple Ingredients: No need for exotic spices or fancy marinades; just a handful of pantry staples and your favorite beer.
- Perfect for Gatherings: Whether it’s a weekend cookout, a family dinner, or a casual hangout, this chicken impresses without stress.
- Crowd-Pleaser: Crispy skin and tender meat? That combo wins over kids, adults, and picky eaters alike.
- Unique Cooking Technique: The beer can method keeps the chicken moist by steaming it from inside while the outside crisps beautifully—a trick you won’t find in your average roasted chicken recipe.
This isn’t just a grilled chicken recipe; it’s a little ritual that turns a simple bird into a juicy masterpiece. I love how it combines smoky grill flavor with a crisp crust that makes every bite a delight. It’s comfort food with a twist, and honestly, once you try it, you’ll see why it’s so beloved in backyard barbecue circles. Plus, if you enjoy dishes like easy juicy chicken breast with honey mustard glaze, this recipe is a next-level upgrade for your grilled chicken game.
What Ingredients You Will Need
This recipe relies on straightforward, everyday ingredients that work together to create that perfect crispy beer can chicken on the grill with juicy, tender meat. Here’s what you’ll need:
- Whole chicken (about 4-5 pounds / 1.8-2.3 kg) – look for fresh or fully thawed for best results.
- Beer (one 12-ounce / 355 ml can) – any lager or pale ale works; avoid super hoppy beers as they may overpower.
- Olive oil (2 tablespoons) – for rubbing the chicken skin to help crisp it up.
- Salt (1 tablespoon) – kosher salt is ideal for seasoning evenly and drawing out moisture from the skin.
- Black pepper (1 teaspoon) – freshly ground adds a nice bite.
- Garlic powder (1 teaspoon) – for subtle savory depth.
- Smoked paprika (1 teaspoon) – adds smoky warmth that complements the grill flavor.
- Onion powder (1/2 teaspoon) – rounds out the seasoning.
- Optional herbs: dried thyme or rosemary (1/2 teaspoon) – for extra aroma and flavor.
Some tips for the ingredients:
- Choose a beer you enjoy drinking since its aroma will influence the chicken’s flavor.
- For salt, brands like Diamond Crystal kosher salt offer great texture and flavor control.
- If you want a gluten-free version, make sure to pick a gluten-free beer or substitute with a flavored sparkling water for steaming.
- You can swap olive oil with melted butter for a richer skin, but olive oil tends to hold up better on the grill.
- Seasonings can be mixed up to your liking; I’ve had great luck adding a pinch of cayenne for heat or dried oregano for a Mediterranean vibe.
Equipment Needed
- Grill: A charcoal or gas grill with a lid works well. Indirect heat setup is key for even cooking.
- Beer can or vertical roasting stand: The classic beer can chicken method uses a half-full beer can to hold the chicken upright. If you prefer, a vertical chicken roaster stand is a safer, sturdier alternative.
- Tongs and heat-resistant gloves: For safely handling the hot chicken and grill components.
- Meat thermometer: Essential for checking doneness without guesswork. Look for instant-read models from brands like ThermoWorks for accuracy.
- Basting brush: Handy for applying oil or glaze if desired during grilling.
- Aluminum foil: Useful for resting the chicken and tenting it to keep warm.
If you don’t have a beer can chicken stand, no worries—just make sure your beer can is stable in the grill and the chicken sits upright securely. I’ve also tried using a bundt pan to hold the chicken, which works surprisingly well. For budget-friendly options, a basic digital meat thermometer and standard grill tools are all you really need to nail this recipe.
Preparation Method
- Prepare the chicken: Remove giblets and excess fat from the cavity. Pat the chicken dry thoroughly with paper towels—dry skin is crucial for crispiness. (10 minutes)
- Season the chicken: Rub olive oil all over the chicken, including under the skin if you can carefully loosen it. Mix the salt, black pepper, garlic powder, smoked paprika, onion powder, and herbs, then sprinkle evenly inside and outside the bird. Don’t skip seasoning the cavity well—it adds flavor from the inside out. (10 minutes)
- Prepare the beer can: Open the beer can and pour out (or drink) about half the beer. You want the can about half full to avoid spills and ensure steaming. You can also poke a few extra holes in the top of the can with a can opener to let steam escape better. (5 minutes)
- Set up the grill for indirect heat: For charcoal grills, bank the coals to one side. For gas grills, preheat one side to medium-high and leave the other side off. Aim for a grill temperature around 350°F (175°C). (10 minutes)
- Mount the chicken on the beer can: Carefully place the chicken cavity over the beer can, balancing it upright on the grill. The legs will act as a tripod stabilizing the bird. (5 minutes)
- Grill the chicken: Place the chicken on the indirect heat side, close the lid, and cook for about 1 to 1.25 hours. Check the temperature after 45 minutes and every 10-15 minutes after. The chicken is done when the internal temperature reaches 165°F (74°C) in the thickest part of the thigh without touching the bone. (60-75 minutes)
- Finish and rest: Once done, carefully remove the chicken from the grill (use gloves and tongs). Let it rest upright on a cutting board or platter tented loosely with foil for 10-15 minutes before carving. This allows juices to redistribute, keeping the meat tender and juicy. (15 minutes)
- Carve and serve: Slice the chicken into pieces, starting with the legs and thighs, then wings, and breast. Serve immediately for best crispy skin and juicy texture.
Pro tip: If the skin is browning too fast, turn the chicken slightly or move it further from the heat. Conversely, if the skin isn’t crisping enough near the end, you can finish it over direct heat for a few minutes, watching carefully to avoid burning.
Cooking Tips & Techniques
This beer can chicken recipe works best when you pay attention to a few key tricks I’ve learned the hard way.
- Dry skin is everything. Don’t rush past the drying step or your skin will steam instead of crisp.
- Indirect heat keeps the chicken juicy. Cooking directly over flames cooks too fast and can dry out the meat before the inside cooks through.
- Use a reliable meat thermometer. Guessing doneness leads to either dry or undercooked chicken. I swear by an instant-read probe for accuracy.
- Let it rest. This step locks in moisture. Cutting too soon means losing those precious juices.
- Be careful with the beer can. It gets hot and can tip easily. Use a stand if you’re nervous or place on a stable surface when removing from the grill.
- Experiment with seasoning blends. I sometimes add a bit of brown sugar for a subtle sweetness that caramelizes on the skin.
One time, I tried rushing the process and skipped drying the bird well—lesson learned: soggy skin is no fun. Another time, I forgot to check the temperature early and ended up with a slightly dry breast. The good news is, once you get the rhythm of this recipe, it’s pretty forgiving. Multitasking here means prepping sides or a quick salad while the chicken grills, making the whole meal come together seamlessly.
Variations & Adaptations
This recipe is a great base for making the crispy beer can chicken on the grill with juicy, tender meat your own. Here are some ways to switch things up:
- Spice it up: Add cayenne pepper or chipotle powder to the rub for a smoky heat kick. I love this when paired with a cooling cucumber salad.
- Herb-forward: Swap dried herbs for fresh rosemary and thyme tucked inside the cavity for an aromatic punch.
- Gluten-free option: Use a gluten-free beer or substitute with apple cider or sparkling water to steam the chicken safely.
- Different marinades: Marinate the chicken in a mixture of soy sauce, honey, and garlic for an Asian twist before applying the dry rub.
- Cooking method: If you don’t have a grill, you can replicate the beer can technique in a conventional oven at 375°F (190°C). Just adjust cooking time and keep an eye on skin crispiness.
Personally, I tried a version with a honey-soy glaze near the end of cooking—think something similar to my quick honey soy glazed salmon—and it added a beautiful sticky shine and extra flavor layer the family loved.
Serving & Storage Suggestions
This crispy beer can chicken is best served hot off the grill, skin crispy and meat juicy. I like to carve it right on a large platter, letting the rustic charm shine through.
Pair it with grilled vegetables, fresh corn on the cob, or a simple green salad for balance. For something heartier, mashed potatoes or a buttery rice pilaf complement the rich flavors beautifully.
Leftovers keep well in an airtight container in the fridge for up to 3 days. To reheat without losing crispness, pop the pieces in a 375°F (190°C) oven for 10-15 minutes on a wire rack. Microwaving can make the skin soggy, so oven reheating is my go-to.
Flavors tend to deepen after a day, so don’t hesitate to make this chicken ahead for a weekend meal. Just reheat gently and enjoy.
Nutritional Information & Benefits
An average serving of this grilled beer can chicken (about 6 ounces / 170 grams of cooked meat) contains approximately:
| Nutrient | Amount |
|---|---|
| Calories | 280-320 |
| Protein | 35g |
| Fat | 15g |
| Carbohydrates | 0-2g |
| Sodium | 600mg (variable, depending on salt added) |
This dish is naturally gluten-free (check your beer choice) and low in carbs, making it a solid choice for many diets. Chicken is a lean protein rich in B vitamins and minerals like selenium and phosphorus, supporting muscle health and metabolism. The moderate fat content comes mostly from the skin, which provides flavor and helps retain moisture during cooking.
If you’re watching sodium, adjust the salt in the rub accordingly. Overall, this recipe balances indulgence with wholesome ingredients, perfect for a satisfying meal that feels both comforting and nourishing.
Conclusion
Making crispy beer can chicken on the grill with juicy, tender meat has become one of those recipes I trust to impress without stress. It’s a straightforward way to get that perfect crispy skin and flavorful, moist interior that’s so hard to beat. Whether you’re feeding a crowd or just craving a delicious solo dinner, this method delivers every time.
Feel free to tweak the seasoning or experiment with your favorite beers and herbs—this recipe is flexible and forgiving. I keep coming back to it because it hits that sweet spot of taste, texture, and ease, much like the savory meatloaf for one I love making on busy nights.
If you try this recipe, I’d love to hear how it turned out or what variations you came up with. Sharing those little tweaks and successes is what makes cooking even better. Here’s to crispy skin, tender meat, and plenty of good meals ahead!
FAQs
Can I use a different type of beer for this recipe?
Yes! Most lagers and pale ales work well. Avoid very bitter or heavily hopped beers, which can impart unpleasant flavors. You can also substitute with sparkling water or apple cider for a non-beer option.
How do I know when the chicken is fully cooked?
The best way is to use a meat thermometer. The internal temperature should reach 165°F (74°C) in the thickest part of the thigh without touching bone.
Is it safe to drink the beer left in the can after cooking?
No, it’s not recommended to drink the beer after cooking due to bacteria and heat exposure. Use a fresh can if you want to enjoy a cold beer alongside your meal.
Can I make beer can chicken in the oven?
Absolutely! Preheat your oven to 375°F (190°C) and use the same technique with a beer can or vertical roaster. Cooking time will be similar, but keep an eye on skin crispness.
How do I keep the chicken skin crispy when reheating leftovers?
Reheat in a 375°F (190°C) oven on a wire rack for 10-15 minutes. Avoid microwaving, which makes the skin soggy.
Pin This Recipe!

Crispy Beer Can Chicken Recipe Easy Juicy Tender Grill Tips

A simple and foolproof beer can chicken recipe that delivers crispy skin and juicy, tender meat using an easy grilling method perfect for gatherings and quick meals.
- Prep Time: 25 minutes
- Cook Time: 1 hour 15 minutes
- Total Time: 1 hour 40 minutes
- Yield: 4-6 servings
- Category: Main Course
- Cuisine: American
Ingredients
- Whole chicken (about 4-5 pounds / 1.8-2.3 kg)
- Beer (one 12-ounce / 355 ml can) – lager or pale ale recommended
- Olive oil (2 tablespoons)
- Salt (1 tablespoon) – kosher salt preferred
- Black pepper (1 teaspoon) – freshly ground
- Garlic powder (1 teaspoon)
- Smoked paprika (1 teaspoon)
- Onion powder (1/2 teaspoon)
- Optional herbs: dried thyme or rosemary (1/2 teaspoon)
Instructions
- Prepare the chicken: Remove giblets and excess fat from the cavity. Pat the chicken dry thoroughly with paper towels. (10 minutes)
- Season the chicken: Rub olive oil all over the chicken, including under the skin if possible. Mix salt, black pepper, garlic powder, smoked paprika, onion powder, and herbs, then sprinkle evenly inside and outside the bird, including the cavity. (10 minutes)
- Prepare the beer can: Open the beer can and pour out or drink about half the beer to leave it half full. Optionally poke extra holes in the top for steam release. (5 minutes)
- Set up the grill for indirect heat: For charcoal, bank coals to one side. For gas, preheat one side to medium-high and leave the other side off. Aim for 350°F (175°C). (10 minutes)
- Mount the chicken on the beer can: Carefully place the chicken cavity over the beer can, balancing it upright on the grill. The legs act as a tripod. (5 minutes)
- Grill the chicken: Place chicken on indirect heat side, close lid, and cook for 1 to 1.25 hours. Check temperature after 45 minutes and every 10-15 minutes after. Chicken is done at 165°F (74°C) internal temperature in the thickest thigh part. (60-75 minutes)
- Finish and rest: Remove chicken carefully using gloves and tongs. Let rest upright tented loosely with foil for 10-15 minutes to redistribute juices. (15 minutes)
- Carve and serve: Slice chicken starting with legs and thighs, then wings and breast. Serve immediately for best crispy skin and juicy texture.
Notes
Dry skin thoroughly before seasoning for best crispiness. Use indirect heat to keep chicken juicy. Use a reliable meat thermometer to avoid under or overcooking. Let chicken rest after grilling to redistribute juices. If skin browns too fast, move chicken away from heat or finish over direct heat briefly. For gluten-free, use gluten-free beer or sparkling water. Reheat leftovers in oven at 375°F on wire rack to keep skin crispy.
Nutrition
- Serving Size: 6 ounces (170 grams)
- Calories: 280320
- Sodium: 600
- Fat: 15
- Carbohydrates: 2
- Protein: 35
Keywords: beer can chicken, grilled chicken, crispy chicken, easy chicken recipe, backyard barbecue, juicy chicken, beer chicken, summer grilling


