“You really think you can pull off a chocolate peanut butter cake with ganache drip at home?” my sister scoffed over the phone, her voice thick with skepticism. Honestly, I couldn’t blame her — the last time I attempted a layered cake, it ended up looking like a lopsided disaster. But this time, I was determined to get it right. I had been in an obsession phase with all things chocolate and peanut butter for weeks. It started with a simple peanut butter swirl in brownies and quickly spiraled into full-on cake mode. Baking late into the night, the kitchen smelled like a candy shop mixed with a cozy bakery. The rich aroma of melted chocolate and roasted peanuts made me pause more than once, just soaking it all in.
What surprised me most was how straightforward it turned out to be. The ganache drip? A total game-changer that looked fancy but was shockingly easy to perfect. And the layers — moist, fluffy, and packed with peanut butter flavor that wasn’t overpowering but just right. I remember slicing into it, the ganache gleaming in the light, and thinking, “Okay, this one’s a keeper.” Since then, I’ve made this decadent chocolate peanut butter layer cake with ganache drip more times than I can count, every time impressing friends or just treating myself to a little celebration. It’s that kind of recipe that feels indulgent without being intimidating, perfect for when you want a dessert that’s both show-stopping and genuinely delicious.
So if you’ve ever hesitated to try a layered cake at home because of the fuss or fear of mess, this recipe might just change your mind. It’s about that quiet joy of baking something special, bit by bit, until it turns into a sweet memory on a plate.
Why You’ll Love This Recipe
Having tested this chocolate peanut butter layer cake repeatedly, I can say it hits all the right notes for both busy cooks and dessert lovers alike. Here’s why it’s become a staple in my kitchen:
- Quick & Easy: The entire cake comes together in under 90 minutes, including baking and assembling, making it a perfect treat for last-minute get-togethers or a weekend baking project.
- Simple Ingredients: No need for specialty stores — this recipe uses pantry staples like cocoa powder, creamy peanut butter, and basic baking essentials you probably already have.
- Perfect for Celebrations: Whether it’s a birthday, casual dinner party, or just a self-care day, this cake impresses without adding stress.
- Crowd-Pleaser: The combination of chocolate richness and peanut butter creaminess always gets rave reviews — kids and adults alike can’t resist.
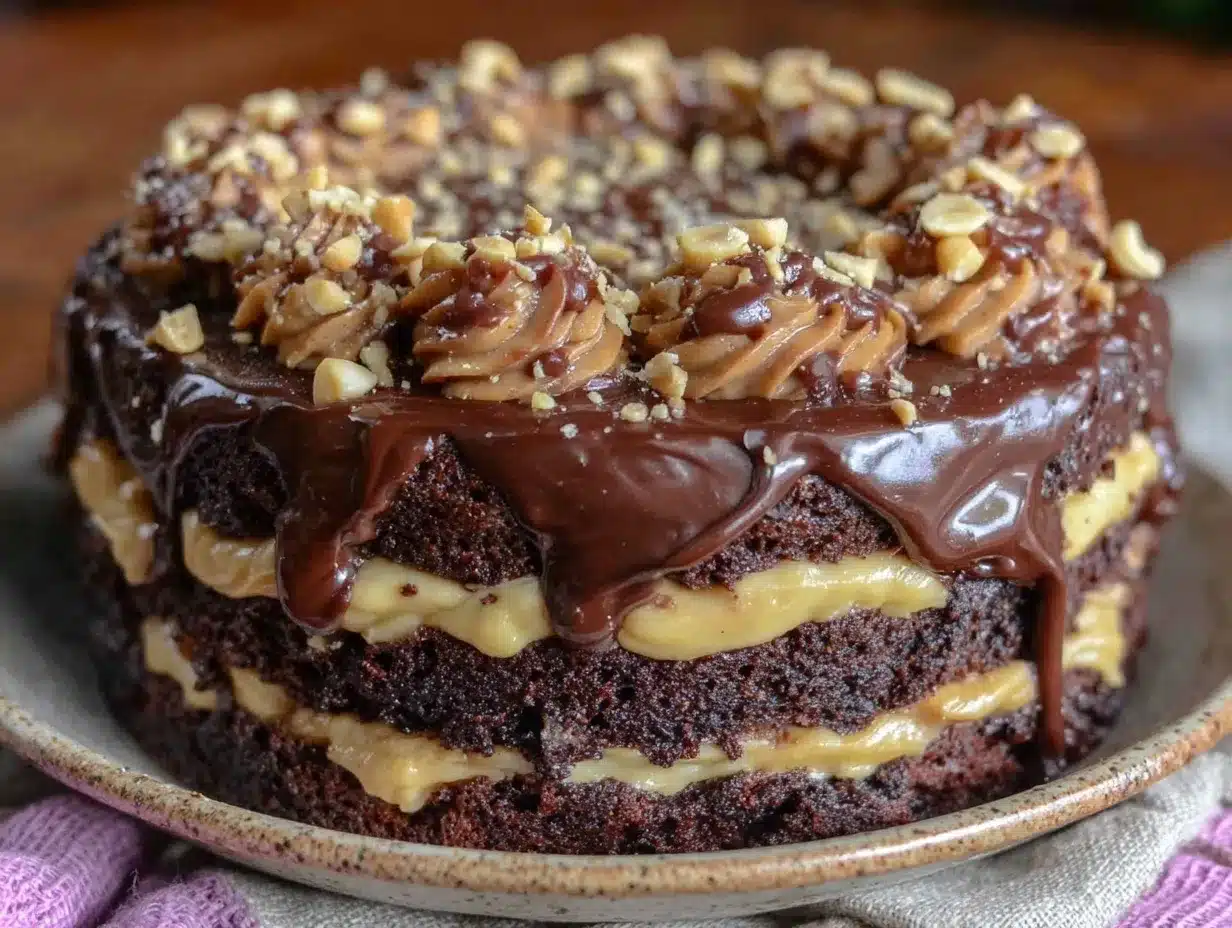
- Unbelievably Delicious: The ganache drip adds a glossy, luscious finish that’s both visually stunning and flavor-packed, making every slice feel like a treat from a fancy bakery.
This isn’t your typical chocolate cake. The secret lies in the balanced peanut butter frosting — not too sweet, with just enough saltiness to complement the cocoa’s deep notes. And the ganache? It’s glossy, smooth, and just thick enough to drip perfectly down the sides without making a mess. Plus, I’ve included some handy tips for getting that flawless drip effect, so you won’t feel like you’re attempting a magic trick in the kitchen.
Honestly, it’s the kind of dessert that makes you pause mid-bite, savoring the creamy, chocolatey layers. It’s a cozy hug in cake form, but also a little showstopper for anyone who sees it on the table.
What Ingredients You Will Need
This decadent chocolate peanut butter layer cake with ganache drip relies on straightforward, wholesome ingredients that come together to create a rich and satisfying dessert. Most are pantry staples, with a few easy-to-find items that add depth and texture.
- For the Chocolate Cake Layers:
- All-purpose flour — 2 ½ cups (315g), sifted for a light crumb
- Cocoa powder — ¾ cup (75g), unsweetened, preferably Dutch-processed for richer flavor
- Baking powder — 2 teaspoons
- Baking soda — 1 ½ teaspoons
- Salt — ½ teaspoon
- Granulated sugar — 2 cups (400g)
- Unsalted butter — ¾ cup (170g), softened (I like using Land O’Lakes for consistent texture)
- Large eggs — 3, room temperature
- Buttermilk — 1 cup (240ml), room temperature (substitute milk + 1 tbsp vinegar if needed)
- Vanilla extract — 2 teaspoons
- For the Peanut Butter Frosting:
- Creamy peanut butter — 1 cup (250g), smooth texture works best
- Unsalted butter — ½ cup (115g), softened
- Powdered sugar — 3 cups (360g), sifted to avoid lumps
- Heavy cream — 2 to 3 tablespoons (30-45ml), to adjust consistency
- Vanilla extract — 1 teaspoon
- Pinch of salt — to balance sweetness
- For the Chocolate Ganache Drip:
- Semisweet or bittersweet chocolate — 8 ounces (225g), finely chopped (use quality chocolate like Ghirardelli for smooth ganache)
- Heavy cream — ¾ cup (180ml)
- Unsalted butter — 2 tablespoons (28g), optional for extra shine
In summer, swapping out the peanut butter frosting for a lighter whipped peanut cream can be refreshing, though I’ve always preferred the classic version for that rich, indulgent feel. If you need a gluten-free version, almond flour can replace all-purpose flour with slightly different texture but delicious results. And if dairy is off-limits, coconut cream and dairy-free butter substitutes keep the frosting luscious and smooth.
Equipment Needed
For this decadent chocolate peanut butter layer cake, you’ll need a handful of common kitchen tools — nothing too fancy, but a few items definitely make the process smoother.
- Two 8-inch round cake pans: I recommend non-stick pans with removable bottoms if you have them, but greased and parchment-lined pans work just fine.
- Electric mixer: A stand mixer or hand mixer helps whip up the frosting and batter effortlessly. I’ve tried mixing by hand, but honestly, the mixer saves time and gives better texture.
- Mixing bowls: Several medium to large bowls for dry and wet ingredients.
- Offset spatula: Perfect for smoothing frosting layers and spreading ganache evenly.
- Small saucepan: For gently heating cream to make the ganache.
- Cooling racks: Crucial for letting cake layers cool completely before frosting.
- Measuring cups and spoons: Precise measurements matter here — especially for baking powder and soda.
- Sharp serrated knife or cake leveler: To trim the cake for even stacking.
If you don’t have an offset spatula, a butter knife angled carefully works in a pinch. For those on a budget, basic cake pans and a hand mixer will do just fine — no need to splurge on high-end gear to nail this recipe.
Preparation Method
- Preheat and prep pans (10 minutes): Heat your oven to 350°F (175°C). Grease two 8-inch round cake pans with butter or non-stick spray, then line the bottoms with parchment paper circles to prevent sticking.
- Mix dry ingredients (5 minutes): In a large bowl, sift together 2 ½ cups all-purpose flour, ¾ cup cocoa powder, 2 teaspoons baking powder, 1 ½ teaspoons baking soda, and ½ teaspoon salt. Whisk to combine evenly.
- Cream butter and sugar (7 minutes): In a separate bowl, use your mixer to beat ¾ cup softened butter and 2 cups granulated sugar until light and fluffy, about 3-4 minutes. This step is key for a tender crumb.
- Add eggs and vanilla (3 minutes): Beat in 3 large eggs one at a time, mixing well after each addition. Stir in 2 teaspoons vanilla extract.
- Alternate adding dry ingredients and buttermilk (8 minutes): With the mixer on low, add the dry ingredients in three parts alternating with 1 cup buttermilk (room temperature), starting and ending with dry ingredients. Mix just until combined — overmixing toughens the cake.
- Divide and bake (30-35 minutes): Pour batter evenly into the prepared pans, smoothing the tops with a spatula. Bake in preheated oven for 30-35 minutes or until a toothpick inserted in the center comes out clean or with just a few moist crumbs. Rotate pans halfway for even baking. Avoid opening the oven door early to prevent sinking.
- Cool layers (30 minutes): Let cakes cool in pans on racks for 15 minutes, then run a knife around edges and invert onto racks to cool completely before frosting.
- Prepare peanut butter frosting (10 minutes): Beat 1 cup creamy peanut butter with ½ cup softened butter until smooth. Gradually add 3 cups powdered sugar, mixing well. Add 2-3 tablespoons heavy cream and 1 teaspoon vanilla extract. Beat until fluffy. Adjust cream to get spreadable consistency.
- Assemble cake (15 minutes): Level tops of cake layers if needed. Place one layer on serving plate, spread a generous amount of peanut butter frosting evenly. Top with second layer and cover entire cake in a thin crumb coat of frosting. Chill 15 minutes to set.
- Make ganache (10 minutes): Heat ¾ cup heavy cream in a small saucepan just until it simmers. Pour over 8 oz chopped semisweet chocolate in a bowl. Let sit 2 minutes, then stir gently until smooth. Stir in 2 tablespoons butter for shine.
- Apply ganache drip (10 minutes): Let ganache cool slightly until thick but pourable. Spoon or pour carefully over chilled cake, letting it drip down the sides naturally. Use an offset spatula to smooth the top if needed. Chill again to set ganache.
When slicing, use a sharp knife warmed in hot water for clean cuts. Cutting too soon makes the frosting and ganache a little soft, so patience pays off here!
Cooking Tips & Techniques
Making this decadent chocolate peanut butter layer cake just right takes a few insider tricks I’ve picked up after a handful of baking adventures (and a few mistakes!).
- Room temperature ingredients: Eggs, butter, and buttermilk should all be at room temp to blend smoothly and avoid curdling or lumps in the batter.
- Don’t overmix the batter: Once you add the flour, mix just until combined. Overmixing develops gluten and leads to a tough cake — not what we want here.
- Level your layers: Cakes often dome on top. Use a serrated knife or cake leveler to trim them flat so your layers stack evenly, making the ganache drip look neat.
- Chill between steps: The crumb coat and frosting firm up better when chilled. This helps prevent the ganache from melting the frosting and keeps the drip controlled.
- Test ganache consistency: If the ganache is too runny, it’ll slide off; too thick and it won’t drip. Cool it slightly after melting, then test a drip on the side of a bowl before pouring on the cake.
- Use quality chocolate: I’ve found that using good semisweet or bittersweet chocolate makes the ganache smoother and shinier — skip the chips for this part!
- Patience is key: Let the cake layers cool completely before frosting. Rushing this step often leads to melting frosting or uneven layers.
I once tried to skip the chilling steps and ended up with a ganache waterfall all over my counter (lesson learned!). Taking it slow really pays off for a polished finish.
Variations & Adaptations
This cake is versatile enough to handle tweaks and twists to suit different tastes or dietary needs. Here are a few ways I’ve adapted it:
- Peanut butter swap: Use almond or cashew butter for a nutty twist with a milder flavor. Just make sure it’s creamy and unsweetened.
- Vegan version: Replace eggs with flax eggs (1 tbsp flaxseed meal + 3 tbsp water per egg), use plant-based butter and milk, and swap heavy cream for coconut cream in the ganache.
- Seasonal fruit addition: Add a layer of sliced bananas or roasted raspberries between the peanut butter frosting layers for a fresh contrast that complements the rich flavors.
- Spice it up: Stir a pinch of cinnamon or chili powder into the cake batter or ganache to add warmth and depth — a subtle surprise that I love.
- Different ganache flavors: Mix in a teaspoon of espresso powder into the ganache for a mocha twist or melt white chocolate instead to create a peanut butter drizzle.
For an alternate technique, you can bake the cake layers in a sheet pan and cut into squares for a fun party presentation. I’ve found the ganache drip works just as beautifully on smaller pieces. If you enjoy bold flavors, you might also appreciate the balance of sweet and spice in my spicy Thai pad krapow basil stir fry — a savory contrast to this rich dessert!
Serving & Storage Suggestions
This chocolate peanut butter layer cake is best served slightly chilled or at room temperature to let the flavors shine and the ganache soften just enough.
- Serving tips: Use a sharp, warm knife to slice clean pieces. Pair with a cold glass of milk, coffee, or even a scoop of vanilla ice cream for an extra indulgent treat.
- Presentation: Garnish with chopped roasted peanuts or a light dusting of cocoa powder for a rustic touch, or add fresh berries for color contrast.
- Storage: Keep the cake covered in the refrigerator for up to 4 days. The peanut butter frosting firms up nicely chilled but can be brought back to room temp before serving for a creamier texture.
- Freezing: You can freeze the cake layers before frosting for up to 2 months, wrapped tightly in plastic wrap and foil. Thaw fully before assembling and decorating.
- Reheating: For a warm slice, microwave a piece for 10-15 seconds — just enough to soften ganache without melting it completely.
- Flavor development: Interestingly, the cake tastes even better the next day as the peanut butter and chocolate meld together more deeply, so leftovers (if any!) are well worth saving.
If you’re looking for a savory bite after dessert, a quick snack like crispy Indian pani puri is a fun way to balance the richness.
Nutritional Information & Benefits
This decadent chocolate peanut butter layer cake is certainly a treat, but it also includes some nutritional perks thanks to its core ingredients.
- Each slice (assuming 12 servings) contains approximately 450 calories, 25g fat, 50g carbohydrates, and 6g protein.
- Peanut butter provides heart-healthy monounsaturated fats and a good dose of protein, helping balance the indulgence.
- Cocoa powder is rich in antioxidants and can boost mood, making this dessert both comforting and a little beneficial.
- The recipe is naturally gluten-containing but can be adapted with almond flour for gluten-free diets.
- Contains dairy and nuts — important to note for allergy considerations.
While this cake is an indulgence, I personally see it as a special occasion dish that fits into a balanced approach to eating. Savoring a slice mindfully is part of the joy, and sometimes chocolate and peanut butter just hit the spot perfectly.
Conclusion
This decadent chocolate peanut butter layer cake with ganache drip isn’t just a dessert — it’s a celebration of flavor and texture that anyone can make at home. It’s the kind of recipe that welcomes experimentation, whether you want to add a seasonal fruit, try a vegan version, or perfect that glossy ganache drip. I love it because it’s approachable yet impressive, turning an ordinary day into something a little sweeter.
So grab your mixer, chocolate, and peanut butter, and give this cake a whirl. Feel free to tweak it to your taste — after all, that’s half the fun and the reason this recipe keeps coming back to my kitchen. If you try it out or have your own variations, I’d love to hear about your experience in the comments below. Sweet baking adventures await!
FAQs
- Can I make this cake ahead of time? Yes! You can bake the layers up to 3 days in advance and keep them wrapped in the fridge. Assemble and add ganache the day you plan to serve.
- How do I get a smooth ganache drip? Let your ganache cool slightly after heating until thick but still pourable. Pour slowly around the edges and use an offset spatula to control drips.
- Can I use crunchy peanut butter? I recommend smooth peanut butter for the frosting to keep the texture creamy and easy to spread.
- What if I don’t have buttermilk? Simply mix 1 cup milk with 1 tablespoon vinegar or lemon juice and let it sit 5 minutes to sour.
- How should I store leftover cake? Keep it covered in the fridge for up to 4 days. Bring to room temperature before serving for the best texture.
Pin This Recipe!
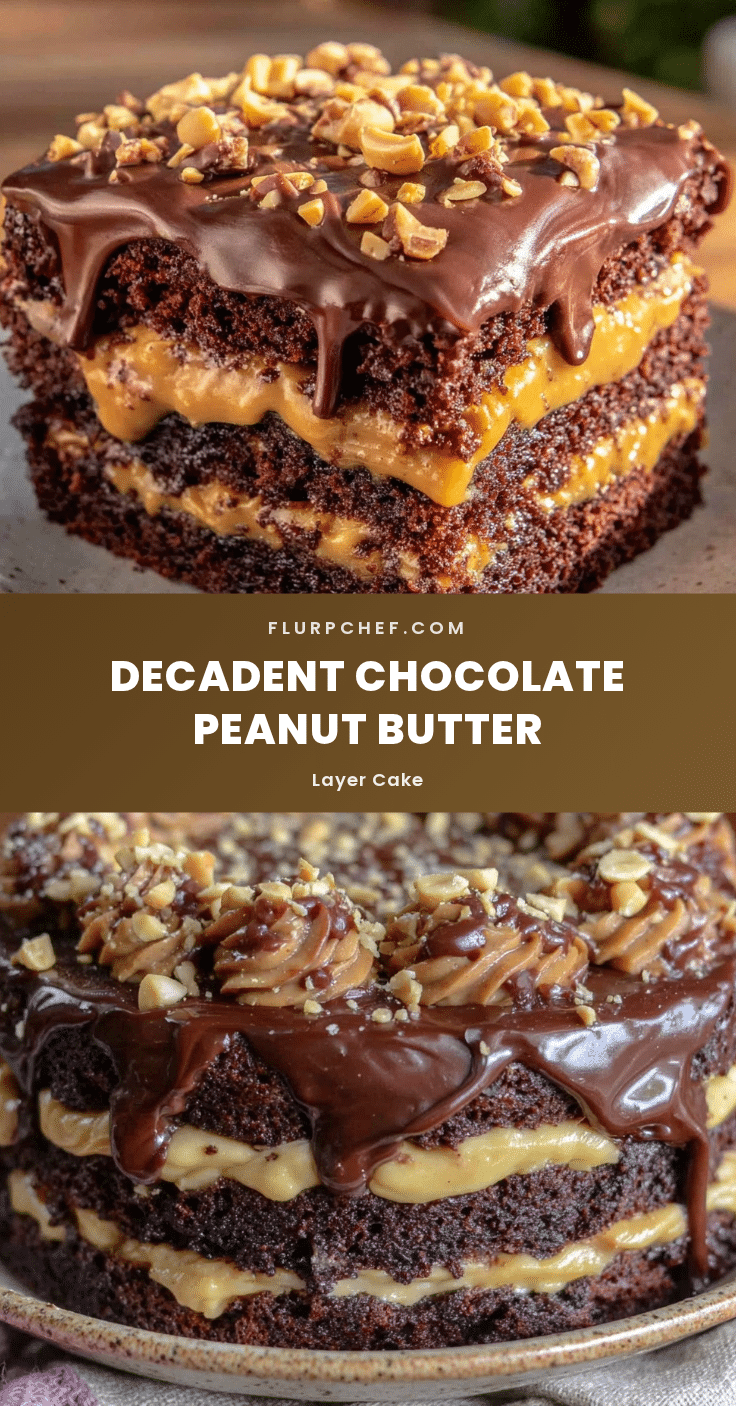
Decadent Chocolate Peanut Butter Layer Cake with Ganache Drip
A rich and moist chocolate cake layered with creamy peanut butter frosting and topped with a glossy ganache drip. This easy homemade recipe is perfect for celebrations and impresses with its decadent flavor and stunning presentation.
- Prep Time: 30 minutes
- Cook Time: 35 minutes
- Total Time: 1 hour 35 minutes
- Yield: 12 servings 1x
- Category: Dessert
- Cuisine: American
Ingredients
- 2 ½ cups (315g) all-purpose flour, sifted
- ¾ cup (75g) unsweetened cocoa powder, preferably Dutch-processed
- 2 teaspoons baking powder
- 1 ½ teaspoons baking soda
- ½ teaspoon salt
- 2 cups (400g) granulated sugar
- ¾ cup (170g) unsalted butter, softened
- 3 large eggs, room temperature
- 1 cup (240ml) buttermilk, room temperature (or milk + 1 tbsp vinegar)
- 2 teaspoons vanilla extract
- 1 cup (250g) creamy peanut butter, smooth
- ½ cup (115g) unsalted butter, softened
- 3 cups (360g) powdered sugar, sifted
- 2 to 3 tablespoons (30-45ml) heavy cream
- 1 teaspoon vanilla extract
- Pinch of salt
- 8 ounces (225g) semisweet or bittersweet chocolate, finely chopped
- ¾ cup (180ml) heavy cream
- 2 tablespoons (28g) unsalted butter, optional
Instructions
- Preheat oven to 350°F (175°C). Grease two 8-inch round cake pans and line bottoms with parchment paper.
- In a large bowl, sift together flour, cocoa powder, baking powder, baking soda, and salt. Whisk to combine.
- In a separate bowl, beat softened butter and granulated sugar with a mixer until light and fluffy, about 3-4 minutes.
- Add eggs one at a time, beating well after each addition. Stir in vanilla extract.
- With mixer on low, alternately add dry ingredients and buttermilk in three parts, starting and ending with dry ingredients. Mix just until combined.
- Divide batter evenly between pans and smooth tops. Bake 30-35 minutes or until a toothpick inserted in center comes out clean or with a few moist crumbs. Rotate pans halfway through baking.
- Cool cakes in pans on racks for 15 minutes, then invert onto racks to cool completely.
- For frosting, beat peanut butter and softened butter until smooth. Gradually add powdered sugar, mixing well. Add heavy cream and vanilla extract, beat until fluffy. Adjust cream for spreadable consistency.
- Level cake layers if needed. Place one layer on serving plate, spread peanut butter frosting evenly. Top with second layer and cover entire cake with a thin crumb coat of frosting. Chill 15 minutes.
- To make ganache, heat heavy cream in a small saucepan until simmering. Pour over chopped chocolate in a bowl. Let sit 2 minutes, then stir gently until smooth. Stir in butter for shine.
- Let ganache cool slightly until thick but pourable. Spoon or pour over chilled cake, letting it drip down sides naturally. Smooth top with offset spatula if needed. Chill again to set ganache.
Notes
Use room temperature ingredients for best results. Do not overmix batter to avoid tough cake. Chill cake between frosting steps to prevent melting. Test ganache consistency before applying. Use quality chocolate for smooth ganache. Warm knife in hot water for clean slices. Cake tastes better the next day.
Nutrition
- Serving Size: 1 slice (1/12 of cak
- Calories: 450
- Fat: 25
- Carbohydrates: 50
- Protein: 6
Keywords: chocolate peanut butter cake, ganache drip, layered cake, easy chocolate cake, peanut butter frosting, homemade cake, celebration cake