“Are you sure these will turn out okay?” my friend asked, eyeing the tiny cupcake liners as I carefully placed the last dollop of batter inside. Honestly, I was half skeptical myself. Mini cupcakes are cute and all, but making them look like graduation caps? That felt like a stretch for someone who’s “not really a baker.” Yet, there I was, on a quiet Saturday morning, surrounded by sprinkles, fondant pieces, and a faint smell of vanilla filling the kitchen air.
The idea hit me when I was scrambling to find a sweet, celebratory treat for my nephew’s graduation party. I wanted something that said “congrats” without the fuss of slicing and serving a big cake. Plus, you know how it is—kids and adults alike love finger foods that don’t require plates and forks. So, with a little trial, error, and a lot of laughs (you should’ve seen my first attempt at the tassels), these easy adorable mini graduation cap cupcakes were born.
What surprised me most wasn’t just how adorable they looked lined up on the table but how many guests came back asking for the recipe. It’s funny how a simple idea—little cupcakes topped with edible graduation caps—can bring everyone together with smiles, stories, and sticky fingers. That quiet moment in my kitchen turned into a recipe I keep coming back to, especially for celebrations where a little whimsy goes a long way.
Why You’ll Love This Recipe
After making these mini graduation cap cupcakes over and over, I can say they’ve become my go-to for marking special moments. Here’s why:
- Quick & Easy: You can whip up the batter, bake, and decorate in under an hour—perfect for last-minute celebrations or spontaneous parties.
- Simple Ingredients: No need for exotic stuff; most are pantry staples like flour, sugar, eggs, and cocoa powder. You might already have everything on hand.
- Perfect for Celebrations: Whether it’s a graduation, milestone, or just a proud moment, these cupcakes fit right in with the festive vibe.
- Crowd-Pleaser: The balance of moist cake and creamy frosting always gets raves from kids and adults alike—plus they’re a fun conversation starter.
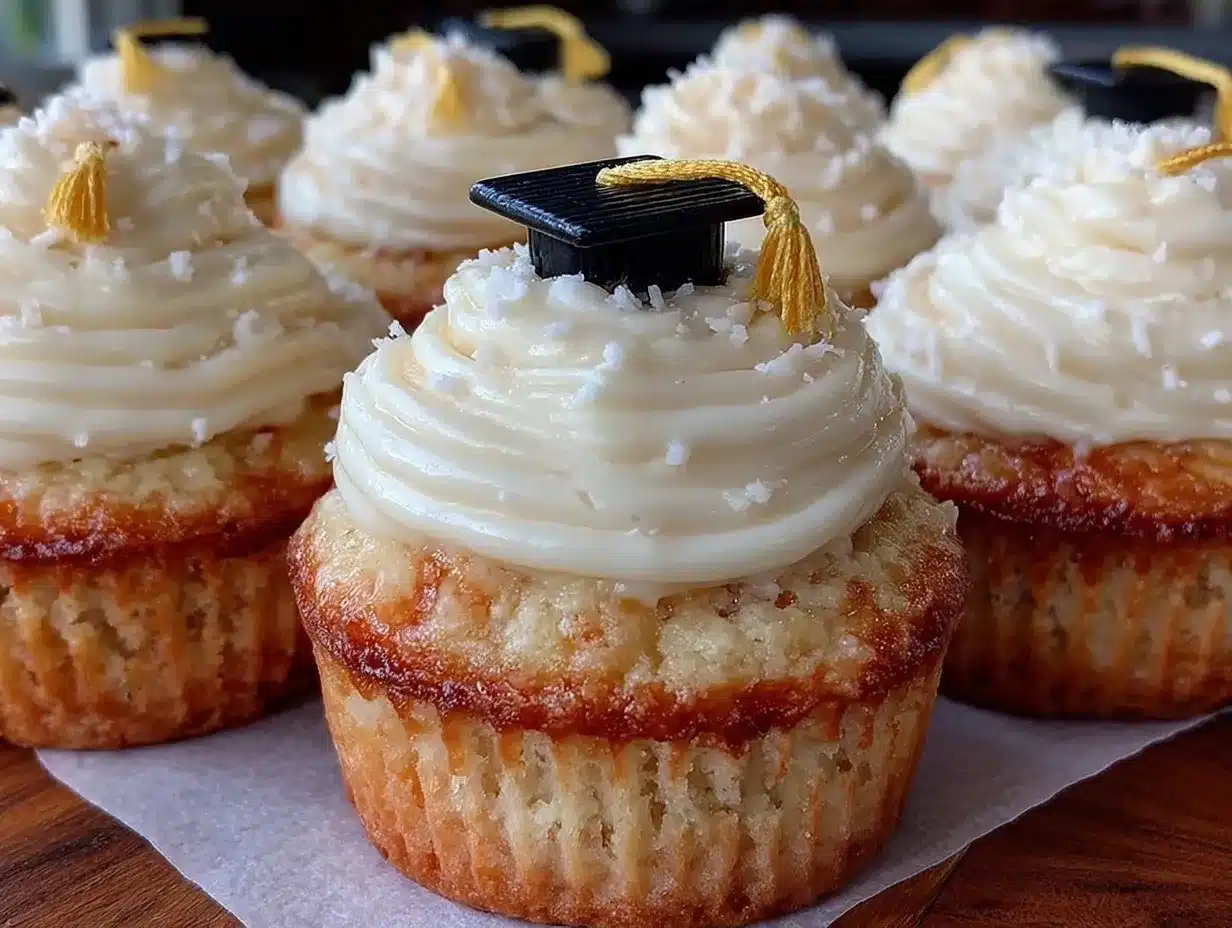
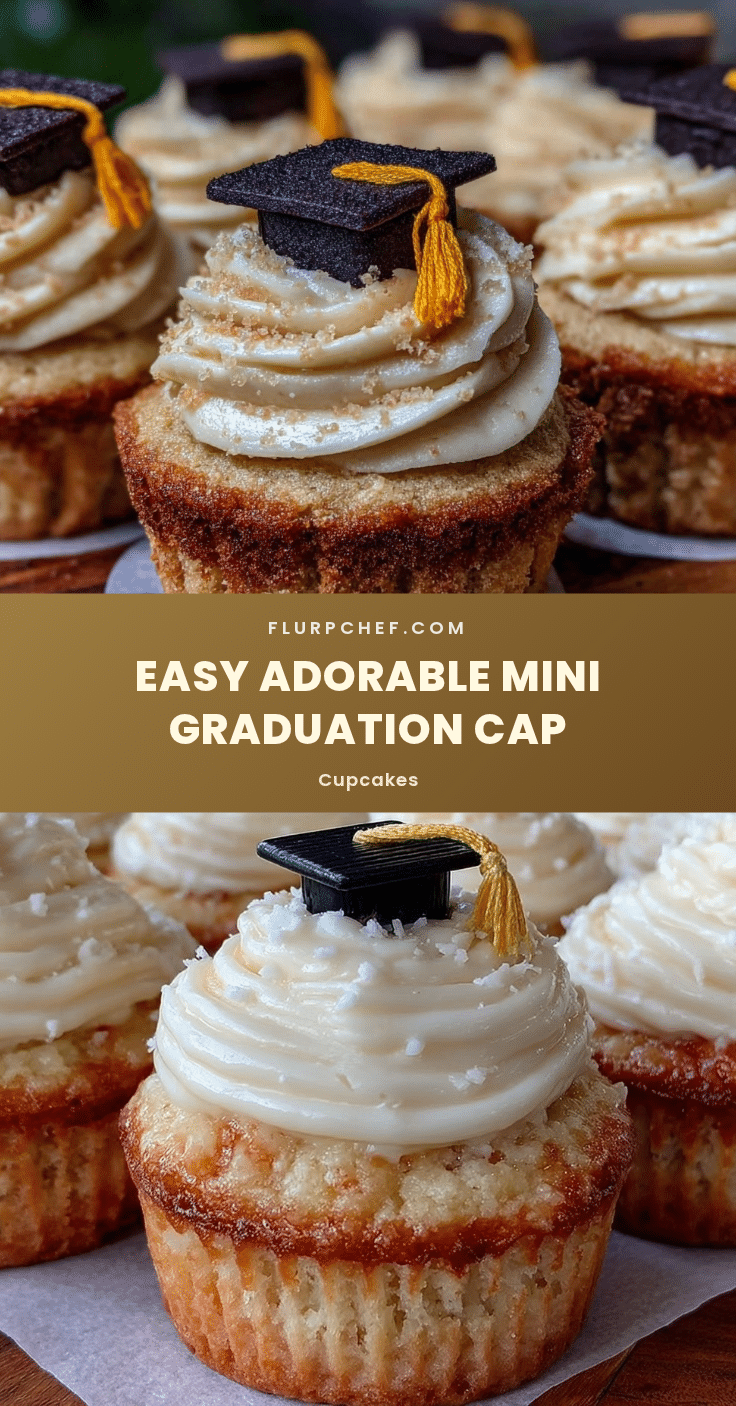
- Unbelievably Adorable: The tiny edible graduation caps add charm without complicated decorating skills. Seriously, if I can make them, so can you!
What sets this recipe apart is the little details I’ve tweaked along the way—like using slightly less sugar in the frosting for balance, or cutting fondant squares just the right size to sit perfectly atop each cupcake. Plus, the frosting is thick enough to hold decorations but soft enough to bite through easily. It’s not just a cupcake; it’s a mini celebration in every bite.
Honestly, it’s the kind of recipe that makes you pause, smile, and maybe even close your eyes for a second after that first delicious bite. It’s comfort food with a playful twist—easy to make, easy to love, and perfect for turning simple gatherings into memorable moments.
What Ingredients You Will Need
This recipe uses simple, wholesome ingredients to deliver bold flavor and delightful texture without any fuss. Most are everyday pantry staples, and substitutions are easy if needed.
- For the Cupcakes:
- All-purpose flour, 1 cup (120g)
- Granulated sugar, 3/4 cup (150g)
- Cocoa powder, unsweetened, 1/4 cup (25g) (I prefer Hershey’s for rich chocolate flavor)
- Baking powder, 1 tsp
- Baking soda, 1/2 tsp
- Salt, 1/4 tsp
- Whole milk, 1/2 cup (120ml) (feel free to use almond or oat milk if preferred)
- Vegetable oil, 1/4 cup (60ml)
- Large egg, room temperature
- Vanilla extract, 1 tsp
- Boiling water, 1/4 cup (60ml) (helps intensify chocolate flavor)
- For the Frosting:
- Unsalted butter, softened, 1/2 cup (115g)
- Powdered sugar, 2 cups (240g)
- Vanilla extract, 1 tsp
- Milk or cream, 2-3 tbsp (to adjust consistency)
- Cocoa powder (optional, for chocolate frosting), 2 tbsp
- For Decoration:
- Black fondant or black gum paste, enough to cut tiny squares (about 1/2 inch / 1.3 cm)
- Edible gold or yellow icing gel or royal icing (for tassels)
- Toothpicks or thin skewers (for tassel stems)
Look for firm, pliable fondant like Wilton’s brand—it’s easier to cut and shapes nicely without cracking. If you want a gluten-free option, try almond flour instead of all-purpose, but note the texture will be a bit different. For dairy-free frosting, swap butter with coconut oil and use powdered sugar that’s vegan-friendly.
Equipment Needed
- Mini muffin pan (12-24 cavities, about 1.25-inch diameter)
- Mini cupcake liners (preferably white or black to contrast decorations)
- Mixing bowls (one large for batter, one medium for frosting)
- Electric hand mixer or stand mixer (makes frosting smooth and fluffy)
- Measuring cups and spoons (accuracy counts here!)
- Spatula (for scraping bowls and folding ingredients)
- Small rolling pin or smooth bottle (to roll fondant)
- Sharp knife or pizza cutter (for cutting fondant squares)
- Toothpicks or small paintbrushes (for applying icing gel tassels)
If you don’t have a mini muffin pan, you can use a regular muffin pan but expect fewer cupcakes and longer baking time. For fondant, if you can’t find black, you can tint white fondant with black gel coloring. I once improvised with licorice strings for tassels, which worked in a pinch but was a little sticky!
Budget-wise, you really only need the pan and liners as specialty items. Everything else you might already own in your kitchen or can borrow easily.
Preparation Method
- Preheat your oven to 350°F (175°C). Line your mini muffin pan with cupcake liners. This helps the cupcakes bake evenly and keeps cleanup simple. (5 minutes prep)
- Mix dry ingredients: In a large bowl, sift together 1 cup all-purpose flour, 3/4 cup sugar, 1/4 cup cocoa powder, 1 tsp baking powder, 1/2 tsp baking soda, and 1/4 tsp salt. Sifting prevents lumps and gives the batter a light texture. (5 minutes)
- Combine wet ingredients: In a separate bowl, whisk 1/2 cup whole milk, 1/4 cup vegetable oil, 1 large egg, and 1 tsp vanilla extract until smooth.
- Make the batter: Slowly add wet ingredients to the dry, stirring gently just until combined. Avoid overmixing or the cupcakes will be dense. Then, carefully stir in 1/4 cup boiling water—this step makes the chocolate flavor pop and keeps the batter thin enough for moist cupcakes. (5 minutes)
- Fill cupcake liners: Spoon batter into liners, filling about 2/3 full to prevent overflow but ensure a nice dome tops. You’ll get about 24 mini cupcakes. (5 minutes)
- Bake: Place the pan in the oven and bake for 12-15 minutes. Check doneness by inserting a toothpick in the center—if it comes out clean, they’re done. Don’t overbake or they’ll dry out. (15 minutes)
- Cool: Let cupcakes cool in the pan for 5 minutes, then transfer to a wire rack to cool completely before frosting. Decorating warm cupcakes will melt the frosting. (20-30 minutes)
- Prepare frosting: Beat 1/2 cup softened unsalted butter with 2 cups powdered sugar, 1 tsp vanilla extract, and 2 tbsp milk or cream until light and fluffy. Add 2 tbsp cocoa powder if you want chocolate frosting. Adjust consistency with milk to pipe easily but hold shape. (10 minutes)
- Frost cupcakes: Use a small offset spatula or piping bag to swirl frosting on each cupcake, making a smooth, slightly domed surface for the graduation cap to sit on. (10 minutes)
- Make the graduation caps: Roll out black fondant to about 1/8 inch (3mm) thickness. Cut into 1.25-inch (3 cm) squares—these will be the caps. Place each square gently on top of a frosted cupcake.
- Create tassels: Use edible gold icing gel or royal icing to draw a small dot in the center of each fondant square. Attach a tiny piece of toothpick or skewer to one corner for the tassel stem. Pipe a short line or dot at the end to mimic the tassel’s tip. It’s okay if they’re a little uneven; that adds charm! (15 minutes)
- Final touches: Let the frosting and decorations set for 15 minutes before serving to avoid smudging.
Pro tip: Working with fondant is easier if your hands are slightly dusted with cornstarch to prevent sticking. If you want, you can prepare the caps ahead of time and store them in an airtight container at room temperature.
Cooking Tips & Techniques
From my experience, the trickiest part is balancing the delicate decorations with the cupcakes’ texture. Here are a few things I’ve learned:
- Don’t skip the boiling water: It might seem odd, but it really makes the cupcakes moist and enhances the chocolate depth.
- Mixing batter: Stir gently and just enough. Overmixing activates gluten and makes cupcakes tough instead of tender.
- Cooling is key: Decorating warm cupcakes with frosting and fondant will cause melty messes. Patience pays off!
- Fondant handling: Keep it covered when not in use to prevent drying. If it cracks, knead gently to soften before rolling out again.
- Frosting consistency: If too stiff, add a teaspoon of milk at a time; if too runny, add powdered sugar gradually.
- Multitasking: While cupcakes bake, prepare frosting and cut fondant squares to save time.
I remember once rushing the tassels, and they ended up looking more like little flags—still cute, but not quite graduation-level! It’s worth taking a few extra minutes for those final details. Also, if you want to experiment with flavors, pairing this chocolate cupcake with a light cream cheese frosting is a fun twist.
Variations & Adaptations
There’s plenty of room to make this recipe your own depending on taste or dietary needs.
- Flavor swaps: Try vanilla or red velvet cupcakes instead of chocolate. The frosting and fondant caps stay the same, but the color contrast changes the vibe.
- Dietary adaptations: Use almond or oat milk and substitute egg with flaxseed “egg” for a dairy-free, vegan-friendly version. Coconut oil can replace butter in frosting.
- Decoration alternatives: Instead of fondant caps, try chocolate squares or black licorice squares topped with yellow candy sprinkles as tassels for a fun texture.
- Seasonal touches: Add a pinch of cinnamon or orange zest to the cupcake batter for subtle warmth that’s great for fall graduations.
- Personal twist: I once swapped the tassels for tiny edible flowers for a springtime graduation party, which was a hit with the guests who preferred something less traditional but just as sweet.
Changing up the frosting color or texture can also reflect school colors or party themes. For instance, a white buttercream with blue and gold sprinkles adds that extra festive touch.
Serving & Storage Suggestions
These mini graduation cap cupcakes are best served at room temperature, so take them out of the fridge about 30 minutes before guests arrive to let frosting soften slightly.
Arrange them on a platter or tiered stand for an eye-catching centerpiece. Pair with light beverages like sparkling lemonade or iced tea for a balanced spread. They make a perfect sweet bite alongside savory snacks like the crispy Indian pani puri you might enjoy at a party too.
For storage, keep cupcakes in an airtight container in the refrigerator for up to 3 days. Fondant decorations hold up well, but frosting can dry a bit—refrigerate only if your room is warm. To reheat, bring cupcakes to room temperature naturally or heat gently in a microwave for 10-15 seconds (watch closely to avoid melting decorations).
Flavors tend to deepen after a day, so making them a day ahead isn’t a bad idea. Just remember to add fondant caps the day of serving for the freshest look.
Nutritional Information & Benefits
Each mini cupcake (including frosting and decoration) contains approximately:
| Nutrient | Amount per cupcake |
|---|---|
| Calories | 90-110 kcal |
| Total Fat | 5-6g |
| Saturated Fat | 3g |
| Carbohydrates | 12-14g |
| Sugar | 9-11g |
| Protein | 1-2g |
The recipe includes wholesome ingredients like eggs and milk providing protein and calcium, while cocoa powder is rich in antioxidants. Using vegetable oil and reduced sugar frosting keeps these cupcakes lighter than traditional butter-heavy cakes.
For those mindful of allergens, remember this recipe contains gluten, dairy, and eggs but can be adapted with gluten-free flour and dairy substitutes. It’s a treat that balances indulgence with a bit of nutrition—perfect for a celebration without overdoing it.
Conclusion
These easy adorable mini graduation cap cupcakes have become a little joyful ritual for me whenever a celebration calls for something sweet and special. They’re approachable, fun, and honestly, a bit addictive to make and eat.
Feel free to tweak flavors, colors, or decorations to suit your own celebration vibe. I love how they bring a smile and a sense of accomplishment to any gathering—like a tiny edible trophy for the graduate and guests alike.
If you give this recipe a try, I’d love to hear how you made it your own or what fun twists you added. It’s the kind of treat that’s better when shared, don’t you think?
Here’s to sweet endings and new beginnings, one mini cupcake at a time.
Frequently Asked Questions
How long do these mini graduation cap cupcakes stay fresh?
Stored in an airtight container in the refrigerator, they stay fresh for 3 days. Bring to room temperature before serving for best flavor and texture.
Can I make the fondant graduation caps ahead of time?
Yes! You can prepare and store them in an airtight container at room temperature for up to a week. Just avoid humid places to prevent sticking.
What if I don’t have black fondant?
Try tinting white fondant with black gel food coloring or substitute with small chocolate squares or licorice pieces for the caps.
Can I freeze these cupcakes?
Yes, freeze unfrosted cupcakes in a sealed container for up to 2 months. Thaw completely and then frost and decorate.
Is there a dairy-free version of this recipe?
Absolutely. Use plant-based milk, coconut oil instead of butter, and dairy-free powdered sugar frosting alternatives.
For a fun savory snack to serve alongside these sweet treats, you might enjoy the crispy Indian pani puri, which always gets guests chatting and reaching for more. Or if you want to mix in some international flair at your grad party, the spicy Korean tteokbokki is a crowd-pleaser with bold flavors to contrast the sweet cupcakes perfectly.
Pin This Recipe!
Easy Adorable Mini Graduation Cap Cupcakes
These mini graduation cap cupcakes are quick, easy, and perfect for celebrations. They feature moist chocolate cupcakes topped with creamy frosting and adorable edible graduation caps.
- Prep Time: 25 minutes
- Cook Time: 15 minutes
- Total Time: 40 minutes
- Yield: 24 mini cupcakes 1x
- Category: Dessert
- Cuisine: American
Ingredients
- 1 cup all-purpose flour (120g)
- 3/4 cup granulated sugar (150g)
- 1/4 cup unsweetened cocoa powder (25g)
- 1 tsp baking powder
- 1/2 tsp baking soda
- 1/4 tsp salt
- 1/2 cup whole milk (120ml)
- 1/4 cup vegetable oil (60ml)
- 1 large egg, room temperature
- 1 tsp vanilla extract
- 1/4 cup boiling water (60ml)
- 1/2 cup unsalted butter, softened (115g)
- 2 cups powdered sugar (240g)
- 1 tsp vanilla extract
- 2–3 tbsp milk or cream (to adjust consistency)
- 2 tbsp cocoa powder (optional, for chocolate frosting)
- Black fondant or black gum paste (enough to cut tiny 1/2 inch squares)
- Edible gold or yellow icing gel or royal icing (for tassels)
- Toothpicks or thin skewers (for tassel stems)
Instructions
- Preheat oven to 350°F (175°C). Line mini muffin pan with cupcake liners.
- Sift together flour, sugar, cocoa powder, baking powder, baking soda, and salt in a large bowl.
- Whisk milk, vegetable oil, egg, and vanilla extract in a separate bowl until smooth.
- Slowly add wet ingredients to dry ingredients, stirring gently just until combined. Stir in boiling water carefully.
- Fill cupcake liners about 2/3 full with batter (makes about 24 mini cupcakes).
- Bake for 12-15 minutes until a toothpick inserted comes out clean.
- Cool cupcakes in pan for 5 minutes, then transfer to wire rack to cool completely.
- Beat butter with powdered sugar, vanilla extract, and 2 tbsp milk or cream until light and fluffy. Add cocoa powder if desired and adjust consistency.
- Frost cupcakes with a small offset spatula or piping bag, creating a smooth, slightly domed surface.
- Roll out black fondant to 1/8 inch thickness and cut into 1.25-inch squares. Place each square on top of frosted cupcakes.
- Use edible gold icing gel or royal icing to dot the center of each fondant square. Attach a tiny toothpick or skewer to one corner for tassel stem and pipe a short line or dot at the end.
- Let frosting and decorations set for 15 minutes before serving.
Notes
Use boiling water to intensify chocolate flavor and keep cupcakes moist. Avoid overmixing batter to prevent toughness. Cool cupcakes completely before frosting to avoid melting. Dust hands with cornstarch when handling fondant to prevent sticking. Fondant caps can be prepared ahead and stored in airtight container at room temperature. For dairy-free or gluten-free versions, substitute ingredients as suggested.
Nutrition
- Serving Size: 1 mini cupcake
- Calories: 100
- Sugar: 10
- Sodium: 80
- Fat: 5.5
- Saturated Fat: 3
- Carbohydrates: 13
- Fiber: 1
- Protein: 1.5
Keywords: mini cupcakes, graduation cupcakes, chocolate cupcakes, party treats, easy cupcakes, celebration desserts