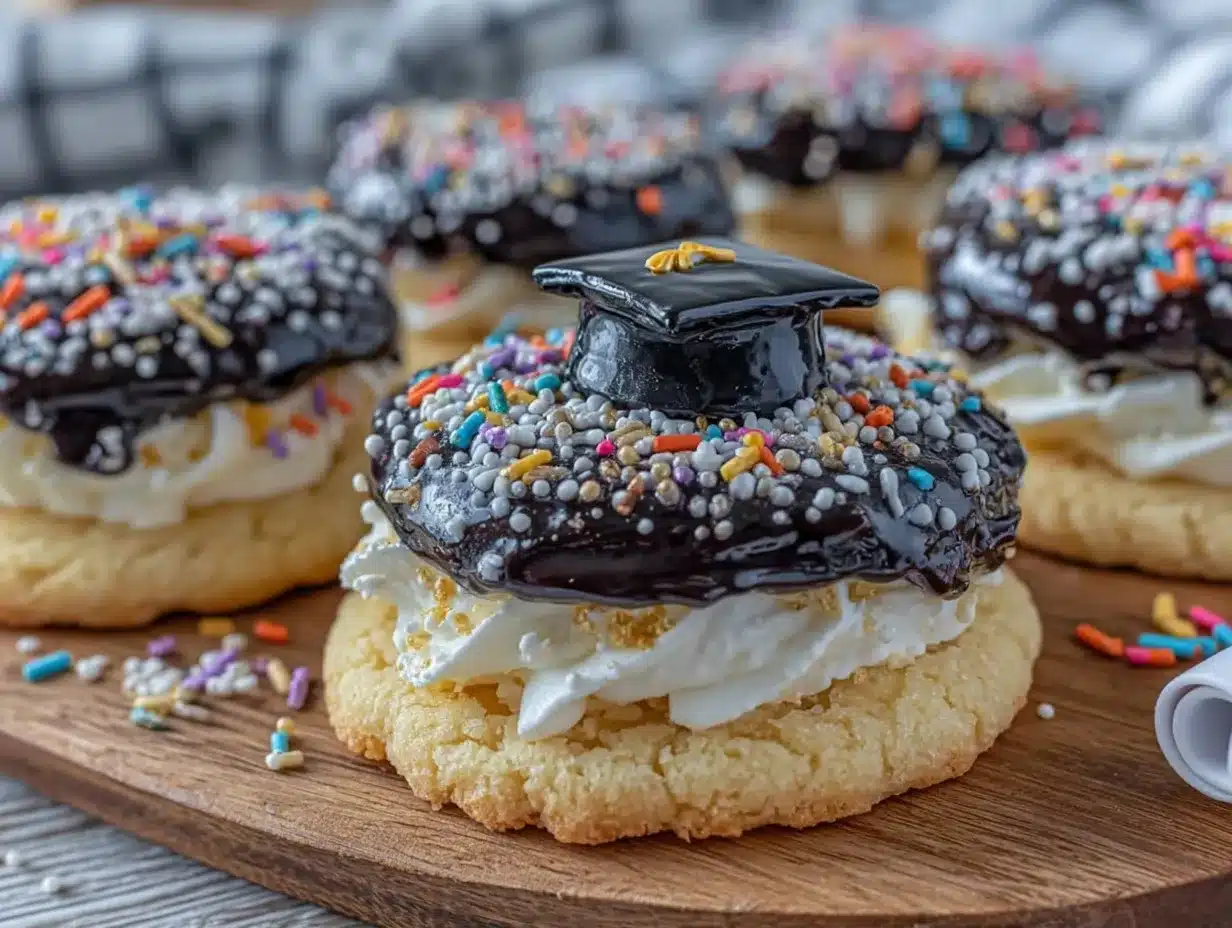
“Can you believe we actually pulled this off?” my friend whispered as she carefully piped the last bit of royal icing onto a tiny graduation cap cookie. That afternoon, her kitchen was a lively chaos of laughter, sprinkles, and the sweet scent of vanilla sugar cookies baking in the oven. Honestly, I hadn’t expected much when she invited me over to try her new idea — a Perfect Cap and Diploma Sugar Cookie Decorating Kit for Graduation. But watching those little cookies transform from plain rounds to miniature diplomas and mortarboards was oddly satisfying. It reminded me of those hectic days when graduation felt miles away, yet here we were, capturing the moment in edible form.
What struck me most was how this decorating kit wasn’t just about sweet treats; it was a celebration you could hold in your hands. The careful detailing of the caps, the tiny scrolls tied with icing ribbons — it felt like a quiet nod to all the hard work and late-night cram sessions that got us there. The recipe itself? Surprisingly straightforward, but the magic was in the decorating process. I found myself coming back to these cookies all week, tweaking the colors and designs, just like a kid obsessed with their craft project.
For anyone juggling graduation parties or last-minute celebrations, this cookie decorating kit offers a fun, hands-on way to mark the occasion. It’s not just about eating the cookies — it’s about making memories, one piped detail at a time. And honestly, that sweet vanilla aroma mixed with a bit of royal icing dust still lingers in my kitchen whenever I think about it.
Why You’ll Love This Recipe
After testing this Perfect Cap and Diploma Sugar Cookie Decorating Kit for Graduation several times (and trust me, I wasn’t complaining), I can say this recipe hits all the right notes. Here’s why it’s become a must-have for celebrations:
- Quick & Easy: The cookie dough comes together in under 20 minutes, making it perfect for those last-minute party plans or a fun weekend project with family.
- Simple Ingredients: No need for specialty stores — most ingredients are pantry staples like flour, sugar, and butter.
- Perfect for Graduation Parties: The cap and diploma shapes bring a festive touch that’s both playful and elegant.
- Crowd-Pleaser: Kids and adults alike love decorating these cookies, and they disappear quickly at any gathering.
- Unbelievably Delicious: The cookies balance a tender crumb with just the right hint of vanilla, while the royal icing adds a smooth, sweet finish.
This isn’t just another sugar cookie recipe. The secret lies in the texture of the dough—it holds its shape perfectly for decorating without losing that melt-in-your-mouth softness. Plus, the royal icing recipe I use dries to a smooth, matte finish, ideal for detailed piping like the little diploma ribbons or the tiny tassels on the caps. I’ve also played around with different food colorings to get that classic black cap and ivory diploma look without any artificial aftertaste. It’s the kind of recipe that makes you close your eyes after the first bite and smile, knowing you just nailed a little celebration in cookie form.
What Ingredients You Will Need
This recipe uses simple, wholesome ingredients to deliver bold flavor and satisfying texture without the fuss. Most of these are probably already in your pantry, which is a relief when party prep gets busy.
- For the Sugar Cookie Dough:
- All-purpose flour, 3 cups (360 g) — I prefer King Arthur for consistent results
- Baking powder, 1 teaspoon — helps the cookies rise just enough
- Salt, ½ teaspoon — balances the sweetness
- Unsalted butter, 1 cup (227 g), softened — use good-quality butter for richness
- Granulated sugar, 1 cup (200 g) — for that classic sweetness
- Large egg, 1, room temperature — binds everything together
- Pure vanilla extract, 1 teaspoon — the heart of the flavor
- Milk, 2 tablespoons (30 ml), optional — adds slight moisture if dough feels dry
- For the Royal Icing:
- Powdered sugar, 3 cups (360 g), sifted — ensures no lumps
- Pasteurized egg whites or meringue powder, 2 tablespoons — for that perfect pipeable texture
- Fresh lemon juice, 1 tablespoon — adds subtle tang and helps icing set
- Water, 2-4 tablespoons (30-60 ml) — adjust to get the right consistency
- Food coloring gels (black, ivory, gold) — I recommend AmeriColor gels for vibrant, clean colors
If you need gluten-free options, swapping all-purpose flour for a 1:1 gluten-free blend works well here. For dairy-free, use vegan butter alternatives and almond or oat milk instead of regular milk. I’ve even tried coconut-based royal icing substitutes, but the traditional recipe holds up best for that crisp finish.
Equipment Needed
- Mixing bowls — a medium and a large one for dough and icing
- Electric mixer or stand mixer — makes creaming butter and sugar a breeze
- Rolling pin — essential for rolling out the dough evenly
- Cookie cutters — specifically a mortarboard (graduation cap) and diploma scroll shape; if you don’t have these, a sharp knife or template can work
- Baking sheets lined with parchment paper — prevents sticking and promotes even baking
- Piping bags and small round piping tips (sizes #1, #2) — for precise icing details
- Toothpicks or scribe tools — helps with fine icing adjustments and fixing small mistakes
When I first tried this, I used plastic sandwich bags with a tiny corner snipped off instead of piping bags — it works in a pinch but lacks control. Investing in a couple of reusable piping bags and tips really makes the decorating part less frustrating. Also, a silicone baking mat can be a budget-friendly alternative to parchment paper, with the bonus of easy cleanup.
Preparation Method
- Mix Dry Ingredients: In a medium bowl, whisk together 3 cups (360 g) of all-purpose flour, 1 teaspoon baking powder, and ½ teaspoon salt. Set aside. This keeps the baking powder evenly distributed.
- Cream Butter and Sugar: In a large bowl, beat 1 cup (227 g) softened unsalted butter with 1 cup (200 g) granulated sugar using an electric mixer on medium speed for about 3-4 minutes. The mixture should look fluffy and pale — that airiness helps the cookies stay tender.
- Add Egg and Vanilla: Beat in 1 large room temperature egg and 1 teaspoon pure vanilla extract until combined. Scrape sides as needed to keep ingredients moving.
- Combine Wet and Dry: Gradually add the flour mixture to the butter mixture, mixing on low speed. Add 2 tablespoons (30 ml) milk if the dough feels too dry. The dough should come together, soft but not sticky.
- Chill the Dough: Divide dough into two discs, wrap each in plastic wrap, and refrigerate for at least 1 hour. Chilling prevents spreading during baking and makes rolling easier.
- Preheat Oven: Set oven to 350°F (175°C). Line baking sheets with parchment paper.
- Roll and Cut: On a lightly floured surface, roll out one dough disc to about ¼ inch (6 mm) thickness. Use mortarboard and diploma cookie cutters to cut shapes. Transfer carefully to baking sheets, spacing about 1 inch (2.5 cm) apart.
- Bake: Bake for 8-10 minutes until edges just begin to turn golden. Be careful not to overbake — cookies should be firm but soft in the center.
- Cool: Allow cookies to cool on baking sheet for 5 minutes, then transfer to wire racks to cool completely before decorating.
- Prepare Royal Icing: In a mixing bowl, combine 3 cups (360 g) sifted powdered sugar, 2 tablespoons meringue powder, 1 tablespoon lemon juice, and 2-4 tablespoons water. Beat on high speed until stiff peaks form (about 5-7 minutes). Divide icing into bowls and tint with food coloring as desired.
- Decorate: Fill piping bags with icing. Use black for caps, ivory for diplomas, and gold for accents like tassels and ribbons. Start with outlining shapes, then flood gently with thinner icing if desired. Use toothpicks to smooth edges or fix small errors.
- Dry: Let decorated cookies dry at room temperature for at least 4 hours or overnight. This ensures the icing hardens and won’t smudge when stacked or wrapped.
If the dough feels sticky during rolling, chill it again for 10 minutes — patience pays off. And when piping, don’t rush. Steady hands and small strokes make all the difference. I often work on a cool surface to keep the dough firm, which helps with clean edges.
Cooking Tips & Techniques
One of the trickiest parts of this recipe is getting consistent cookie shapes and smooth icing finishes. Here are some tips I’ve picked up:
- Keep Dough Chilled: Warm dough can become sticky and lose shape. If you notice it getting too soft while rolling, pop it back in the fridge.
- Use a Light Dusting of Flour: Too much flour while rolling can dry out cookies. Just a light sprinkle on the surface and rolling pin is enough.
- Don’t Overbake: Cookies continue to firm up as they cool. Pull them out as soon as edges start turning golden to keep them tender.
- Royal Icing Consistency: For outlining, the icing should be thicker, about toothpaste consistency. For flooding (filling in), thin the icing with a little water until it flows smoothly but still holds shape.
- Practice Piping on Parchment First: This helps you get a feel for pressure and control before decorating cookies.
- Fix Mistakes with a Damp Brush or Toothpick: If icing blobs or lines aren’t perfect, use a small damp brush or a toothpick to smooth or lift excess.
I once tried rushing through the decorating step and ended up with a lumpy mess of icing — lesson learned! Taking your time is key. Also, multitasking helps: while cookies bake, prep your icing and set up your decorating station. That way, you’re ready to go as soon as they cool.
Variations & Adaptations
This sugar cookie kit is versatile and can be customized to fit different tastes, diets, and occasions:
- Flavor Twists: Add lemon zest or almond extract to the dough for a fresh change. A hint of cinnamon or nutmeg can add warmth, perfect for fall graduations.
- Dietary Adaptations: Use gluten-free flour blends to make the cookies safe for gluten-sensitive guests. Swap dairy butter with vegan margarine and milk with any plant-based milk for dairy-free versions.
- Decorating Styles: Instead of royal icing, try colored fondant for a smooth, shiny finish. Or use edible markers on plain iced cookies for quick, kid-friendly decorating.
- Seasonal Versions: Swap out the black cap icing for bright school colors or metallic gold for a more formal look. For summer graduations, add edible flower petals or pastel shades.
- Personal Touch: I once added the graduate’s initials on diplomas using fine piping, which made the cookies feel extra special and personalized for the party.
Serving & Storage Suggestions
These decorated sugar cookies are best served at room temperature to enjoy their tender crumb and crisp icing contrast. Arrange them on a festive platter or in clear treat bags tied with ribbon for an elegant party favor.
They pair wonderfully with a cold glass of milk, iced tea, or even a light sparkling cider — perfect for graduation toasts without the alcohol. For a fun party spread, consider serving alongside simple finger foods like the fresh Greek salad or a comforting dish like the creamy chicken and rice casserole.
Store the cookies in an airtight container at room temperature for up to 5 days. To keep them longer, freeze undecorated cookies in a single layer wrapped tightly, then thaw before decorating. Decorated cookies freeze best if you flash freeze them on a tray first, then wrap carefully to prevent icing damage.
When reheating, avoid microwaving as it can soften the icing. Let cookies come back to room temperature naturally to preserve their texture. Over time, the flavors mellow and the icing hardens slightly, making them even easier to stack or package.
Nutritional Information & Benefits
An average sugar cookie from this recipe typically contains around 150-180 calories, with about 7 grams of fat and 22 grams of carbohydrates. While these are treats, the use of real butter and fresh ingredients means they’re free from artificial preservatives and rely on wholesome pantry staples.
The royal icing, made from meringue powder and powdered sugar, is low in fat and adds just a touch of sweetness and texture. For those mindful of allergens, this recipe contains gluten, dairy, and eggs, but substitutions make it adaptable for many diets.
From a wellness perspective, celebrating milestones with homemade treats like these can be a joyful ritual that fosters connection and creativity — important ingredients for mental well-being that can be just as nourishing as food.
Conclusion
Making the Perfect Cap and Diploma Sugar Cookie Decorating Kit for Graduation isn’t just about the cookies themselves — it’s about sharing a moment, a little sweet celebration that sticks with you. Whether you’re planning a party, a family gathering, or a quiet congratulatory treat, this recipe offers an approachable way to mark the occasion with hands-on fun and tasty results.
Feel free to customize the colors, flavors, and decorating styles to match your graduate’s personality or school spirit. Honestly, these cookies remind me every time that the best celebrations come from simple ingredients and a little creativity.
If you try this recipe, I’d love to hear how your decorating went or what twists you added. Sharing those moments and ideas is what makes cooking so rewarding. Here’s to sweet successes — in baking and beyond!
FAQs
- Can I make the cookie dough ahead of time? Yes! The dough can be refrigerated for up to 3 days or frozen for up to 1 month. Just thaw before rolling.
- How do I prevent royal icing from cracking? Avoid adding too much water when thinning the icing and let it dry slowly at room temperature, not in direct sunlight or heat.
- What if I don’t have graduation cap or diploma cookie cutters? You can use a sharp knife to cut shapes freehand or print templates to cut around with a knife.
- Can I use store-bought royal icing? While homemade royal icing tastes better and pipes smoother, store-bought can work in a pinch for simpler decorating.
- How can I store decorated cookies longer? Freeze them after decorating by flash freezing on a tray, then wrapping tightly in plastic wrap and placing in an airtight container.
Pin This Recipe!

Perfect Cap and Diploma Sugar Cookie Decorating Kit
A fun and easy sugar cookie recipe designed for graduation celebrations, featuring vanilla sugar cookies decorated with royal icing shaped like graduation caps and diplomas.
- Prep Time: 20 minutes
- Cook Time: 10 minutes
- Total Time: 1 hour 30 minutes
- Yield: 24 cookies 1x
- Category: Dessert
- Cuisine: American
Ingredients
- 3 cups (360 g) all-purpose flour
- 1 teaspoon baking powder
- ½ teaspoon salt
- 1 cup (227 g) unsalted butter, softened
- 1 cup (200 g) granulated sugar
- 1 large egg, room temperature
- 1 teaspoon pure vanilla extract
- 2 tablespoons (30 ml) milk, optional
- 3 cups (360 g) powdered sugar, sifted
- 2 tablespoons pasteurized egg whites or meringue powder
- 1 tablespoon fresh lemon juice
- 2–4 tablespoons (30–60 ml) water
- Food coloring gels (black, ivory, gold)
Instructions
- Mix dry ingredients: In a medium bowl, whisk together flour, baking powder, and salt. Set aside.
- Cream butter and sugar: In a large bowl, beat softened butter with granulated sugar on medium speed for 3-4 minutes until fluffy and pale.
- Add egg and vanilla: Beat in the egg and vanilla extract until combined, scraping sides as needed.
- Combine wet and dry: Gradually add flour mixture to butter mixture on low speed. Add milk if dough feels dry. Dough should be soft but not sticky.
- Chill dough: Divide dough into two discs, wrap in plastic wrap, and refrigerate for at least 1 hour.
- Preheat oven to 350°F (175°C). Line baking sheets with parchment paper.
- Roll and cut: Roll out one dough disc to ¼ inch thickness on a lightly floured surface. Cut shapes using mortarboard and diploma cookie cutters. Place cookies 1 inch apart on baking sheets.
- Bake: Bake for 8-10 minutes until edges begin to turn golden but centers remain soft.
- Cool: Let cookies cool on baking sheet for 5 minutes, then transfer to wire racks to cool completely.
- Prepare royal icing: In a bowl, combine powdered sugar, meringue powder, lemon juice, and water. Beat on high speed until stiff peaks form (5-7 minutes). Divide and tint with food coloring.
- Decorate: Fill piping bags with icing. Use black for caps, ivory for diplomas, and gold for accents. Outline shapes first, then flood with thinner icing if desired. Use toothpicks to smooth edges or fix mistakes.
- Dry: Let decorated cookies dry at room temperature for at least 4 hours or overnight.
Notes
Keep dough chilled to prevent stickiness and spreading. Use light dusting of flour when rolling. Avoid overbaking to keep cookies tender. Practice piping on parchment paper before decorating. Let decorated cookies dry fully to avoid smudging. Dough can be refrigerated up to 3 days or frozen for 1 month. Decorated cookies can be frozen after flash freezing on a tray.
Nutrition
- Serving Size: 1 cookie
- Calories: 165
- Sugar: 12
- Sodium: 90
- Fat: 7
- Saturated Fat: 4
- Carbohydrates: 22
- Protein: 2
Keywords: sugar cookies, graduation cookies, royal icing, cookie decorating, vanilla sugar cookies, mortarboard cookies, diploma cookies, party treats