I was standing in the frozen foods aisle last October, staring at a box of pre-made frozen pizza rolls, when the fluorescent lights flickered and the hum of the freezer case suddenly sounded like a low, familiar groan from my past. And just like that, I was seven years old, sitting on the cracked vinyl stool at my Aunt Carla’s kitchen counter, watching her wrap strips of crescent roll dough around a meatball until it looked like a tiny, clumsy ghost. She wasn’t trying to be fancy—she was just trying to get me and my cousins to eat dinner on a school night without a full-blown negotiation. That memory hit me so hard I almost dropped the pizza rolls. I mean, honestly, who gets emotional over processed dough in a frozen aisle? But there it was. That specific, buttery, slightly sweet smell of canned biscuits—the kind that pops open with a loud *thump*—and I could suddenly feel the sticky dough on my fingers and hear Aunt Carla telling me to “make the eyes a little crooked so they look scared.” She passed away a few years back, and I haven’t thought about those silly mummy meatballs in ages. I put the pizza rolls back on the shelf and drove straight to the grocery store for bell peppers, ground beef, and a can of refrigerated crescent rolls. Maybe you’ve been there—that sudden, aching need to recreate a feeling you can’t quite name, but you know it lives in a specific taste or smell. This recipe is my attempt to get it back, and honestly, it works every single time.
Why You’ll Love This Recipe
Let me tell you, as someone who has tested this recipe with three different types of ground meat, two kinds of cheese, and one very memorable attempt with gluten-free dough that ended up looking like sad, deflated ghosts—this is the version that actually works. Every single time. And not just for Halloween, either. We make these mummy-wrapped stuffed peppers for regular Tuesday dinners, and my kids act like I’ve pulled off some kind of kitchen magic trick.
Here’s why this recipe has earned a permanent spot in our dinner rotation:
- Kid-Approved Fun: The mummy wrapping turns dinner into a craft project. My kids actually argue over who gets to wrap the next one. I’m not kidding.
- Budget-Friendly: Ground beef, bell peppers, rice, and refrigerated dough. That’s it. No fancy ingredients, no special trips to a specialty store.
- Picky Eater Approved: The crescent dough adds a buttery, slightly sweet element that even the most skeptical vegetable-avoider will happily eat. My youngest calls them “pepper tacos with pajamas on.”
- Make-Ahead Friendly: You can assemble these the night before, keep them in the fridge, and just pop them in the oven when you get home from work. Dinner stress? Gone.
- Leftovers That Actually Reheat Well: Unlike regular stuffed peppers that can get mushy, the dough wrapping helps hold everything together. Day-two leftovers taste just as good.
What makes this recipe different from the dozens of stuffed pepper recipes out there? It’s the combination of textures—the soft, slightly sweet dough, the savory meat filling, and the tender-but-not-soggy bell pepper. Plus, the visual payoff is huge. When you pull a tray of these little mummies out of the oven, with their “eyes” made of tiny dollops of cream cheese or mustard, everyone at the table actually gasps. I mean, that’s not something you get from a regular casserole, you know?
What Ingredients You Will Need
This recipe uses simple, everyday ingredients that you probably already have in your kitchen. The beauty of it is that everything is flexible—swap in what you have, leave out what you don’t. Here’s what you’ll need to make about 6 mummy-wrapped stuffed peppers, which feeds a family of four with maybe one leftover for lunch the next day.
For the Stuffed Peppers
- 6 medium bell peppers (any color works, but green are cheapest and hold their shape best—I usually grab whatever’s on sale)
- 1 pound ground beef (80/20 is ideal—lean enough to not be greasy, but enough fat for flavor. Ground turkey or chicken works too, just add a tablespoon of olive oil)
- 1 cup cooked white rice (leftover rice is perfect here. Brown rice works, just make sure it’s fully cooked and cooled)
- 1 small yellow onion, finely diced (about 1/2 cup)
- 2 cloves garlic, minced (or 1 teaspoon garlic powder in a pinch)
- 1 cup shredded mozzarella cheese (divided—half goes in the filling, half goes on top before wrapping)
- 1/2 cup tomato sauce (canned is fine, or use leftover pasta sauce. Adds moisture and flavor)
- 1 teaspoon dried oregano
- 1/2 teaspoon salt
- 1/4 teaspoon black pepper
- 1 tablespoon olive oil (for sautéing)
For the Mummy Wraps

- 1 can (8 ounces) refrigerated crescent roll dough (I recommend Pillsbury for the most consistent texture. The store brand works, but the dough can be a little stickier)
- 1 egg, beaten (for an egg wash—gives the dough that beautiful golden-brown color. Skip it if you’re in a hurry, but it really makes a difference)
For the Mummy Eyes
- 2 tablespoons cream cheese, softened (or use small dollops of sour cream, or even mustard for a tangy twist)
- 12 black olive slices (or small dots of black sesame seeds, or even tiny pieces of nori if you have it. My kids use raisins sometimes, and honestly, it works)
Substitution Guidance: If you’re feeding a crowd that doesn’t eat beef, ground Italian sausage works beautifully here—just reduce the salt since sausage is already seasoned. For a vegetarian version, I’ve used a mixture of black beans, corn, and quinoa with a generous handful of cheese, and it was honestly just as satisfying. The dough does all the heavy lifting in terms of texture and fun factor.
Equipment Needed
You don’t need any fancy equipment for this recipe, which is part of why I love it so much. Here’s what you’ll need:
- Large skillet or frying pan (for cooking the filling. A 12-inch pan gives you enough room to brown the meat evenly)
- Large pot (for parboiling the peppers. If you don’t have one big enough, a deep saucepan works—just work in batches)
- Baking sheet or 9×13-inch baking dish (a rimmed baking sheet works best because it catches any drips from the dough)
- Parchment paper or silicone baking mat (highly recommended—the dough can stick to bare metal, and nobody wants to scrape mummy faces off a pan)
- Sharp knife and cutting board
- Small bowl (for the egg wash)
- Pastry brush (or just use a clean finger—I’ve done it both ways, and the finger method is surprisingly effective)
- Measuring cups and spoons
Budget-Friendly Tip: If you don’t own a pastry brush, don’t buy one just for this. Use the back of a spoon or just dip a paper towel in the egg wash and dab it on. I’ve also used a clean paintbrush from my kid’s art supplies in a pinch—just make sure it’s never been used for paint!
Preparation Method
Alright, let’s get into the actual cooking. I’ve broken this down into manageable steps so you don’t feel overwhelmed. Trust me, the first time I made these, I forgot to parboil the peppers and ended up with crunchy, undercooked peppers wrapped in perfectly golden dough. Learn from my mistakes!
Step 1: Prep the Peppers
Preheat your oven to 375°F (190°C). Bring a large pot of salted water to a boil. While you’re waiting, wash your bell peppers and slice off the top 1/2 inch of each pepper. Remove the seeds and white membranes from inside. If the peppers don’t stand up straight on their own, trim a tiny sliver off the bottom—just enough to make them stable, but not so much that they leak. Drop the peppers into the boiling water and cook for exactly 3 minutes. This softens them just enough that they’ll finish cooking in the oven without turning into mush. Remove them with tongs and let them drain upside down on a paper towel.
Step 2: Make the Filling
While the peppers are boiling, heat 1 tablespoon of olive oil in your skillet over medium heat. Add the diced onion and cook for 3-4 minutes until it’s soft and translucent. Add the minced garlic and cook for another 30 seconds—just until it smells amazing. Add the ground beef and break it up with a wooden spoon. Cook for 5-7 minutes until it’s browned all the way through. If there’s excess fat, carefully spoon it out or tilt the pan and soak it up with a paper towel. Remove the pan from heat and stir in the cooked rice, 1/2 cup of the shredded mozzarella, the tomato sauce, oregano, salt, and pepper. Mix everything together until it’s well combined. Taste it—I always do, even with raw-ish ingredients, because it’s the best way to catch seasoning issues early. Adjust salt or pepper if needed.
Step 3: Stuff the Peppers
Place your parboiled peppers upright in your baking dish or on your parchment-lined baking sheet. Spoon the filling into each pepper, pressing down gently to pack it in. Don’t overstuff—you want the filling to be level with the top of the pepper, not mounded. Sprinkle the remaining 1/2 cup of mozzarella cheese on top of each stuffed pepper. This cheese layer will melt and act as a “glue” for the dough strips.
Step 4: Create the Mummy Wraps
Open your can of crescent roll dough. Instead of separating it into triangles along the perforations, keep the dough in one piece and carefully unroll it onto a cutting board. Use a sharp knife or pizza cutter to cut the dough into 1/2-inch-wide strips. You should get about 12-16 strips from one can. Take 2-3 strips per pepper and wrap them around the pepper, starting at the bottom and working your way up. Leave a small gap at the top—about 1/2 inch—where the “face” will be. Cross the strips slightly as you go to create that classic mummy wrapping effect. Don’t worry if it looks messy; mummies are supposed to look a little ragged. Tuck the ends of the strips under the bottom of the pepper to secure them.
Step 5: Egg Wash and Bake
Brush the dough strips lightly with the beaten egg. This is what gives them that gorgeous golden-brown color. Bake for 18-22 minutes, until the dough is golden brown and puffed, and the filling is hot and bubbly. If you’re unsure, insert an instant-read thermometer into the center of the filling—it should read at least 165°F (74°C).
Step 6: Add the Faces
Let the mummy peppers cool for 5 minutes on the baking sheet. While they’re cooling, mix the softened cream cheese with a tiny splash of water to make it pipeable. Transfer it to a small zip-top bag, snip off a tiny corner, and pipe two small dots onto the exposed pepper “face” area of each mummy. Press an olive slice onto each dot. If you don’t have a piping bag, use a toothpick to dab the cream cheese on—it’s messier but just as effective.
Cooking Tips & Techniques
I’ve made this recipe at least a dozen times now, and I’ve learned a few things the hard way. Here are my best tips to save you from the same mistakes:
Don’t skip the parboiling step. I know it’s an extra pot to wash, but trust me on this. If you put raw peppers in the oven, they’ll still be crunchy after 20 minutes, and nobody wants a crunchy pepper wrapped in soft dough. Three minutes in boiling water is all it takes.
Dry your peppers after parboiling. This is a small detail that makes a big difference. If the peppers are wet when you wrap them, the dough will get soggy on the bottom and won’t puff up properly. Let them drain upside down on a paper towel for at least 5 minutes.
Use cold dough. Crescent roll dough gets sticky and hard to work with if it gets too warm. Keep it in the fridge until you’re ready to cut and wrap. If the dough starts sticking to your fingers, pop it in the freezer for 5 minutes.
Don’t overfill the peppers. I know it’s tempting to pack as much filling in as possible, but if the filling is mounded above the pepper, the dough strips won’t stay in place. Level filling = tidy mummies.
Multitasking is your friend. While the peppers are parboiling, cook the filling. While the peppers are cooling after parboiling, cut your dough strips. While the mummies are baking, clean up your kitchen. This recipe comes together in about 45 minutes total if you keep things moving.
One time I forgot the egg wash. The mummies came out pale and sad-looking—like they’d been through a washing machine instead of a haunted house. The egg wash really does make a difference in appearance, so don’t skip it unless you absolutely have to.
Variations & Adaptations
This recipe is incredibly flexible, which is one of the reasons it’s become a staple in our house. Here are some variations I’ve tried and loved:
Spicy Southwest Mummies
Add 1/2 cup of corn kernels and 1/4 cup of diced green chiles to the filling. Swap the mozzarella for pepper jack cheese. Top with a dollop of sour cream and a sprinkle of cumin before serving. My husband, who claims he doesn’t like stuffed peppers, ate three of these in one sitting.
Breakfast Mummies
Use the same wrapping technique, but fill the peppers with scrambled eggs, cooked breakfast sausage, and shredded cheddar cheese. Bake for 15 minutes at 375°F. Serve with salsa on the side. I made these for a Halloween-themed brunch last year, and they were gone before the pancakes were done.
Vegetarian Black Bean Mummies
Replace the ground beef with one can of black beans (rinsed and drained) and one cup of cooked quinoa. Add 1/2 cup of corn and a teaspoon of cumin. The texture is a little different—more crumbly—but the flavor is fantastic. My vegetarian sister-in-law requests these for every family gathering now.
Gluten-Free Option
Use gluten-free crescent roll dough (I’ve found it at most major grocery stores, usually in the frozen section) or make your own gluten-free dough using a 1:1 gluten-free flour blend. The texture won’t be quite as flaky, but the fun factor is still there.
Serving & Storage Suggestions
These mummy-wrapped stuffed peppers are best served warm, right out of the oven, when the dough is still flaky and the cheese is gooey. I usually let them cool for about 5 minutes before serving—long enough that nobody burns their mouth, but short enough that the cheese hasn’t set.
For presentation, arrange the mummies on a platter with a few sprigs of fresh parsley or basil to look like “spooky grass.” If you’re serving these for a Halloween party, you can even arrange them on a bed of black beans to look like dirt. My kids love that.
What to serve with them: A simple side salad with a tangy vinaigrette balances out the richness of the dough and cheese. Roasted broccoli or green beans also work well. For a heartier meal, serve with a bowl of tomato soup or a side of garlic bread.
Storage: Leftover mummies keep well in an airtight container in the refrigerator for up to 4 days. The dough will soften slightly, but the flavor is still great. To reheat, place them on a baking sheet in a 350°F oven for 8-10 minutes. The microwave works in a pinch, but the dough will be soft rather than crispy.
Freezer Instructions: You can freeze these either before or after baking. To freeze before baking, assemble the mummies completely (including the dough wrap, but not the egg wash), place them on a baking sheet, and freeze until solid. Transfer to a freezer bag and store for up to 3 months. When ready to bake, place them on a baking sheet, brush with egg wash, and bake at 375°F for 25-28 minutes. To freeze after baking, cool completely, wrap individually in plastic wrap, and store in a freezer bag. Reheat directly from frozen in a 350°F oven for 15-18 minutes.
Nutritional Information & Benefits
Here’s the approximate nutritional breakdown for one mummy-wrapped stuffed pepper (based on using 80/20 ground beef, white rice, and regular crescent roll dough):
| Nutrient | Amount per Serving |
|---|---|
| Calories | 385 |
| Protein | 22g |
| Carbohydrates | 28g |
| Fat | 18g |
| Fiber | 3g |
| Sodium | 620mg |
Bell peppers are an excellent source of vitamin C—in fact, one medium red bell pepper contains more vitamin C than an orange. They also provide vitamin A, vitamin B6, and fiber. The ground beef adds iron and zinc, while the cheese contributes calcium. If you’re looking to lighten this up, use ground turkey instead of beef, swap the white rice for brown rice, and use reduced-fat cheese. The crescent roll dough is the hardest thing to replace, but you can find whole-wheat versions at some stores.
Dietary Considerations: This recipe contains gluten (from the crescent roll dough) and dairy (from the cheese). For a dairy-free version, use dairy-free cheese and skip the cream cheese eyes—use mustard dots or small pieces of roasted red pepper instead. For a gluten-free version, use gluten-free crescent roll dough as mentioned above.
Conclusion
Look, I’m not going to tell you that these mummy-wrapped stuffed peppers will change your life. But I will tell you that they changed my Tuesday nights. There’s something about sitting down to dinner with my family, watching my kids giggle at the silly faces on their peppers, and knowing that I made something that’s both fun and nutritious—that’s a win in my book.
This recipe is forgiving, flexible, and genuinely fun to make. Whether you’re preparing for a Halloween party, trying to convince a picky eater to eat vegetables, or just looking for a dinner that feels a little more special than usual, these mummy peppers deliver. Don’t be afraid to experiment with the fillings, the dough, or the face designs. My kids once made a mummy with three eyes and a crooked smile, and honestly, it was my favorite one on the tray.
If you make these, I’d love to hear about it. Drop a comment below and tell me how your mummies turned out—did your kids help wrap them? Did you try a different filling? Did anyone at your table actually scream (with delight, I hope)? Share a photo on social media and tag me—I’m always looking for new mummy inspiration. Until next time, happy cooking, and remember: even imperfect mummies are still delicious.
Frequently Asked Questions
Can I use pre-cooked rice for this recipe?
Absolutely! In fact, leftover rice works perfectly here. If you’re starting from scratch, cook your rice according to package directions and let it cool slightly before mixing it with the other filling ingredients. Cold rice is actually easier to work with because it doesn’t clump together as much.
Can I make these ahead of time for a party?
Yes, and I actually recommend it. You can assemble the mummies completely (up to the egg wash step) and refrigerate them for up to 24 hours. When you’re ready to bake, just brush on the egg wash and add about 5 minutes to the baking time since they’ll be starting from cold.
My dough strips keep breaking—what am I doing wrong?
This usually happens when the dough is too cold or too warm. If it’s too cold, it will crack when you try to wrap it. Let it sit at room temperature for 5 minutes before cutting. If it’s too warm, it will be sticky and tear easily. Pop it in the fridge for 10 minutes. Also, make sure you’re using a sharp knife or pizza cutter to cut the strips—dull blades drag and tear the dough.
Can I use different vegetables instead of bell peppers?
Yes, but you’ll need to adjust the cooking time. Large portobello mushroom caps work wonderfully—just remove the stems and skip the parboiling step. Zucchini boats are also great, but they release a lot of water, so salt them and let them drain for 15 minutes before stuffing. For mini sweet peppers, reduce the baking time to 12-15 minutes.
How do I get the dough to stay wrapped around the pepper?
The cheese on top of the filling acts as a natural “glue” for the dough strips. Make sure you’re pressing the strips gently into the cheese. If the strips still seem loose, you can use a toothpick to secure them in place before baking—just remember to remove the toothpicks before serving!
Pin This Recipe!
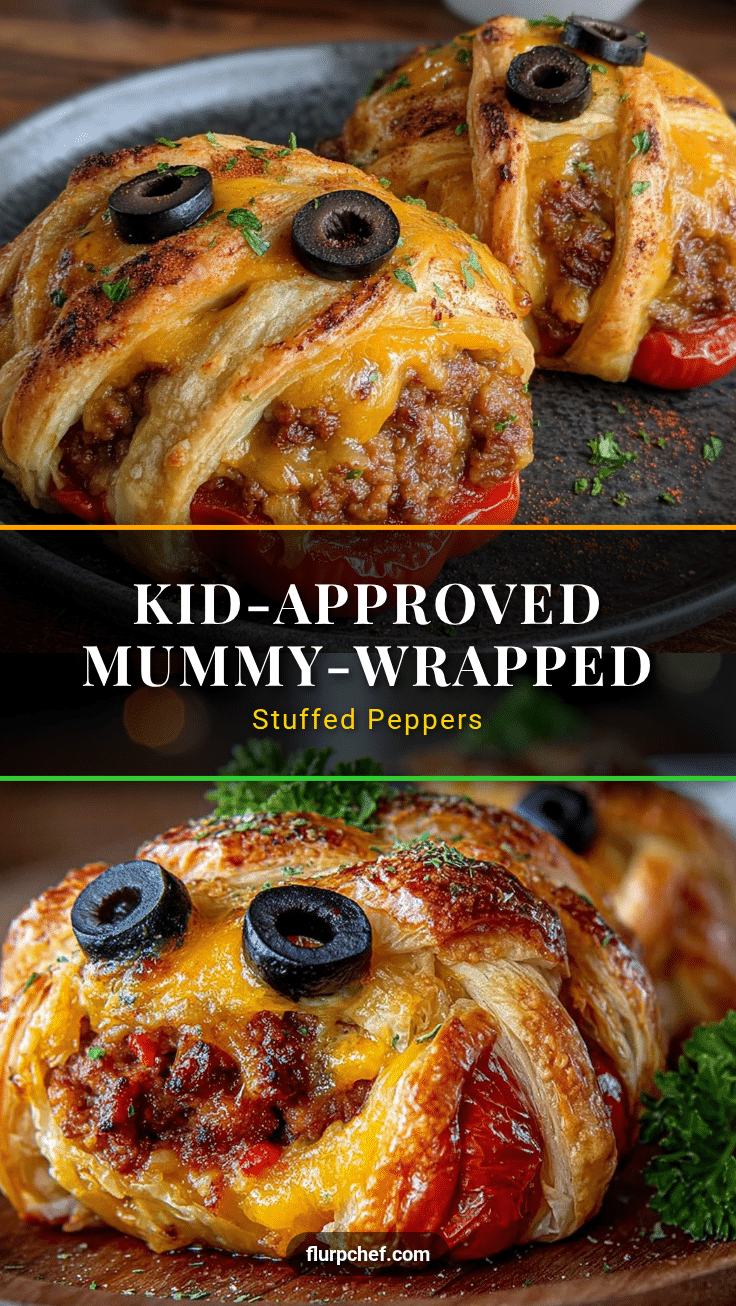
Best Easy Mummy-Wrapped Stuffed Peppers for Kids
Fun and kid-friendly mummy-wrapped stuffed peppers made with bell peppers, ground beef, rice, and crescent roll dough. Perfect for Halloween or a creative weeknight dinner.
- Prep Time: 20 minutes
- Cook Time: 25 minutes
- Total Time: 45 minutes
- Yield: 6 servings 1x
- Category: Main Course
- Cuisine: American
Ingredients
- 6 medium bell peppers (any color)
- 1 pound ground beef (80/20)
- 1 cup cooked white rice
- 1 small yellow onion, finely diced (about 1/2 cup)
- 2 cloves garlic, minced (or 1 teaspoon garlic powder)
- 1 cup shredded mozzarella cheese, divided
- 1/2 cup tomato sauce
- 1 teaspoon dried oregano
- 1/2 teaspoon salt
- 1/4 teaspoon black pepper
- 1 tablespoon olive oil
- 1 can (8 ounces) refrigerated crescent roll dough
- 1 egg, beaten (for egg wash)
- 2 tablespoons cream cheese, softened (for eyes)
- 12 black olive slices (for eyes)
Instructions
- Preheat oven to 375°F (190°C). Bring a large pot of salted water to a boil.
- Wash bell peppers, slice off top 1/2 inch, remove seeds and membranes. Trim bottom if needed so they stand upright.
- Parboil peppers in boiling water for 3 minutes. Remove with tongs and drain upside down on paper towels.
- Heat olive oil in a large skillet over medium heat. Add onion and cook 3-4 minutes until soft. Add garlic and cook 30 seconds.
- Add ground beef, break it up, and cook 5-7 minutes until browned. Drain excess fat.
- Remove from heat and stir in cooked rice, 1/2 cup mozzarella, tomato sauce, oregano, salt, and pepper. Mix well.
- Place parboiled peppers upright in a baking dish or parchment-lined baking sheet. Spoon filling into each pepper, pressing gently. Sprinkle remaining 1/2 cup mozzarella on top.
- Unroll crescent roll dough without separating triangles. Cut into 1/2-inch-wide strips (about 12-16 strips).
- Wrap 2-3 strips around each pepper, starting at bottom and working up, leaving a 1/2-inch gap at top for the face. Cross strips slightly for mummy effect. Tuck ends under pepper.
- Brush dough strips with beaten egg. Bake for 18-22 minutes until golden brown and filling is hot (internal temp 165°F/74°C).
- Let cool 5 minutes. Mix cream cheese with a splash of water to make pipeable. Pipe two small dots on each pepper face and press an olive slice onto each dot.
Notes
Don’t skip parboiling peppers—it ensures they are tender. Dry peppers after parboiling to prevent soggy dough. Use cold dough for easier handling. Do not overfill peppers; filling should be level with top. Egg wash gives golden color; don’t skip it. For make-ahead, assemble up to egg wash step and refrigerate up to 24 hours. Freeze before or after baking.
Nutrition
- Serving Size: 1 mummy-wrapped stuf
- Calories: 385
- Sugar: 6
- Sodium: 620
- Fat: 18
- Saturated Fat: 7
- Carbohydrates: 28
- Fiber: 3
- Protein: 22
Keywords: mummy peppers, stuffed peppers, Halloween dinner, kid-friendly, crescent roll, ground beef, bell peppers