It wasn’t that I didn’t like pumpkin muffins. It was more that I didn’t like what they asked of me. Every recipe I found demanded a pantry full of spices—cinnamon, nutmeg, ginger, cloves—plus the usual flour, sugar, eggs, oil, and the rest. I’d stand in the baking aisle, staring at a shopping list that felt longer than the recipe itself. For a Tuesday morning, that just wasn’t going to happen. I wanted a pumpkin muffin that tasted like fall, smelled like a bakery, and didn’t require me to own a spice rack that looked like a chemistry set. I wanted it to be easy. Like, almost too easy.
And then I realized something obvious: pumpkin pie filling already has the spices in it. Why was I adding them separately? That was the moment these easy 5-ingredient pumpkin chocolate chip muffins were born. No cinnamon shaker required. No nutmeg grater. Just a can of pumpkin pie filling doing all the heavy lifting in the background while I stood there feeling slightly smarter than I had five minutes earlier. It’s the kind of shortcut that feels like cheating—but honestly, it’s just working smarter.
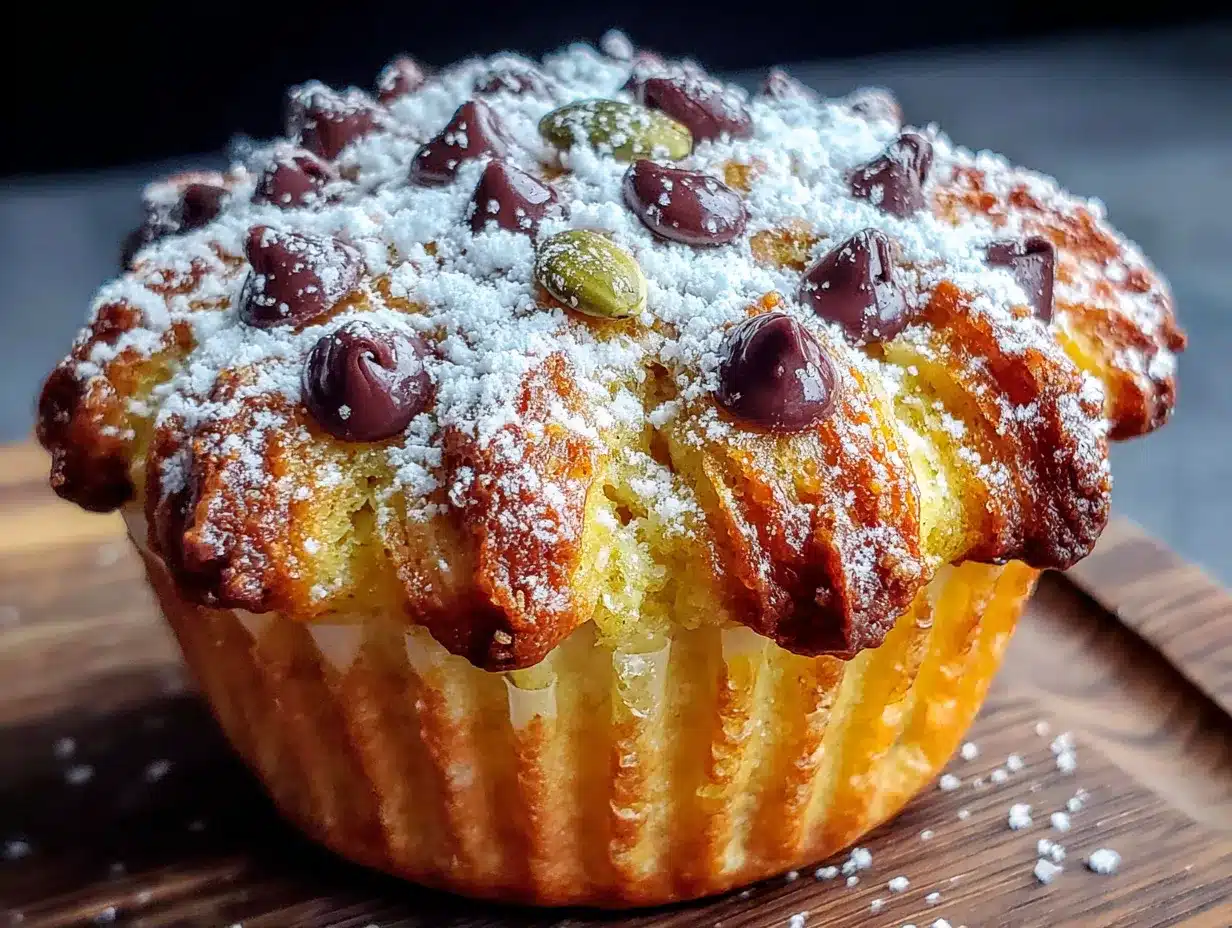
The first batch came out of the oven, and I remember just standing there, muffin in hand, thinking about how something this simple shouldn’t work this well. But it does. The texture is soft, the chocolate is melty, and the pumpkin flavor is warm and present without being overwhelming. These are the muffins you make when you want to bake something good but don’t have the energy to follow a long list of instructions. They’re the muffins you make when you just need a win in the kitchen.
Why You’ll Love This Recipe
I’ve tested this recipe more times than I care to admit. The first few batches were good. Then I tweaked the ratio of pumpkin to mix, adjusted the baking time, and finally landed on something that feels like a real bakery muffin—not a dense, gummy mess. Here’s why these stand out:
- Only 5 Ingredients: You probably already have most of them. No trips to three different stores for obscure extracts or specialty flours.
- No Spice Rack Required: The pumpkin pie filling does the seasoning work. You get cinnamon, ginger, nutmeg, and cloves without measuring a single one.
- Ready in 30 Minutes: From bowl to plate in about half an hour. That’s faster than ordering delivery in some neighborhoods.
- Incredibly Moist: Pumpkin puree keeps these muffins soft for days. They don’t dry out by lunchtime like some bakery versions.
- Perfect for Fall Mornings: They pair beautifully with coffee, tea, or even a creamy iced pumpkin chai latte for the ultimate autumn breakfast.
- Crowd-Pleaser: Kids love the chocolate chips. Adults love that they’re not overly sweet. Everyone wins.
What makes these muffins different from the dozens of other pumpkin muffin recipes out there? It’s the simplicity. Most recipes are just the same thing with more steps. This one cuts through the noise. It’s not trying to be gourmet. It’s trying to be good, fast, and reliable. And honestly, sometimes that’s the best kind of recipe to have in your back pocket. It’s the kind that makes you close your eyes after the first bite and think, I can’t believe I made that with five ingredients.
What Ingredients You Will Need
This recipe uses simple, wholesome ingredients to deliver bold flavor and satisfying texture without any fuss. Everything comes together with pantry staples you likely already have on hand.
- 1 box (15.25 oz) yellow cake mix – This is your shortcut to structure. I prefer Duncan Hines or Betty Crocker for consistent results. The cake mix provides the flour, sugar, leavening, and a touch of vanilla flavor all in one. Don’t use a sugar-free or gluten-free version unless you’ve tested it before—they behave differently.
- 1 can (15 oz) pumpkin pie filling – Not pumpkin puree. This is important. The pie filling already has sugar and spices mixed in, which is what allows us to skip the cinnamon and nutmeg entirely. Libby’s is my go-to, but store brands work fine. Just make sure the label says “pumpkin pie filling” and not “100% pure pumpkin.”
- 2 large eggs – Room temperature if you remember, straight from the fridge if you don’t. It honestly doesn’t matter much here. The eggs bind everything together and give the muffins structure.
- 1/3 cup vegetable oil – Canola, avocado, or melted coconut oil all work. Vegetable oil keeps the muffins moist without adding flavor. If you use coconut oil, make sure it’s melted and cooled slightly before mixing.
- 1 cup semi-sweet chocolate chips – I use Ghirardelli because they melt beautifully and aren’t too sweet. You can use milk chocolate, dark chocolate, or even white chocolate chips if you want a different vibe. Mini chocolate chips work great too—they distribute more evenly throughout the batter.
That’s it. Five ingredients. No fancy additions. No special trips to the specialty grocery store. The beauty of this recipe is that it relies on the quality of what you already have. If you’re feeling adventurous, you can add a handful of chopped pecans or walnuts on top before baking. But honestly, it doesn’t need them.
Equipment Needed
You don’t need a professional bakery setup for these muffins. Just the basics:
- Muffin tin – A standard 12-cup muffin tin. Non-stick is helpful but not required. If you only have a mini muffin tin, adjust the baking time to about 12-14 minutes.
- Paper liners – I prefer parchment-style liners because muffins release easily. Foil liners work too. If you skip liners, make sure to grease the tin thoroughly with butter or non-stick spray.
- Large mixing bowl – Any bowl big enough to hold the batter without splashing. Glass, ceramic, or stainless steel all work.
- Whisk or wooden spoon – A whisk works best to break up any lumps in the cake mix. A wooden spoon is fine too, just takes a bit more elbow grease.
- Measuring cups and spoons – For the oil and chocolate chips. A 1/3 cup measure and a 1 cup measure are all you need.
- Cooling rack – Not strictly necessary, but it helps the muffins cool evenly and prevents soggy bottoms. A wire rack is ideal.
If you don’t have paper liners, you can grease the muffin tin directly. Just run a butter knife around the edges after baking to release them. I’ve done it both ways, and honestly, liners make cleanup about a million times easier. Worth the investment.
Preparation Method
Preheat your oven to 350°F (175°C). Line a 12-cup muffin tin with paper liners or grease it well. This is the only prep work you need to do—no sifting, no softening butter, no waiting for anything to come to room temperature (except maybe the eggs, but again, not critical).
- Combine the wet ingredients: In a large mixing bowl, add the can of pumpkin pie filling (15 oz), 2 large eggs, and 1/3 cup vegetable oil. Whisk everything together until smooth. The mixture should be a deep orange color with no streaks of egg or oil visible. It will look slightly thicker than pancake batter at this point.
- Add the cake mix: Pour the entire box of yellow cake mix into the bowl. Stir gently with a wooden spoon or spatula until just combined. Do not overmix. A few small lumps are fine—they’ll bake out in the oven. Overmixing can make the muffins tough, and nobody wants a tough muffin. The batter will be thick, almost like a cookie dough, but looser.
- Fold in the chocolate chips: Add 1 cup of semi-sweet chocolate chips to the batter. Fold them in with a spatula until they’re evenly distributed. If you’re adding nuts or any other mix-ins, fold them in now. The batter should look speckled with chocolate, not one solid mass of chips in one spot.
- Fill the muffin cups: Using a cookie scoop or a large spoon, divide the batter evenly among the 12 muffin cups. Fill each cup about 3/4 full. The batter is thick enough that it won’t spread much on its own, so use the back of the spoon to level it out slightly. If you want bakery-style domed tops, fill the cups almost to the rim.
- Bake: Place the muffin tin in the preheated oven and bake for 18-22 minutes. Start checking at 18 minutes by inserting a toothpick into the center of a muffin. If it comes out clean or with just a few moist crumbs, they’re done. If the toothpick has wet batter on it, give them another 2-3 minutes. The tops should be golden brown and spring back when lightly pressed.
- Cool: Let the muffins cool in the tin for 5 minutes. This allows them to set and makes them easier to remove without falling apart. Then transfer them to a wire rack to cool completely. If you try to eat one right out of the oven (and you will), just be careful—the chocolate chips are molten lava hot.
A few notes: If your oven runs hot, check at 16 minutes. If it runs cool, you might need the full 22 minutes. Every oven is different, and I’ve burned my fair share of muffins learning this lesson. Also, if you’re using a dark non-stick muffin tin, reduce the baking time by 2-3 minutes because dark pans absorb more heat.
Cooking Tips & Techniques
I’ve made these muffins about a dozen times now, and I’ve learned a few things the hard way. Here are the tips that actually matter:
Don’t overmix the batter. I know I said this already, but it’s worth repeating. When you stir the cake mix into the wet ingredients, stop as soon as the flour streaks disappear. Overmixing develops gluten, which makes muffins tough and rubbery. You want tender, fluffy muffins, not hockey pucks.
Use a cookie scoop for even portions. This is my favorite tip for consistent muffins. A #20 cookie scoop (about 3 tablespoons) fills each cup perfectly. It also keeps the batter from getting all over the edges of the tin, which means less cleanup and more even baking.
Let the muffins cool in the pan. I know it’s tempting to flip them out immediately, but those 5 minutes of rest time are crucial. The muffins are still setting up internally, and moving them too soon can cause them to collapse or stick to the liners. Patience pays off here.
Check for doneness with a toothpick, not your eyes. The tops might look golden and set, but the centers could still be raw. Insert a toothpick into the tallest part of a muffin. If it comes out clean, you’re good. If it’s gooey, give them more time. This is the most reliable test I know.
Room temperature ingredients aren’t critical here. Unlike some baking recipes that demand everything be at exactly 70°F, this recipe is forgiving. Cold eggs straight from the fridge work fine. The pumpkin filling is usually at room temperature anyway. Don’t stress about it.
Variations & Adaptations
One of the best things about this recipe is how flexible it is. Here are a few variations I’ve tried and loved:
Gluten-Free Version: Use a gluten-free yellow cake mix. I’ve tested this with Bob’s Red Mill gluten-free yellow cake mix, and it works beautifully. The texture is slightly more crumbly, but the flavor is spot on. Just make sure the pumpkin pie filling is also gluten-free (most brands are).
Dairy-Free Option: Use dairy-free chocolate chips (Enjoy Life makes great ones) and a cake mix that doesn’t contain milk solids. Most standard yellow cake mixes are dairy-free, but check the label to be sure. The oil and pumpkin filling are already dairy-free, so this is an easy swap.
Spiced Variation: If you want even more warmth, add 1 teaspoon of pumpkin pie spice or cinnamon to the batter. This is optional, obviously, since the pie filling already has spices, but it gives an extra layer of flavor that’s lovely on a cold morning.
Nutty Addition: Fold in 1/2 cup of chopped pecans or walnuts along with the chocolate chips. The crunch adds a nice contrast to the soft muffin texture. Toast the nuts first for even more flavor—just spread them on a baking sheet at 350°F for 5-7 minutes.
Mini Muffins: Use a mini muffin tin and reduce the baking time to 12-14 minutes. These are perfect for parties, lunchboxes, or just portion control (if that’s your thing). You’ll get about 24-30 mini muffins from this recipe.
I personally love the version with toasted pecans and dark chocolate chips. It feels a little more grown-up, like something you’d find at a fancy coffee shop. But the original version is the one I make most often because it’s just so easy.
Serving & Storage Suggestions
These muffins are best served warm, when the chocolate chips are still slightly melty and the pumpkin flavor is at its peak. Let them cool for about 5-10 minutes after baking, then dig in. They’re perfect with a cup of coffee, a glass of cold milk, or alongside a cozy pumpkin cream cheese swirl muffin for a full fall brunch spread.
For storage, keep the muffins in an airtight container at room temperature for up to 3 days. I line the bottom of the container with a paper towel to absorb excess moisture, then place another paper towel on top of the muffins before sealing the lid. This keeps them from getting soggy. If you live in a humid climate, skip the top paper towel—it can trap too much moisture.
These muffins freeze beautifully. Wrap each muffin individually in plastic wrap, then place them in a freezer-safe zip-top bag. They’ll keep for up to 3 months. To reheat, unwrap a muffin and microwave for 20-30 seconds, or pop it in a 350°F oven for 5-7 minutes. The texture comes back almost perfectly, which is honestly kind of magical for a muffin made from cake mix.
One thing I’ve noticed: the flavor actually improves on day two. The pumpkin and chocolate meld together overnight, and the spices become more pronounced. So if you can resist eating them all on day one, you’re in for a treat on day two. (I say this as someone who has never successfully resisted eating them all on day one.)
Nutritional Information & Benefits
Here’s the approximate nutritional breakdown for one muffin (based on 12 servings):
- Calories: 290
- Fat: 14g
- Carbohydrates: 40g
- Fiber: 2g
- Sugar: 24g
- Protein: 4g
While these aren’t health food, they do offer some benefits. Pumpkin is rich in vitamin A and fiber, which supports eye health and digestion. The chocolate chips provide antioxidants (yes, really—dark chocolate has flavonoids). And the eggs add a small amount of protein to help keep you full a little longer.
If you’re looking to lighten them up, you can reduce the chocolate chips to 1/2 cup or use sugar-free chocolate chips. You can also use a sugar-free cake mix, though I find the texture changes slightly. These are meant to be a treat, not a health food, and I think that’s okay. Sometimes you just need a muffin that tastes like fall without overthinking it.
Conclusion
These easy 5-ingredient pumpkin chocolate chip muffins are proof that baking doesn’t have to be complicated to be good. They’re soft, moist, perfectly spiced, and loaded with melty chocolate in every bite. The best part? You probably already have everything you need to make them right now. No special trips. No fancy equipment. Just a bowl, a whisk, and about 30 minutes of your time.
I’ve made these for lazy Sunday mornings, for impromptu brunches, and for those afternoons when I just need something warm and sweet to get through the rest of the day. They’ve never let me down. And I think they’ll become a regular in your kitchen too.
If you try this recipe, I’d love to hear how it goes. Leave a comment below and let me know if you added any fun mix-ins or if you kept it simple with just the five ingredients. And if you’re looking for more easy fall baking ideas, check out my brown butter pumpkin chocolate chip cookies—they’re another one of my favorites. Happy baking!
Frequently Asked Questions
Can I use pumpkin puree instead of pumpkin pie filling?
Not in this recipe. Pumpkin puree is just pumpkin—no sugar, no spices. If you use it, you’ll need to add your own sugar and spices (about 1/2 cup sugar and 2 teaspoons pumpkin pie spice). The texture will also be slightly different because the pie filling has a thicker consistency. Stick with the pie filling for the best results.
Can I use a different cake mix flavor?
Yes! Spice cake mix is a fantastic substitute—it adds even more warm fall flavors. White cake mix works too, but the pumpkin flavor will be more prominent. Avoid chocolate cake mix unless you want double chocolate muffins (which are also delicious, just different).
How do I know when the muffins are done baking?
Insert a toothpick into the center of a muffin. If it comes out clean or with just a few moist crumbs, they’re done. If the toothpick has wet batter on it, bake for 2-3 more minutes and check again. The tops should also spring back when lightly pressed.
Can I make these muffins ahead of time?
Absolutely. They stay fresh at room temperature for up to 3 days in an airtight container. You can also freeze them for up to 3 months. Just wrap each muffin individually in plastic wrap and store in a freezer bag. Reheat in the microwave for 20-30 seconds when ready to eat.
Why did my muffins turn out dry?
This usually happens from overbaking or overmixing. Check your oven temperature with an oven thermometer—it might run hot. Also, make sure you’re not mixing the batter too much. Stir just until the flour disappears, and no more. If you’re using a dark non-stick pan, reduce the baking time by 2-3 minutes.
Pin This Recipe!
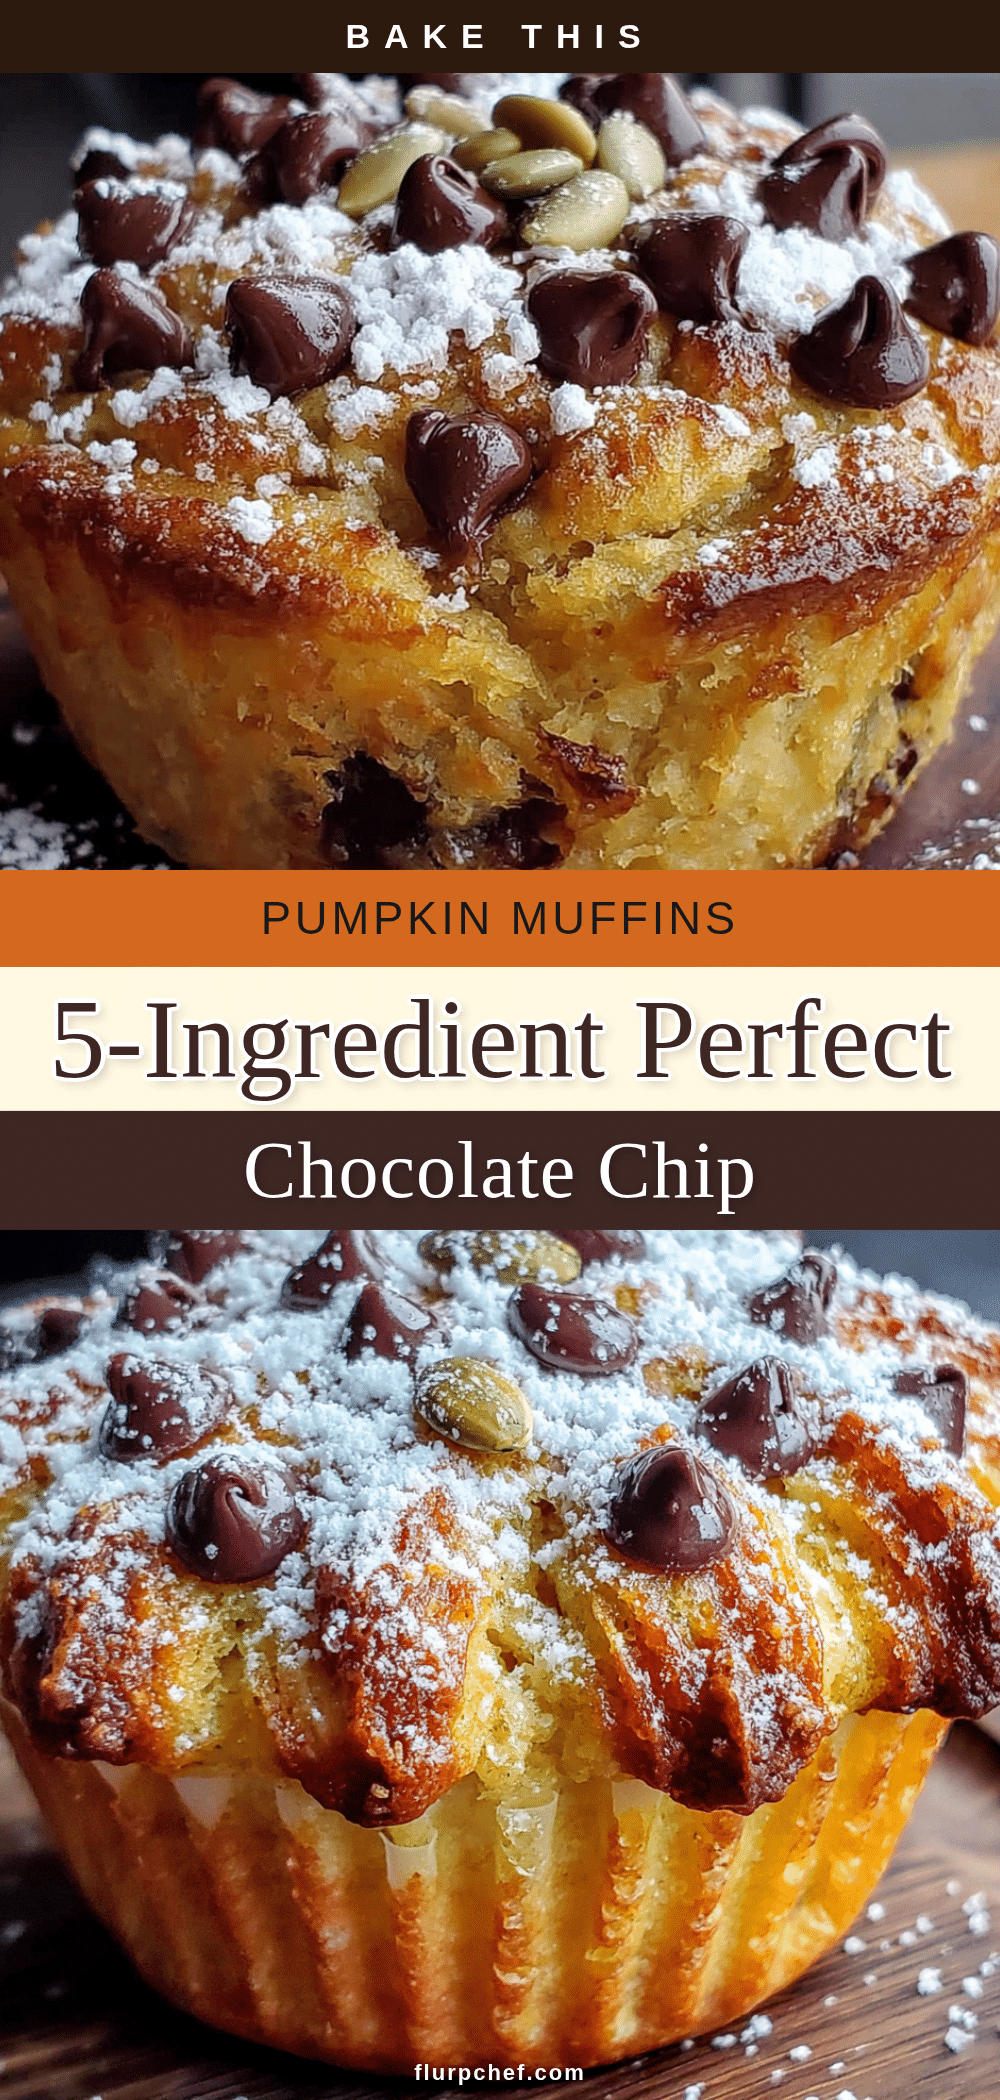
Easy 5-Ingredient Pumpkin Chocolate Chip Muffins
These easy 5-ingredient pumpkin chocolate chip muffins are soft, moist, perfectly spiced, and loaded with melty chocolate in every bite. Made with pumpkin pie filling and yellow cake mix, they come together in about 30 minutes with no spice rack required.
- Prep Time: 10 minutes
- Cook Time: 20 minutes
- Total Time: 30 minutes
- Yield: 12 servings 1x
- Category: Breakfast
- Cuisine: American
Ingredients
- 1 box (15.25 oz) yellow cake mix
- 1 can (15 oz) pumpkin pie filling
- 2 large eggs
- 1/3 cup vegetable oil
- 1 cup semi-sweet chocolate chips
Instructions
- Preheat your oven to 350°F (175°C). Line a 12-cup muffin tin with paper liners or grease it well.
- In a large mixing bowl, add the can of pumpkin pie filling (15 oz), 2 large eggs, and 1/3 cup vegetable oil. Whisk everything together until smooth.
- Pour the entire box of yellow cake mix into the bowl. Stir gently with a wooden spoon or spatula until just combined. Do not overmix.
- Add 1 cup of semi-sweet chocolate chips to the batter. Fold them in with a spatula until they’re evenly distributed.
- Using a cookie scoop or a large spoon, divide the batter evenly among the 12 muffin cups. Fill each cup about 3/4 full.
- Place the muffin tin in the preheated oven and bake for 18-22 minutes. Start checking at 18 minutes by inserting a toothpick into the center of a muffin. If it comes out clean or with just a few moist crumbs, they’re done.
- Let the muffins cool in the tin for 5 minutes. Then transfer them to a wire rack to cool completely.
Notes
Don’t overmix the batter to avoid tough muffins. Use a cookie scoop for even portions. Let muffins cool in the pan for 5 minutes before transferring. Check doneness with a toothpick. Room temperature ingredients aren’t critical. For gluten-free, use a gluten-free yellow cake mix. For dairy-free, use dairy-free chocolate chips. Muffins can be stored in an airtight container at room temperature for up to 3 days or frozen for up to 3 months.
Nutrition
- Serving Size: 1 muffin
- Calories: 290
- Sugar: 24
- Sodium: 320
- Fat: 14
- Saturated Fat: 4
- Carbohydrates: 40
- Fiber: 2
- Protein: 4
Keywords: pumpkin muffins, chocolate chip muffins, 5 ingredient muffins, easy pumpkin muffins, fall baking, pumpkin chocolate chip muffins