Late August heat hangs heavy in the kitchen, the last real stretch of summer before the calendar flips. The sun is coming through the window at that particular angle that makes everything look a little golden, a little tired. And the only thing I want is this berry trifle. Not because it’s fancy, but because it asks for nothing from me. No oven preheating, no complicated techniques, no stress. Just layers of ripe berries, soft cake, and cold cream stacked in a glass bowl. It’s the kind of dessert that feels like an exhale. A quiet way to honor the last long weekend without making a big production out of it. Honestly, that’s the whole point of Labor Day for me—a pause, not a performance. This Perfect Labor Day Berry Trifle with Whipped Cream became my tradition not because I planned it, but because the first time I made it, everyone stopped talking. And that’s rare in my house. There’s something about the way the berries bleed into the cream overnight, turning everything a soft pink. It’s messy and beautiful and tastes like the end of August. I think that’s why it stuck.
Why You’ll Love This Recipe
This isn’t just another dessert you throw together. It’s the one you’ll actually want to make again. I’ve tested this version more times than I can count, tweaking the ratios until every spoonful had the perfect balance of sweet cream, tart berries, and tender cake. It’s been family-approved at three different barbecues and one very serious potluck. Here is why it works so well:
- Quick & Easy : Comes together in under 30 minutes with zero baking required. Perfect for when you’d rather be outside with a drink in your hand.
- Simple Ingredients : No fancy grocery trips. You probably have most of this in your kitchen right now, especially if you’ve got leftover pound cake or angel food cake hanging around.
- Perfect for Labor Day : Light enough for a hot afternoon, impressive enough for the last big gathering of the season. It travels well too, which matters when you’re heading to someone else’s party.
- Crowd-Pleaser : Kids love the creamy layers, adults appreciate that it’s not cloyingly sweet. I’ve watched people go back for thirds. Quietly. Like they’re embarrassed about it.
- Unbelievably Delicious : The texture is what gets you. Soft cake soaked in berry juice, fluffy whipped cream, and those bursts of fresh fruit. It’s comfort food that still feels light.
What makes this recipe different from every other trifle out there? It’s the way I macerate the berries. A little sugar, a splash of lemon, and time. That simple step changes everything. The berries release their juices and create a natural syrup that soaks into the cake layers without making them soggy. It’s a small technique, but it’s the difference between a good trifle and one people ask you to bring every year. This is the kind of dessert that makes you close your eyes after the first bite. Not because it’s complicated, but because it tastes exactly like summer should.
What Ingredients You Will Need
This Perfect Labor Day Berry Trifle with Whipped Cream uses simple, fresh ingredients to create something that feels much more luxurious than the effort it requires. Most of these are pantry staples or easy to find at any grocery store. The key is using good-quality berries and real cream—no shortcuts on those two.
- Fresh strawberries – 1 pound, hulled and sliced. Look for deep red berries that smell fragrant. If strawberries aren’t at their peak, frozen work in a pinch, just thaw and drain them first.
- Fresh blueberries – 6 ounces (about 1 cup). Small, firm berries hold up best in the layers. Wild blueberries are great if you can find them.
- Fresh raspberries – 6 ounces (about 1 cup). Handle these gently. They’re delicate and will break apart as you layer, which honestly just makes the trifle prettier.
- Granulated sugar – ¼ cup, divided. You’ll use some for macerating the berries and a little for sweetening the cream. I use organic cane sugar, but regular white sugar works fine.
- Fresh lemon juice – 2 tablespoons. Fresh is non-negotiable here. Bottled lemon juice tastes flat and won’t brighten the berries the same way. (adds brightness and helps draw out berry juices)
- Vanilla extract – 2 teaspoons, divided. I use pure vanilla extract, not imitation. It makes a noticeable difference in the whipped cream. (adds warmth and depth)
- Heavy whipping cream – 2 cups (1 pint). Look for cream with at least 36% milk fat. Ultra-pasteurized works, but if you can find regular pasteurized cream, it whips up fluffier and tastes cleaner.
- Powdered sugar – 3 tablespoons. This dissolves more easily than granulated sugar in cold cream. It also stabilizes the whipped cream slightly.
- Pound cake or angel food cake – 1 store-bought loaf (about 10-12 ounces). Day-old cake is actually better here. It’s slightly drier and soaks up the berry juices perfectly. I’ve used both and honestly prefer pound cake for its buttery richness. (adds structure and soaks up berry syrup)
- Fresh mint leaves – Optional, for garnish. Adds a pop of color and a fresh finish that cuts through the richness.
For substitutions, you can swap the heavy cream with full-fat coconut cream if you need a dairy-free option, but the texture will be slightly denser. Use gluten-free pound cake if needed. And if berries are out of season, frozen mixed berries work well—just macerate them a little longer and drain off excess liquid before layering. I’ve done this in January when I was craving summer, and it still hit the spot.
Equipment Needed
You don’t need much for this recipe, which is part of why I love it. The trifle is forgiving and doesn’t require any special skills or gadgets. Here’s what you’ll want to have on hand:
- Large glass trifle bowl or a clear glass serving dish – A 3- to 4-quart bowl works best. The clear glass shows off the layers, which is half the fun. If you don’t have a trifle bowl, a large glass casserole dish or even a wide-mouth mason jar for individual servings works beautifully.
- Mixing bowls – You’ll need one medium bowl for the berries and one large bowl for the whipped cream. Stainless steel or glass both work. I prefer glass because it stays colder longer when you’re whipping cream.
- Electric hand mixer or stand mixer – Whipping cream by hand is totally doable, but it takes about 8-10 minutes of steady whisking. I usually use my hand mixer because it’s faster and I’m impatient. A stand mixer with the whisk attachment is great if you’re making a double batch.
- Rubber spatula – For folding the whipped cream and scraping every last bit out of the bowl. A good spatula is worth its weight in gold.
- Sharp knife and cutting board – For hulling strawberries and slicing cake into cubes. A serrated knife works best for cutting cake without crushing it.
- Measuring cups and spoons – Accuracy matters for the macerating step. Too much sugar and the berries get syrupy too fast.
If you don’t own a trifle bowl, don’t run out and buy one. A big glass mixing bowl or even a wide jar works. I’ve made individual trifles in mason jars for picnics, and they’re adorable. Budget-friendly options include thrift stores—I found my favorite trifle bowl for three dollars at a garage sale. For the mixer, any brand works. I’ve used a cheap hand mixer for years and it’s never let me down. Just make sure your bowl is cold before whipping the cream. Pop it in the freezer for 10 minutes beforehand, it makes a real difference.
Preparation Method
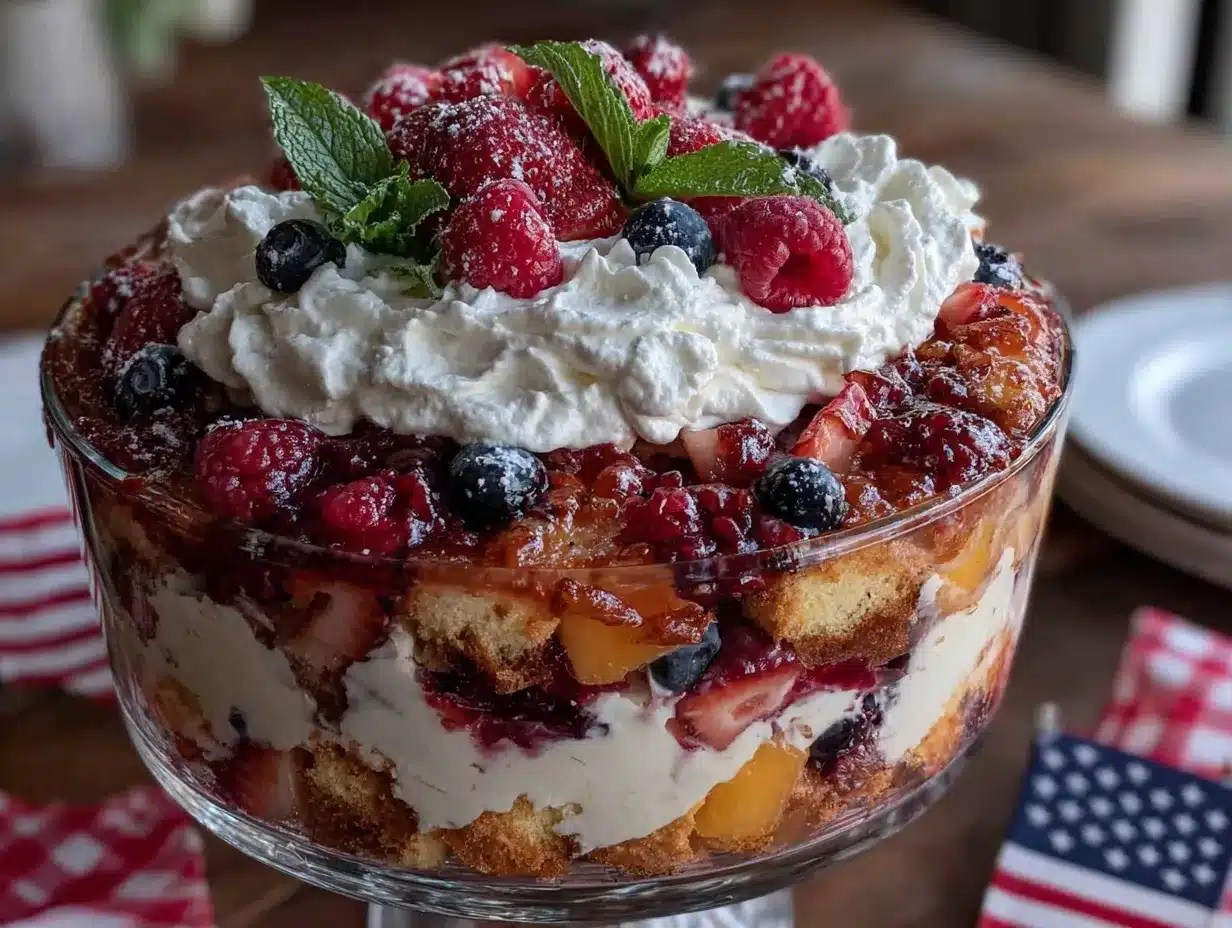
This is where the magic happens. The process is simple, but each step builds on the last to create something that feels much more complex than it is. Take your time with the berries—that step is the secret.
- Macerate the berries. In a medium mixing bowl, combine the sliced strawberries, blueberries, and raspberries. Add 2 tablespoons of granulated sugar and the fresh lemon juice. Gently toss everything together with a rubber spatula until the sugar starts to dissolve. Let the berries sit at room temperature for 15-20 minutes. You’ll see them release their juices and create a beautiful ruby syrup. This step is non-negotiable. It’s what makes the trifle taste like summer concentrated into a spoonful. (Sensory cue: the berries should look glossy and the liquid at the bottom of the bowl should be deep pink and fragrant.)
- Prepare the cake. While the berries rest, cut the pound cake or angel food cake into 1-inch cubes. Don’t worry about being too precise—rustic cubes look better in the glass anyway. If you’re using pound cake, leave the crust on. It adds texture and holds up better against the berry juice. Aim for about 4 cups of cake cubes total. Set them aside on a plate or baking sheet.
- Whip the cream. Pour the heavy whipping cream into a large chilled bowl. Add the powdered sugar and 1 teaspoon of vanilla extract. Using an electric hand mixer or stand mixer with the whisk attachment, beat the cream on medium speed until soft peaks form. This takes about 3-4 minutes. You’re looking for peaks that hold their shape but still look soft and billowy, not stiff. (Troubleshooting tip: If you overwhip the cream, it will start to look grainy and separate. Stop as soon as it holds soft peaks. If it does separate, you can try whisking in a tablespoon of cold cream by hand to bring it back, but it’s better to just start over.)
- Start layering. Spoon about one-third of the macerated berries and their juices into the bottom of your trifle bowl. Spread them evenly. The juice will pool at the bottom, which is exactly what you want. Top the berries with half of the cake cubes, pressing them down gently so they start absorbing the berry syrup. Don’t smash them, just nudge them into the juice.
- Add the cream layer. Spoon half of the whipped cream over the cake cubes. Spread it gently with your spatula, trying not to disturb the layers underneath too much. The cream should cover the cake completely. (Personal tip: I use the back of a spoon to spread the cream in a swirling motion. It looks prettier and creates little peaks that catch the light.)
- Repeat the layers. Add another third of the berries and juice on top of the cream. Then add the remaining cake cubes, pressing them down gently. Top with the remaining berries and their juice. Finish with the last of the whipped cream, spreading it evenly over the top. Leave a little border around the edge so you can see the berry layer peeking through. It looks more intentional that way.
- Garnish and chill. Garnish the top with a few reserved berries and fresh mint leaves if you’re using them. Cover the trifle loosely with plastic wrap and refrigerate for at least 2 hours, but ideally 4 hours or overnight. This resting time is crucial. It lets the flavors meld and the cake absorb the berry syrup fully. The trifle actually tastes better the next day. (Warning: Don’t skip the chilling step. If you serve it immediately, the cake will be dry and the cream won’t have set. Patience pays off here.)
That’s it. Seven steps and you’re done. The hardest part is waiting for it to chill, honestly. I’ve made this so many times that I can do it in my sleep, but even the first time, it felt easy. The layers stack up like a beautiful edible mosaic, and when you finally dig in, every spoonful has a little bit of everything.
Cooking Tips & Techniques
Over the years, I’ve learned a few things the hard way. This trifle is forgiving, but these tips will take it from good to unforgettable. Trust me, I’ve made every mistake so you don’t have to.
Macerate longer for deeper flavor. If you have time, let the berries sit for 30 minutes instead of 15. The extra time draws out more juice and intensifies the sweetness. I once forgot about my berries for almost an hour, and that trifle was the best one I’ve ever made. The syrup was almost jammy. Just don’t go past an hour, or the berries start breaking down too much and get mushy.
Keep everything cold. Cold cream whips better and holds its shape longer. Stick your mixing bowl and beaters in the freezer for 10 minutes before you start. Same goes for the trifle bowl if you have room. A cold bowl helps the cream stay fluffy while you’re layering, especially on a hot summer day when your kitchen feels like a sauna.
Don’t oversoak the cake. It’s tempting to dump all the berry juice on the cake at once, but trust the layering process. The juice from the berries in each layer is enough. If you oversoak the cake, it turns into mush and the layers collapse. You want the cake to be tender and juicy, not swimming. (I learned this one the hard way during a Fourth of July party. The trifle looked beautiful going in, but by serving time it had turned into berry soup. Still delicious, but not pretty.)
Multitask wisely. While the berries are macerating, cut the cake and chill your bowl for the cream. That 15-20 minute window is perfect for prep work. I usually wash my dishes during that time too, so there’s less mess at the end. It’s a small thing, but it makes the whole process feel smoother.
Use a serrated knife for the cake. Pound cake and angel food cake are soft and prone to squishing under a straight blade. A serrated knife cuts cleanly without crushing the crumb. Saw gently, don’t press down hard. If your cake is particularly soft, pop it in the freezer for 15 minutes before cutting. It firms up just enough to make clean cubes.
Reserve some berries for the top. Before you start layering, pull out a handful of the prettiest berries. Arrange them on top of the finished trifle along with the mint leaves. It makes the dessert look intentional and gorgeous, like something from a bakery. Presentation matters, especially when you’re bringing this to a gathering.
Variations & Adaptations
This Perfect Labor Day Berry Trifle with Whipped Cream is endlessly adaptable. I’ve played around with it more times than I can count, and every version has been delicious in its own way. Here are some of my favorites:
Seasonal fruit swap. In the summer, stick with berries. But come fall, try sliced peaches and blackberries with a splash of bourbon in the macerating liquid. In winter, use poached pears and pomegranate arils. The technique stays the same, but the flavor profile changes completely. I made a peach version last August when peaches were at their peak, and it was almost better than the original.
Dairy-free adaptation. Swap the heavy cream for full-fat coconut cream. Chill the can overnight, scoop out the solid cream, and whip it with powdered sugar and vanilla. It won’t be as fluffy as dairy cream, but it’s rich and delicious. I’ve served this to dairy-free friends and they didn’t feel like they were missing out. Just make sure to use a high-quality coconut cream with no additives.
Gluten-free option. Use a gluten-free pound cake or angel food cake. Most store-bought versions work well. I’ve also used gluten-free vanilla cake cubes from a box mix, baked and cooled. The texture is slightly different, but the flavor is still great. Just make sure the cake is sturdy enough to hold up to the berry juice.
Boozy adult version. Add 2 tablespoons of orange liqueur like Grand Marnier or a berry-flavored vodka to the macerating berries. The alcohol enhances the berry flavor and adds a subtle warmth. I’ve also used limoncello for a bright, citrusy twist. If you’re serving kids, skip this or make a separate adult-only version. (Personal note: I tried this with bourbon once, and it was surprisingly good. The smoky notes played well with the berries.)
Individual servings. Layer the trifle in mason jars or small glass cups for a portable, party-friendly option. This is perfect for picnics or barbecues where people are standing and eating. Layer each jar the same way you would the big bowl, and refrigerate for at least an hour before serving. They look adorable and everyone gets their own perfect portion.
Serving & Storage Suggestions
This trifle is best served cold, straight from the refrigerator. The layers hold together beautifully when chilled, and the cream stays fluffy. I like to let it sit out for about 10 minutes before serving to take the edge off the chill, but that’s personal preference.
For presentation, use a large serving spoon that can reach the bottom of the bowl. You want to scoop through all the layers in one clean motion. Each serving should have a little bit of everything—cake, berries, cream. Garnish the top with fresh mint leaves and a few extra berries for color. If you’re feeling fancy, a light dusting of powdered sugar over the top looks beautiful.
This trifle pairs wonderfully with a glass of chilled rosé or a light sparkling wine. For a non-alcoholic option, try a sparkling lemonade or a cold brew coffee. The acidity in the wine cuts through the richness of the cream, while the coffee provides a nice contrast to the sweetness. I’ve also served it alongside a simple sheet pan teriyaki chicken bento box for a sweet-savory combo that works surprisingly well.
Storage is straightforward. Cover the trifle bowl tightly with plastic wrap and refrigerate for up to 3 days. The flavors actually deepen overnight, so day two is often the best. The cake soaks up more juice and the cream firms up slightly. Just be aware that the berries will continue to release juice, so the layers will soften over time. It won’t look as pretty on day three, but it will still taste amazing.
For reheating, you don’t. This is a cold dessert. If you have leftovers that have been sitting out for more than 2 hours, discard them. The cream and berries don’t hold up well at room temperature. If you’re taking this to a party, keep it chilled in a cooler until serving time. I’ve made the mistake of leaving it out too long at a picnic, and the cream started to separate. Not a disaster, but not ideal.
One more thing: the trifle doesn’t freeze well. The cream will separate and the berries will turn watery when thawed. Make it fresh or enjoy leftovers within a few days. If you absolutely must freeze it, freeze the individual components separately and assemble after thawing. But honestly, it’s so easy to make that you’re better off just making a new one.
Nutritional Information & Benefits
This Perfect Labor Day Berry Trifle with Whipped Cream is a dessert, so it’s not exactly health food. But it’s made with real ingredients and has some redeeming qualities. Here’s a rough estimate per serving (based on 8 servings):
- Calories: 320
- Total Fat: 18g
- Saturated Fat: 11g
- Carbohydrates: 38g
- Sugar: 24g
- Fiber: 3g
- Protein: 4g
The berries are the real stars here nutritionally. Strawberries, blueberries, and raspberries are packed with antioxidants, vitamin C, and fiber. Blueberries are especially high in anthocyanins, which support brain health. The heavy cream provides some calcium and vitamin A, though it’s also high in saturated fat. The cake is the main source of carbs and sugar, so if you’re watching your intake, use a lighter cake like angel food cake and go easy on the portion size.
For dietary considerations, this recipe contains gluten and dairy. To make it gluten-free, use a gluten-free cake. For dairy-free, use coconut cream as mentioned above. It’s also vegetarian. If you’re looking for a lower-sugar option, reduce the sugar in the macerating step to 1 tablespoon and use a sugar-free or low-sugar cake. The berries will still release juice, just less of it.
I personally love that this dessert feels indulgent without being heavy. It’s the kind of thing you can enjoy after a big Labor Day barbecue without feeling like you need a nap. The berries add freshness and lightness that balances the richness of the cream. It’s comfort food that doesn’t weigh you down.
Conclusion
This Perfect Labor Day Berry Trifle with Whipped Cream is the dessert that summer deserves. It’s simple, beautiful, and tastes like the season itself. No stress, no complicated techniques, just layers of flavor that come together in under 30 minutes. Whether you’re hosting a big barbecue or just want something special for a quiet evening, this trifle delivers every single time.
I love this recipe because it reminds me that the best desserts don’t have to be hard. They just have to be made with care and good ingredients. The berries do most of the work here, and the cream and cake are just supporting players. It’s a team effort that tastes like a celebration.
So go ahead and make this for your Labor Day gathering. Customize it with whatever fruit looks best at the market, or keep it classic with berries. Add a splash of something boozy if that’s your style, or keep it family-friendly. The recipe is yours to play with. And when you take that first spoonful and see the layers come together, you’ll know exactly why this one stuck.
I’d love to hear how yours turns out. Drop a comment below and let me know what variations you tried, or tag me in your photos if you share them online. Did you use peaches instead of berries? Add a little bourbon? Make individual jars for a picnic? Tell me everything. And if you’re looking for more easy, crowd-pleasing desserts, check out my brown butter peach cobbler or these brown butter pumpkin chocolate chip cookies for when fall rolls around. Happy Labor Day, friends. Make it sweet.
Frequently Asked Questions
Can I make this trifle a day ahead?
Absolutely. In fact, I recommend it. Making the trifle a day ahead gives the flavors time to meld and the cake to absorb the berry syrup fully. Just cover it tightly with plastic wrap and refrigerate. The texture will be even better the next day. I’ve made this for countless gatherings, and the day-old version always gets more compliments.
Can I use frozen berries instead of fresh?
Yes, but with a caveat. Frozen berries release more liquid when they thaw, so you’ll need to drain off some of the excess juice before layering. Thaw the berries completely in a colander set over a bowl, then proceed with the macerating step. The flavor will still be great, especially in winter when fresh berries aren’t at their peak. Just expect a slightly softer texture.
What if I don’t have a trifle bowl?
No problem at all. Use a large glass mixing bowl, a casserole dish, or even individual mason jars. The key is using clear glass so you can see the layers. I’ve made this in a 9×13 baking dish before, and it worked perfectly. The layers are just horizontal instead of vertical. It’s still beautiful and delicious.
How long will leftovers last in the fridge?
Leftovers will keep for up to 3 days in the refrigerator if covered tightly. The texture will soften over time as the cake continues to absorb the berry juice, but the flavor will deepen. I actually prefer the trifle on day two. After day three, the cream may start to separate and the berries will be quite soft, so try to finish it by then.
Can I use store-bought whipped cream instead of making my own?
You can, but I really don’t recommend it. Homemade whipped cream is so much better in texture and flavor. It’s fluffier, less sweet, and doesn’t have any stabilizers or preservatives. Store-bought whipped cream tends to deflate quickly and can make the trifle feel heavy. Making your own takes less than 5 minutes and makes a noticeable difference. Trust me on this one.
Pin This Recipe!

Perfect Labor Day Berry Trifle Easy Dessert Recipe

A no-bake, layered dessert featuring ripe berries, soft cake, and fluffy whipped cream. Perfect for Labor Day gatherings, this easy trifle comes together in under 30 minutes and tastes like summer.
- Prep Time: 20 minutes
- Cook Time: 0 minutes
- Total Time: 2 hours 20 minutes (includes chilling)
- Yield: 8 servings 1x
- Category: Dessert
- Cuisine: American
Ingredients
- 1 pound fresh strawberries, hulled and sliced
- 6 ounces fresh blueberries (about 1 cup)
- 6 ounces fresh raspberries (about 1 cup)
- ¼ cup granulated sugar, divided
- 2 tablespoons fresh lemon juice
- 2 teaspoons vanilla extract, divided
- 2 cups heavy whipping cream (1 pint)
- 3 tablespoons powdered sugar
- 1 store-bought pound cake or angel food cake loaf (about 10–12 ounces)
- Fresh mint leaves for garnish (optional)
Instructions
- Macerate the berries: In a medium mixing bowl, combine sliced strawberries, blueberries, and raspberries. Add 2 tablespoons granulated sugar and fresh lemon juice. Gently toss with a rubber spatula until sugar starts to dissolve. Let sit at room temperature for 15-20 minutes until berries release their juices.
- Prepare the cake: While berries rest, cut pound cake or angel food cake into 1-inch cubes (about 4 cups). Set aside.
- Whip the cream: Pour heavy whipping cream into a large chilled bowl. Add powdered sugar and 1 teaspoon vanilla extract. Beat with an electric hand mixer or stand mixer on medium speed until soft peaks form, about 3-4 minutes.
- Start layering: Spoon about one-third of the macerated berries and their juices into the bottom of a trifle bowl. Top with half of the cake cubes, pressing down gently.
- Add the cream layer: Spoon half of the whipped cream over the cake cubes. Spread gently with a spatula.
- Repeat layers: Add another third of the berries and juice, then remaining cake cubes, pressing gently. Top with remaining berries and juice. Finish with remaining whipped cream, spreading evenly. Leave a small border to show berry layer.
- Garnish and chill: Garnish with reserved berries and mint leaves if using. Cover loosely with plastic wrap and refrigerate for at least 2 hours, ideally 4 hours or overnight.
Notes
Macerate berries longer (up to 30 minutes) for deeper flavor. Keep everything cold for best whipped cream results. Don’t oversoak the cake; trust the layering process. Reserve some berries for top garnish. Trifle tastes even better the next day. Does not freeze well.
Nutrition
- Serving Size: 1 serving
- Calories: 320
- Sugar: 24
- Fat: 18
- Saturated Fat: 11
- Carbohydrates: 38
- Fiber: 3
- Protein: 4
Keywords: berry trifle, labor day dessert, no-bake dessert, summer dessert, easy trifle recipe, berry dessert, whipped cream trifle