“Watch out for the witch’s fingers!” my niece joked as she grabbed one of the pretzel rods from the Halloween spread. Honestly, I wasn’t sure if these “Spooky Crispy Witch Finger Pretzel Rods with White Chocolate” would be more creepy or just a fun snack. The first time I made them, it was late at night, and I only intended to whip up a quick treat for a last-minute gathering. I never expected these eerie delights to steal the show.
The crackle of the pretzel, the sweetness of white chocolate, and the little almond ‘nails’ gave a perfect mix of texture and spooky charm. I remember carefully scoring each pretzel, trying to get that gnarled finger look just right. It took some trial and error—some fingers looked more like twigs than digits—but once I got the hang of it, I couldn’t stop making them. By the end of that week, several friends had asked for the recipe, and honestly, it always makes me smile to see grown-ups and kids alike reaching for these creepy, crunchy treats.
There’s something about crafting these witch finger pretzel rods that turns a simple snack into a seasonal ritual. Maybe it’s the way the white chocolate hardens with a slight sheen or how the almonds peek out like tiny, spooky fingernails. Whatever it is, this recipe stuck with me because it brings a bit of fun and unexpected delight to Halloween parties and cozy nights alike. It’s not just about the look—it’s a trust that each bite will be just as satisfying as you hoped.
Why You’ll Love This Recipe
After making these Spooky Crispy Witch Finger Pretzel Rods with White Chocolate multiple times (sometimes more than once a week during October), I’m convinced this recipe is a must-have for your Halloween toolkit. Here’s why it stands out:
- Quick & Easy: You can have these creepy treats ready in under 30 minutes, perfect for those last-minute party preps or when you suddenly crave something spooky.
- Simple Ingredients: No need for specialty shops—most ingredients are pantry staples, and the pretzels themselves are easy to find at any grocery store.
- Perfect for Halloween Parties: These witch finger pretzel rods bring a fun, eerie vibe that’s both kid-friendly and a little cheeky for adults.
- Crowd-Pleaser: Whether you’re feeding a classroom or a casual get-together, these treats always get rave reviews for their crunch and sweetness combo.
- Unbelievably Delicious: The contrast between the salty pretzel and the creamy white chocolate coating is just next-level comfort food for this spooky season.
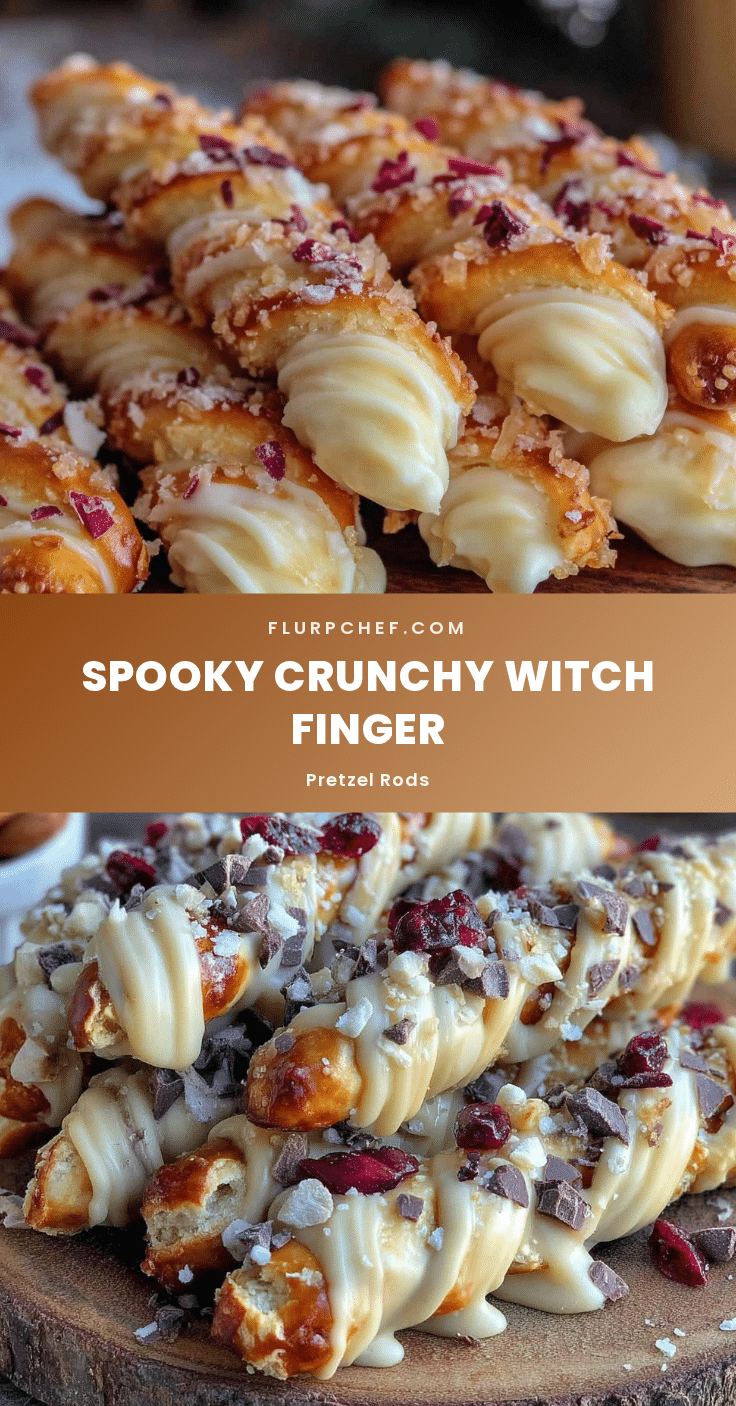
What really sets this recipe apart is the little details—the scoring that makes the pretzels look like gnarled fingers, the sliced almonds as nails, and the drizzle of melted white chocolate that adds a ghostly sheen. This isn’t just a white chocolate pretzel rod; it’s a playful, hands-on craft that turns snack time into a mini event. I’ve also found that tweaking the chocolate thickness or using colored candy melts can add an extra pop, but the classic white chocolate version remains my favorite.
Honestly, these witch finger pretzel rods are the kind of treat that makes you pause and smile, whether you’re handing them out at a party or sneaking a few late at night. It’s a little spooky, a lot crunchy, and totally fun.
What Ingredients You Will Need
This recipe uses simple, wholesome ingredients to pull off a bold, spooky look and satisfying texture without much fuss. Most of these are pantry staples, and you can easily swap a few based on what you have on hand.
- Pretzel rods: Classic crunchy rods, about 4.5 to 5 inches long. I prefer Rold Gold for their perfect thickness and sturdy crunch.
- White chocolate chips or melting wafers: About 12 ounces (340 grams). Choose good-quality white chocolate for a smooth melt—Ghirardelli or Wilton candy melts work well.
- Sliced almonds: Whole or slivered, these act as the witch’s nails. Toast lightly if you want extra crunch and flavor.
- Red food coloring gel (optional): For a bloody touch around the “nails” or fingertips.
- Vegetable oil or coconut oil (optional): A tablespoon to thin the white chocolate if it feels too thick to coat smoothly.
- Black edible marker (optional): If you want to add extra lines or details on the fingers for a more realistic look.
If you want to make a gluten-free version, swap the pretzel rods for gluten-free pretzels—you can find these easily nowadays. For a dairy-free spin, use vegan white chocolate chips or candy melts. And if you’re feeling adventurous, you can try swapping almonds for pumpkin seeds for a different nail texture.
Equipment Needed
- Baking sheet: For laying out pretzel rods while the chocolate sets. I like using one lined with parchment paper to avoid sticking.
- Microwave-safe bowl or double boiler: To gently melt the white chocolate without burning it. I’ve had better results with a double boiler, but a microwave at 20-second intervals works fine.
- Small knife or toothpick: For scoring the pretzels to create the finger joint indentations. A sharp paring knife works best.
- Tweezers or small tongs (optional): Handy for placing the almond “nails” precisely.
- Cooling rack: Useful if you want to avoid the pretzels sticking to a surface after coating.
If you don’t have a double boiler, you can easily improvise by placing a heatproof bowl over a pot of simmering water. Also, having a small paintbrush or disposable brush can help if you want to add red food coloring for blood effects subtly. For a budget-friendly option, parchment paper and a microwave-safe bowl will get you through just fine.
Preparation Method

- Score the Pretzels: Using a small sharp knife, gently carve shallow lines across each pretzel rod about an inch apart to mimic finger joints. Don’t press too hard or you might break the pretzel. These lines give the creepy “knuckle” effect. (About 10 minutes)
- Melt the White Chocolate: Place white chocolate chips or melting wafers in a microwave-safe bowl. Heat on medium power for 20 seconds, stir, then repeat until smooth. If it’s too thick, stir in 1 tablespoon of vegetable or coconut oil to thin it out. (5 minutes)
- Dip Pretzels in White Chocolate: Holding the pretzel rod by one end, dip it into the melted white chocolate, swirling to coat evenly up to about ¾ of the length. Let excess chocolate drip off. (15 minutes)
- Place Almond “Nails”: Before the chocolate hardens, press a sliced almond onto the tip of each pretzel rod to resemble a fingernail. Adjust placement quickly as chocolate sets fast. (5 minutes)
- Add Red “Blood” Detail (Optional): Using a small brush or toothpick, dab a little red food coloring gel around the almond nails or along the “knuckles” for a spooky blood effect. Let dry. (10 minutes)
- Set the Pretzels: Lay the dipped pretzels on parchment paper or a cooling rack. Allow chocolate to harden completely at room temperature or place in the fridge for 10 minutes to speed up. (15-20 minutes)
- Optional Finishing Touches: Use a black edible marker to draw tiny wrinkles or cracks on the fingers for added realism. Let dry before serving. (5 minutes)
One tip I learned the hard way: don’t wait too long to press the almond nails in, or the chocolate gets too firm and they won’t stick well. Also, if any pretzel breaks while scoring, keep it for dipping—broken pieces still taste great and can be fun to snack on!
Cooking Tips & Techniques
Making these witch finger pretzel rods requires a bit of patience, but it’s mostly fun. Here are some tips to keep your process smooth:
- Chocolate Melting: Avoid overheating the white chocolate—burnt chocolate tastes bitter and looks grainy. Stir frequently and use gentle heat.
- Scoring Technique: Use light pressure with a sharp knife rather than forcing deep cuts. Pretzels are fragile and can snap easily.
- Almond Placement: Work quickly when adding almonds, as the chocolate will start to set within minutes. If you feel rushed, melt a little extra chocolate to “glue” almonds back on if needed.
- Coating Thickness: Too thin a chocolate layer won’t give the right look or crunch, but too thick can be messy and take longer to dry. Aim for a smooth, even coat that looks ghostly white and shiny.
- Storage: Keep pretzels in an airtight container at room temperature to maintain crispness. Refrigeration can cause condensation and soften the crunch.
One time, I tried coating the pretzels in colored candy melts instead of white chocolate. It looked cool but the flavor was a little too sweet for my taste. Sticking with classic white chocolate keeps the balance just right—salty, sweet, and spooky.
Variations & Adaptations
This recipe is flexible and can be adapted to fit your Halloween vibe or dietary needs.
- Chocolate Type: Swap white chocolate for dark or milk chocolate for a different flavor profile. Dark chocolate gives a richer taste and a more sinister look.
- Colorful Candy Coating: Use green or purple candy melts for a witchy twist. Adding edible glitter or colored sugar sprinkles can also boost the festive effect.
- Nut-Free Version: Replace almonds with small pieces of dried fruit or candy buttons as “nails” for those with nut allergies.
- Gluten-Free Option: Use gluten-free pretzel rods, which are widely available and keep the same crunch and shape.
- Spicy Touch: Add a pinch of cayenne powder to the melted chocolate for a sneaky spicy kick that surprises some guests.
Personally, I once tried adding a thin drizzle of melted dark chocolate over the white coating for contrast, and it looked impressively spooky while adding depth to the flavor.
Serving & Storage Suggestions
These witch finger pretzel rods are best served at room temperature so the chocolate is firm but not cold and hard. Arrange them on a platter with some fake spider webs or Halloween-themed napkins for a fun party display.
They pair surprisingly well with warm drinks like hot apple cider or a spiced pumpkin latte, making the snack a cozy addition to chilly October evenings. For a savory-sweet combo, consider serving alongside a batch of honey mustard glazed chicken breast bites or some simple cheese cubes.
Store leftovers in an airtight container at room temperature; they’ll stay crisp for up to 3 days. Avoid refrigeration if you want to keep that fresh crunch. To refresh slightly softened pretzels, a quick 5-minute bake at 300°F (150°C) can help crisp them back up without melting the chocolate.
Flavors tend to meld a bit over time, so letting them sit overnight can actually deepen the taste, making them even yummier the next day.
Nutritional Information & Benefits
Each Spooky Crispy Witch Finger Pretzel Rod roughly contains about 150-180 calories depending on chocolate amount, with a good balance of sweet and salty. The pretzels provide carbohydrates and a satisfying crunch, while the white chocolate adds fat and sweetness.
Almonds bring a touch of protein and healthy fats, plus a little vitamin E and fiber. If you choose gluten-free pretzels, this snack can fit gluten-sensitive diets easily.
While these are definitely a treat (let’s be honest), they’re made with simple ingredients and no artificial fillers, so you can feel good sharing them. Plus, the portion control of individual rods helps keep indulgence in check.
Conclusion
These Spooky Crispy Witch Finger Pretzel Rods with White Chocolate are more than just a Halloween snack—they’re a little project, a conversation starter, and a sweet crunch of seasonal fun. Whether you’re crafting them with kids or whipping up a quick treat for friends, they bring a playful spirit to your table that’s hard to beat.
Feel free to tweak the details, add your own spooky touches, or pair them with other favorites like cozy cheesy casseroles or crispy cheeseburger pie for a full festive feast. I love how this recipe brings a little joy and creativity to the kitchen without fuss, and I hope it becomes a fun tradition in your home too.
Don’t be shy—drop a comment below with your own spooky twists or questions. Happy haunting and happy snacking!
FAQs
- Can I make these witch finger pretzel rods ahead of time?
Yes, you can prepare them a day or two in advance and store in an airtight container at room temperature. Just avoid refrigeration to keep them crispy. - What can I use instead of almonds for the fingernails?
You can use pumpkin seeds, candy buttons, or even small pieces of colored candy to mimic nails if you have nut allergies. - How do I prevent white chocolate from seizing while melting?
Melt slowly over low heat or in short microwave bursts, stirring frequently. Adding a small amount of oil can help keep it smooth. - Can I decorate the pretzels with colored candy melts instead of white chocolate?
Absolutely! Colored candy melts add fun variety, but white chocolate gives the classic spooky look and balanced flavor. - Are these pretzel rods gluten-free?
Traditional pretzel rods contain gluten, so swap in certified gluten-free pretzels to make the recipe safe for gluten-sensitive eaters.
Pin This Recipe!
Spooky Crispy Witch Finger Pretzel Rods

These witch finger pretzel rods coated in white chocolate with almond ‘nails’ are a fun, crunchy, and spooky Halloween treat perfect for parties and cozy nights.
- Prep Time: 10 minutes
- Cook Time: 30 minutes
- Total Time: 40 minutes
- Yield: 12 servings 1x
- Category: Snack
- Cuisine: American
Ingredients
- Pretzel rods (4.5 to 5 inches long)
- 12 ounces white chocolate chips or melting wafers
- Sliced almonds (whole or slivered)
- Red food coloring gel (optional)
- 1 tablespoon vegetable oil or coconut oil (optional)
- Black edible marker (optional)
Instructions
- Score the pretzels: Using a small sharp knife, gently carve shallow lines across each pretzel rod about an inch apart to mimic finger joints. Be careful not to break the pretzel. (About 10 minutes)
- Melt the white chocolate: Place white chocolate chips or melting wafers in a microwave-safe bowl. Heat on medium power for 20 seconds, stir, then repeat until smooth. If too thick, stir in 1 tablespoon of vegetable or coconut oil to thin it out. (5 minutes)
- Dip pretzels in white chocolate: Holding the pretzel rod by one end, dip it into the melted white chocolate, swirling to coat evenly up to about ¾ of the length. Let excess chocolate drip off. (15 minutes)
- Place almond ‘nails’: Before the chocolate hardens, press a sliced almond onto the tip of each pretzel rod to resemble a fingernail. Adjust placement quickly as chocolate sets fast. (5 minutes)
- Add red ‘blood’ detail (optional): Using a small brush or toothpick, dab a little red food coloring gel around the almond nails or along the ‘knuckles’ for a spooky blood effect. Let dry. (10 minutes)
- Set the pretzels: Lay the dipped pretzels on parchment paper or a cooling rack. Allow chocolate to harden completely at room temperature or place in the fridge for 10 minutes to speed up. (15-20 minutes)
- Optional finishing touches: Use a black edible marker to draw tiny wrinkles or cracks on the fingers for added realism. Let dry before serving. (5 minutes)
Notes
Do not press too hard when scoring pretzels to avoid breaking. Work quickly when placing almonds as chocolate sets fast. Avoid overheating white chocolate to prevent bitterness. Store pretzels in an airtight container at room temperature to maintain crispness. Refrigeration can soften the crunch. To refresh softened pretzels, bake at 300°F for 5 minutes.
Nutrition
- Serving Size: 1 pretzel rod
- Calories: 165
- Sugar: 12
- Sodium: 210
- Fat: 9
- Saturated Fat: 5
- Carbohydrates: 20
- Fiber: 1
- Protein: 2
Keywords: Halloween treats, witch finger pretzels, white chocolate pretzels, spooky snacks, easy Halloween recipe, almond nails, party snacks


