Last October, I was standing in the checkout line at our local grocery store, and the woman behind me had a cart overflowing with bags of individually wrapped candy. My own cart had a bunch of bananas, a few mangoes, and a bag of clementines. She glanced at my groceries, then back at her candy mountain, and let out a little laugh. “You’re that mom, aren’t you?” she said, but her voice was warm, not judgmental. “I tried the fruit platter thing one year. My kids looked at me like I’d lost my mind.” I laughed with her, because honestly, I’d been there. I told her about the first time I made a monster fruit tray for my nephew’s school party. I’d spent an hour carefully arranging kiwi slices to look like scales, only to watch him grab a handful of gummy worms off someone else’s plate instead. It was a total flop.
But here’s the thing—I didn’t give up. I tweaked it. I watched what actually got eaten at those parties (hint: it was always the fruit that looked like something fun). And slowly, I figured out the secret. The monster faces couldn’t be too realistic. They needed to be cute, almost silly. The fruit had to be sweet and ripe, the kind you’d actually want to eat. And most importantly, it had to be easy enough that you could throw it together on a Tuesday night when you’re already exhausted from helping with costume emergencies. That’s how this Wholesome Halloween Fruit Tray with Monster Faces was born. It’s the recipe that finally got my nephew to reach for a strawberry instead of a sugar packet. And honestly? It made me feel like I’d cracked some kind of parenting code.
Maybe you’ve been there too—standing in the aisle, trying to decide if you can get away with bringing something healthy to the Halloween potluck. Or maybe you just want a snack that feels festive without the sugar crash. Either way, this tray is for you. It’s proof that Halloween can be fun and a little bit good for you at the same time.
Why You’ll Love This Recipe
Let me tell you why this tray has become my go-to for every Halloween gathering, from classroom parties to family movie nights. I’ve tested it on picky kids, skeptical adults, and even a few self-proclaimed “fruit haters.” The results? Empty platters and requests for the recipe. Here’s what makes it special:
- Quick & Easy: You can put this together in under 20 minutes. No baking, no complicated steps, just chopping and arranging.
- Simple Ingredients: Everything comes from the produce section. No specialty stores, no weird health-food aisle finds.
- Perfect for Halloween Parties: It’s a hit at school events, office potlucks, and neighborhood gatherings. Kids love the monster faces, and adults appreciate having a healthy option.
- Crowd-Pleaser: I’ve watched kids who “don’t like fruit” go back for thirds. The presentation makes all the difference.
- Unbelievably Delicious: When you use ripe, seasonal fruit, the natural sweetness is incredible. The yogurt dip adds a creamy tang that ties everything together.
What sets this apart from other fruit trays is the monster face design. Instead of just throwing fruit on a plate, you’re creating little characters. Each monster has a personality—some are grumpy, some are silly, all of them are edible. I’ve tested different fruit combinations to find what holds up best, and I’ve learned a few tricks along the way. For instance, apple slices need a quick lemon juice bath to keep from browning. And banana rounds are best added right before serving.
This recipe isn’t just good—it’s the kind that makes you smile when you set it on the table. It’s Halloween fun without the guilt, and that’s a win in my book.
What Ingredients You Will Need
This recipe uses simple, wholesome ingredients that you can find at any grocery store. The key is choosing fruit that’s ripe but still firm enough to hold its shape when cut. Here’s what you’ll need:
For the Monster Faces
- 1 large honeydew melon (or cantaloupe) – This forms the base of your monsters. Look for one that’s heavy for its size and has a slight give at the stem end.
- 2 large mangoes – The bright orange color makes perfect monster mouths. Use ripe but firm mangoes so they slice cleanly.
- 1 pint of strawberries – These become monster eyes and noses. Choose berries that are bright red and fragrant.
- 2 kiwis – The green color adds variety. Peel them before slicing into rounds or half-moons.
- 1 bunch of green grapes – Use these for hair, ears, or little monster horns. Seedless grapes work best.
- 1 pint of blueberries – Perfect for small details like pupils or freckles.
- 2 bananas – Slice into rounds for eyes or use whole for a different monster shape. Add lemon juice to prevent browning.
- 1 apple (any variety) – Cut into wedges or thin slices for monster teeth or arms. Toss with lemon juice to keep them from browning.
- 1 pomegranate (optional) – The seeds look like little monster spots or blood drips. Great for a spooky touch.
For the Yogurt Dip
- 2 cups plain Greek yogurt (I prefer Fage or Stonyfield for thickness)
- 2 tablespoons honey (or maple syrup for a vegan option)
- 1 teaspoon vanilla extract
- Optional: Orange or green food coloring (natural options work great) – Just a drop to make the dip festive.
For Assembly
- Wooden skewers (optional) – For making fruit pops or securing monster features.
- Small cookie cutters (star, circle, or bone shapes) – These help create consistent shapes for monster features.
I recommend using organic fruit when possible, especially for the strawberries and apples since you’ll be eating the skins. But honestly, conventional works fine too. Just give everything a good wash before you start.
Equipment Needed
You don’t need any fancy gadgets for this recipe. Here’s what I use:
- Large serving platter or cutting board – A white platter makes the colors pop. I use a 16-inch round wooden board for a rustic look.
- Sharp chef’s knife – A good knife makes all the difference when cutting melon and mango. I use my 8-inch Wusthof.
- Small cookie cutters – Star, circle, and bone shapes are perfect for creating consistent monster features. Wilton makes a great Halloween set.
- Melon baller – Not essential, but it creates nice round shapes for monster eyes. A teaspoon works in a pinch.
- Cutting board – Use one for fruit prep and another for assembly to keep things clean.
- Small bowls – For holding the yogurt dip and any extra fruit pieces.
- Toothpicks – Great for securing small fruit pieces to the monsters. Just warn kids about them.
If you don’t have cookie cutters, you can freehand the shapes with a paring knife. It takes a little more time, but the imperfections add character. I’ve also used the top of a small drinking glass to cut out circle shapes—works like a charm.
Preparation Method
Making this fruit tray is more about assembly than actual cooking. The key is to prep all your fruit first, then arrange everything at once. Here’s how I do it:
- Prep the melon base: Cut your honeydew or cantaloupe in half and scoop out the seeds. Slice each half into 1-inch thick half-moons. You want pieces that are wide enough to serve as a monster body. Set aside on a paper towel to absorb excess moisture.
- Cut the mango: Slice off the cheeks of each mango, avoiding the flat pit in the center. Score the flesh in a crosshatch pattern, then scoop out the cubes with a spoon. For monster mouths, cut some slices into wide strips. Set aside.
- Prepare the strawberries: Hull the strawberries and slice them in half lengthwise. For monster eyes, leave some whole. For noses, cut off the tip of a strawberry to create a triangle shape.
- Slice the kiwis: Peel the kiwis with a vegetable peeler or paring knife. Slice into 1/4-inch rounds. Use a small circle cookie cutter to create even shapes, or just leave them as rounds.
- Cut the apple: Core the apple and slice into thin wedges. Toss immediately with lemon juice to prevent browning. For monster teeth, cut some wedges into small triangle shapes.
- Prepare the bananas: Slice bananas into 1/2-inch rounds. Toss with lemon juice if you’re not serving immediately. I usually add these last to keep them fresh.
- Make the yogurt dip: In a small bowl, whisk together the Greek yogurt, honey, and vanilla extract. If using food coloring, add a drop at a time until you reach your desired color. Transfer to a small serving bowl.
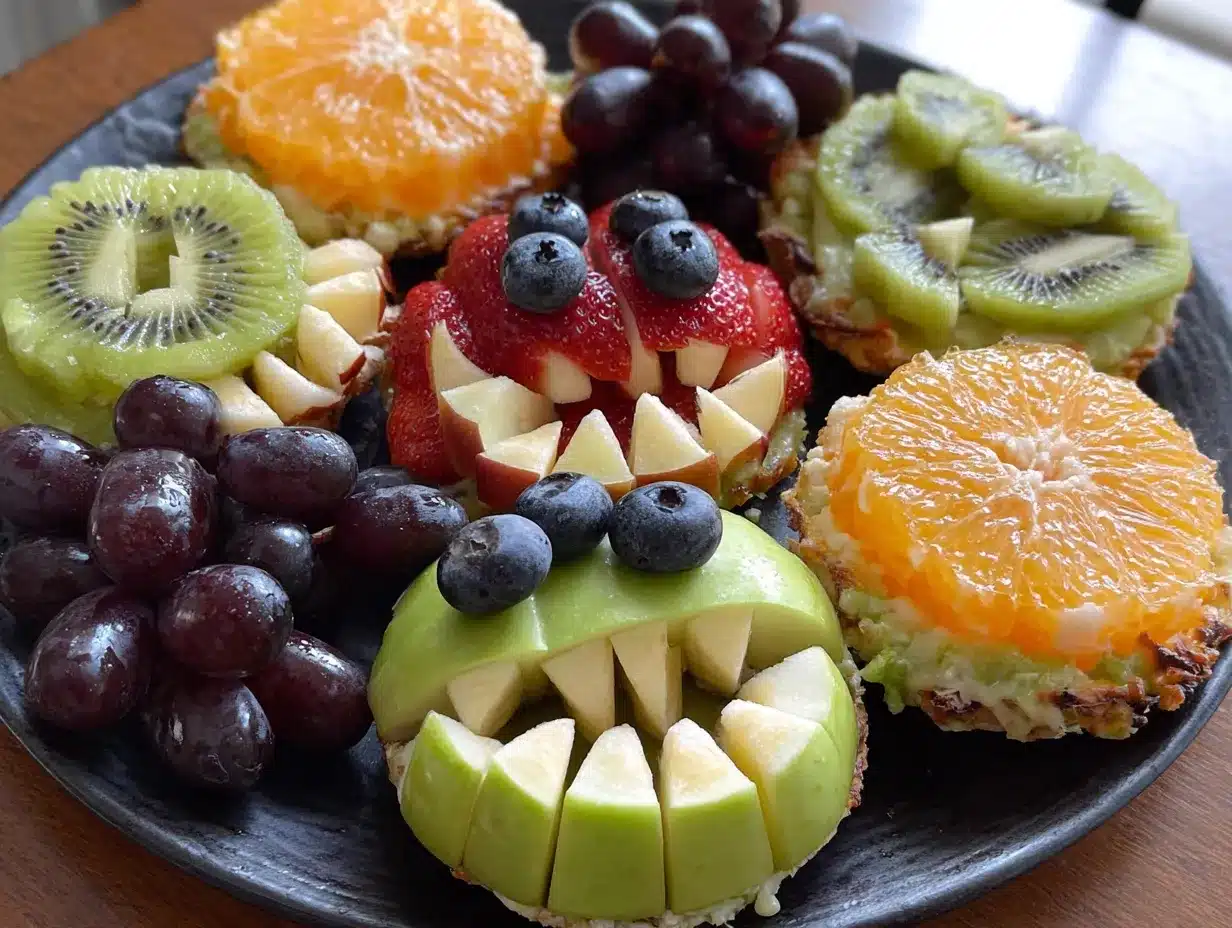
- Assemble the monsters: Place your melon half-moons on the platter, leaving space between each one. These are your monster bodies. Now start adding features:
- Eyes: Use banana rounds or kiwi slices. Add a blueberry in the center for the pupil.
- Mouths: Arrange mango strips in a zigzag or wide smile. Use apple triangles for teeth.
- Noses: Place a strawberry tip or a grape in the center of the face.
- Hair: Use green grapes or kiwi slices arranged in a spiky pattern on top.
- Arms: Add apple wedges or banana rounds on the sides.
Use toothpicks to secure any pieces that won’t stay put. Just remember to remove them before serving.
- Add the finishing touches: Scatter blueberries and pomegranate seeds around the platter. Place the yogurt dip bowl in the center or off to one side. If you’re using skewers, thread alternating fruit pieces onto them and arrange around the monsters.
- Serve immediately or refrigerate: This tray is best served within an hour of assembly. If you need to make it ahead, prep all the fruit and store it separately in airtight containers. Assemble right before serving.
A quick note: Don’t stress about making every monster look perfect. The charm of this tray is in the imperfections. One of my monsters ended up with three eyes and a sideways mouth, and my nephew declared it his favorite. Kids don’t care about symmetry—they care about fun.
Cooking Tips & Techniques
Over the years, I’ve learned a few tricks that make this process smoother. Let me share them with you:
Keep fruit from browning: This is the biggest challenge with any fruit tray. For apples and bananas, toss them in a mixture of 1 tablespoon lemon juice and 1 cup water. Let them sit for 2 minutes, then drain. This buys you a few extra hours of freshness.
Choose the right melon: A ripe honeydew should have a creamy yellow color, not green. Give it a gentle press near the stem—it should give slightly. I’ve made the mistake of buying underripe melon, and the monsters ended up tasting like water. Not good.
Cut fruit in advance: You can prep all the fruit the night before. Store each type in a separate airtight container in the fridge. Add the lemon juice treatment to apples and bananas right before assembly. This saves a ton of time on party day.
Use a damp paper towel: Place a slightly damp paper towel under the melon pieces to keep them from sliding around on the platter. This is especially helpful if you’re transporting the tray somewhere.
Make extra dip: The yogurt dip is always the first thing to disappear. I double the recipe every time. It’s also great with granola the next morning, so leftovers aren’t a problem.
Don’t overcomplicate the faces: I once tried to make a monster with 3D features using carved melon balls. It collapsed within 10 minutes. Stick to flat arrangements—they hold up better and are easier to eat.
Variations & Adaptations
One of the best things about this recipe is how flexible it is. Here are some ways to change it up:
Dietary Adaptations: For a vegan version, use coconut yogurt instead of Greek yogurt and maple syrup instead of honey. For a nut-free option (if you’re serving at a school), just skip any nut-based garnishes. This recipe is naturally gluten-free.
Seasonal Swaps: In fall, use apples and pears as the base instead of melon. In summer, add watermelon and stone fruits like peaches or plums. The monster faces work with any fruit that holds its shape when cut.
Different Monster Styles: Try making “zombie” monsters using green grapes for skin and red fruit for brains. Or “alien” monsters using star-shaped cookie cutters for eyes. For a less scary version, use smiley face arrangements instead of monsters.
Dip Variations: Swap the yogurt dip for a chocolate hummus (store-bought or homemade) for a richer treat. Or make a peanut butter dip by mixing peanut butter with a little honey and yogurt. Just check for allergies first.
Individual Servings: Instead of one large tray, make individual monster cups. Use small clear cups, add a melon ball base, and arrange fruit features on top. These are perfect for classroom parties or trick-or-treat alternatives.
I once made a “Frankenstein” version using green apple slices for the face and blueberry bolts on the neck. It was a hit at my niece’s Halloween party. The best part? The kids ate every single piece.
Serving & Storage Suggestions
This tray is best served chilled, right after assembly. The contrast between the cold fruit and the creamy dip is part of the magic. Here’s how to make the most of it:
Serving Temperature: Keep the fruit cold but not ice-cold. If you’ve refrigerated the platter, let it sit at room temperature for 10 minutes before serving. This brings out the fruit’s natural sweetness.
Presentation Ideas: Arrange the monsters in a circle around the dip bowl, like they’re all reaching for it. Or create a “monster graveyard” with the monsters peeking out from behind small cookie tombstones (use rectangular cookies or crackers).
Complementary Dishes: This tray pairs beautifully with other Halloween snacks. Try it alongside roasted pumpkin seeds, veggie skeletons (cucumber slices with cream cheese faces), or mummy hot dogs wrapped in crescent dough.
Storage Instructions: Leftover fruit (if there is any) can be stored in an airtight container in the fridge for up to 2 days. The yogurt dip keeps for 3-4 days. Don’t freeze the assembled tray—the fruit will turn mushy when thawed.
Reheating: You don’t need to reheat anything. But if the dip has been refrigerated, give it a good stir before serving again. You might need to add a splash of milk to thin it out.
Flavor Development: The fruit doesn’t really “develop” flavors like a stew would, but the dip gets better after a few hours in the fridge. The honey and vanilla meld together beautifully. I actually prefer making the dip a day ahead.
Nutritional Information & Benefits
This fruit tray is packed with goodness. Here’s a rough estimate per serving (about 1 cup of fruit with 2 tablespoons of dip):
- Calories: 150-180
- Protein: 8-10g (from the yogurt)
- Fiber: 3-5g
- Sugar: 18-22g (natural from fruit)
- Vitamin C: 60% of daily value
- Calcium: 15% of daily value
The fruit provides a wide range of vitamins and antioxidants. Honeydew is rich in vitamin C and potassium. Mangoes are packed with vitamin A for eye health. Berries are loaded with antioxidants that support your immune system. The Greek yogurt adds protein and probiotics for gut health.
This tray is naturally gluten-free, dairy-free if you use a plant-based yogurt, and can be made nut-free easily. The only potential allergen is dairy in the yogurt dip. If you’re serving at a school event, check for allergies and offer a dairy-free option.
I love that this recipe lets me feel good about what I’m serving. It’s Halloween fun without the sugar coma, and that’s a win for everyone.
Conclusion
This Wholesome Halloween Fruit Tray with Monster Faces is more than just a snack—it’s a conversation starter, a memory maker, and a way to keep the Halloween spirit alive without the sugar rush. I’ve made it for parties, school events, and even just for a fun Friday night movie at home. Every single time, it brings smiles.
The best part? You can make it your own. Swap in your favorite fruits, create new monster designs, experiment with different dips. This recipe is a template, not a rulebook. I’ve seen versions with dragon fruit scales, star fruit eyes, and even a monster made entirely out of purple grapes. The possibilities are endless.
So go ahead—give it a try. Grab some fruit, get creative, and watch the faces light up when you set this tray on the table. And if you come up with a monster design that’s particularly brilliant, I’d love to hear about it. Drop a comment below or tag me in your photos. Happy Halloween, and happy snacking!
Frequently Asked Questions
How far in advance can I make this fruit tray?
You can prep all the fruit up to 24 hours in advance. Store each type in separate airtight containers in the fridge. Add the lemon juice treatment to apples and bananas. Assemble the tray no more than 2 hours before serving for the best appearance.
Can I use frozen fruit for this recipe?
I don’t recommend it. Frozen fruit releases water as it thaws, which will make the tray soggy and mess up your monster designs. Stick with fresh fruit for the best results.
How do I keep the banana slices from turning brown?
Toss them in a mixture of 1 tablespoon lemon juice and 1 cup water. Let them sit for 2 minutes, then drain well. You can also use pineapple juice or lime juice for the same effect. Add the bananas to the tray right before serving for the freshest look.
What if I don’t have cookie cutters for the shapes?
No problem! Use a paring knife to freehand the shapes. You can also use the top of a small drinking glass to cut circles, or just leave the fruit in natural shapes. The monsters will still look great.
Is this recipe safe for school parties with nut allergies?
Yes, as long as you don’t add any nuts or nut-based dips. The basic recipe uses only fruit and yogurt, both of which are nut-free. Just check the labels on your yogurt to make sure it’s processed in a nut-free facility if that’s a concern.
Pin This Recipe!
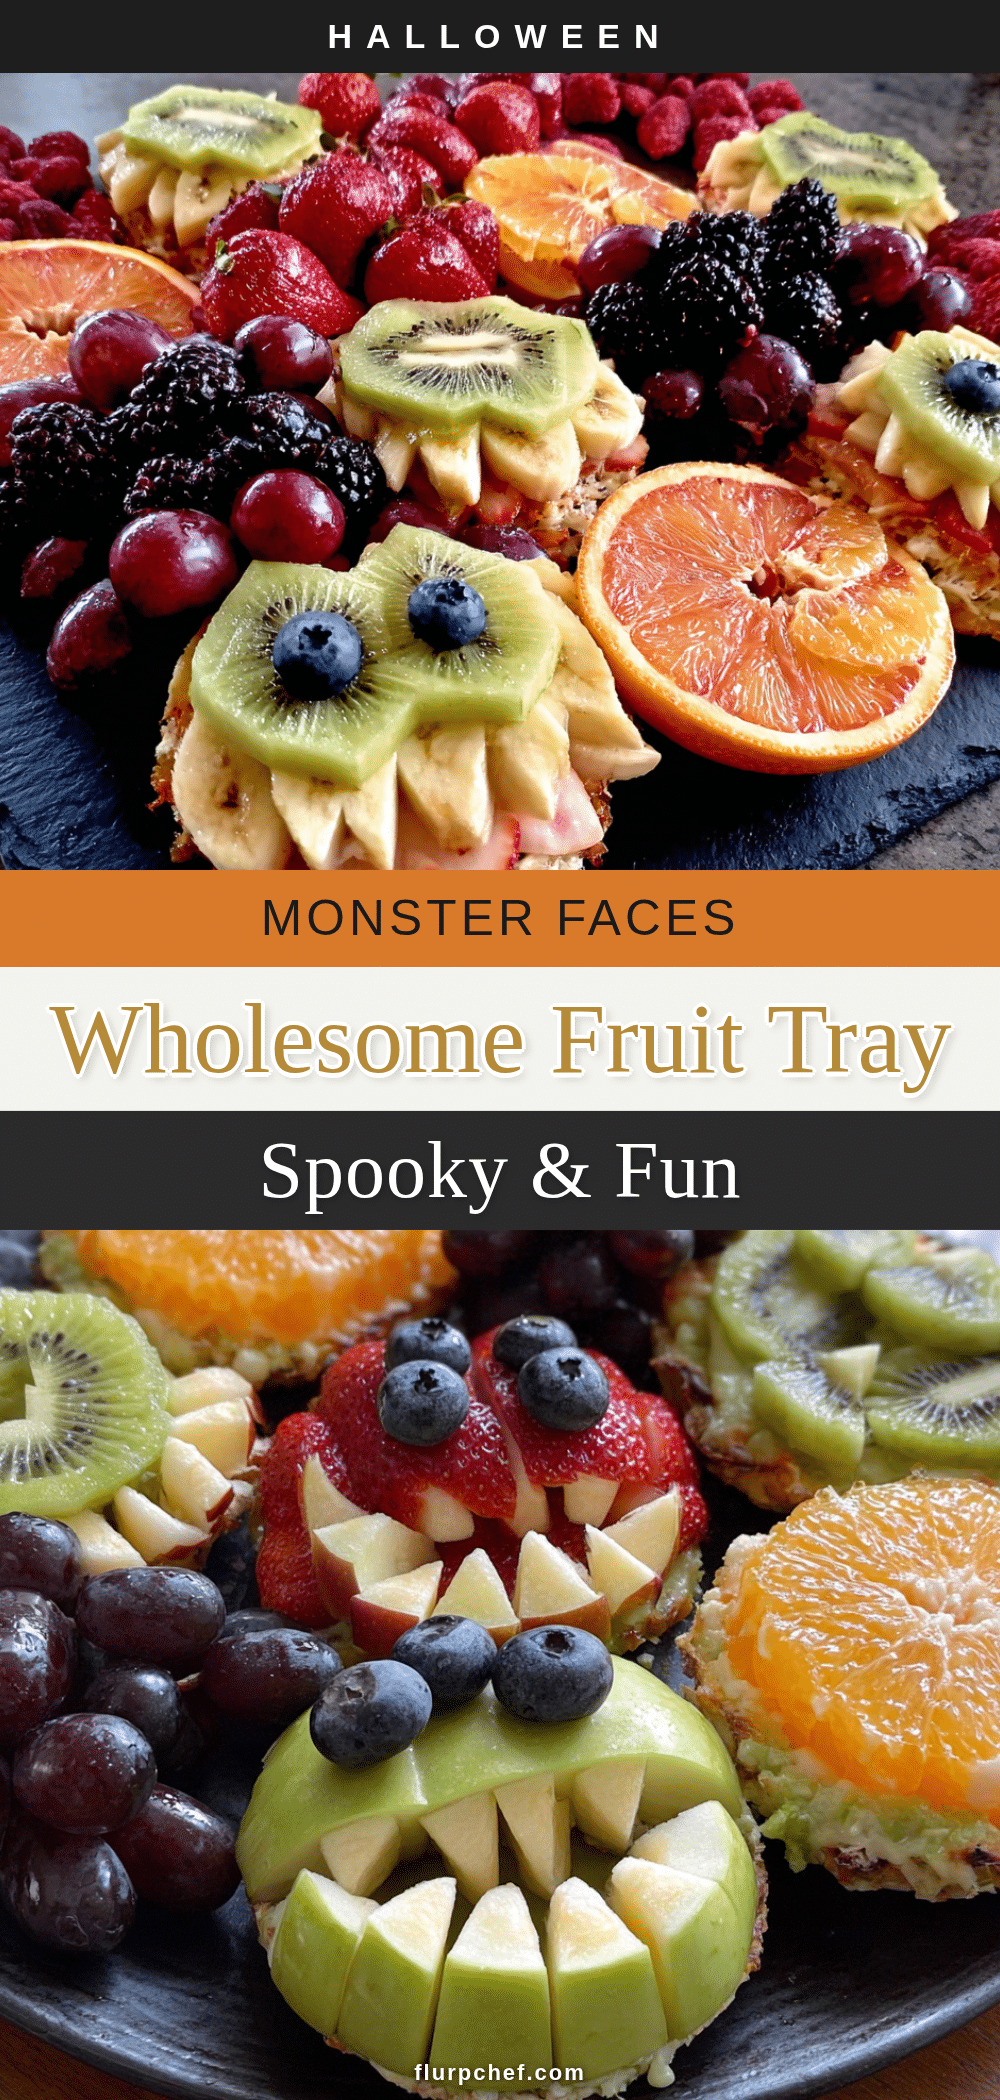
Wholesome Halloween Fruit Tray with Cute Monster Faces
A fun and healthy Halloween snack featuring cute monster faces made from fresh fruit, served with a creamy yogurt dip. Perfect for parties, school events, or family movie nights.
- Prep Time: 20 minutes
- Cook Time: 0 minutes
- Total Time: 20 minutes
- Yield: 8 servings 1x
- Category: Snack
- Cuisine: American
Ingredients
- 1 large honeydew melon (or cantaloupe)
- 2 large mangoes
- 1 pint strawberries
- 2 kiwis
- 1 bunch green grapes
- 1 pint blueberries
- 2 bananas
- 1 apple (any variety)
- 1 pomegranate (optional)
- 2 cups plain Greek yogurt
- 2 tablespoons honey (or maple syrup for vegan)
- 1 teaspoon vanilla extract
- Optional: Orange or green food coloring (natural options work great)
- Wooden skewers (optional)
- Small cookie cutters (star, circle, or bone shapes)
Instructions
- Prep the melon base: Cut honeydew or cantaloupe in half, scoop out seeds, and slice into 1-inch thick half-moons. Set aside on a paper towel to absorb excess moisture.
- Cut the mango: Slice off the cheeks of each mango, avoiding the flat pit. Score the flesh in a crosshatch pattern, then scoop out cubes with a spoon. For monster mouths, cut some slices into wide strips.
- Prepare the strawberries: Hull and slice in half lengthwise. Leave some whole for eyes. For noses, cut off the tip of a strawberry to create a triangle shape.
- Slice the kiwis: Peel and slice into 1/4-inch rounds. Use a small circle cookie cutter to create even shapes, or leave as rounds.
- Cut the apple: Core and slice into thin wedges. Toss immediately with lemon juice to prevent browning. For monster teeth, cut some wedges into small triangle shapes.
- Prepare the bananas: Slice into 1/2-inch rounds. Toss with lemon juice if not serving immediately. Add last to keep fresh.
- Make the yogurt dip: In a small bowl, whisk together Greek yogurt, honey, and vanilla extract. Add food coloring if desired. Transfer to a small serving bowl.
- Assemble the monsters: Place melon half-moons on the platter, leaving space between each. Add features: eyes (banana rounds or kiwi slices with blueberry pupils), mouths (mango strips with apple triangles for teeth), noses (strawberry tip or grape), hair (green grapes or kiwi slices), arms (apple wedges or banana rounds). Use toothpicks to secure pieces if needed.
- Add finishing touches: Scatter blueberries and pomegranate seeds around the platter. Place yogurt dip bowl in the center or off to one side. If using skewers, thread alternating fruit pieces and arrange around monsters.
- Serve immediately or refrigerate: Best served within an hour of assembly. To make ahead, prep all fruit and store separately in airtight containers; assemble right before serving.
Notes
For best results, use ripe but firm fruit. Toss apple and banana slices in lemon juice to prevent browning. Assemble no more than 2 hours before serving. The yogurt dip can be made a day ahead and refrigerated.
Nutrition
- Serving Size: 1 cup of fruit with
- Calories: 165
- Sugar: 20
- Sodium: 50
- Fat: 2
- Saturated Fat: 1
- Carbohydrates: 32
- Fiber: 4
- Protein: 9
Keywords: Halloween, fruit tray, monster faces, healthy snack, party platter, kid-friendly, yogurt dip