“You really don’t need a fancy oven for this one,” my grandmother said, sliding the pie out from the fridge with a proud smile. I remember that afternoon clearly—the sun was dipping low, and the kitchen smelled like a bright burst of citrus, a scent so nostalgic it felt like a warm hug. This Classic Creamy Vintage Lemon Icebox Pie wasn’t anything complicated, but honestly, it felt like magic. It was one of those recipes that snuck up on me, a simple dessert born out of a no-bake necessity and a handful of pantry staples.
Back then, I was skeptical about how a chilled pie could be so luscious and satisfying without the usual fuss of baking. But after that first bite—tangy, velvety, with just the right amount of sweetness—I realized there’s a reason this pie has stuck around for generations. It’s the kind of treat that makes you pause and appreciate the easy joys of life, especially on a lazy afternoon or after a long day when you just want something comforting without much effort.
What’s funny is how this pie came to be my go-to for summer get-togethers. It’s refreshing and creamy, yet light enough that no one ever feels weighed down. I even found myself making it multiple times in a week once the lemon season hit, and each time, it felt like a small celebration of simple, honest flavors.
For me, the classic creamy vintage lemon icebox pie is proof that some of the best recipes are the ones that don’t try too hard but deliver every bit of satisfaction. There’s a quiet confidence in a chilled pie that’s perfectly balanced—bright lemon, rich creaminess, and a buttery crust that just crumbles in the mouth. It’s a dessert that invites you to slow down and enjoy, a trust passed down through generations and now gently passed on to you.
Why You’ll Love This Classic Creamy Vintage Lemon Icebox Pie Recipe
Having tested this Classic Creamy Vintage Lemon Icebox Pie countless times, I can say it’s one of those desserts you’ll keep coming back to for all the right reasons. Here’s why it’s a staple in my kitchen and why it might just become your new favorite, too:
- Quick & Easy: This pie comes together in under 20 minutes, making it perfect for those moments when you want dessert without the wait or fuss.
- Simple Ingredients: No need for a special grocery run—you probably already have everything at home, from sweetened condensed milk to fresh lemons.
- Perfect for Summer: Its cool, refreshing texture makes it ideal for warm-weather gatherings, backyard barbecues, or just a quiet evening on the porch.
- Crowd-Pleaser: Whether it’s kids, grandparents, or friends, this pie always gets rave reviews—some even ask for seconds before the first slice is gone.
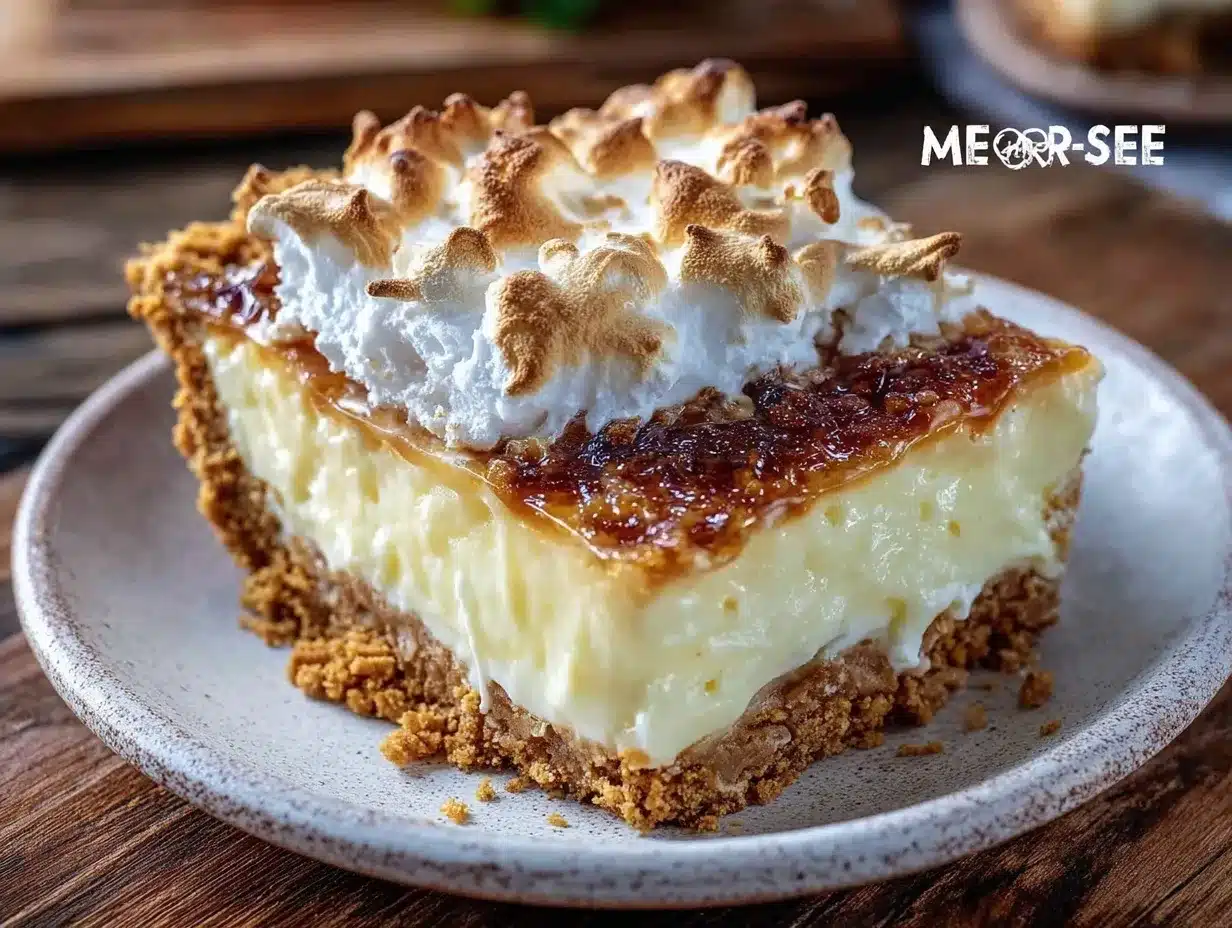
- Unbelievably Delicious: The creamy filling with a subtle tang and the buttery graham cracker crust combine for a melt-in-your-mouth experience that’s pure comfort food.
What sets this pie apart from other lemon desserts is the way it balances tartness and sweetness without being overpowering. The filling is made silky smooth by blending sweetened condensed milk with fresh lemon juice, creating that classic vintage vibe that’s hard to find in modern recipes. Plus, the no-bake approach means you get a glossy, set pie that holds its shape but is still soft and luscious.
Honestly, it’s the kind of recipe that makes you close your eyes after the first bite and smile. It’s comforting yet refreshing, simple but satisfying—a dessert that feels like a warm memory you didn’t even know you had. And if you’re looking to impress guests without breaking a sweat, this pie fits the bill perfectly.
What Ingredients You Will Need
This pie uses simple, wholesome ingredients to deliver bold flavor and satisfying texture without the fuss. Most of the ingredients are pantry staples, and the fresh lemons bring that zing that makes this pie truly special.
- Graham Cracker Crust
- 1 ½ cups graham cracker crumbs (about 10 full sheets; I prefer Honey Maid for the perfect crunch)
- 6 tablespoons unsalted butter, melted (adds richness and helps bind the crust)
- ¼ cup granulated sugar (for a touch of sweetness)
- Filling
- 1 (14-ounce) can sweetened condensed milk (the key to creamy texture)
- ½ cup freshly squeezed lemon juice (about 3-4 lemons; always worth fresh for that bright flavor)
- 1 tablespoon lemon zest (adds an aromatic punch)
- 3 large egg yolks (room temperature; ensures smooth, rich filling)
- ½ teaspoon vanilla extract (optional, but gives depth)
- A pinch of salt (balances the sweetness)
- Topping (Optional)
- 1 cup heavy cream, chilled
- 2 tablespoons powdered sugar
- Thin lemon slices or candied lemon peel for garnish
Substitution Tips: You can swap the graham cracker crust with a gluten-free version using almond flour or gluten-free cookies if needed. If you want a dairy-free pie, try using coconut condensed milk and whipped coconut cream for the topping. For a lighter version, Greek yogurt can replace some of the condensed milk, though it will change the texture slightly.
Equipment Needed
- 9-inch (23 cm) pie dish — glass or ceramic works best for even chilling
- Mixing bowls — at least two, one for crust, one for filling
- Whisk and rubber spatula — for smooth blending
- Measuring cups and spoons — accuracy helps with balance, especially for this pie
- Citrus juicer or reamer — makes extracting lemon juice easier and less messy
- Zester or microplane — for that fresh lemon zest aroma
- Electric mixer or hand whisk — helpful for whipping cream topping
If you don’t have a zester, a fine grater works just fine. For the crust, pressing it firmly into the pie dish with the back of a spoon or a flat-bottomed glass ensures even thickness. I’ve also used a food processor to blitz the graham crackers quickly, saving time and ensuring uniform crumbs.
Preparation Method
- Prepare the crust: Preheat your oven to 350°F (175°C) if you want a firmer crust, though this step is optional. Combine 1 ½ cups graham cracker crumbs, 6 tablespoons melted butter, and ¼ cup sugar in a bowl. Stir until all crumbs are moistened.
- Press the mixture firmly into the bottom and up the sides of your pie dish, making an even layer. If baking, bake for 8-10 minutes until golden and fragrant. Let cool completely before filling. If skipping baking, chill crust while preparing the filling.
- Make the filling: In a medium bowl, whisk together 3 large egg yolks and lemon zest until pale and slightly thickened (about 2 minutes). This step helps avoid curdling later.
- Slowly add the sweetened condensed milk, stirring constantly to keep it smooth. Then pour in ½ cup fresh lemon juice and a pinch of salt. Whisk gently until combined and the mixture thickens slightly (about 3-4 minutes)—it should have a glossy, velvety appearance.
- Pour the filling into the cooled crust and spread evenly with a spatula. Cover the pie loosely with plastic wrap.
- Chill the pie: Refrigerate for at least 4 hours, ideally overnight, to allow the filling to set fully. You’ll notice it firms up nicely but remains creamy and luscious.
- Optional whipped cream topping: Whip 1 cup cold heavy cream with 2 tablespoons powdered sugar until soft peaks form. Spread or pipe over pie just before serving, and garnish with thin lemon slices or candied peel for a pretty finish.
Tip: If your filling looks a little too loose before chilling, don’t panic—the lemon juice reacts with the milk to thicken over time. And if you want a slightly tangier pie, add an extra teaspoon of zest. Just keep an eye on balance!
Cooking Tips & Techniques
Getting this pie just right is about patience and balance. Here’s what I’ve learned through trial and error:
- Fresh lemon juice makes all the difference. Bottled juice just doesn’t give that bright, clean flavor. Always go fresh, and zest before juicing for easier handling.
- Room temperature eggs prevent curdling. Cold eggs can cause the filling to seize up. Let them sit out for 15-20 minutes before starting.
- Don’t skip the chilling time. The magic happens in the fridge—this pie needs at least 4 hours to set properly. Overnight is best for a slice that holds perfectly.
- Press your crust firmly. Loose crust means crumbs falling apart when serving. Using the bottom of a glass to compact it helps maintain structure.
- Whipping cream topping can be sweet or neutral. If you want a less sweet finish, reduce powdered sugar or skip it altogether and add a hint of vanilla instead.
- Slice cleanly. Run a sharp knife under hot water and wipe dry between cuts for neat pieces without smudging the pie.
One funny lesson: I once rushed the chilling, and the filling was too soft to slice cleanly. It was still tasty but a bit messy. Since then, I always build in that waiting time—it’s worth it for presentation and texture.
Variations & Adaptations
This vintage pie is a great base for playful twists or dietary needs. Here’s what you can try:
- Key Lime Pie Twist: Swap lemon juice and zest with fresh key lime juice and zest for a tangy, tropical spin.
- Berry Layer: Add a thin layer of fresh raspberries or blueberries over the crust before pouring the filling, creating a beautiful color contrast and a burst of fruity flavor.
- Dairy-Free Version: Use coconut condensed milk and top with whipped coconut cream. The pie will have a subtle coconut undertone but maintain that creamy texture.
- Low-Sugar Option: Substitute sweetened condensed milk with a sugar-free condensed milk alternative or blend Greek yogurt with honey and lemon juice, though the texture will be less silky.
- Crust Alternatives: Try crushed vanilla wafers or digestive biscuits instead of graham crackers for a different flavor base.
Personally, I love mixing up the topping sometimes. A dollop of tangy whipped mascarpone with a sprinkle of lemon zest can transform this pie into a fancier dessert for special occasions.
Serving & Storage Suggestions
This pie shines best when served chilled straight from the fridge. The creamy filling holds its shape beautifully but softens quickly once out, so slice just before serving. Garnish with fresh lemon slices or a little zest for that vintage charm.
Pair it with a cup of iced tea, sparkling water with mint, or even a light dessert wine for an elegant touch. For a casual summer meal, it works wonderfully alongside a fresh salad like the fresh cucumber watermelon feta salad, balancing sweet and savory beautifully.
Store leftovers covered tightly in the refrigerator for up to 3 days. The flavors actually deepen over time, making it even more luscious. Avoid freezing, as the creamy filling can separate and lose its smooth texture.
When reheating, this pie is best enjoyed cold, but if you prefer, let it sit at room temperature for 10-15 minutes to soften slightly before serving.
Nutritional Information & Benefits
This pie packs a punch of flavor with relatively simple ingredients. A typical slice (1/8 of the pie) contains approximately:
| Calories | 320 kcal |
|---|---|
| Fat | 18 g |
| Carbohydrates | 36 g |
| Protein | 4 g |
| Sugar | 28 g |
The lemon juice is a great source of vitamin C, which supports immunity, and the eggs add protein. While this dessert isn’t low-calorie, it’s a satisfying treat that uses natural ingredients without artificial additives. For those with gluten intolerance, swapping the crust for almond flour keeps it gluten-free.
From my perspective, this pie fits well into a balanced diet when enjoyed in moderation—as a little reward or a bright note after a meal.
Conclusion
The Classic Creamy Vintage Lemon Icebox Pie is one of those recipes that feels timeless yet effortlessly simple. It’s perfect for anyone who loves a no-bake dessert with a refreshing citrus kick and a silky texture that melts in your mouth. The balance of tart lemon and sweet creaminess has kept this pie a beloved staple across generations, and now it’s ready to be part of your kitchen memories.
What I love most is how forgiving it is—whether you’re a novice or a seasoned cook, it turns out beautifully with minimal effort. Plus, the versatility means you can tweak it to match your taste or dietary needs.
If you try it, I’d love to hear what variations you come up with or how it fits into your family’s tradition. Sharing those moments makes recipes like this even more special.
FAQs About Classic Creamy Vintage Lemon Icebox Pie
Can I make this pie ahead of time?
Absolutely! In fact, chilling the pie overnight helps it set perfectly and develop deeper flavors.
Is it safe to use raw egg yolks in the filling?
Yes, as long as you use fresh, pasteurized eggs and keep the pie refrigerated. If you’re concerned, you can use pasteurized egg products or look for eggless lemon pie recipes.
Can I use a store-bought pie crust instead?
Yes, a pre-made graham cracker or regular pie crust works fine, but the homemade crust adds that authentic vintage touch.
How can I make the pie more tart?
Add extra lemon zest or a bit more lemon juice, but be careful not to overdo it to maintain the creamy balance.
What should I serve this pie with?
A light beverage like iced tea or a fresh fruit salad complements the pie well. You might also enjoy it alongside dishes like a creamy one-pot Tuscan chicken penne for a complete meal with contrasting flavors.
Pin This Recipe!
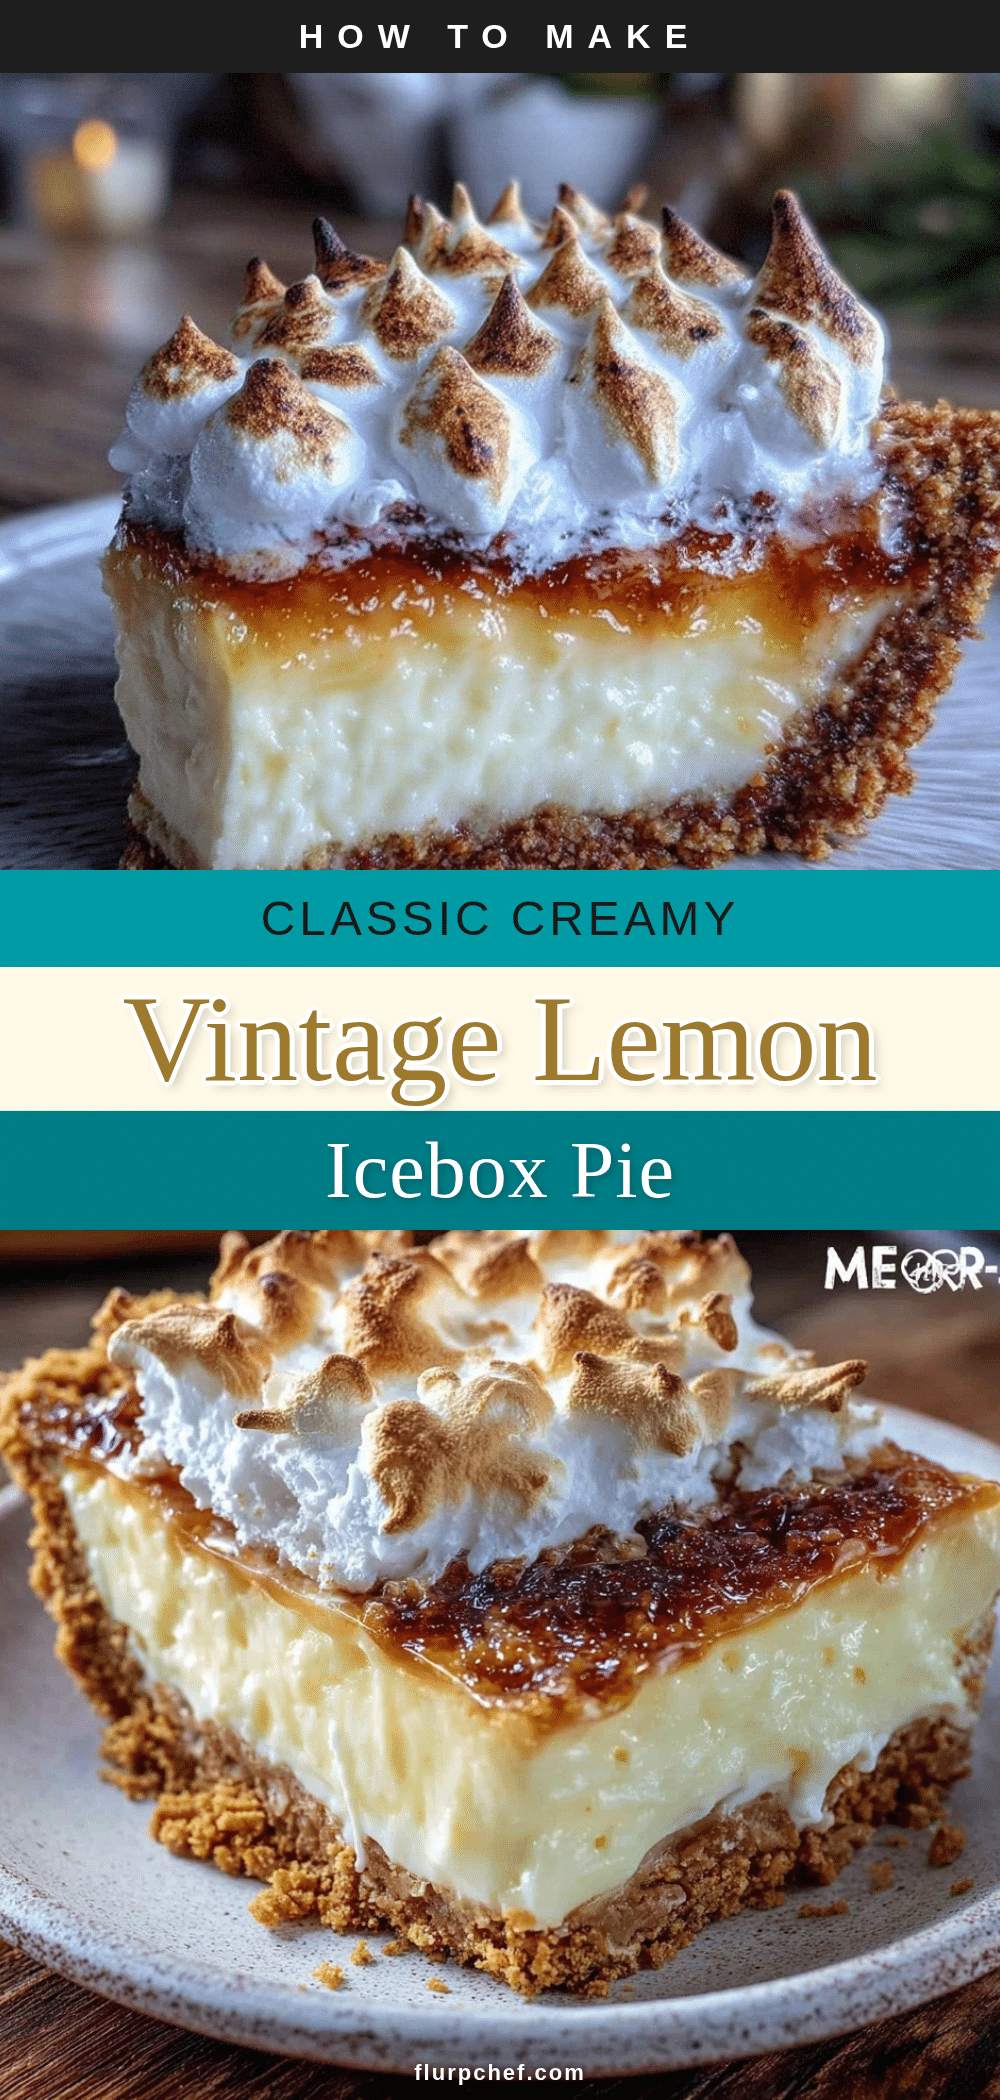
Classic Creamy Vintage Lemon Icebox Pie

A no-bake, creamy lemon icebox pie with a buttery graham cracker crust and a refreshing citrus filling, perfect for summer gatherings and easy homemade dessert.
- Prep Time: 15 minutes
- Cook Time: 10 minutes (optional baking)
- Total Time: 4 hours 25 minutes (including chilling time)
- Yield: 8 servings 1x
- Category: Dessert
- Cuisine: American
Ingredients
- 1 ½ cups graham cracker crumbs (about 10 full sheets)
- 6 tablespoons unsalted butter, melted
- ¼ cup granulated sugar
- 1 (14-ounce) can sweetened condensed milk
- ½ cup freshly squeezed lemon juice (about 3–4 lemons)
- 1 tablespoon lemon zest
- 3 large egg yolks (room temperature)
- ½ teaspoon vanilla extract (optional)
- A pinch of salt
- 1 cup heavy cream, chilled (optional topping)
- 2 tablespoons powdered sugar (optional topping)
- Thin lemon slices or candied lemon peel for garnish (optional)
Instructions
- Prepare the crust: Combine graham cracker crumbs, melted butter, and sugar in a bowl until moistened.
- Press the crust mixture firmly into the bottom and up the sides of a 9-inch pie dish. Optionally bake at 350°F for 8-10 minutes until golden and fragrant, then cool completely. If not baking, chill crust while preparing filling.
- Make the filling: Whisk egg yolks and lemon zest in a medium bowl until pale and slightly thickened (about 2 minutes).
- Slowly add sweetened condensed milk while stirring constantly to keep smooth.
- Add lemon juice and a pinch of salt, whisk gently until combined and slightly thickened (about 3-4 minutes) with a glossy appearance.
- Pour filling into cooled crust and spread evenly. Cover loosely with plastic wrap.
- Refrigerate for at least 4 hours or overnight to set the filling.
- Optional topping: Whip cold heavy cream with powdered sugar until soft peaks form. Spread or pipe over pie before serving and garnish with lemon slices or candied peel.
Notes
[‘Fresh lemon juice is essential for bright flavor; avoid bottled juice.’, ‘Use room temperature eggs to prevent curdling.’, ‘Chill pie at least 4 hours or overnight for best texture and slicing.’, ‘Press crust firmly to avoid crumbling.’, ‘Whipped cream topping can be adjusted for sweetness or skipped.’, ‘Run a sharp knife under hot water and dry between cuts for clean slices.’, ‘Optional baking of crust adds firmness but is not required.’, ‘Substitute gluten-free crust with almond flour or gluten-free cookies.’, ‘Dairy-free version possible with coconut condensed milk and whipped coconut cream.’, ‘Low-sugar option by using sugar-free condensed milk or Greek yogurt blend.’]
Nutrition
- Serving Size: 1 slice (1/8 of pie)
- Calories: 320
- Sugar: 28
- Fat: 18
- Carbohydrates: 36
- Protein: 4
Keywords: lemon pie, icebox pie, no-bake dessert, creamy lemon pie, vintage recipe, summer dessert, easy pie, graham cracker crust


