I burned butternut squash more times than I care to admit before I figured out how to get it actually crispy. Not just browned in spots or slightly caramelized—I mean genuinely, shatteringly crisp on the outside while staying tender and sweet inside. For years I’d toss cubed squash with oil, spread it on a sheet pan, and cross my fingers. Sometimes it came out okay. Most times it came out steamy and soft, with maybe one or two edges that looked promising. The garlic and parmesan always tasted good, sure, but the texture was never what I wanted. It drove me crazy because I knew the potential was there.
Then I spent an afternoon really paying attention to what was happening in the oven. I watched the squash release steam, saw how overcrowding the pan turned everything into a mushy mess, and noticed that the cheese either melted into a golden crust or burned into bitterness depending on timing. So I started testing small changes—higher heat, lower racks, tossing halfway through, adding the parmesan at the very end. Eventually I landed on a method that works every single time, no luck required. This crispy garlic parmesan butternut squash is the result of all those failed batches and burnt edges. It is the side dish I now make for holiday dinners, weeknight roasts, and everything in between. Honestly, I might like it more than the main course.
Why You’ll Love This Recipe
Let me tell you why this one is different. I have tested this method more times than I can count, adjusting oven temps and rack positions until the texture was exactly right. The secret is a two-step roasting process that first dries out the squash surface, then crisps up the garlic parmesan coating. It is a technique I picked up from years of trial and error in my own kitchen.
- Quick & Easy : Comes together in about 40 minutes, with only 10 minutes of active prep. Perfect for busy weeknights when you want something impressive without the stress.
- Simple Ingredients : You probably already have butternut squash, garlic, parmesan, olive oil, and basic seasonings in your kitchen. No fancy grocery runs needed.
- Perfect for Any Occasion : Works beautifully as a Thanksgiving side, a holiday brunch addition, or a simple weeknight vegetable dish. It is versatile enough for both casual dinners and special gatherings.
- Crowd-Pleaser : Even people who claim they don’t like squash end up reaching for seconds. The crispy garlic parmesan coating wins over skeptics every time.
- Unbelievably Delicious : The contrast between the crunchy exterior and the soft, sweet interior is next-level comfort food. It is the kind of dish that makes you close your eyes after the first bite.
What sets this recipe apart from other roasted squash recipes is the technique. Instead of just tossing everything together and hoping for the best, we roast the squash first to remove excess moisture, then add the garlic and parmesan at the right moment. This guarantees crispiness without burning the cheese. It is not just another version of roasted squash—it is the best version I have ever made.
What Ingredients You Will Need
This recipe uses simple, wholesome ingredients to deliver bold flavor and satisfying texture without the fuss. Most of these are pantry staples, and the ones that aren’t are easy to find at any grocery store.
- Butternut Squash – 1 medium (about 2-3 pounds), peeled, seeded, and cut into 1-inch cubes. Look for squash that feels heavy for its size with firm, unblemished skin. I prefer using pre-cut squash from the store when I am short on time, but fresh always tastes better.
- Olive Oil – 3 tablespoons. Use a good quality extra virgin olive oil for the best flavor, but regular olive oil works fine too. The oil helps the squash brown and prevents sticking.
- Garlic – 4 cloves, minced. Fresh garlic is non-negotiable here—the pre-minced stuff in jars just doesn’t have the same punch. I have used garlic paste in a pinch and it works okay, but fresh is best.
- Parmesan Cheese – ½ cup, finely grated. Buy a block of real parmesan and grate it yourself if you can. The pre-shredded stuff has anti-caking agents that prevent it from melting properly. I recommend Parmigiano-Reggiano for the best texture and flavor.
- Salt – 1 teaspoon. I use kosher salt for its clean flavor and easy pinchability. Adjust to taste depending on your dietary needs.
- Black Pepper – ½ teaspoon, freshly ground. Freshly ground pepper makes a noticeable difference in the final flavor.
- Dried Oregano – ½ teaspoon. Adds a subtle herbaceous note that complements the garlic and parmesan beautifully. You can substitute dried thyme or rosemary if you prefer.
- Red Pepper Flakes – ¼ teaspoon (optional). Adds a gentle heat that balances the sweetness of the squash. Leave it out if you are sensitive to spice.
- Fresh Parsley – 2 tablespoons, chopped (for garnish). Adds a pop of color and freshness at the end. Flat-leaf parsley is best, but curly works too.
Equipment Needed
You do not need any fancy equipment for this recipe, which is part of why I love it so much. Here is what you will need:
- Baking Sheet – A large, rimmed baking sheet is essential. I use a half-sheet pan (18×13 inches) because it gives the squash plenty of space to spread out. If your pan is smaller, use two pans to avoid overcrowding.
- Parchment Paper – Lining the baking sheet makes cleanup a breeze and prevents sticking. You can use a silicone baking mat instead if you prefer.
- Chef’s Knife – A sharp chef’s knife makes cutting through butternut squash much easier. I recommend an 8-inch knife for good control.
- Vegetable Peeler – A sturdy peeler is essential for removing the tough skin. I prefer a Y-shaped peeler for better grip and control.
- Large Bowl – For tossing the squash with oil and seasonings. Any medium-to-large mixing bowl will do.
- Measuring Spoons – For accurate measurements of spices and oil.
- Microplane or Box Grater – For grating the parmesan cheese. A microplane gives you the finest, fluffiest texture.
If you do not have a microplane, you can use the small holes of a box grater. Just make sure the cheese is finely grated so it melts evenly into a crisp coating rather than clumping up.
Preparation Method
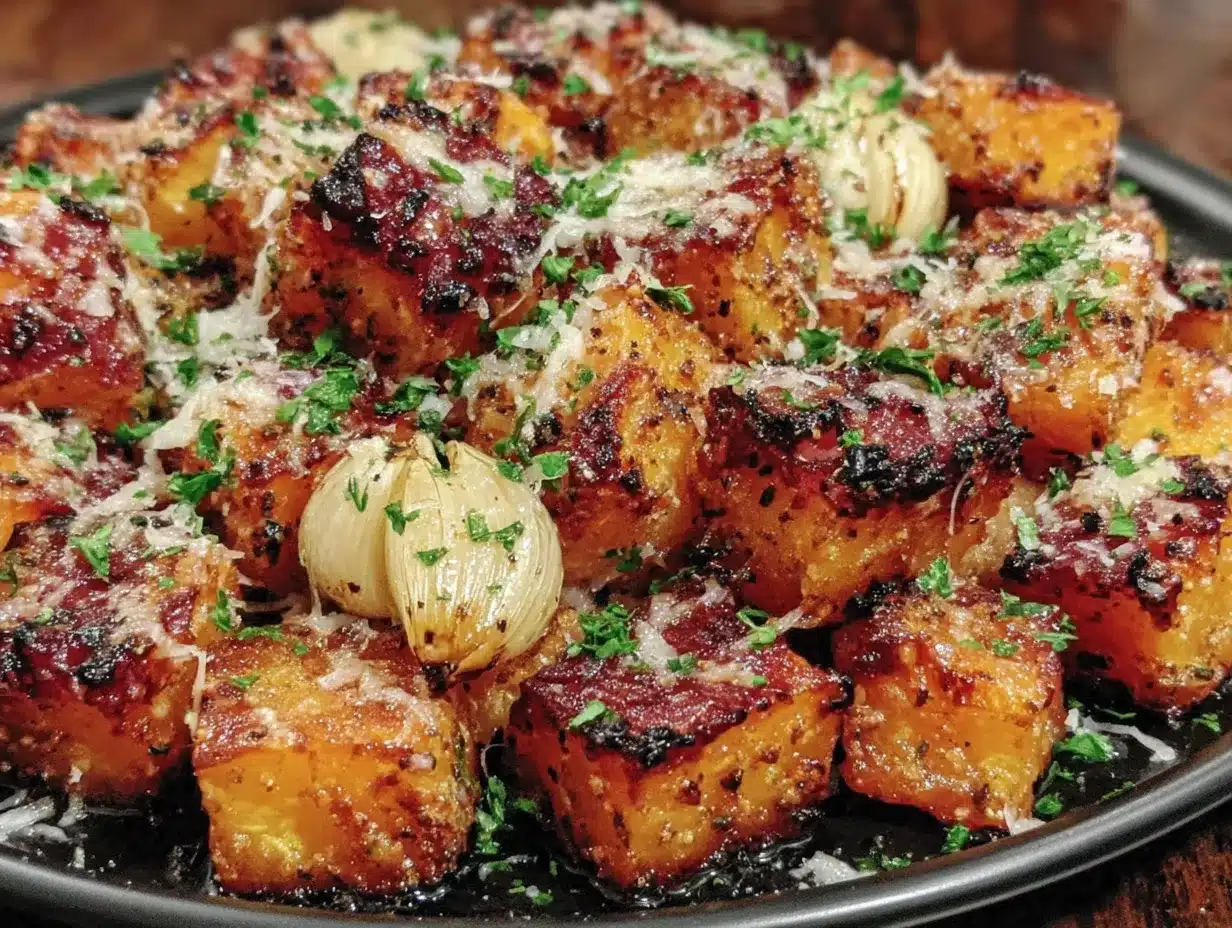
Getting the perfect texture on this crispy garlic parmesan butternut squash comes down to a few key steps. Follow them closely, and you will have the best roasted squash of your life.
Step 1: Prepare the Squash
Preheat your oven to 425°F (220°C). Line a large baking sheet with parchment paper. Peel the butternut squash using a vegetable peeler, making sure to remove all the tough skin. Cut off the stem end and the bottom, then slice the squash in half lengthwise. Scoop out the seeds and stringy pulp with a spoon. Cut the flesh into 1-inch cubes, trying to keep them as uniform as possible so they cook evenly. You should end up with about 5-6 cups of cubed squash.
Step 2: First Roast (Dry Roast)
Place the cubed squash on the prepared baking sheet in a single layer. Make sure there is space between each piece—if they are touching, they will steam instead of roast. Drizzle with 2 tablespoons of olive oil and sprinkle with salt and pepper. Toss gently with your hands to coat evenly. Roast for 15 minutes. The squash should be starting to brown on the edges but not fully cooked through. This first roast removes excess moisture and creates a dry surface for the garlic parmesan coating to stick to.
Step 3: Prepare the Garlic Parmesan Coating
While the squash roasts, prepare the coating. In a small bowl, combine the minced garlic, grated parmesan, dried oregano, and red pepper flakes (if using). Add the remaining 1 tablespoon of olive oil and stir to form a paste. The mixture should be thick but spreadable. If it seems too dry, add another teaspoon of olive oil.
Step 4: Second Roast (Crisp Roast)
After the first 15 minutes, remove the baking sheet from the oven. Using a spatula, carefully flip each piece of squash. Spoon the garlic parmesan mixture evenly over the squash, trying to get a little on each piece. Return the sheet to the oven and roast for another 10-12 minutes, until the cheese is golden brown and crispy. Keep an eye on it during the last few minutes—parmesan can go from golden to burnt very quickly. The squash should be tender when pierced with a fork but still holding its shape.
Step 5: Garnish and Serve
Remove the baking sheet from the oven and let the squash cool for 2-3 minutes on the pan. This allows the coating to set and become extra crispy. Transfer to a serving platter and sprinkle with fresh chopped parsley. Serve immediately while still hot and crispy. The texture is best right out of the oven, but leftovers are still delicious (more on that below).
Pro Tip : If you want extra crispy squash, you can broil it for the last 1-2 minutes of cooking. Just watch it closely so the garlic and parmesan don’t burn.
Cooking Tips & Techniques
I have made this recipe more times than I can count, and I have learned a few things along the way. Here are my best tips for getting perfect results every time.
- Don’t overcrowd the pan. This is the number one mistake I made for years. If the squash pieces are touching or overlapping, they will steam instead of roast. Use two baking sheets if you need to. The extra space is worth it for the crispy texture.
- Cut the squash into uniform pieces. I know it is tempting to rush through this step, but uneven pieces cook at different rates. Some will be burnt while others are still raw. Take the extra minute to cut them all roughly the same size.
- Use a hot oven. 425°F is the sweet spot for this recipe. It is hot enough to caramelize the squash and crisp the cheese without burning either. If your oven runs hot, you can reduce the temperature to 400°F and extend the cooking time by a few minutes.
- Flip the squash halfway through. This ensures even browning on all sides. I use a thin metal spatula for this task, and I make sure to flip each piece individually rather than just stirring them around.
- Add the cheese at the right time. If you add the parmesan at the beginning, it will burn before the squash is done. Adding it halfway through the cooking process gives the squash time to dry out and start browning, then the cheese melts into a perfect crispy crust.
I once forgot to flip the squash and ended up with one side beautifully crispy and the other side pale and soft. It was a reminder that even simple steps matter. Don’t skip the flip!
Variations & Adaptations
This recipe is incredibly versatile. Here are a few ways to change it up based on your preferences or what you have on hand.
Dietary Variations
- Vegan Option : Substitute the parmesan with nutritional yeast (about 3 tablespoons) mixed with ¼ cup of almond flour or breadcrumbs. The texture won’t be exactly the same, but it will still be crispy and flavorful.
- Gluten-Free : This recipe is naturally gluten-free as written. Just make sure your parmesan and seasonings are certified gluten-free if you have celiac disease.
- Low-Carb/Keto : Butternut squash is moderately high in carbs, so this works best as an occasional treat rather than a daily side on a strict keto diet. You can substitute cauliflower florets for a lower-carb option.
Flavor Twists
- Herb Lovers : Add 1 teaspoon of dried rosemary or thyme to the garlic parmesan mixture. Fresh herbs work too—just use 1 tablespoon of fresh chopped herbs instead.
- Spicy Version : Double the red pepper flakes or add a pinch of cayenne pepper to the coating. I have also drizzled the finished squash with hot honey for a sweet-spicy combo that is incredible.
- Balsamic Glaze : Drizzle the finished squash with a balsamic reduction just before serving. The acidity cuts through the richness of the parmesan beautifully.
Different Squash Options
This technique works with other winter squashes too. Try it with acorn squash, delicata squash (no need to peel), or even sweet potatoes. The cooking time may vary slightly depending on the density of the vegetable, so check for doneness a few minutes early.
Serving & Storage Suggestions
This crispy garlic parmesan butternut squash is best served hot and fresh from the oven, but it still holds up well for leftovers.
Serving Suggestions
Serve the squash as a side dish alongside roasted chicken, grilled steak, or baked fish. It also makes a fantastic addition to holiday tables—think Thanksgiving, Christmas, or Easter dinners. For a lighter meal, serve it over a bed of arugula with a simple lemon vinaigrette for a warm salad. I have even added it to grain bowls with quinoa and roasted chickpeas for a satisfying vegetarian dinner.
Storage Instructions
Store any leftovers in an airtight container in the refrigerator for up to 4 days. The squash will lose some of its crispiness as it sits, but it will still taste delicious. To reheat, spread the squash on a baking sheet and warm it in a 400°F oven for 5-7 minutes. This helps restore some of the crunch. Avoid microwaving if possible—it makes the squash soggy.
Freezing
I do not recommend freezing this dish. The texture of the squash changes significantly after thawing, and the crispy coating will become soft. If you have a large batch of roasted squash you want to preserve, freeze it without the garlic parmesan coating and add the coating fresh when you reheat it.
One thing I love about this recipe is that the flavors actually develop a bit overnight. The garlic and parmesan meld together, and while the squash is softer the next day, it makes a fantastic addition to soups or purees. I have blended leftover squash into a creamy soup with vegetable broth and a splash of cream—absolutely delicious.
Nutritional Information & Benefits
Here is the estimated nutritional breakdown for one serving (about 1 cup of roasted squash, based on 4 servings per recipe):
| Nutrient | Amount Per Serving |
|---|---|
| Calories | 185 |
| Total Fat | 11g |
| Saturated Fat | 3g |
| Cholesterol | 10mg |
| Sodium | 480mg |
| Total Carbohydrates | 20g |
| Dietary Fiber | 4g |
| Sugars | 4g |
| Protein | 6g |
Butternut squash is packed with vitamin A (one serving provides over 100% of your daily needs), vitamin C, potassium, and fiber. The parmesan adds calcium and protein, while the olive oil provides healthy monounsaturated fats. This dish is naturally gluten-free and can be made vegetarian or vegan with the substitutions mentioned above. If you are watching your sodium intake, you can reduce the salt slightly—the parmesan already adds plenty of saltiness.
I honestly feel good serving this to my family because it is a vegetable dish that actually gets eaten without complaints. The crispy coating makes it feel indulgent, but the nutritional profile is solid. It is comfort food that happens to be good for you.
Conclusion
This crispy garlic parmesan butternut squash has become a staple in my kitchen for good reason. It is simple enough for a Tuesday night but impressive enough for a holiday table. The technique is foolproof once you understand the two-step roasting method, and the flavor combination is absolutely addictive. I love how the sweet, tender squash contrasts with the savory, crispy coating. It is the kind of side dish that steals the show.
I encourage you to make this recipe your own. Adjust the seasonings, try different squashes, or experiment with the variations I shared. Cooking should be personal, and this recipe is a great canvas for your creativity. If you make it, I would love to hear how it turns out. Leave a comment below and let me know what you think—did you add any twists? Did your family love it as much as mine does? Your feedback helps me create better recipes for all of us.
Thank you for reading, and happy cooking. You have got this.
Frequently Asked Questions
Can I use pre-cut butternut squash from the store?
Absolutely. Pre-cut squash saves time and works perfectly for this recipe. Just make sure the pieces are roughly the same size so they cook evenly. If they are larger than 1 inch, cut them down to size before roasting.
Why is my squash not getting crispy?
The most common reason is overcrowding the baking sheet. If the squash pieces are touching, they release steam and become soft instead of crispy. Make sure to spread them in a single layer with space between each piece. Using a higher oven temperature (425°F) also helps.
Can I make this recipe ahead of time?
You can prep the squash up to a day in advance by peeling and cutting it, then storing it in an airtight container in the refrigerator. The garlic parmesan coating can also be prepared ahead and stored in the fridge. Roast the squash just before serving for the best texture.
What can I use instead of parmesan cheese?
Pecorino Romano is a great substitute with a similar texture and even more saltiness. For a dairy-free option, try nutritional yeast mixed with almond flour or breadcrumbs. The flavor will be different, but still delicious.
How do I prevent the garlic from burning?
Adding the garlic halfway through the roasting process is key. If you add it at the beginning, the garlic will burn before the squash is done. Also, make sure the garlic is minced finely so it coats the squash evenly without clumping.
Pin This Recipe!
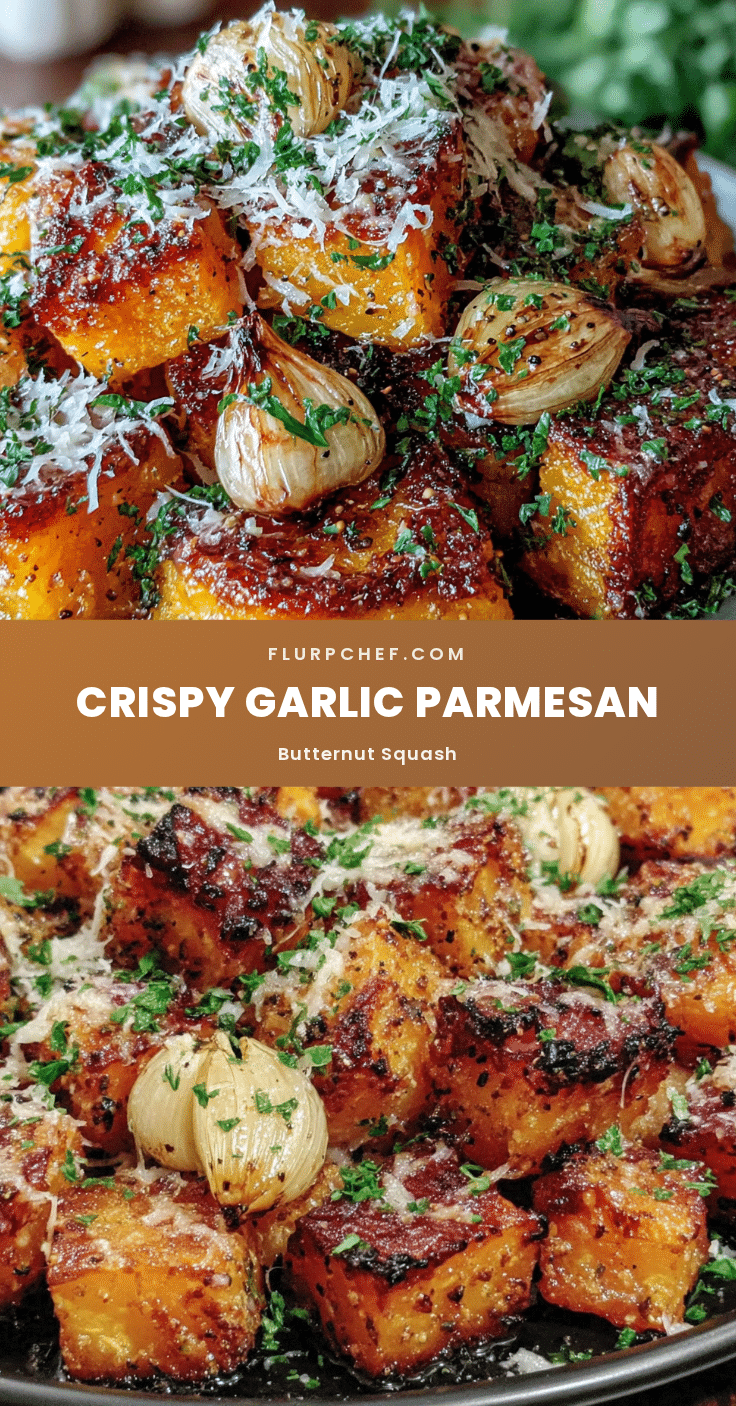
Crispy Garlic Parmesan Butternut Squash: Easy Side Dish

This crispy garlic parmesan butternut squash is the result of all those failed batches and burnt edges. It is the side dish I now make for holiday dinners, weeknight roasts, and everything in between.
- Prep Time: 10 minutes
- Cook Time: 25-27 minutes
- Total Time: 35-37 minutes
- Yield: 4 servings 1x
- Category: Side Dish
- Cuisine: American
Ingredients
- 1 medium butternut squash (about 2–3 pounds), peeled, seeded, and cut into 1-inch cubes
- 3 tablespoons olive oil
- 4 cloves garlic, minced
- ½ cup finely grated Parmesan cheese
- 1 teaspoon kosher salt
- ½ teaspoon freshly ground black pepper
- ½ teaspoon dried oregano
- ¼ teaspoon red pepper flakes (optional)
- 2 tablespoons fresh parsley, chopped (for garnish)
Instructions
- Preheat oven to 425°F (220°C). Line a large baking sheet with parchment paper.
- Peel the butternut squash, cut in half lengthwise, scoop out seeds, and cut into 1-inch cubes.
- Place cubed squash on the prepared baking sheet in a single layer. Drizzle with 2 tablespoons olive oil, sprinkle with salt and pepper, and toss to coat.
- Roast for 15 minutes until edges start to brown.
- While squash roasts, combine minced garlic, grated Parmesan, dried oregano, red pepper flakes (if using), and remaining 1 tablespoon olive oil in a small bowl to form a paste.
- Remove squash from oven, flip each piece, and spoon the garlic Parmesan mixture evenly over the squash.
- Return to oven and roast for another 10-12 minutes until cheese is golden brown and crispy.
- Remove from oven, let cool for 2-3 minutes on the pan, then transfer to a serving platter and garnish with fresh parsley. Serve immediately.
Notes
For extra crispy squash, broil for the last 1-2 minutes, watching closely to prevent burning. Do not overcrowd the pan; use two baking sheets if needed. Cut squash into uniform pieces for even cooking. Add cheese halfway through roasting to prevent burning.
Nutrition
- Serving Size: 1 cup
- Calories: 185
- Sugar: 4
- Sodium: 480
- Fat: 11
- Saturated Fat: 3
- Carbohydrates: 20
- Fiber: 4
- Protein: 6
Keywords: crispy garlic parmesan butternut squash, roasted butternut squash, easy side dish, holiday side, vegetarian, gluten-free