Easy Ghost-Shaped Meringue Cookies: Best Spooky Treat
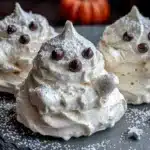
These light, airy ghost-shaped meringue cookies are the perfect spooky treat for Halloween. With a crisp exterior and melt-in-your-mouth texture, they’re surprisingly easy to make and naturally gluten-free and low-fat.
- Prep Time: 15 minutes
- Cook Time: 90 minutes
- Total Time: 2 hours 45 minutes (including cooling)
- Yield: 24-30 cookies 1x
- Category: Dessert
- Cuisine: American
Ingredients
Scale
- 4 large egg whites, at room temperature
- 1 cup (200g) granulated sugar
- 1/2 teaspoon cream of tartar
- 1 teaspoon pure vanilla extract
- Pinch of salt
- Black food coloring gel (for decorating)
- Small food-safe paintbrush or toothpick (for decorating)
- Optional: Orange and green gel colors (for decorating)
Instructions
- Preheat your oven to 200°F (93°C). Position the racks in the upper and lower thirds of the oven.
- Line two baking sheets with parchment paper. Set aside.
- Wipe down your mixing bowl and whisk with a paper towel dipped in lemon juice or white vinegar to remove any grease. Let air dry.
- Separate the eggs, placing each white in a small bowl first before transferring to the mixing bowl. Let the egg whites sit at room temperature for 30 minutes.
- Beat the egg whites on medium speed until foamy and bubbly, about 1-2 minutes. Add the cream of tartar and salt, then continue beating on medium speed.
- With the mixer still running on medium speed, add the sugar one tablespoon at a time, letting each addition incorporate fully before adding the next (about 3-4 minutes total).
- Once all the sugar is in, increase the mixer speed to high and add the vanilla extract. Beat until stiff, glossy peaks form, about 5-7 more minutes. The meringue should stand up in a firm, straight peak and feel smooth between your fingers.
- Test for stability by turning the bowl upside down over the sink—if the meringue stays put, it’s ready.
- Fit a piping bag with a round tip (e.g., Wilton #12). Fold the top of the bag over your hand to create a cuff, spoon the meringue into the bag, filling it about halfway. Twist the top to seal.
- Pipe the ghosts: Hold the piping bag at a 90-degree angle about 1/2 inch above the parchment. Squeeze gently to create a round base about 1.5 inches wide, then slowly lift the bag while continuing to squeeze to form a tall peak. Release pressure and pull away quickly to create a pointy ghost head. Leave about 1 inch between each ghost. You should get about 24-30 ghosts.
- Bake for 90 minutes at 200°F (93°C). After 45 minutes, rotate the pans (swap top and bottom, and turn them front to back) for even baking. The meringues are done when they’re dry to the touch and can be easily lifted off the parchment.
- Turn off the oven and let the meringues cool inside with the door slightly ajar (prop it open with a wooden spoon) for 1-2 hours.
- Once completely cool, decorate the ghosts: Dip a paintbrush or toothpick into the black gel coloring and carefully paint on two eyes and a little ghost mouth. Let the faces dry for about 15 minutes before serving or storing.
Notes
Make these on a dry day—humidity can make meringues sticky. Don’t overbeat the meringue; stop once stiff, glossy peaks form. Store in an airtight container at room temperature for up to 1 week. Do not refrigerate. For best results, make them a day ahead—the flavor and texture improve.
Nutrition
- Serving Size: 1 ghost-shaped merin
- Calories: 28
- Sugar: 7
- Sodium: 8
- Carbohydrates: 7
- Protein: 0.5
Keywords: ghost meringue cookies, Halloween cookies, meringue cookies, easy meringue, gluten-free cookies, low-fat cookies, spooky treats