Three blocks of cream cheese sitting on the counter, softening, when I realized I had zero energy to turn on the oven. It was mid-October, the house smelled like cinnamon from a candle that wasn’t even lit yet, and I had promised a friend I’d bring dessert to her small get-together. The pumpkin puree was there. The graham crackers were there. But the thought of preheating, baking, cooling, and waiting? Not happening. That’s when these easy no-bake pumpkin cheesecake bars with graham crust just sort of… happened.
I remember staring at the cream cheese and thinking, “You’re going to have to work for me today.” And honestly? They did. I crushed the graham crackers with a rolling pin because my food processor was buried somewhere behind the blender. The butter melted in the microwave, I pressed the crust into a dish with the bottom of a measuring cup, and everything came together in about twenty minutes flat. No oven. No sweat. No waiting for things to cool down before adding the next layer. It felt like a cheat code for fall baking.
The first time I made these, I was skeptical. Could a no-bake cheesecake really hold up? Would it be firm enough to slice? Would people know I didn’t actually bake anything? The answer to all of that was a very happy yes. The filling set beautifully in the fridge, the pumpkin flavor came through without being overpowering, and the graham crust stayed crisp in a way that surprised me. I brought the pan to the party, and by the end of the night, there was nothing left but a spatula and some crumbs. That’s when I knew this one was a keeper.
These bars have become my go-to for fall gatherings, Thanksgiving potlucks, and those random Tuesday nights when you just want something sweet without turning your kitchen into a sauna. They’re the kind of dessert that feels fancy but takes almost no real effort. And if you’ve ever wanted a pumpkin dessert that doesn’t require you to babysit an oven, this is it.
Why You’ll Love This Recipe
Let me tell you why these bars are about to become your new favorite fall dessert. I’ve tested this recipe about six times now (rough job, I know) and every single batch has disappeared faster than I expected. Here’s what makes them special:
- No oven required. Seriously. Zero baking. If you can stir and press, you can make these.
- Simple ingredients. You probably have most of this stuff in your pantry already. No weird specialty items.
- Perfect for fall gatherings. Thanksgiving, Friendsgiving, Halloween parties, or just a cozy night in.
- Crowd-pleaser. I’ve served these to kids, adults, and picky eaters. Everyone goes back for seconds.
- Make-ahead friendly. They actually taste better after sitting in the fridge overnight. Less stress on the day you need them.
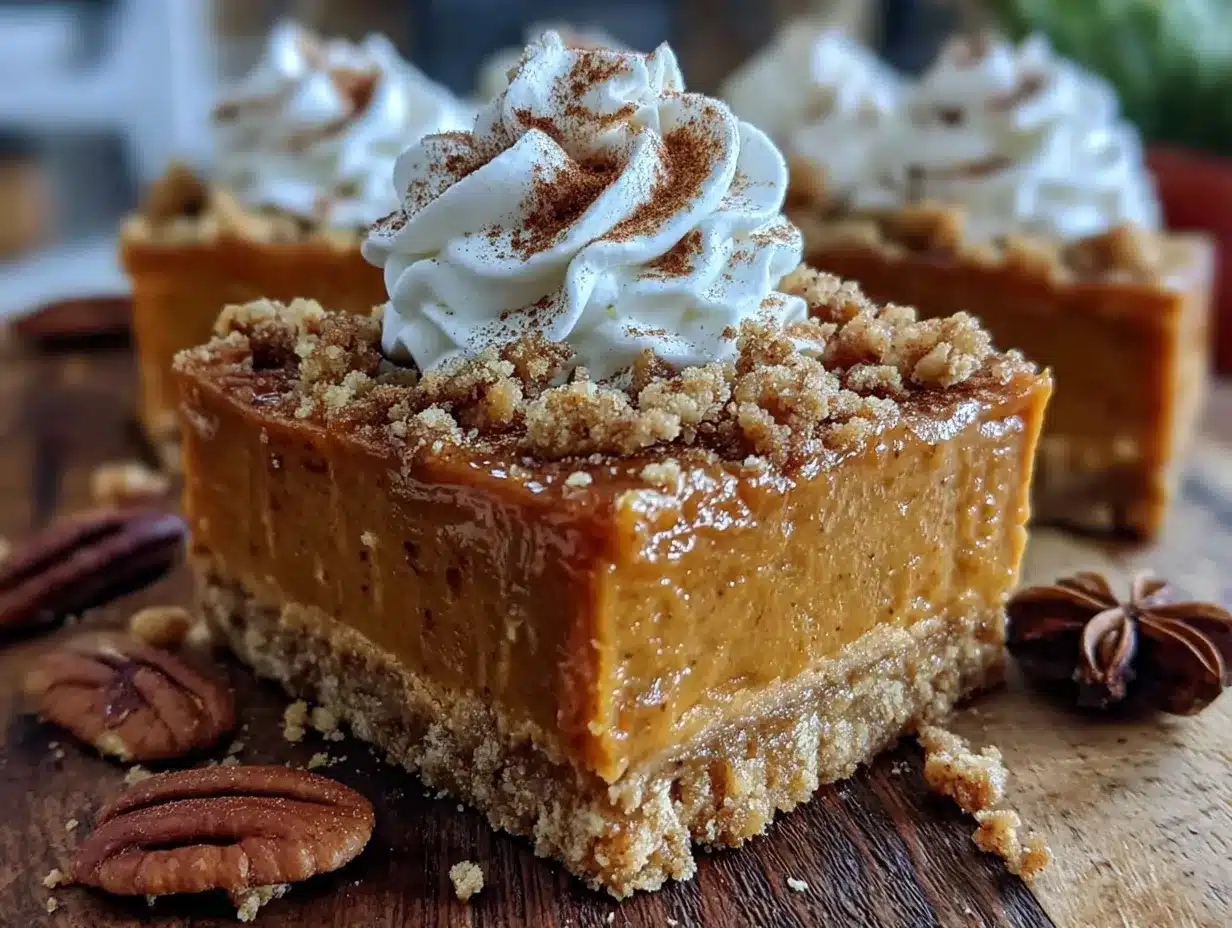
What really sets these bars apart from other pumpkin cheesecake recipes is the texture. The filling is incredibly smooth and creamy, thanks to room temperature cream cheese and a little trick I picked up from making too many cheesecakes in my twenties. It’s dense but not heavy, sweet but not cloying, and the pumpkin flavor is warm and spiced without tasting like a candle. The graham crust stays firm and buttery, which gives each bite that perfect contrast between crunchy and silky.
I’m not gonna lie—I’ve made these bars on a weeknight after a long day, and they made everything feel better. There’s something about that first bite, when the cold, creamy filling hits your tongue and the cinnamon and nutmeg just wrap around you like a cozy sweater. It’s comfort food, no-bake style. And you deserve it.
What Ingredients You Will Need
This recipe uses simple, everyday ingredients that come together to create something truly special. Most of these are pantry staples for fall baking, which means you might already have everything you need.
For the Graham Cracker Crust
- 2 cups graham cracker crumbs (about 14-16 full sheets, crushed finely)
- 1/2 cup unsalted butter, melted (I use salted butter in a pinch and just skip the added salt)
- 1/4 cup granulated sugar
- 1/4 teaspoon salt (skip if using salted butter)
For the Pumpkin Cheesecake Filling
- 16 ounces cream cheese, softened to room temperature (full-fat works best for texture)
- 1 cup pumpkin puree (not pumpkin pie filling—make sure it’s 100% pumpkin)
- 1/2 cup granulated sugar
- 1/4 cup packed light brown sugar
- 1 teaspoon vanilla extract
- 1 1/2 teaspoons pumpkin pie spice (or make your own with cinnamon, nutmeg, ginger, cloves)
- 1/2 teaspoon ground cinnamon
- 1 cup heavy whipping cream, cold
- 2 tablespoons powdered sugar
For the Topping (optional but recommended)
- 1/2 cup heavy whipping cream, cold
- 1 tablespoon powdered sugar
- 1/4 teaspoon vanilla extract
- Caramel sauce for drizzling
- Crushed graham crackers for garnish
A quick note on cream cheese: please let it come to room temperature. I know we’re all impatient, but cold cream cheese will give you a lumpy filling that no amount of mixing can fix. Set it out about an hour before you start. Same goes for the pumpkin puree—room temperature ingredients blend together much smoother.
For the graham cracker crumbs, you can buy them pre-crushed, but I prefer crushing my own. The texture is better, and honestly, smashing things with a rolling pin is kind of therapeutic. If you have a food processor, that works too. Just pulse until you get fine crumbs with no big chunks.
I recommend using Libby’s pumpkin puree if you can find it. It has the right consistency—not too watery, not too thick. Some store brands work fine, but I’ve had a few that were a bit runny and made the filling softer than I wanted. If your pumpkin puree looks watery, pat it dry with a paper towel before mixing.
Equipment Needed
You don’t need a fancy kitchen to make these bars. Here’s what you’ll need:
- 9×9-inch baking dish (an 8×8 works too, bars will be slightly thicker)
- Mixing bowls (one large, one medium)
- Electric hand mixer or stand mixer (you can do this by hand, but your arm will thank you for the mixer)
- Measuring cups and spoons
- Spatula
- Plastic wrap or parchment paper for lining the dish
- Rolling pin or food processor for crushing graham crackers
If you don’t have a 9×9 dish, you can use a 9×13 and the bars will just be thinner. Reduce the chill time slightly since they’ll set faster. I’ve also made these in a springform pan for a prettier presentation—just make sure the sides are tall enough.
Pro tip: line your dish with parchment paper, leaving some overhang on two sides. This makes lifting the whole block of cheesecake out so much easier. Learned that one after a particularly messy extraction attempt.
Preparation Method
Alright, let’s get into it. This is easier than you think, I promise.
Step 1: Make the Crust
Crush your graham crackers into fine crumbs. You want about 2 cups. In a medium bowl, mix the crumbs with the sugar and salt. Pour in the melted butter and stir until every crumb is coated. It should look like wet sand.
Press the mixture firmly into your parchment-lined 9×9 dish. Use the bottom of a measuring cup or a flat glass to really pack it down. The firmer you press, the cleaner your slices will be later. Pop it in the fridge to set while you make the filling.
Step 2: Whip the Cream
In a medium bowl, pour the cold heavy cream and add the powdered sugar. Using your hand mixer, whip on medium-high speed until stiff peaks form. This takes about 3-4 minutes. You’ll know it’s ready when you lift the beaters and the cream holds its shape without drooping. Set this in the fridge for now.
Step 3: Make the Cheesecake Filling
In a large bowl, beat the softened cream cheese with an electric mixer until it’s completely smooth. No lumps allowed. Scrape down the sides and bottom of the bowl at least once.
Add the granulated sugar and brown sugar, then beat again until combined. Mix in the pumpkin puree, vanilla extract, pumpkin pie spice, and cinnamon. Beat until everything is smooth and uniform. Taste it here—I always do. Adjust the spices if you want more warmth.
Step 4: Fold in the Whipped Cream
Take your whipped cream out of the fridge. Using a spatula, gently fold it into the pumpkin mixture. Don’t stir vigorously—you want to keep as much air in the whipped cream as possible. Fold just until no white streaks remain. The filling should be light, airy, and a beautiful pale orange color.
Step 5: Assemble and Chill
Pour the filling over the chilled crust and spread it evenly with your spatula. Give the dish a few gentle taps on the counter to release any air bubbles. Cover with plastic wrap and refrigerate for at least 6 hours, but overnight is better. I know, waiting is the hardest part. But trust me, the bars need this time to set properly.
Step 6: Make the Topping and Serve
When you’re ready to serve, make the whipped cream topping. Whip the cream, powdered sugar, and vanilla until soft peaks form. Spread or pipe it over the set cheesecake. Drizzle with caramel sauce and sprinkle with extra crushed graham crackers if you’re feeling fancy.
Slice into 9 or 12 squares, depending on how generous you’re feeling. Use a sharp knife and wipe it clean between cuts for neat edges.
Cooking Tips & Techniques
I’ve made a lot of mistakes so you don’t have to. Here’s what I learned:
- Room temperature ingredients are non-negotiable. Cold cream cheese = lumpy filling. Cold pumpkin puree = uneven mixing. Set everything out an hour before you start.
- Don’t overwhip the cream. You want stiff peaks, but if you go too far, you’ll end up with butter. Stop as soon as the cream holds its shape.
- Press the crust firmly. Loose crust = crumbly bars that fall apart when you try to cut them. Use a measuring cup and really lean into it.
- Chill overnight if possible. Six hours is the minimum, but twelve hours gives you a much cleaner slice. The flavors also meld together better.
- Use a hot knife for clean cuts. Run your knife under hot water, dry it, then slice. Wipe and repeat between cuts.
One time I was in a rush and only chilled these for four hours. The bars were still a bit soft and didn’t hold their shape well. They still tasted amazing (we ate them with spoons), but they weren’t pretty. Give them the full time. Your patience will be rewarded.
Variations & Adaptations
This recipe is super flexible. Here are some ways to change it up:
- Gluten-free version: Use gluten-free graham crackers or crushed gluten-free cookies. Everything else is naturally gluten-free.
- Dairy-free option: Use dairy-free cream cheese and coconut cream instead of heavy cream. The texture will be slightly different, but still delicious.
- Extra pumpkin spice: Add a pinch of ground ginger and cloves to really amp up the fall flavor.
- Chocolate twist: Swap the graham crust for crushed chocolate cookies. The chocolate-pumpkin combo is surprisingly good.
- Bourbon caramel: Add a tablespoon of bourbon to your caramel sauce for an adult version. I tried this last Thanksgiving and it was a hit.
If you’re feeling adventurous, try adding a layer of pumpkin spice syrup drizzled over the crust before adding the filling. It adds another layer of flavor that’s subtle but lovely.
Serving & Storage Suggestions
These bars are best served cold, straight from the fridge. The texture is firm and creamy, and the crust stays perfectly crisp. I like to let them sit at room temperature for about 5 minutes before serving—just enough to take the chill off without losing the structure.
For a beautiful presentation, pipe the whipped cream in rosettes or swirls. Drizzle caramel sauce in a zigzag pattern and sprinkle crushed graham crackers on top. A few fresh mint leaves add a nice pop of green if you’re serving these for a holiday.
These pair beautifully with a warm drink. Try serving them alongside a creamy iced pumpkin chai latte or a cozy spiced pumpkin apple cider mocktail for the ultimate fall treat spread.
Storage: Keep the bars covered in the refrigerator for up to 5 days. They actually taste better on day two or three as the flavors continue to meld. If you’ve added the whipped cream topping, it’s best to add that right before serving, as it can deflate over time.
Freezing: These freeze beautifully. Wrap the entire pan (or individual bars) tightly in plastic wrap, then foil. Freeze for up to 3 months. Thaw overnight in the refrigerator before serving. Add fresh whipped cream after thawing.
Nutritional Information & Benefits
Here’s the approximate nutritional breakdown for one bar (based on 9 servings):
- Calories: 410
- Fat: 28g
- Carbohydrates: 37g
- Protein: 5g
- Sugar: 26g
- Fiber: 2g
Pumpkin is packed with vitamin A, which is great for your eyes and immune system. It’s also a good source of fiber and antioxidants. The cream cheese and heavy cream add calcium and protein, so these bars aren’t just delicious—they’ve got some nutritional value too. Not that I’m claiming they’re health food, but hey, every little bit counts.
If you’re watching your sugar intake, you can reduce the sugar in the filling by about a quarter cup without affecting the texture too much. The bars will be slightly less sweet but still plenty satisfying.
Conclusion
These easy no-bake pumpkin cheesecake bars with graham crust have become my fall signature dessert, and I think they’re about to become yours too. They’re simple enough for a Tuesday night treat but impressive enough for a Thanksgiving table. No oven required, minimal cleanup, and maximum flavor.
I love that this recipe doesn’t ask much of you. It doesn’t demand precision timing or fancy techniques. It just asks for a little patience while it chills, and in return, it gives you something truly special. The kind of dessert that makes people close their eyes and go “mm” after the first bite.
If you make these bars, I’d love to hear about it. Leave a comment below and tell me how they turned out, what variations you tried, or if you served them at a gathering. Tag me in your photos—I genuinely get excited seeing other people enjoy recipes I’ve shared.
Go ahead, give yourself a break from the oven this fall. You deserve these bars. And honestly? They’re worth every minute of that overnight chill.
Frequently Asked Questions
Can I use low-fat cream cheese?
You can, but the filling won’t be as rich or firm. Full-fat cream cheese gives the best texture and flavor. If you use low-fat, expect a slightly softer set.
How do I know when the bars are fully set?
The bars should feel firm to the touch, not jiggly. If you gently shake the pan, the center should move very little. Minimum 6 hours, but overnight is safest.
Can I make these without a mixer?
Yes, but you’ll need some elbow grease. Make sure the cream cheese is very soft, and whisk the cream by hand until stiff. It’s doable, just takes longer.
Can I use pumpkin pie filling instead of pumpkin puree?
No, pumpkin pie filling already has sugar and spices added. It will throw off the sweetness and texture. Stick with 100% pumpkin puree.
How far in advance can I make these?
You can make them up to 3 days ahead. Keep them covered in the fridge and add the whipped cream topping right before serving. They actually taste better after a day or two.
Pin This Recipe!
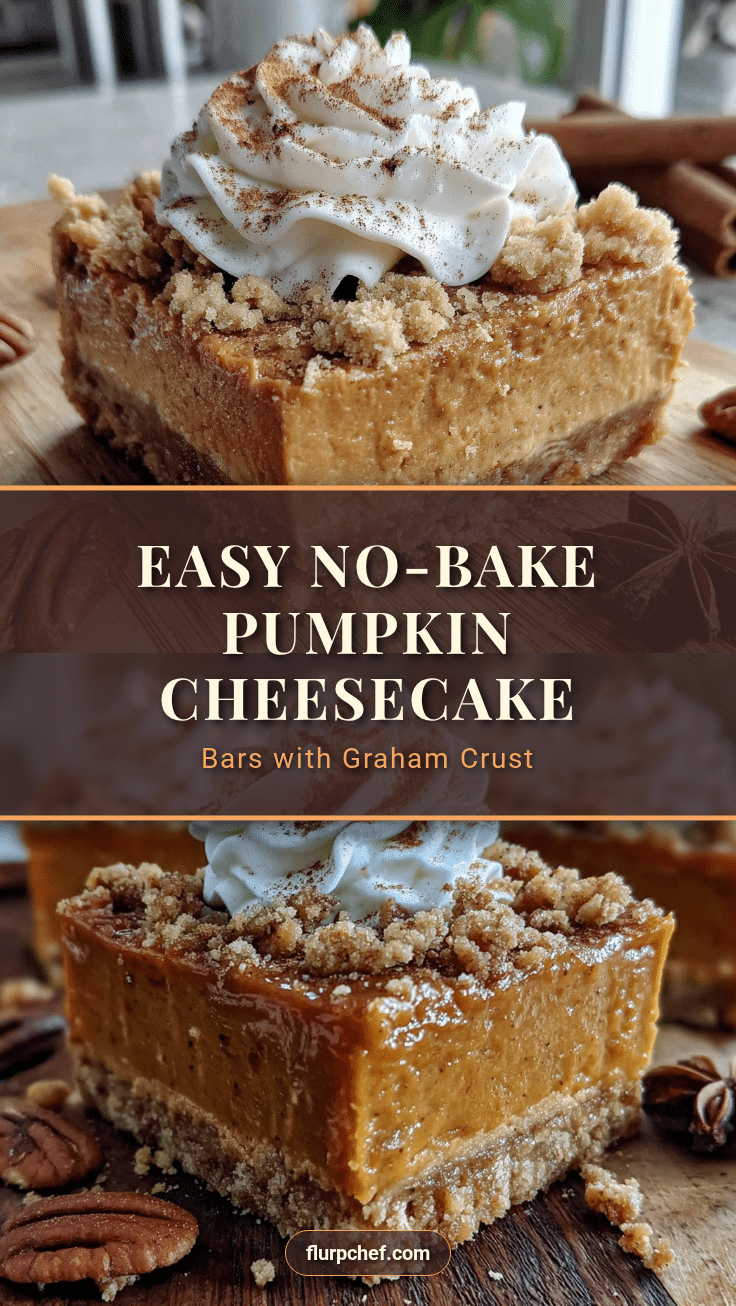
Easy No-Bake Pumpkin Cheesecake Bars with Perfect Graham Crust
These easy no-bake pumpkin cheesecake bars with graham crust are the perfect fall dessert. No oven required, simple ingredients, and a creamy, spiced pumpkin filling on a buttery graham cracker crust.
- Prep Time: 20 minutes
- Cook Time: 0 minutes
- Total Time: 6 hours 20 minutes (includes chilling)
- Yield: 9-12 servings 1x
- Category: Dessert
- Cuisine: American
Ingredients
- 2 cups graham cracker crumbs (about 14–16 full sheets, crushed finely)
- 1/2 cup unsalted butter, melted
- 1/4 cup granulated sugar
- 1/4 teaspoon salt (skip if using salted butter)
- 16 ounces cream cheese, softened to room temperature
- 1 cup pumpkin puree (not pumpkin pie filling)
- 1/2 cup granulated sugar
- 1/4 cup packed light brown sugar
- 1 teaspoon vanilla extract
- 1 1/2 teaspoons pumpkin pie spice
- 1/2 teaspoon ground cinnamon
- 1 cup heavy whipping cream, cold
- 2 tablespoons powdered sugar
- 1/2 cup heavy whipping cream, cold (for topping)
- 1 tablespoon powdered sugar (for topping)
- 1/4 teaspoon vanilla extract (for topping)
- Caramel sauce for drizzling
- Crushed graham crackers for garnish
Instructions
- Crush graham crackers into fine crumbs. In a medium bowl, mix crumbs with 1/4 cup sugar and salt. Pour in melted butter and stir until every crumb is coated. Press mixture firmly into a parchment-lined 9×9-inch dish. Refrigerate while making filling.
- In a medium bowl, whip 1 cup cold heavy cream and 2 tablespoons powdered sugar with an electric mixer on medium-high speed until stiff peaks form, about 3-4 minutes. Set in fridge.
- In a large bowl, beat softened cream cheese until smooth. Add 1/2 cup granulated sugar and brown sugar; beat until combined. Mix in pumpkin puree, 1 teaspoon vanilla, pumpkin pie spice, and cinnamon until smooth.
- Gently fold whipped cream into pumpkin mixture using a spatula until no white streaks remain. Pour filling over chilled crust and spread evenly. Tap dish gently to release air bubbles.
- Cover with plastic wrap and refrigerate for at least 6 hours, preferably overnight.
- Before serving, make topping: whip 1/2 cup cold heavy cream, 1 tablespoon powdered sugar, and 1/4 teaspoon vanilla until soft peaks form. Spread or pipe over set cheesecake. Drizzle with caramel sauce and sprinkle with crushed graham crackers. Slice into 9 or 12 squares.
Notes
Room temperature ingredients are essential for a smooth filling. Chill overnight for best results. Use a hot knife for clean slices. Store covered in refrigerator for up to 5 days. Freeze for up to 3 months.
Nutrition
- Serving Size: 1 bar (based on 9 se
- Calories: 410
- Sugar: 26
- Sodium: 320
- Fat: 28
- Saturated Fat: 16
- Carbohydrates: 37
- Fiber: 2
- Protein: 5
Keywords: no-bake pumpkin cheesecake bars, pumpkin cheesecake, no-bake dessert, fall dessert, Thanksgiving dessert, graham cracker crust