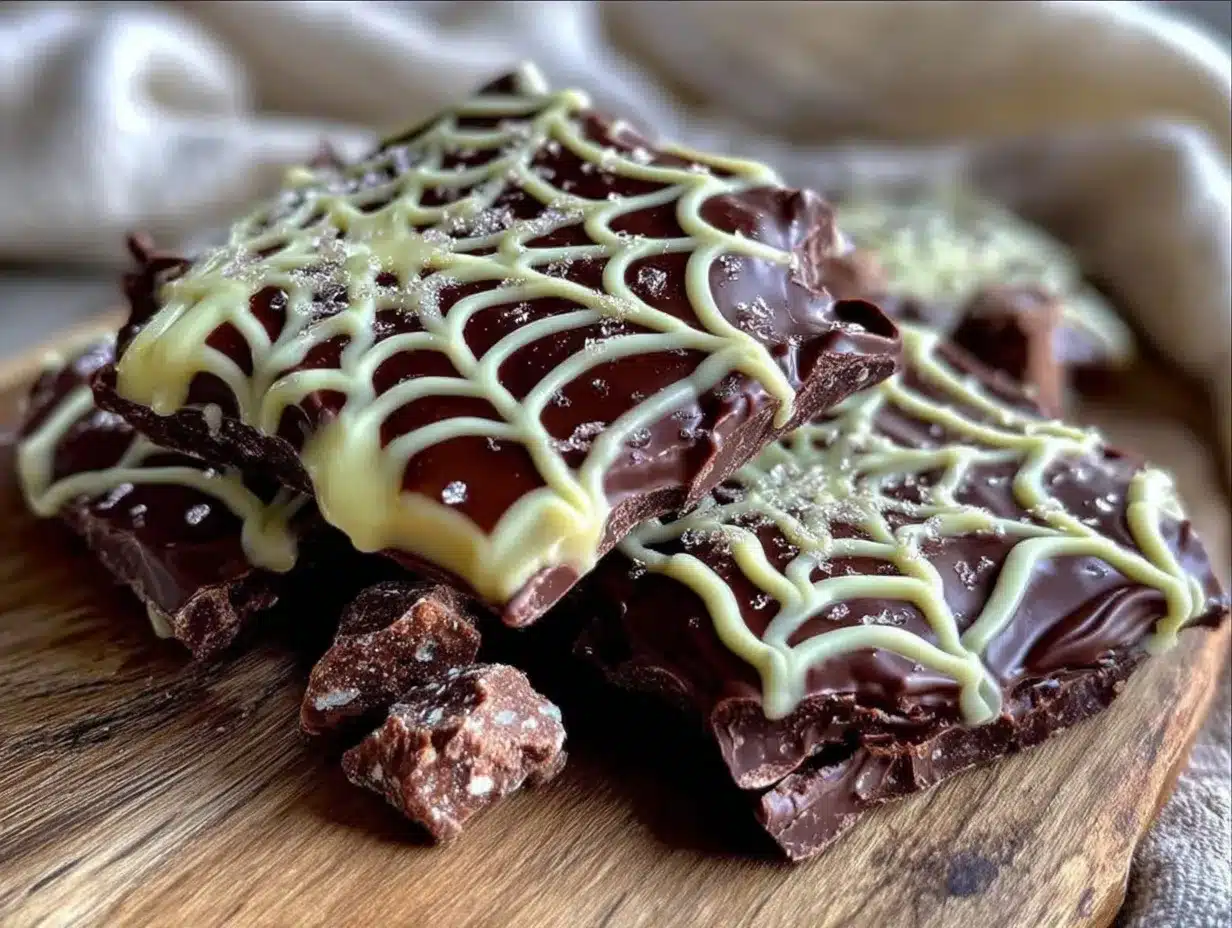
“You’ve got to see this,” my friend messaged me, sending a grainy photo of a chocolate bark that looked like a tiny spiderweb had been spun right on top. Honestly, I thought it was some fancy artisan thing that required a ton of skill—because who really has time for intricate chocolate work? But after a quick chat and a little nudge, I decided to give the perfect spiderweb chocolate bark for spooky treats a try. What started as a Halloween experiment became one of those recipes I found myself making multiple times in October.
The process was way less intimidating than I expected. I mean, melting chocolate and drawing a spiderweb? How hard could it be? Yet, the first time I pulled that tray from the fridge, the delicate web pattern looked just like the photo. And the best part? It tasted as good as it looked—rich, creamy chocolate with a hint of vanilla sweetness that felt like a cozy nod to the season.
What really stuck with me about this recipe, beyond the fun design, was how it turned simple ingredients into something magically festive. It wasn’t just a treat; it was a little moment of joy on a chilly night, a sweet way to bring some spooky spirit without fuss or mess. That quiet satisfaction is why this spiderweb chocolate bark has become a staple for my Halloween gatherings, and I have a feeling it might just become one for you, too.
Why You’ll Love This Recipe
Making the perfect spiderweb chocolate bark for spooky treats has become a go-to for me every fall, and here’s why:
- Quick & Easy: This recipe comes together in about 20 minutes, plus chilling time, which means you can whip it up even if you’re scrambling last minute before a Halloween party.
- Simple Ingredients: You probably already have the main ingredients—melting chocolate, a little cream, and some vanilla extract. No need for specialty shops or odd flavors.
- Perfect for Halloween Parties: The spiderweb design is spooky without being scary, making it perfect for kids and adults alike who want a festive treat.
- Crowd-Pleaser: Every time I bring this bark to a gathering, it disappears fast. The texture is just right—crisp but creamy, with that irresistible chocolate snap.
- Unbelievably Delicious: The contrast between the dark chocolate base and the creamy white chocolate web is not just pretty, it’s a flavor combo that hits the spot.
What makes this recipe different from other chocolate bark versions? Honestly, it’s the technique of creating that spiderweb pattern with white chocolate that feels fancy but is surprisingly doable. I like to use a piping bag with a fine tip (or even a zip-top bag with a corner snipped off) to draw the web, which makes the lines clean and crisp. Plus, adding a touch of vanilla to the white chocolate brings a subtle depth that complements the bittersweet dark chocolate perfectly.
This recipe isn’t just a Halloween novelty—it’s a little ritual that turns a simple chocolate bark into a fun, thematic treat that invites smiles and compliments. It’s that kind of recipe you come back to, year after year, because it’s easy to make, easy to share, and just plain delicious.
What Ingredients You Will Need
This recipe uses simple, wholesome ingredients to create bold flavor and a satisfying texture without any complex steps. Most are pantry staples, and substitutions are easy if needed.
- Dark chocolate (10 oz / 280 g): Choose good-quality baking or couverture chocolate for a smooth, glossy finish. I prefer brands like Ghirardelli or Lindt for their reliable melt and flavor.
- White chocolate (6 oz / 170 g): Use real white chocolate chips or bars, not white candy melts, for the best texture and taste. Adding vanilla extract to this helps deepen the flavor.
- Vanilla extract (1 tsp): Adds a warm, subtle note to the white chocolate; pure vanilla extract is best.
- Heavy cream (2 tbsp / 30 ml): Optional, but I add it to the white chocolate for extra creaminess and easier piping.
- Optional toppings: For added spooky flair—mini marshmallows, edible glitter, or crushed candy canes (great for a twist after Halloween).
If you want to make this recipe dairy-free, swap the heavy cream for coconut cream and use dairy-free chocolate alternatives. For a gluten-free treat, rest assured all these ingredients are naturally gluten-free, which is great for parties with dietary restrictions.
In summer, when I’m not craving spooky treats, I sometimes swap the white chocolate spiderweb for colorful drizzle—like raspberry or caramel—but for Halloween, the classic black-and-white contrast is unbeatable.
Equipment Needed
- Baking sheet or tray: A rimmed tray lined with parchment paper or a silicone baking mat works best for easy removal.
- Microwave-safe bowls or double boiler: For melting the chocolates gently. I prefer the double boiler method to keep chocolate smooth and avoid scorching, but a quick burst in the microwave with stirring works fine.
- Small piping bag or zip-top bag: Essential for drawing the spiderweb lines with white chocolate. If you don’t have a piping bag, just snip a tiny corner off a zip-top bag.
- Spatula: For spreading the melted dark chocolate evenly.
- Toothpick or skewer: Used to drag through the white chocolate lines to create the web effect.
I once tried using a plastic spoon to pipe the web, but it was too thick and clumsy—trust me, the piping or zip-top bag method gives the best control. If you’re on a budget, a simple silicone mat and a small zip bag are all you need to make this look professional.
Preparation Method
- Prepare your workspace: Line a baking sheet (about 9×13 inches / 23×33 cm) with parchment paper or a silicone mat. This makes cleanup easier and helps the bark release smoothly.
- Melt the dark chocolate: Chop the dark chocolate if using bars. Melt it gently using a double boiler or microwave in 30-second bursts, stirring in between until smooth. This should take about 5-7 minutes. Avoid overheating—the chocolate should be glossy and fluid, not grainy.
- Spread the dark chocolate: Pour the melted dark chocolate onto the lined baking sheet. Use a spatula to gently spread it to about 1/4 inch (6 mm) thickness. The edges can be a bit uneven—that’s part of the charm. Allow this to set at room temperature for about 10 minutes, or chill for 5 to speed things up.
- Melt the white chocolate: While the dark chocolate firms up, melt the white chocolate in a microwave or double boiler. Stir in the vanilla extract and heavy cream for smoothness. The white chocolate should be pourable but not runny.
- Create the spiderweb pattern: Transfer the white chocolate into your piping bag or zip-top bag with a tiny snip at the corner. Pipe concentric circles over the dark chocolate surface, starting from the center working outward.
- Draw the web: Using a toothpick or skewer, drag lines from the center to the edges through the white chocolate circles. Do this gently to avoid mixing the two chocolates too much. This step creates the classic spiderweb design. You’ll see the pattern form as you pull the lines outward, which is oddly satisfying.
- Chill to set: Place the tray in the refrigerator for about 20-30 minutes until the bark is fully firm and snaps cleanly when broken.
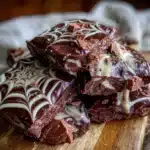
- Break and serve: Once set, break the bark into rustic pieces. You can make chunks as big or small as you want. Store leftovers in an airtight container in a cool place or refrigerator.
Tip: If your white chocolate starts to harden while piping, gently warm it again for a few seconds. Also, keep an eye on the dark chocolate thickness; too thin and the bark breaks too easily, too thick and it’s hard to bite through.
Cooking Tips & Techniques
Making the perfect spiderweb chocolate bark hinges on a few simple but important tips I’ve learned the hard way:
- Temperature control is key: Chocolate hates sudden temperature changes. Keep your bowls warm but not hot to avoid seizing. Stir often.
- Use quality chocolate: It really makes a difference in gloss and snap. Cheap chocolate can be grainy or dull and harder to work with.
- Thicken the dark chocolate layer: About 1/4 inch thick is ideal. Too thin and the bark won’t hold up; too thick and it’s clumsy to eat.
- Practice your web drawing: Don’t stress if your first few lines look wonky. The beauty of this bark is its rustic charm. A steady hand helps but isn’t mandatory.
- Work quickly: Chocolate sets fast, so have your tools ready before melting. If the white chocolate cools and thickens too much, it’s tough to pipe.
One time, I rushed the chilling step and ended up with melted fingers instead of crisp bark (lesson learned!). Also, multitasking by melting the white chocolate while the dark layer sets saves time and keeps the process flowing smoothly.
Variations & Adaptations
While the classic dark and white chocolate spiderweb is my favorite, I’ve played around with some fun twists:
- White chocolate base with dark web: Flip the colors for a lighter look—just swap the chocolate types in the method.
- Peanut butter swirl: Add dollops of peanut butter to the dark chocolate before spreading, then swirl for a rich, nutty flavor.
- Spiced bark: Mix a pinch of cinnamon or chili powder into the dark chocolate for a subtle kick that’s perfect for fall.
- Vegan version: Use dairy-free dark and white chocolate alternatives and coconut cream for the drizzle.
- Seasonal toppings: Sprinkle crushed candy corn, edible glitter, or miniature candy eyeballs onto the wet chocolate for extra festive flair.
Once, I tried piping the spiderweb with colored candy melts for a rainbow effect—kids loved it! You can also adjust thickness or size of the bark pieces depending on your presentation needs. For a quick twist, check out how I paired chocolate bark with my cozy single serving casserole recipe for a complete seasonal snack board.
Serving & Storage Suggestions
Serve your spiderweb chocolate bark at room temperature for the best snap and flavor. It looks fantastic broken into uneven shards on a black or orange platter—perfect for Halloween gatherings or just a spooky movie night.
Pair it with warm drinks like spiced apple cider or a creamy hot chocolate to complement the rich chocolate flavors. It’s also a fun after-dinner treat when you want something sweet but not too heavy.
For storing, keep the bark in an airtight container at cool room temperature or in the fridge if your kitchen is warm. It’ll stay fresh for up to two weeks, though it rarely lasts that long in my house! To re-crisp chilled bark, let it sit out for 15 minutes before serving.
Flavors tend to mellow and blend a bit over time, so if you make it a day ahead, that spiderweb pattern will still look great and taste even smoother. Just avoid freezing, as chocolate can bloom and get a dull appearance.
Nutritional Information & Benefits
This spiderweb chocolate bark is an indulgent treat but made with real chocolate ingredients, it offers some surprising benefits:
| Per serving (about 1 oz / 28 g) | Amount |
|---|---|
| Calories | 150-170 |
| Fat | 10-12 g |
| Sugar | 14-16 g |
| Protein | 1-2 g |
Dark chocolate contains antioxidants and minerals like magnesium, which can be a small health bonus when enjoyed in moderation. The white chocolate adds sweetness and creaminess but generally has more sugar and fat.
For those watching sugar intake, you can experiment with sugar-free or stevia-sweetened chocolates, though the texture may differ slightly. This recipe is naturally gluten-free but contains dairy, so adjust accordingly if you have allergies.
From a wellness perspective, I find this chocolate bark to be a satisfying treat that fits well into an occasional indulgence mindset, especially when paired with wholesome meals like the easy juicy chicken breast with honey mustard glaze I love making for quick dinners.
Conclusion
The perfect spiderweb chocolate bark for spooky treats is one of those recipes that proves simple ingredients and a little creativity can make a memorable dessert. It’s quick to prepare, visually impressive, and offers that cozy chocolate comfort you want when the nights turn cooler and the Halloween decorations come out.
Feel free to customize the web design, try different chocolate combos, or add toppings that suit your style. Personally, I love how this bark brings a smile every time I pull it from the fridge, whether it’s for a party or a quiet evening treat.
If you give this recipe a go, I’d love to hear how it turns out—or what fun twists you add! Sharing recipes and kitchen stories is what keeps this little corner of the internet lively and sweet. Happy spooky baking!
FAQs
Can I use milk chocolate instead of dark chocolate?
Yes, milk chocolate works well, but keep in mind the bark will be sweeter and less intense. Adjust the white chocolate amount if you want a balanced look.
How do I prevent the white chocolate from hardening too fast while piping?
Keep small amounts warm by microwaving for a few seconds as needed. Work quickly and close the piping bag when not in use to retain heat.
Can I store spiderweb chocolate bark at room temperature?
Yes, in a cool, dry place away from sunlight. If your kitchen is warm or humid, refrigerate to avoid melting.
What’s the best way to break the bark into pieces?
Once fully set, flex the parchment paper slightly or use your hands to break into rustic chunks. Avoid using a knife to keep the edges natural.
Can I make this recipe vegan?
Absolutely! Use dairy-free dark and white chocolate alternatives and substitute heavy cream with coconut cream for the drizzle.
Pin This Recipe!

Perfect Spiderweb Chocolate Bark Recipe Easy Homemade Spooky Treats Ideas
A quick and easy Halloween treat featuring a rich dark chocolate base with a creamy white chocolate spiderweb design, perfect for festive gatherings.
- Prep Time: 10 minutes
- Cook Time: 10 minutes
- Total Time: 40-50 minutes (including chilling time)
- Yield: About 12 servings 1x
- Category: Dessert
- Cuisine: American
Ingredients
- 10 oz (280 g) dark chocolate (baking or couverture chocolate)
- 6 oz (170 g) white chocolate (chips or bars, not candy melts)
- 1 tsp vanilla extract
- 2 tbsp (30 ml) heavy cream (optional)
- Optional toppings: mini marshmallows, edible glitter, crushed candy canes
Instructions
- Line a 9×13 inch (23×33 cm) baking sheet with parchment paper or a silicone mat.
- Chop and melt the dark chocolate gently using a double boiler or microwave in 30-second bursts, stirring until smooth (about 5-7 minutes).
- Pour the melted dark chocolate onto the lined baking sheet and spread evenly to about 1/4 inch (6 mm) thickness. Let set at room temperature for 10 minutes or chill for 5 minutes.
- Melt the white chocolate using a microwave or double boiler. Stir in vanilla extract and heavy cream until smooth and pourable.
- Transfer the white chocolate to a piping bag or zip-top bag with a small corner snipped off. Pipe concentric circles over the dark chocolate surface starting from the center.
- Use a toothpick or skewer to drag lines from the center to the edges through the white chocolate circles to create the spiderweb pattern.
- Chill the tray in the refrigerator for 20-30 minutes until the bark is firm and snaps cleanly.
- Break the bark into rustic pieces and serve. Store leftovers in an airtight container in a cool place or refrigerator.
Notes
If white chocolate hardens while piping, gently warm it again for a few seconds. Keep dark chocolate layer about 1/4 inch thick for best texture. Work quickly as chocolate sets fast. Use quality chocolate for best results. Store bark in airtight container at cool room temperature or refrigerate if warm.
Nutrition
- Serving Size: 1 oz (28 g) piece
- Calories: 150170
- Sugar: 1416
- Fat: 1012
- Protein: 12
Keywords: chocolate bark, spiderweb chocolate, Halloween treats, easy chocolate recipe, spooky desserts, homemade chocolate bark


