Marta wasn’t trying to impress anyone. I’d stopped by her place to borrow a cake pan—she lived three doors down and I was in the middle of a baking disaster—and the smell hit me before I even got through the screen door. That scent? Garlic, paprika, and something impossibly savory, all wrapped up in the unmistakable aroma of perfectly crisped chicken skin. I stood there in her doorway, cake pan forgotten, while she shrugged and said, “Oh, it’s just chicken thighs. Air fryer thing. I make them for game nights.”
“Just chicken thighs.” Right. Like it was nothing. Like she hadn’t just created the most mouthwatering smell to ever drift through a suburban hallway on a Tuesday afternoon. I mean, honestly, I think I said something dumb like, “Wow, that smells… aggressive.” She laughed and handed me a napkin with a crispy thigh resting on it. That first bite? The skin cracked like glass, the meat underneath was so juicy it practically melted, and I stood there in her kitchen, eating a chicken thigh with my hands like I hadn’t been fed in weeks. Marta just watched me, amused, and said, “Told you. Game night.”
That was three years ago, and I’ve been making these crispy air fryer chicken thighs ever since. Not just for game nights, either—for every party, every potluck, every time I need a dish that disappears before I even get a chance to sit down. You know that feeling when you bring something to a gathering and people keep circling back to the platter? That’s this recipe. The best part? Marta taught me her trick that day, and I’ve been tweaking it ever since. The casualness of it all is what stuck with me—she wasn’t trying to be a hero. She just knew good food didn’t have to be complicated. And honestly? She was right.
Why You’ll Love This Recipe
Let’s be real for a second. Hosting a party is stressful enough without worrying about whether the food will actually deliver. You want something that looks impressive, tastes incredible, and doesn’t keep you stuck in the kitchen while your guests are having fun. That’s exactly where these crispy air fryer chicken thighs come in. They’re the kind of appetizer that makes people think you spent hours on them—when really, the air fryer does all the heavy lifting.
- Quick & Easy: From start to finish, you’re looking at about 25 minutes. No marinating overnight, no complicated steps. Just season, air fry, and serve.
- Simple Ingredients: Chances are, you already have most of these in your pantry. Garlic powder, paprika, salt, pepper—the basics that deliver big flavor without a specialty shopping trip.
- Perfect for Parties: These are made for gatherings. They’re easy to grab, eat with your hands, and pair with dips or sides. Plus, they scale beautifully—double or triple the batch without any issues.
- Crowd-Pleaser: I’ve brought these to Super Bowl parties, birthday dinners, and casual backyard hangs. Every single time, the platter comes back empty. Kids love them. Adults love them. Even picky eaters go back for seconds.
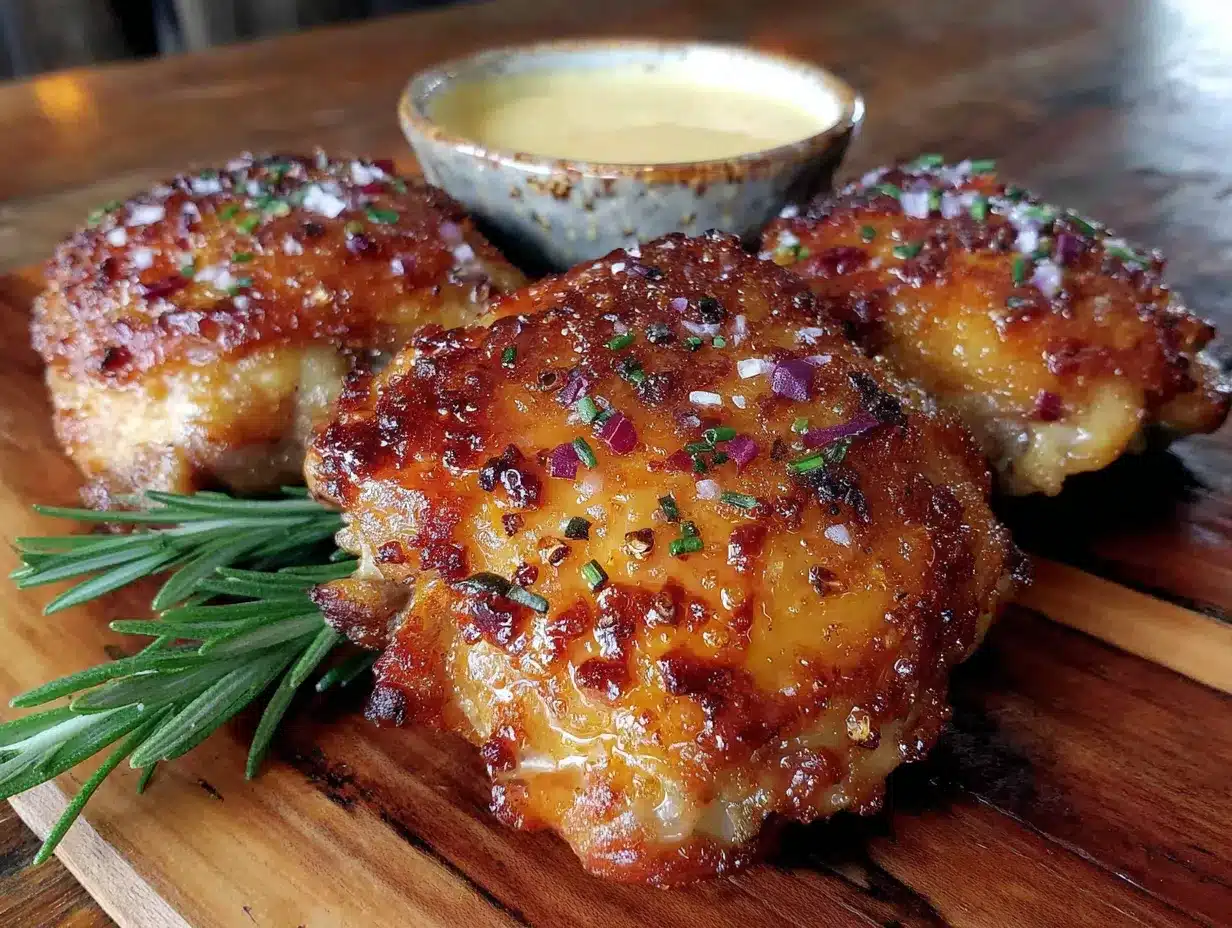
- Unbelievably Delicious: The skin gets this incredible crunch—like crackling—while the meat stays tender and juicy. It’s the texture contrast that makes people close their eyes after the first bite. I’ve seen it happen more times than I can count.
What makes this version different? It’s the technique. Most recipes tell you to just toss the thighs in the air fryer and hope for the best. But I’ve tested this dozens of times—different temperatures, different seasonings, different prep methods. The secret is in how you pat the skin dry, how you layer the seasoning, and how you arrange them in the basket. No overcrowding. No soggy skin. Just pure, golden-brown perfection every single time.
This is the recipe I turn to when I want to impress without the stress. It’s comfort food that fits any occasion—from a fancy dinner party to a laid-back movie night. And honestly? It’s the kind of dish that makes you look like a hero in the kitchen without breaking a sweat.
What Ingredients You Will Need
This recipe relies on simple, pantry-friendly ingredients that work together to create that signature crispy exterior and juicy interior. You don’t need anything fancy—just good-quality chicken and the right seasoning blend. Here’s what you’ll need:
For the Chicken
- 2 pounds bone-in, skin-on chicken thighs (about 6-8 thighs) — The skin is crucial for that crispy finish. Boneless works in a pinch, but you’ll lose some of that crackling texture. I prefer thighs from a trusted brand like Bell & Evans or a local butcher for the best flavor.
- 1 tablespoon olive oil — Helps the seasoning stick and promotes even browning. You can use avocado oil if you prefer a higher smoke point.
For the Seasoning Blend
- 1 teaspoon garlic powder — Not garlic salt. Garlic powder distributes evenly without making things too salty.
- 1 teaspoon smoked paprika — This is non-negotiable in my kitchen. It adds that deep, smoky flavor that makes the thighs taste like they’ve been grilled. Regular paprika works, but smoked is better.
- 1 teaspoon onion powder — Adds a subtle sweetness that balances the savory notes.
- ½ teaspoon dried thyme — Optional, but I love the earthy undertone it brings. You can skip it or swap for oregano.
- ½ teaspoon cayenne pepper — For a little kick. Leave it out if you’re serving a crowd with sensitive palates, or add an extra pinch if you like heat.
- 1 teaspoon kosher salt — I use Diamond Crystal. If you’re using table salt, reduce to ¾ teaspoon.
- ½ teaspoon black pepper — Freshly ground is always better, but pre-ground works fine.
Optional Add-Ins
- 1 teaspoon brown sugar — Adds a touch of sweetness and helps the skin caramelize. I use this when I’m serving them at parties because it gives a slightly sticky, glazed finish.
- ½ teaspoon chili powder — For extra depth. I sometimes add this when I’m in the mood for a more complex flavor profile.
Ingredient Selection Tips: Look for chicken thighs that have even fat distribution—not too fatty, but not too lean. The fat renders during cooking and keeps the meat moist. If you’re buying from a store, check the sell-by date and smell the package before opening. Fresh chicken should have a neutral scent. Also, if you can find air-chilled chicken, go for it. It’s less watery and crisps up better than water-chilled options.
Substitution Guidance: Need a dairy-free option? This recipe is already dairy-free, so you’re good. For a gluten-free version, just check your spice blends—some pre-mixed seasonings contain anti-caking agents with gluten. If you’re out of smoked paprika, use regular paprika and add a drop of liquid smoke. And if you’re feeding a crowd with different spice tolerances, make a mild batch and a spicy batch separately—it takes the same amount of time.
Equipment Needed
You don’t need a professional kitchen to pull these off. Just a few basics that most home cooks already have:
- Air fryer — Any model works, but a 5.8-quart or larger basket-style air fryer is ideal for cooking 6-8 thighs in a single batch. I use a Cosori Pro II and love how evenly it cooks. If you have a smaller model, just work in batches.
- Paper towels — For patting the chicken dry. This step is more important than you think—moisture is the enemy of crispy skin.
- Mixing bowl — A medium bowl for tossing the thighs with oil and seasoning. I prefer stainless steel because it doesn’t absorb odors.
- Tongs — For flipping the chicken halfway through. Silicone-tipped tongs won’t scratch your air fryer basket.
- Instant-read thermometer — Not strictly necessary, but highly recommended if you’re new to cooking chicken. It takes the guesswork out and ensures perfectly cooked meat every time.
- Cutting board and knife — For trimming any excess skin or fat. A sharp chef’s knife makes quick work of it.
Budget-Friendly Options: Don’t have an air fryer? You can use a convection oven or a regular oven set to 425°F with a wire rack placed over a baking sheet. The results won’t be quite as crispy, but they’ll still be delicious. Also, skip the thermometer if you’re confident checking doneness visually—the juices should run clear, and the internal temperature should reach 165°F.
Maintenance Tip: After each use, clean your air fryer basket with warm soapy water and a soft sponge. Avoid abrasive scrubbers—they’ll damage the non-stick coating. A well-maintained air fryer lasts years and cooks more evenly.
Preparation Method
Alright, let’s get cooking. This method is straightforward, but I’ve included every little detail I’ve learned from making these dozens of times. Follow these steps, and you’ll have the crispiest, juiciest chicken thighs your guests have ever tasted.
- Prep the chicken. Remove the chicken thighs from the package and pat them dry with paper towels. I mean really dry—get in between the skin and the meat if you can. Any moisture left on the surface will steam instead of crisp. Trim any excess skin or fat hanging off the edges, but leave enough to render during cooking. Let them sit at room temperature for 10 minutes while you preheat the air fryer.
- Preheat the air fryer. Set your air fryer to 400°F (200°C) and let it preheat for 3-5 minutes. Preheating ensures the skin starts crisping immediately. If your air fryer doesn’t have a preheat function, just run it empty for 3 minutes at the same temperature.
- Season the chicken. In a medium mixing bowl, combine the olive oil, garlic powder, smoked paprika, onion powder, dried thyme, cayenne pepper, salt, and black pepper. Whisk with a fork until evenly mixed. Add the chicken thighs and toss with your hands—yes, your hands—until every piece is evenly coated. Make sure to get seasoning under the skin too, if you can lift it gently. This is where the flavor really penetrates.
- Arrange in the basket. Place the seasoned thighs in the air fryer basket, skin-side down, in a single layer. Don’t overcrowd—leave at least half an inch between each piece. If they’re touching, they won’t crisp evenly. I usually fit 6-8 thighs in my 5.8-quart basket. If you have more, cook them in batches.
- First cook cycle. Air fry at 400°F (200°C) for 12 minutes. Don’t open the basket during this time—you’ll let out heat and steam. You want the skin to start rendering and browning undisturbed.
- Flip and continue. After 12 minutes, use tongs to carefully flip each thigh over. They’ll be hot, so be careful. The skin should be starting to brown and crisp. Return the basket to the air fryer and cook for another 8-10 minutes, depending on the size of your thighs. The skin should be deep golden brown and crispy to the touch.
- Check doneness. Use an instant-read thermometer to check the thickest part of a thigh (avoiding the bone). It should read 165°F (74°C). If it’s not there yet, cook in 2-minute increments until it reaches temperature. I’ve found that 20-22 minutes total is usually perfect for medium-sized thighs.
- Rest before serving. Remove the thighs from the air fryer and let them rest on a wire rack or plate for 5 minutes. This allows the juices to redistribute, keeping the meat tender. Don’t skip this step—I’ve made that mistake before, and the juices end up all over the cutting board instead of in the chicken.
- Serve immediately. Arrange the crispy thighs on a platter, garnish with fresh parsley or a sprinkle of flaky sea salt if you’re feeling fancy, and watch them disappear.
Visual Cues: At the 12-minute mark, the skin should look golden with some darker spots starting to form. After flipping, you’ll hear a satisfying sizzle. By the end, the skin should crackle when you press it gently with a fork. If it feels soft or rubbery, give it another 2-3 minutes.
Prep Note: You can season the chicken up to 4 hours in advance and keep it covered in the fridge. Just let it sit at room temperature for 15 minutes before air frying to ensure even cooking.
Cooking Tips & Techniques
I’ve learned a few things the hard way so you don’t have to. Here are the tips that make the difference between good chicken and unforgettable chicken:
Patience with the skin. The biggest mistake people make is not drying the chicken thoroughly. I’m guilty of rushing this step once—I was hosting a last-minute gathering and figured “close enough” would work. The skin came out chewy and sad. Trust me, take the extra 30 seconds to really blot every surface dry. It’s the single most important step for crispy results.
Don’t skip the flip. Some recipes say you can cook chicken thighs without flipping. Don’t believe them. Flipping halfway through ensures both sides get exposed to the circulating hot air, resulting in even browning and crispiness. I’ve tested it both ways, and the flip method wins every time.
Work in batches if needed. I know it’s tempting to cram as many thighs as possible into the basket to save time. But overcrowding creates steam, and steam is the enemy of crispiness. If you’re cooking for a crowd, cook in batches and keep the finished thighs warm in a 200°F oven on a wire rack. They’ll stay crispy for up to 30 minutes.
Season generously. Chicken thighs can handle bold flavors. Don’t be shy with the seasoning—the skin is the first thing people taste, and it should pop. I’ve found that a heavy hand with paprika and garlic powder gives the best crust. If you’re unsure, taste your seasoning blend before adding it to the chicken. It should be slightly stronger than you think you need.
Timing multitasking. While the first batch cooks, prep your second batch. While the chicken rests, arrange your serving platter and prep any dips or sides. This way, everything comes together seamlessly. I usually make a quick yogurt dip (Greek yogurt, lemon juice, garlic, and dill) while the thighs are in the air fryer—it takes 2 minutes and pairs perfectly.
One more thing: If you want extra-crispy skin, try this trick I stumbled upon by accident: after patting the chicken dry, let it sit uncovered in the fridge for an hour. The cold air dries out the skin even more, which means it crisps up faster in the air fryer. It’s a game-changer for parties when you’re prepping ahead anyway.
Variations & Adaptations
One of the best things about this recipe is how easily it adapts to different tastes, diets, and occasions. Here are some variations I’ve tried and loved:
Spicy Buffalo Version
Toss the cooked thighs in buffalo sauce (mix ¼ cup hot sauce with 2 tablespoons melted butter) and serve with ranch or blue cheese dip. This is my go-to for game day parties—people go absolutely crazy for it. Just toss them gently so the skin stays crispy.
Herb & Lemon Version
Swap the smoked paprika for dried oregano and add the zest of one lemon to the seasoning blend. After cooking, squeeze fresh lemon juice over the thighs and sprinkle with chopped parsley. This version is brighter and fresher—perfect for spring gatherings or lighter appetizer spreads.
Honey Garlic Version
Mix 2 tablespoons honey, 1 tablespoon soy sauce, and 2 minced garlic cloves. Brush this mixture onto the thighs during the last 5 minutes of cooking. The honey caramelizes and creates a sticky, sweet-savory glaze that’s absolutely addictive. Fair warning: these will disappear first.
Dietary Adaptations
- Keto/Low-Carb: This recipe is naturally low-carb—just skip any sugar in the seasoning. Serve with celery sticks and ranch dip for a keto-friendly appetizer.
- Gluten-Free: As written, this recipe is gluten-free. Just double-check your spice blends for any hidden gluten.
- Dairy-Free: Already dairy-free! Use avocado oil instead of olive oil if you prefer.
Different Cooking Methods
No air fryer? No problem. Bake the thighs on a wire rack over a baking sheet at 425°F for 35-40 minutes, flipping halfway through. The skin won’t be quite as crispy, but it’ll still be delicious. You can also grill them over medium-high heat for 6-8 minutes per side—the smoky char adds another layer of flavor.
Serving & Storage Suggestions
These crispy air fryer chicken thighs are incredibly versatile when it comes to serving. Here’s how I like to present and store them:
Serving Temperature: Serve them hot and fresh from the air fryer. That’s when the skin is at its crispiest and the meat is most tender. If you’re serving them buffet-style, keep them warm in a low oven (200°F) on a wire rack for up to 30 minutes. Don’t cover them with foil—that traps steam and ruins the crust.
Presentation Tips: Arrange the thighs on a large wooden board or platter. Sprinkle with flaky sea salt, fresh parsley, or chopped chives for color. Add lemon wedges on the side for squeezing. If you’re serving dips, place small bowls of ranch, blue cheese, or honey mustard around the platter. The visual contrast of golden chicken against dark wood or white ceramic is stunning.
What to Serve Alongside: These thighs pair beautifully with a simple salad, roasted vegetables, or crusty bread. For parties, I like to serve them with a few dipping sauces and some crunchy veggies like carrot sticks and cucumber slices. They also work great as part of a larger spread—think coleslaw, baked beans, or corn on the cob.
Storage Instructions: Store leftover chicken thighs in an airtight container in the refrigerator for up to 4 days. The skin will soften, but the flavor will still be great. To reheat, place them back in the air fryer at 375°F for 3-4 minutes—this brings back most of the crispiness. You can also reheat them in a 400°F oven for 5-7 minutes. Avoid the microwave—it turns the skin rubbery.
Freezer Tips: You can freeze cooked thighs for up to 3 months. Let them cool completely, then wrap individually in plastic wrap and place in a freezer bag. To reheat, thaw in the fridge overnight and crisp up in the air fryer at 375°F for 5-6 minutes.
Flavor Development: Honestly, these thighs taste even better the next day. The flavors meld together overnight, and while the skin loses some crunch, the meat becomes incredibly flavorful. I’ve been known to make a double batch just for leftovers—they’re amazing chopped up over salads or in wraps.
Nutritional Information & Benefits
Here’s a rough breakdown per serving (2 thighs, based on a 6-serving batch):
- Calories: Approximately 350-400
- Protein: 28g
- Fat: 25g (including healthy monounsaturated fats from olive oil)
- Carbohydrates: 2g
- Fiber: 0.5g
- Sugar: 0.5g
- Sodium: 550mg (varies based on salt used)
Health Benefits: Chicken thighs are an excellent source of high-quality protein, which supports muscle repair and keeps you feeling full. They’re also rich in B vitamins, particularly B6 and B12, which help with energy metabolism and brain function. The skin contains collagen, which is great for joint and skin health. Plus, using an air fryer significantly reduces the amount of oil needed compared to traditional frying—so you get that crispy texture with less fat.
Dietary Considerations: This recipe is naturally gluten-free, dairy-free, and low-carb. If you’re watching your sodium, reduce the salt to ½ teaspoon and rely on the other spices for flavor. The cayenne pepper can also be adjusted based on your heat tolerance.
Personal Wellness Perspective: I love that this recipe lets me enjoy crispy, indulgent-tasting food without guilt. It fits into a balanced diet—especially when paired with a big salad or roasted veggies. And honestly, knowing that I’m serving something that’s both delicious and reasonably nutritious makes me feel good about putting it on the party table.
Conclusion
If you take one thing away from this post, let it be this: you don’t need complicated techniques or fancy ingredients to make something truly memorable. These crispy air fryer chicken thighs prove that simple, well-executed food is what people remember. They’re the dish that makes you look like you spent hours in the kitchen—when really, the air fryer did most of the work.
I’ve made these for backyard barbecues, holiday parties, and quiet weeknight dinners. Every single time, they deliver. The skin crackles. The meat stays juicy. And the people you’re feeding? They’ll keep coming back for more. That’s the kind of recipe worth holding onto.
So go ahead—give them a try. Play with the seasonings, make them your own, and don’t be afraid to double the batch. Trust me, you’ll thank yourself later. And when your guests start asking for the recipe (they will), just smile and tell them it’s nothing special. Just chicken thighs. Just an air fryer thing. Just like Marta taught me.
Have you tried these crispy air fryer chicken thighs? I’d love to hear how they turned out! Drop a comment below, share your twist on the recipe, or tag me in your photos. And if you’re looking for more party-perfect appetizers, check out my crispy buffalo cauliflower bites or these garlic parmesan pulled pork sliders—they’re always a hit too!
Frequently Asked Questions
Can I use boneless, skinless chicken thighs?
You can, but you’ll lose the crispy skin that makes this recipe so special. Boneless thighs cook faster—about 15-18 minutes total—and won’t have that same crackling texture. If you’re in a pinch, they’ll still taste good, but I recommend sticking with bone-in, skin-on for the best results.
Why is my chicken skin not getting crispy?
This usually happens for one of three reasons: the chicken wasn’t dried properly, the basket was overcrowded, or the temperature was too low. Make sure you pat the skin completely dry, leave space between each thigh, and cook at 400°F. If it’s still not crispy, try adding an extra 2-3 minutes to the cooking time.
Can I make these ahead of time for a party?
Absolutely! Cook them up to 4 hours in advance, let them cool, and store them in the fridge. When you’re ready to serve, reheat them in the air fryer at 375°F for 3-4 minutes. They’ll crisp right back up. Just don’t reheat them in the microwave—it makes the skin sad and rubbery.
How do I know when the chicken is fully cooked?
The safest way is to use an instant-read thermometer. Insert it into the thickest part of the thigh (avoiding the bone) and look for 165°F. If you don’t have a thermometer, cut into the thickest part—the juices should run clear, and there should be no pinkness near the bone.
Can I use frozen chicken thighs?
I don’t recommend it. Frozen thighs release too much moisture as they cook, which prevents the skin from crisping. If you only have frozen, thaw them completely in the fridge overnight, then pat them extra dry before seasoning. You’ll get decent results, but fresh is always better for crispy skin.
Pin This Recipe!

Crispy Air Fryer Chicken Thighs: The Best Easy Party Appetizer

These crispy air fryer chicken thighs are the perfect party appetizer—quick, easy, and incredibly delicious. With a simple seasoning blend and the air fryer doing all the work, you’ll have golden, crackling skin and juicy meat in about 25 minutes.
- Prep Time: 10 minutes
- Cook Time: 20-22 minutes
- Total Time: 30-32 minutes
- Yield: 6 servings (2 thighs per serving) 1x
- Category: Appetizer
- Cuisine: American
Ingredients
- 2 pounds bone-in, skin-on chicken thighs (about 6–8 thighs)
- 1 tablespoon olive oil
- 1 teaspoon garlic powder
- 1 teaspoon smoked paprika
- 1 teaspoon onion powder
- ½ teaspoon dried thyme
- ½ teaspoon cayenne pepper
- 1 teaspoon kosher salt (Diamond Crystal; reduce to ¾ teaspoon if using table salt)
- ½ teaspoon black pepper
- 1 teaspoon brown sugar (optional)
- ½ teaspoon chili powder (optional)
Instructions
- Prep the chicken: Remove chicken thighs from package and pat dry thoroughly with paper towels, getting between skin and meat. Trim excess skin or fat. Let sit at room temperature for 10 minutes while preheating air fryer.
- Preheat air fryer to 400°F (200°C) for 3-5 minutes.
- Season the chicken: In a medium bowl, combine olive oil, garlic powder, smoked paprika, onion powder, dried thyme, cayenne pepper, salt, and black pepper. Add chicken thighs and toss with hands until evenly coated, getting seasoning under the skin if possible.
- Arrange thighs in air fryer basket skin-side down in a single layer, leaving at least half an inch between pieces. Cook in batches if needed.
- Air fry at 400°F (200°C) for 12 minutes without opening the basket.
- Flip thighs with tongs and cook for another 8-10 minutes until skin is deep golden brown and crispy.
- Check doneness with an instant-read thermometer: internal temperature should reach 165°F (74°C) in thickest part. Cook in 2-minute increments if needed.
- Remove thighs and let rest on a wire rack or plate for 5 minutes.
- Serve immediately on a platter, garnished with fresh parsley or flaky sea salt if desired.
Notes
For extra-crispy skin, pat chicken dry and let sit uncovered in the fridge for an hour before cooking. You can season the chicken up to 4 hours in advance. To reheat leftovers, use the air fryer at 375°F for 3-4 minutes—avoid the microwave.
Nutrition
- Serving Size: 2 thighs
- Calories: 375
- Sugar: 0.5
- Sodium: 550
- Fat: 25
- Saturated Fat: 7
- Carbohydrates: 2
- Fiber: 0.5
- Protein: 28
Keywords: air fryer chicken thighs, crispy chicken thighs, party appetizer, game day snack, easy chicken recipe


