Three Octobers ago, I was at the community garden plot I share with a handful of neighbors, pulling up the last of the carrots before the first hard frost. My friend Maria, who tends the plot two rows over, watched me struggle with a particularly stubborn root. She didn’t say anything at first. Then she disappeared into her shed and came back with a trowel, handed it to me without a word, and knelt down to show me how to loosen the soil around the carrot before pulling. We ended up sitting on overturned buckets, drinking lukewarm tea from a thermos, and somehow the conversation drifted to Halloween. She told me about the desserts her grandmother used to make for the neighborhood kids in her hometown in Mexico—little cups of chocolate pudding topped with crushed cookies that looked just like tiny pots of soil. She called them “tierritas.” I asked her for the recipe, and she laughed and said, “There’s no recipe. You just know.”
I went home that evening and tried to recreate what she described. I mean, I got it wrong the first time. I used the wrong cookies, and the pudding was too runny. It was a mess, honestly. But the second attempt? That was the one. I called her the next day to tell her, and she said, “See? You knew.” So every Halloween since then, I’ve made these spooky no-bake dirt cups. They are the one dessert I never skip, even when I’m swamped. Maybe you’ve been there—standing in the kitchen at 10 PM the night before a school party, realizing you forgot to plan a treat. That’s exactly when this recipe saves the day. It’s the kind of thing you can throw together in fifteen minutes, and somehow it looks like you put in way more effort than you actually did. And isn’t that the best kind of recipe?
Why You’ll Love This Recipe
Look, I am not a fancy pastry chef. I am a home cook who has burned more batches of cookies than I care to admit. But these spooky no-bake dirt cups? They are foolproof. I have tested this recipe at least a dozen times over the past three years, tweaking the pudding-to-cookie ratio, experimenting with different pudding flavors, and figuring out exactly how long to let them chill for that perfect texture. My friend’s kids, who are brutally honest about desserts, gave these a thumbs-up. Even my neighbor who swears she doesn’t like sweets ate two in one sitting.
- Quick & Easy: Comes together in about 15 minutes of active prep time. No baking, no complicated steps, no stress.
- Simple Ingredients: You probably have most of these in your pantry right now. No fancy grocery trips needed.
- Perfect for Halloween: These are the ultimate Halloween party dessert—creepy, cute, and completely irresistible.
- Crowd-Pleaser: Kids go wild for them, and adults secretly love them too. I have seen grown-ups sneak seconds.
- Unbelievably Delicious: The creamy chocolate pudding combined with the crunchy cookie “dirt” and the surprise gummy worm? It is next-level comfort food.
What makes these dirt cups different from all the other recipes out there? It is the texture. I use a specific ratio of milk to pudding mix that gives you a pudding that is thick but still silky—not gloopy or stiff. And I have a trick for the cookie crumbs that makes them taste almost like toasted soil, even though there is no actual toasting involved. It is the little details that make this version the one you will come back to year after year.
This is not just a dessert. It is the one that makes you close your eyes after the first bite because it tastes like childhood Halloween parties and cozy autumn nights. It is comfort food reimagined—faster, easier, but with the same soul-soothing satisfaction.
What Ingredients You Will Need
This recipe uses simple, everyday ingredients to create something that feels special. Most of these are pantry staples, and the ones that aren’t are easy to find at any grocery store. Here is what you will need to make about 8 spooky no-bake dirt cups.
- 1 (3.9-ounce) package instant chocolate pudding mix (I prefer Jell-O brand for the best texture, but store brands work fine too)
- 2 cups cold whole milk (you can use 2% or even oat milk in a pinch, but whole milk gives the creamiest result)
- 1 (14.3-ounce) package chocolate sandwich cookies (Oreos are the classic choice, but any chocolate sandwich cookie works)
- 8 clear plastic cups (5-ounce size) (the clear cups are key—you want to see the layers)
- 16 gummy worms (the sour kind add a nice tangy contrast, but regular ones are great too)
- Optional: 8 gummy spiders or other Halloween candy for decoration (I get these at the dollar store)
- Optional: 1 tablespoon unsweetened cocoa powder (for dusting, if you want extra “dirt” color)
Let me talk about the pudding mix for a second. I have tried making this with cook-and-serve pudding, and honestly, it is not worth the extra effort. Instant pudding is the way to go because it sets up quickly and has the right consistency for layering. If you are dairy-free, use a plant-based milk like oat or almond, but know that the pudding might be slightly less firm. You can compensate by using a little less milk—about 1 ¾ cups instead of 2.
For the cookies, I have tested this with generic store-brand chocolate sandwich cookies, and they work fine. But the real Oreos have a better crumb texture. If you want to get fancy, try the chocolate creme Oreos for an extra-chocolatey version. And here is a tip I learned the hard way: do not crush the cookies into a fine powder. You want some texture—little bits and pieces that look like real soil. I use a zip-top bag and a rolling pin, and I stop when I still see some small chunks.
The gummy worms are non-negotiable in my book. They are what make these dirt cups fun. But if you have kids who don’t like gummy candy, you can use gummy bats, candy eyeballs, or even little plastic spiders (just remind everyone to take them out before eating).
Equipment Needed
You do not need any fancy equipment for these spooky no-bake dirt cups. That is part of the beauty. Here is what you will need:
- Large mixing bowl (for the pudding)
- Whisk (a hand whisk works perfectly—no electric mixer needed)
- Measuring cups (for the milk)
- Zip-top plastic bag (gallon size) (for crushing the cookies)
- Rolling pin or heavy-bottomed pan (to crush the cookies)
- 8 clear plastic cups (5-ounce size) (you can also use small mason jars or tumblers)
- Spoon or small spatula (for layering)
If you do not have a rolling pin, a wine bottle works surprisingly well. I have used one in a pinch, and it did the job. For the cups, I buy the clear plastic ones at the grocery store in packs of 10. They are cheap and disposable, which makes cleanup a breeze. But if you want to be more eco-friendly, small glass jars or even ramekins work beautifully. Just make sure they are clear so you can see the layers.
Preparation Method
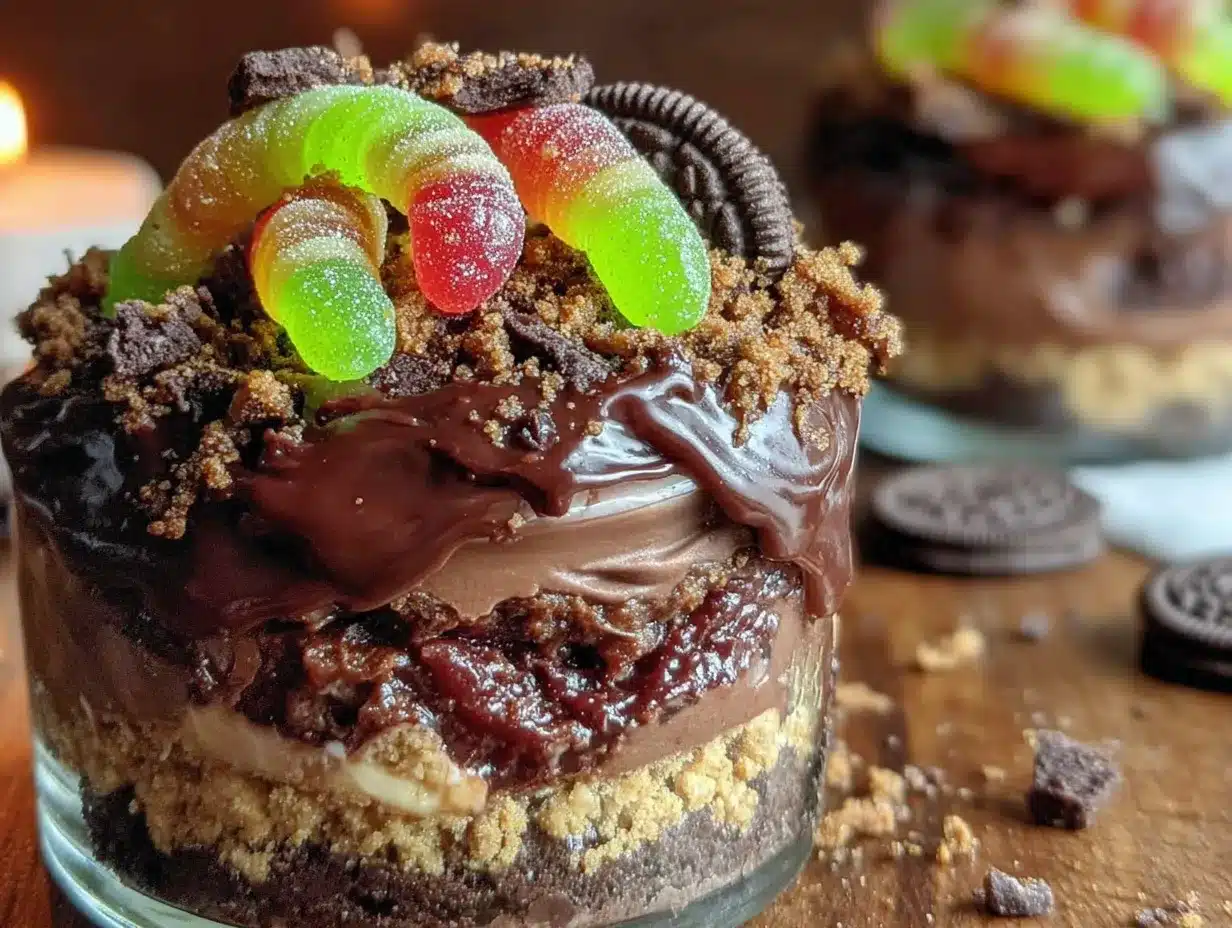
Alright, let me walk you through this step by step. I promise it is easier than it looks.
- Make the pudding: In a large mixing bowl, whisk together the instant chocolate pudding mix and 2 cups of cold whole milk. Whisk for about 2 minutes until the mixture starts to thicken. It will be loose at first, but trust the process. Let it sit for 5 minutes to set up completely. You will know it is ready when it holds a soft shape when you lift the whisk.
- Crush the cookies: While the pudding is setting, place the chocolate sandwich cookies in a gallon-size zip-top bag. Seal it, making sure to push out as much air as possible. Use a rolling pin to crush the cookies into coarse crumbs. You want a mix of fine crumbs and small chunks—not a powder. Think of the texture of garden soil. Set aside about ½ cup of the crumbs for the top layer.
- Layer the cups: Now comes the fun part. Take your clear cups and spoon about 2 tablespoons of the crushed cookies into the bottom of each cup. This is the “dirt” base. Gently press it down with the back of a spoon to create an even layer.
- Add the pudding: Spoon the chocolate pudding on top of the cookie layer, filling each cup about three-quarters full. I use about ¼ cup of pudding per cup. Smooth the top with the back of a spoon or a small spatula. Tap the cup gently on the counter to settle the pudding and remove any air bubbles.
- Top with more “dirt”: Sprinkle the reserved cookie crumbs over the pudding layer. You want a generous, even coating that completely covers the pudding. This is the soil that the worms will poke out of.
- Add the gummy worms: Here is the trick—gently push a gummy worm into the side of each cup so it looks like it is crawling out of the dirt. I like to use two worms per cup, positioning them at different angles. Some poking out, some half-buried. It makes it look more realistic.
- Chill: Place the cups in the refrigerator for at least 30 minutes before serving. This allows the pudding to firm up and the cookie crumbs to soften slightly, creating that authentic “dirt” texture. If you are making them for a party, you can chill them for up to 24 hours ahead of time.
- Decorate (optional): Just before serving, you can add extra decorations like gummy spiders, candy eyeballs, or a small plastic spider on top. I once added a little graveyard scene with a broken cookie as a tombstone. It was ridiculous and my kids loved it.
One thing I learned the hard way: do not skip the chilling step. I made these once for a last-minute Halloween gathering and served them right after assembling. The pudding was too soft, and the cookie crumbs got soggy almost immediately. Give them that 30 minutes in the fridge. It makes all the difference.
Cooking Tips & Techniques
After making these spooky no-bake dirt cups more times than I can count, I have picked up a few tricks that make the process smoother and the results better.
Use cold milk. This is non-negotiable for instant pudding. If your milk is warm, the pudding will not set properly. I take the milk straight from the fridge and whisk it immediately. If you are using a plant-based milk, chill it well beforehand.
Do not overmix the pudding. I know it is tempting to keep whisking until it is perfectly smooth, but overmixing can make the pudding thin. Whisk just until the powder is dissolved and the mixture starts to thicken. Then stop. Let it do its thing.
Crush the cookies in batches. If you try to crush all the cookies at once, you will end up with uneven crumbs. I do it in two batches, checking the texture as I go. You want some bigger pieces for texture, but mostly fine crumbs.
Make extra crumbs. I always crush a few extra cookies beyond what the recipe calls for. Why? Because kids (and adults) will sneak handfuls of the crumbs while you are assembling. It happens every single time. Having extra ensures you have enough for the topping.
Layer carefully. When you add the pudding on top of the cookie base, spoon it gently so you do not disturb the cookie layer. I use a small spoon and drizzle the pudding around the edges first, then fill the center. This keeps the layers distinct.
Chill before adding worms. If you add the gummy worms right after assembling, they might sink into the pudding. I let the cups chill for about 15 minutes first, then add the worms, then chill for another 15 minutes. The worms stay right where you put them.
I once forgot to chill the cups before a Halloween party and had to hide them in the fridge while guests were arriving. I told everyone they were “still setting up.” It was a lie, but it worked. Learn from my mistake!
Variations & Adaptations
One of the best things about this recipe is how easy it is to adapt. Here are some variations I have tried over the years.
Dairy-Free Version: Use a dairy-free instant pudding mix (check the label—some are naturally dairy-free) and swap the whole milk for oat milk or full-fat coconut milk. The coconut milk adds a slight tropical flavor that pairs surprisingly well with chocolate. I made this version for a friend who is lactose intolerant, and she said it was better than the original.
Peanut Butter Dirt Cups: Add 2 tablespoons of creamy peanut butter to the pudding mix before whisking in the milk. It gives the pudding a rich, nutty flavor that complements the chocolate. Use crushed peanut butter cookies instead of chocolate sandwich cookies for an extra peanut butter punch.
Mint Chocolate Version: Use instant chocolate pudding and add ½ teaspoon of peppermint extract to the milk before whisking. Top with crushed chocolate mint cookies if you can find them. This version is especially fun for a Halloween party because the mint flavor feels festive and cool.
Vegan Option: Use a vegan instant pudding mix, plant-based milk, and vegan chocolate sandwich cookies (some brands are accidentally vegan). For the gummy worms, look for vegan gummy candies made without gelatin. I have made this version for a vegan friend’s Halloween party, and no one could tell the difference.
Pumpkin Spice Dirt Cups: Swap the chocolate pudding for instant vanilla pudding and add ½ cup of canned pumpkin puree and 1 teaspoon of pumpkin pie spice to the milk before whisking. Use crushed graham crackers or ginger snaps for the “dirt.” This is my go-to for Thanksgiving week when I want something Halloween-adjacent but seasonal.
My personal favorite variation is the peanut butter one. I made it on a whim one October when I had leftover peanut butter from making sandwiches, and now it is the version my kids request every year. It is funny how accidents sometimes become traditions.
Serving & Storage Suggestions
These spooky no-bake dirt cups are best served cold, straight from the refrigerator. I like to take them out about 5 minutes before serving so they are not ice-cold, but still nicely chilled. Arrange them on a platter or a baking sheet lined with parchment paper for a fun, grab-and-go presentation at parties.
For a Halloween party, I like to set up a “dirt cup bar” where guests can add their own decorations. I put out bowls of extra gummy worms, candy eyeballs, gummy spiders, and even some crushed graham crackers for “sand.” It is a huge hit with kids, and adults get into it too.
These cups pair wonderfully with a warm drink. A mug of hot apple cider or a pumpkin spice latte complements the chocolatey, creamy flavors. If you are serving them at a Halloween party, set out a pitcher of spooky punch or some caramel apple cider.
As for storage, these keep well in the refrigerator for up to 3 days. Cover the cups with plastic wrap or transfer them to an airtight container to prevent the cookie crumbs from absorbing moisture from the fridge. The texture is best within the first 24 hours, but they are still delicious after a couple of days.
I do not recommend freezing these. The pudding becomes watery when thawed, and the cookie crumbs turn into a soggy mess. Trust me on this one—I tried it once when I had leftovers, and it was not worth it.
One more thing: the flavors actually develop as they sit. The cookie crumbs soften slightly and meld with the pudding, creating a texture that reminds me of actual dirt (in the best possible way). So if you can make them a day ahead, do it. They taste even better the next day.
Nutritional Information & Benefits
Let me be honest—these spooky no-bake dirt cups are a treat, not a health food. But that does not mean they are without any redeeming qualities. Here is a rough estimate of the nutritional content per cup (based on 8 servings):
| Nutrient | Amount per Serving |
|---|---|
| Calories | 280 |
| Total Fat | 11g |
| Saturated Fat | 4g |
| Carbohydrates | 42g |
| Sugar | 28g |
| Protein | 5g |
| Calcium | 100mg |
The milk in this recipe provides calcium and vitamin D, which are important for bone health. The chocolate pudding contains a small amount of iron from the cocoa. And the gummy worms? Well, they are mostly sugar, but they make people smile, and that counts for something in my book.
If you are looking to lighten these up, you can use sugar-free instant pudding mix and low-fat milk. That will cut the sugar and calories by about half. I have tried this version, and it is still tasty, though the texture is slightly less creamy.
Potential allergens include milk (from the pudding and milk), wheat (from the cookies), and soy (from some cookie brands). Check labels if you are serving guests with allergies. The gummy worms may contain gelatin, so look for vegan versions if needed.
Conclusion
These spooky no-bake dirt cups are the kind of recipe that makes you look like a Halloween hero without breaking a sweat. They are fun, they are delicious, and they come together in almost no time. Whether you are making them for a classroom party, a Halloween gathering, or just a cozy night in with your family, they deliver every single time.
I love this recipe because it reminds me of that afternoon in the garden with Maria, sitting on overturned buckets and talking about grandmothers and traditions. It is proof that the best recipes are not always the most complicated ones. Sometimes they are the ones that come from a shared moment and a handful of simple ingredients.
I would love to hear how yours turn out. Do you add any fun decorations? Have you tried a variation? Drop a comment below and let me know. And if you make these for a Halloween party, take a picture—I want to see your spooky creations! Happy Halloween, and happy eating!
Frequently Asked Questions
Can I make these dirt cups ahead of time?
Absolutely. You can assemble them up to 24 hours in advance. Just keep them covered in the refrigerator. The texture is actually best after they have sat for a few hours, as the cookie crumbs soften slightly and meld with the pudding.
Can I use homemade chocolate pudding instead of instant?
You can, but it will change the texture. Homemade pudding is thinner and may not hold up as well for layering. If you want to use homemade, let it cool completely and thicken in the fridge for at least 2 hours before assembling. You might also need to use less milk to achieve a firmer consistency.
What if I don’t have clear cups?
No problem! You can use small mason jars, glass tumblers, or even ramekins. The key is to use something transparent so you can see the layers. If you only have opaque cups, the dirt cups will still taste great—they just won’t have that spooky visual effect.
Can I freeze these for later?
I do not recommend freezing them. The pudding becomes watery when thawed, and the cookie crumbs turn soggy. These are best enjoyed fresh or within a few days of making them. If you have leftovers, keep them in the fridge for up to 3 days.
How do I keep the gummy worms from sinking?
Let the cups chill in the fridge for about 15 minutes before adding the gummy worms. This allows the pudding to firm up slightly, so the worms stay in place. If you add them right away, they tend to sink into the pudding and disappear.
PrintSpooky No-Bake Dirt Cups: Easy Halloween Dessert Recipe
These spooky no-bake dirt cups are a quick and easy Halloween dessert made with creamy chocolate pudding, crushed chocolate sandwich cookies, and gummy worms. They come together in just 15 minutes and are perfect for parties or a fun family treat.
- Prep Time: 15 minutes
- Cook Time: 0 minutes
- Total Time: 45 minutes (includes 30 minutes chilling)
- Yield: 8 servings 1x
- Category: Dessert
- Cuisine: American
Ingredients
- 1 (3.9-ounce) package instant chocolate pudding mix
- 2 cups cold whole milk
- 1 (14.3-ounce) package chocolate sandwich cookies (e.g., Oreos)
- 8 clear plastic cups (5-ounce size)
- 16 gummy worms
- Optional: 8 gummy spiders or other Halloween candy for decoration
- Optional: 1 tablespoon unsweetened cocoa powder for dusting
Instructions
- In a large mixing bowl, whisk together the instant chocolate pudding mix and 2 cups of cold whole milk. Whisk for about 2 minutes until the mixture starts to thicken. Let it sit for 5 minutes to set up completely.
- While the pudding is setting, place the chocolate sandwich cookies in a gallon-size zip-top bag. Seal it, pushing out as much air as possible. Use a rolling pin to crush the cookies into coarse crumbs (a mix of fine crumbs and small chunks). Set aside about ½ cup of the crumbs for the top layer.
- Spoon about 2 tablespoons of the crushed cookies into the bottom of each clear cup. Gently press it down with the back of a spoon to create an even layer.
- Spoon the chocolate pudding on top of the cookie layer, filling each cup about three-quarters full (about ¼ cup of pudding per cup). Smooth the top with the back of a spoon or a small spatula. Tap the cup gently on the counter to settle the pudding and remove any air bubbles.
- Sprinkle the reserved cookie crumbs over the pudding layer, covering it completely.
- Gently push a gummy worm into the side of each cup so it looks like it is crawling out of the dirt. Use two worms per cup, positioning them at different angles.
- Place the cups in the refrigerator for at least 30 minutes before serving to allow the pudding to firm up and the cookie crumbs to soften slightly.
- Just before serving, add optional decorations like gummy spiders or candy eyeballs.
Notes
Use cold milk for the pudding to set properly. Do not overmix the pudding. Crush cookies in batches for even crumbs. Chill cups for 15 minutes before adding gummy worms to prevent them from sinking. These can be made up to 24 hours ahead and stored covered in the refrigerator for up to 3 days. Do not freeze.
Nutrition
- Serving Size: 1 cup
- Calories: 280
- Sugar: 28
- Sodium: 320
- Fat: 11
- Saturated Fat: 4
- Carbohydrates: 42
- Fiber: 1
- Protein: 5
Keywords: Halloween dessert, no-bake dirt cups, chocolate pudding, gummy worms, easy dessert, spooky treat


