I was at the hardware store last October, of all places, picking up a new showerhead. The line at the register was snaking past the gardening section, and the woman in front of me—she had to be in her seventies, wearing a faded flannel shirt—was unloading a cart full of almond slivers and green food coloring. I’m not usually one to eavesdrop, but the cashier asked if she was baking for a party. “Nope,” she said, without turning around. “These are for the kids on my block. They expect the fingers every year.”
I laughed, and she caught me looking at her cart. “Witch fingers,” she explained, like it was the most obvious thing in the world. “You’ve never made them?” I admitted I hadn’t. She shrugged, pulled a crumpled receipt from her pocket, and jotted down the directions right there on the counter. “Butter, sugar, flour, almonds. Don’t overthink it.” I thanked her, paid for my showerhead, and honestly, I forgot about that scrap of paper for a week. Then Halloween crept up, and I found it stuck to my fridge under a takeout menu.
So I tried them. And let me tell you—I’ve made a lot of Halloween treats over the years. The Pinterest-perfect cakes, the elaborate cupcakes. But these cookies? They’re the ones my kids actually remember. They’re creepy without being complicated, and they take maybe thirty minutes from start to finish. That’s the kind of recipe you keep in your back pocket for a Tuesday night when you realize the school Halloween party is tomorrow and you have nothing to bring. Maybe you’ve been there. I have, more times than I’d like to admit.
Why You’ll Love This Recipe
Let’s be honest—most Halloween baking projects are a total pain. You spend hours on a cake that gets dropped on the way to the party, or you buy those pre-made cookie kits that taste like cardboard. These Quick Witch’s Finger Cookies with Almond Nails are different. They’re the kind of recipe that actually works on a busy weeknight when you’re tired and the kids are bouncing off the walls.
- Quick & Easy: From mixing bowl to oven in under 20 minutes. No chilling time, no complicated steps. Just mix, shape, bake, and you’re done.
- Simple Ingredients: You probably have everything already. Butter, sugar, flour, vanilla, and a bag of slivered almonds. No specialty stores required.
- Perfect for Halloween: These are the cookies that make people gasp (in a good way). They look genuinely creepy, but they’re just buttery shortbread underneath.
- Crowd-Pleaser: Kids love the gross-out factor. Adults love that they actually taste amazing. It’s a win-win.
- Unbelievably Delicious: The texture is that perfect shortbread crumble—not too sweet, with the nutty crunch from the almond “nail.” It’s the kind of cookie you’ll want to eat even when it’s not Halloween.
I’ve tested these cookies at least a dozen times over the past few years. The trick is getting the almond to look like a real nail—pressed in just right, with a dab of red jam at the base for that “bloody” cuticle effect. It’s silly, but it works. My neighbor, who’s a professional baker, actually asked me for the recipe after I brought a batch to our block party. That’s when I knew this one was a keeper.
This isn’t just another Halloween cookie. It’s the one that disappears first from every platter. It’s the one people text you about the next day, asking if you can make more. And honestly? It takes less time than running to the store to buy a bag of candy.
What Ingredients You Will Need
This recipe uses basic pantry staples to create something that looks like it came out of a haunted kitchen. The ingredients are simple, but each one plays a specific role. Here’s what you’ll need:
For the Cookie Dough
- 1 cup (226g) unsalted butter, softened — Make sure it’s at room temperature. Cold butter won’t cream properly, and your cookies won’t have that tender shortbread texture. I like using Kerrygold for the richness, but any good butter works.
- 1 cup (200g) granulated sugar — Regular white sugar. Don’t use powdered sugar here; it changes the texture.
- 1 large egg, room temperature — This helps bind everything together. If you forgot to take it out of the fridge, place it in a bowl of warm water for 5 minutes.
- 1 teaspoon vanilla extract — Pure vanilla makes a difference. The imitation stuff has a weird aftertaste in shortbread.
- ½ teaspoon almond extract — This is the secret ingredient. It enhances the almond flavor and makes the cookies taste more “authentic.” Don’t skip it.
- 2 ½ cups (312g) all-purpose flour — Spoon and level your flour. Scooping directly from the bag packs it down and gives you dense cookies.
- 1 teaspoon baking powder — Just enough to give them a little lift without losing that dense, crumbly shortbread feel.
- ½ teaspoon salt — Balances the sweetness. I use fine sea salt.
For the “Nails” and Decoration
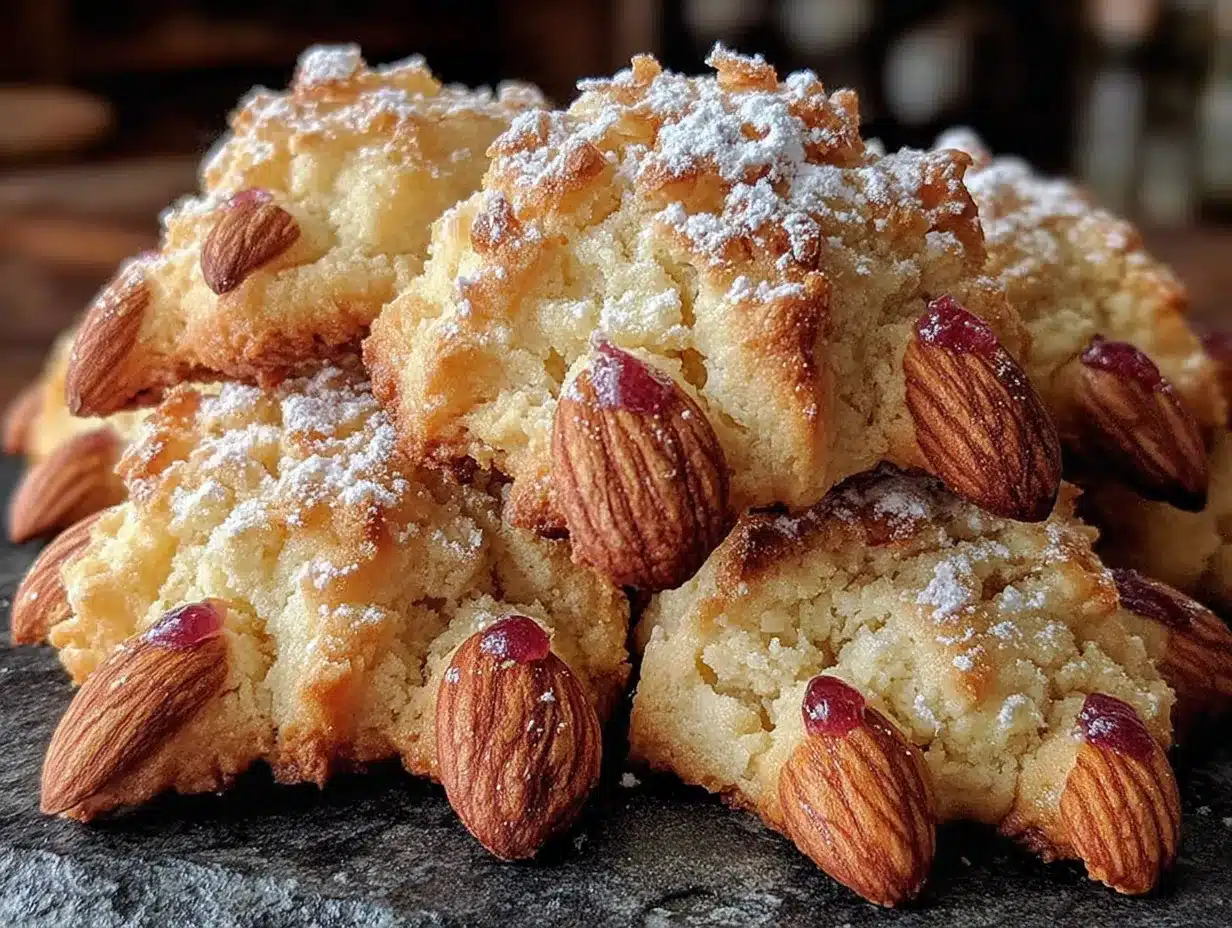
- About 30 whole blanched almonds or slivered almonds — You want the flat, slivered kind for the most realistic nail look. Blanched almonds (the ones with the skin removed) also work. Look for them in the baking aisle.
- Red jam or jelly (strawberry or raspberry) — For the “bloody” cuticle. A little goes a long way. I use Bonne Maman strawberry preserves because the color is deep and natural-looking.
- Green food coloring (optional, but recommended) — For that witchy green tint. You can use gel or liquid. Gel gives a more vibrant color without thinning the dough.
Ingredient Tips: If you want a gluten-free version, swap the all-purpose flour for a 1:1 gluten-free baking blend. I’ve tested this with King Arthur’s Measure for Measure and it works perfectly. For a dairy-free option, use vegan butter sticks (not the spreadable kind in a tub). The texture will be slightly different, but still delicious.
One thing I learned the hard way: don’t use salted butter and then add the salt. It makes the cookies taste overly salty. Stick with unsalted so you control the sodium.
Equipment Needed
You don’t need anything fancy for these cookies. Here’s the basic setup:
- Electric mixer (hand or stand) — You can cream the butter and sugar by hand, but it takes forever and your arm will get tired. A hand mixer works great.
- Large mixing bowl — Any bowl will do. I use a glass one because I can see if the butter is fully incorporated.
- Measuring cups and spoons — For accuracy. Baking is a science, even for simple cookies.
- Baking sheets (2) — Line them with parchment paper or silicone baking mats. Non-stick spray can leave a greasy residue on the cookies.
- Cooling rack — Essential for getting that perfect texture. If you let cookies cool on the hot baking sheet, they keep cooking and can get dry.
- Small offset spatula or butter knife — For shaping the “fingers” and creating the knuckle lines.
- Pastry brush (optional) — For brushing on the jam. A clean finger works too, honestly.
Budget-friendly tip: If you don’t have a cooling rack, just slide the parchment paper off the hot baking sheet onto the counter. The cookies will cool fine. I’ve done this more times than I want to admit.
Preparation Method
These cookies come together fast, so read through the steps once before you start. Trust me, it helps.
- Preheat your oven to 350°F (175°C). Line two baking sheets with parchment paper. Set them aside.
- Cream the butter and sugar. In a large bowl, beat the softened butter and granulated sugar together until light and fluffy. This takes about 2-3 minutes with an electric mixer on medium speed. You’re looking for a pale, creamy mixture that looks almost like frosting. Scrape down the sides of the bowl once or twice.
- Add the wet ingredients. Beat in the egg, vanilla extract, and almond extract until fully combined. The mixture might look slightly curdled at this point—that’s totally normal. Don’t panic.
- Incorporate the dry ingredients. In a separate bowl, whisk together the flour, baking powder, and salt. Gradually add this to the wet mixture, mixing on low speed until just combined. You want to stop as soon as the flour disappears. Overmixing makes tough cookies.
- Add the food coloring (if using). If you want green witch fingers, add a few drops of green gel food coloring to the dough and mix until the color is even. Start with 2-3 drops and add more if you want a deeper shade. Remember, the cookies will darken slightly as they bake.
- Shape the fingers. Take about 1 tablespoon of dough and roll it into a log shape that’s roughly the size and thickness of your index finger. Place it on the prepared baking sheet. Gently taper one end to look like a fingertip, and make the other end slightly wider to look like the base of a finger. Repeat with the remaining dough, spacing the cookies about 2 inches apart. You should get about 30 cookies.
- Create the knuckle details. Use the back of a butter knife or a small offset spatula to gently press lines into each “finger” at the knuckle joints. Press firmly enough to leave an indent, but not so hard that you cut through the dough. I usually make 2-3 lines per finger.
- Add the almond nails. Press one slivered almond into the tapered end of each finger. The pointed tip of the almond should stick out slightly, like a fingernail. Press gently so it stays in place during baking.
- Bake. Place the baking sheets in the preheated oven and bake for 12-15 minutes, or until the cookies are set and just barely golden on the bottom. The tops should remain pale. Rotate the pans halfway through for even baking.
- Cool and decorate. Let the cookies cool on the baking sheet for 5 minutes, then transfer them to a cooling rack. While they’re still slightly warm, use a small brush or your fingertip to dab a tiny bit of red jam at the base of each almond “nail.” This creates the bloody cuticle effect. Let the cookies cool completely before serving.
Sensory cues: When the dough is ready, it should feel soft but not sticky—like Play-Doh. When you press the knuckle lines, you should see a clear indent that doesn’t spring back. The cookies are done when the bottoms are a light golden brown and the edges look set. They’ll firm up as they cool.
One thing I learned the hard way: don’t skip the 5-minute cooling on the baking sheet. The cookies are fragile right out of the oven, and moving them too soon can break the “fingers.” Trust me, I’ve had a baking sheet full of witch stumps before.
Cooking Tips & Techniques
I’ve made these cookies every Halloween for the past four years, and I’ve learned a few things along the way. Here are my best tips for getting them right every time:
Don’t overwork the dough. This is the number one mistake people make with shortbread cookies. Mix just until the flour disappears. If you keep mixing, you develop gluten, and gluten makes tough cookies. Your witch fingers should snap with a clean, tender crumb, not chew like a bagel.
Chill your hands. The dough gets soft quickly from the warmth of your hands, especially if your kitchen is warm. If the dough starts sticking to your fingers, run them under cold water for a few seconds and dry them off. Or pop the dough in the fridge for 10 minutes. I’ve done this mid-shaping more times than I can count.
Vary the finger sizes. Not all fingers are the same length. Make some longer, some shorter, some thicker. It adds to the realism. I usually make a few that look like pinky fingers and a few that look like thumbs. It’s a small detail, but people notice.
Watch the bake time. Every oven runs differently. Start checking at 12 minutes. You want the cookies to be set but not browned. If they start turning golden on top, they’ve been in too long. Pale cookies look more realistic and creepy.
Use gel food coloring. Liquid food coloring can thin out the dough and make it sticky. Gel gives you a vibrant green without changing the consistency. I use Americolor brand, but any gel works.
Make them ahead. The dough can be made up to 3 days in advance and stored in the fridge. Just let it sit at room temperature for 10 minutes before shaping. You can also freeze the shaped, unbaked cookies on a baking sheet, then transfer them to a freezer bag. Bake from frozen, adding 2-3 minutes to the bake time.
I once forgot to add the almond extract and ended up with cookies that tasted fine but were missing that “something.” Don’t skip it. It’s what makes these taste like more than just plain shortbread.
Variations & Adaptations
These cookies are easy to customize. Here are a few ways I’ve adapted them over the years:
Gluten-Free Witch Fingers
Swap the all-purpose flour for a 1:1 gluten-free baking blend. I’ve tested this with King Arthur’s Measure for Measure and Cup4Cup. The texture is slightly more tender, but they still hold their shape perfectly. Just make sure your blend contains xanthan gum for structure.
Vegan Version
Use vegan butter sticks (like Earth Balance or Miyoko’s) and a flax egg (1 tablespoon ground flaxseed mixed with 3 tablespoons water, let sit for 5 minutes). The cookies won’t be quite as rich, but they’re still delicious. I made these for a friend’s vegan Halloween party and they disappeared fast.
Chocolate-Dipped Fingers
After the cookies have cooled completely, dip the “broken” ends in melted dark chocolate. Let the chocolate set on parchment paper. It looks like the witches have dirty fingernails. My kids actually prefer these over the original.
Spiced Version
Add 1 teaspoon of pumpkin pie spice or cinnamon to the flour mixture. It gives the cookies a warm, fall flavor that pairs beautifully with the almond. I did this by accident one year (grabbed the wrong jar) and it turned out to be a happy mistake.
Different “Nails”
If you don’t have slivered almonds, try using whole almonds (pointed end out), sunflower seeds, or even candy corn for a sweeter version. Pistachios give a greenish tint that looks extra creepy. I’ve used all of these at different points, and they all work.
Pro tip: If you’re making these for a party where kids will be eating them, mention the almond nail. I once had a kid try to bite through the almond and he was not happy. A little warning goes a long way.
Serving & Storage Suggestions
These cookies are best served at room temperature, arranged on a platter in a way that looks like a pile of severed fingers. It’s gruesome, but that’s the point. I like to scatter them on a black or orange platter with a few fake spider webs for extra effect.
What to serve with them: These pair perfectly with a glass of cold milk, hot apple cider, or a pumpkin spice latte. For a Halloween party, set them out alongside other spooky treats like mummy meatball poppers or spider deviled eggs. They also look great on a dessert table with ghost-shaped meringues and pumpkin cupcakes.
Storage: Store the cookies in an airtight container at room temperature for up to 5 days. Layer them between sheets of parchment paper so the almonds don’t get knocked off. Do not refrigerate—the fridge dries them out and makes them hard.
Freezing: These freeze beautifully. Place the cooled, undecorated cookies in a single layer in a freezer-safe container, with parchment between layers. Freeze for up to 3 months. When you’re ready to serve, thaw them at room temperature, then add the jam “blood” just before serving. The jam can get weepy if frozen and thawed.
Reheating: Honestly, these are best at room temperature. If you want to warm them slightly, pop them in a 300°F oven for 3-4 minutes. But don’t microwave them—it makes the almonds rubbery.
One thing I love about these cookies is that the flavor actually improves after a day or two. The almond extract mellows out and the cookies get even more tender. So feel free to make them a day ahead.
Nutritional Information & Benefits
Let’s be real—these are cookies. They’re a treat. But here’s the nutritional breakdown for one cookie (based on 30 cookies per batch):
| Nutrient | Amount Per Cookie |
|---|---|
| Calories | 135 |
| Total Fat | 8g |
| Saturated Fat | 4.5g |
| Cholesterol | 25mg |
| Sodium | 55mg |
| Total Carbohydrates | 15g |
| Dietary Fiber | 0.5g |
| Sugars | 7g |
| Protein | 2g |
Health benefits: Almonds are a good source of vitamin E, magnesium, and healthy monounsaturated fats. So there’s that. The butter provides some vitamin A. But honestly, the main benefit here is the joy of making something fun and delicious with your family. That counts for something, right?
Dietary considerations: These cookies contain dairy, eggs, gluten, and tree nuts (almonds). For allergen-friendly versions, see the variations section above. They are not suitable for vegans (unless modified) or those with nut allergies.
My perspective: I believe in balance. Halloween comes once a year, and these cookies are a tradition in our house. We don’t eat them every day, but for one spooky week in October, they’re fair game. Life’s too short to skip the fun stuff.
Conclusion
These Quick Witch’s Finger Cookies with Almond Nails are everything I want in a Halloween treat: creepy, delicious, and ridiculously easy to make. They came from a chance encounter at a hardware store, of all places, and now they’re a staple in my October baking rotation. That’s the thing about good recipes—they show up when you least expect them.
I hope you give these a try. Make them with your kids, bring them to a party, or just make them for yourself because you deserve a little spooky fun. Customize them however you like—add chocolate, skip the food coloring, use different nuts. That’s the beauty of a simple recipe. It’s a starting point, not a rulebook.
If you make these, I’d love to hear about it. Leave a comment below and tell me how they turned out. Did your kids freak out? Did your coworkers love them? Did you accidentally make them look too realistic and scare yourself? (It happens. I’ve been there.)
Until next time, happy baking—and happy Halloween.
Frequently Asked Questions
Can I make these cookies without almond extract?
Yes, you can skip it. The cookies will still taste like buttery shortbread. But the almond extract really adds that extra layer of flavor that makes these cookies special. If you don’t have it, use an extra teaspoon of vanilla extract instead.
Why did my cookies spread out and lose their shape?
This usually happens when the butter is too soft or the dough is too warm. Make sure your butter is softened, not melted. If the dough feels greasy or sticky, chill it in the fridge for 15-20 minutes before shaping. Also, make sure you measured your flour correctly—too little flour can cause spreading.
Can I use a different nut for the nails?
Absolutely. Slivered almonds are the most realistic, but you can use whole almonds (pointed end out), pistachios, sunflower seeds, or even candy corn for a sweeter version. Just make sure whatever you use is large enough to look like a fingernail.
How far in advance can I make these?
You can make the dough up to 3 days ahead and keep it in the fridge. The baked cookies (without the jam) can be stored in an airtight container for up to 5 days. Add the jam just before serving so it stays fresh and glossy. You can also freeze the baked, undecorated cookies for up to 3 months.
My cookies turned out too hard. What went wrong?
Overbaking is the most common culprit. These cookies should be pale and just set when you take them out of the oven. They continue to cook on the hot baking sheet for the first 5 minutes. Also, make sure you measured your flour correctly—too much flour can make cookies dry and hard. Spoon and level your flour, don’t scoop it.
Pin This Recipe!

Quick Witch’s Finger Cookies Easy Homemade Halloween Treat
These creepy but delicious witch finger cookies are made with buttery shortbread dough and almond ‘nails,’ perfect for Halloween. Quick to prepare and guaranteed to be a hit at any spooky gathering.
- Prep Time: 20 minutes
- Cook Time: 15 minutes
- Total Time: 35 minutes
- Yield: 30 cookies 1x
- Category: Dessert
- Cuisine: American
Ingredients
- 1 cup (226g) unsalted butter, softened
- 1 cup (200g) granulated sugar
- 1 large egg, room temperature
- 1 teaspoon vanilla extract
- ½ teaspoon almond extract
- 2 ½ cups (312g) all-purpose flour
- 1 teaspoon baking powder
- ½ teaspoon salt
- About 30 whole blanched almonds or slivered almonds
- Red jam or jelly (strawberry or raspberry)
- Green food coloring (optional, but recommended)
Instructions
- Preheat your oven to 350°F (175°C). Line two baking sheets with parchment paper.
- In a large bowl, beat the softened butter and granulated sugar together until light and fluffy, about 2-3 minutes with an electric mixer on medium speed.
- Beat in the egg, vanilla extract, and almond extract until fully combined.
- In a separate bowl, whisk together the flour, baking powder, and salt. Gradually add this to the wet mixture, mixing on low speed until just combined.
- If using green food coloring, add a few drops of gel food coloring to the dough and mix until the color is even.
- Take about 1 tablespoon of dough and roll it into a log shape roughly the size and thickness of your index finger. Place on the prepared baking sheet. Taper one end to look like a fingertip and make the other end slightly wider. Repeat with remaining dough, spacing cookies about 2 inches apart.
- Use the back of a butter knife or small offset spatula to gently press lines into each ‘finger’ at the knuckle joints, making 2-3 lines per finger.
- Press one slivered almond into the tapered end of each finger, with the pointed tip sticking out slightly.
- Bake for 12-15 minutes, or until the cookies are set and just barely golden on the bottom. Rotate the pans halfway through.
- Let the cookies cool on the baking sheet for 5 minutes, then transfer to a cooling rack. While still slightly warm, dab a tiny bit of red jam at the base of each almond ‘nail’ to create the bloody cuticle effect. Let cool completely before serving.
Notes
Don’t overwork the dough to keep cookies tender. Chill your hands if dough gets sticky. Vary finger sizes for realism. Use gel food coloring for vibrant green without thinning dough. Cookies can be made ahead; dough keeps 3 days in fridge, baked cookies (without jam) store 5 days at room temperature, or freeze undecorated for up to 3 months. Add jam just before serving.
Nutrition
- Serving Size: 1 cookie
- Calories: 135
- Sugar: 7
- Sodium: 55
- Fat: 8
- Saturated Fat: 4.5
- Carbohydrates: 15
- Fiber: 0.5
- Protein: 2
Keywords: Halloween cookies, witch finger cookies, shortbread cookies, almond cookies, spooky treats, easy Halloween recipe


