This was supposed to be a batch of perfectly iced Halloween sugar cookies—you know, the kind with the neat little pumpkins and tidy ghosts you see all over Pinterest. I had the royal icing mixed, the piping bags ready, and a whole afternoon cleared on the calendar. But then my neighbor’s dog started barking, I got distracted, and I grabbed the black food coloring instead of the orange. By the time I realized my mistake, the icing was already a deep, inky black, and I was already 45 minutes into a project that felt like it was falling apart. Honestly, I stood there staring at this bowl of what looked like edible tar, wondering if I should just toss it and start over.
But I hate wasting ingredients—it feels like throwing money in the trash. So I did what any stubborn home baker would do: I kept going. I piped the black icing onto the cookies anyway, and then, on a whim, I used a toothpick to drag out two little pointed ears and a long, curled tail. I added a dab of yellow gel coloring for eyes. What came out of that moment of panic was nothing like the plan—and honestly, it was so much better. These black cat sugar cookies have become my absolute go-to for Halloween, and I mean that with zero exaggeration. They’re spooky, they’re cute, and they have this little story baked right into them. Maybe you’ve been there—staring at a baking disaster and wondering if you should just give up. Let me tell you, sometimes the best recipes come from the messiest moments.
Why You’ll Love These Black Cat Sugar Cookies
I have tested this recipe more times than I care to count, and I can tell you with confidence that these are the easiest Halloween cookies you will ever make. They don’t require any fancy piping skills or complicated decorating techniques—just a steady hand and a little bit of patience. Here is why these cookies keep showing up at every Halloween party I attend:
- Kid-Friendly Fun : This decorating method is so simple that even little hands can help. My niece made a batch with me last year, and her cats came out crooked and lopsided—and somehow that made them even cuter.
- No Royal Icing Stress : Forget the stiff peaks and the flooding consistency. This recipe uses a simple buttercream that holds its shape and tastes incredible.
- Perfect for Halloween Parties : These cookies are always the first thing to disappear from the dessert table. They have that “wow” factor without the stress.
- Simple Pantry Ingredients : You probably already have everything you need in your kitchen. No special trips to the store required.
- Unbelievably Delicious : The cookie base is soft in the center with slightly crispy edges—the perfect sugar cookie texture that melts in your mouth.
What makes these different from every other Halloween cookie recipe out there is the technique. Instead of trying to pipe perfect cat shapes freehand, you use a simple cookie cutter for the base and then add the details with a toothpick. It is foolproof, I promise. And honestly, there is something so satisfying about watching those little black cats come to life on your baking sheet.
What Ingredients You Will Need
This recipe uses simple, wholesome ingredients to deliver that classic sugar cookie flavor with a spooky twist. Most of these are pantry staples, so you probably won’t need to make a special trip to the grocery store.
- Unsalted butter, softened – 1 cup (2 sticks). Make sure it is truly at room temperature—cold butter will not cream properly with the sugar. I usually leave mine out on the counter for about an hour before I start baking.
- Granulated sugar – 1 cup. This gives the cookies their structure and that perfect sweetness.
- Large eggs, room temperature – 1 whole egg plus 1 egg yolk. The extra yolk adds richness and makes the cookies extra tender. If you forget to take your eggs out ahead of time, place them in a bowl of warm water for 5 minutes.
- Vanilla extract – 2 teaspoons. I use pure vanilla extract here—the artificial stuff has a weird aftertaste that really stands out in a simple cookie.
- All-purpose flour – 2 ¾ cups. Spoon and level your flour for the most accurate measurement. Scooping directly from the bag can pack in too much flour and make your cookies dry.
- Baking powder – 1 teaspoon. This gives the cookies just the right amount of lift without making them puffy.
- Salt – ½ teaspoon. Don’t skip this—salt balances the sweetness and enhances the vanilla flavor.
- For the buttercream frosting : Unsalted butter (½ cup, softened), powdered sugar (2 cups), heavy cream (2 tablespoons), vanilla extract (1 teaspoon), and black gel food coloring. I recommend the gel kind, not the liquid drops—liquid coloring will thin out your frosting and make it runny. Americolor Super Black is my go-to brand.
- For the eyes : Yellow gel food coloring or yellow candy melts. A tiny dab goes a long way.
If you want to make these dairy-free, swap the butter for a high-quality vegan butter stick and use coconut cream instead of heavy cream. The texture will be slightly different, but they will still taste amazing.
Equipment Needed
You do not need a lot of fancy equipment for these cookies, which is part of why I love this recipe so much. Here is what you will need:
- Electric hand mixer or stand mixer – Either works fine. I have made these with both, and honestly, the hand mixer is easier for small batches.
- Large mixing bowls – At least two. One for the dry ingredients and one for the wet ingredients.
- Rolling pin – A standard rolling pin works, but if you have adjustable rolling rings, they help you get perfectly even dough thickness every time.
- Cat-shaped cookie cutter – You can find these at any craft store or online. I got mine at a random kitchen supply store for three dollars.
- Baking sheets – Two or three, lined with parchment paper. Silicone baking mats also work great.
- Piping bags or zip-top bags – For the frosting. If you don’t have piping bags, just snip a tiny corner off a zip-top bag—it works perfectly.
- Toothpicks – These are essential for creating the cat details. You will use them to drag the frosting into ears and tails.
- Cooling rack – Wire racks help your cookies cool evenly so the frosting doesn’t melt.
Preparation Method
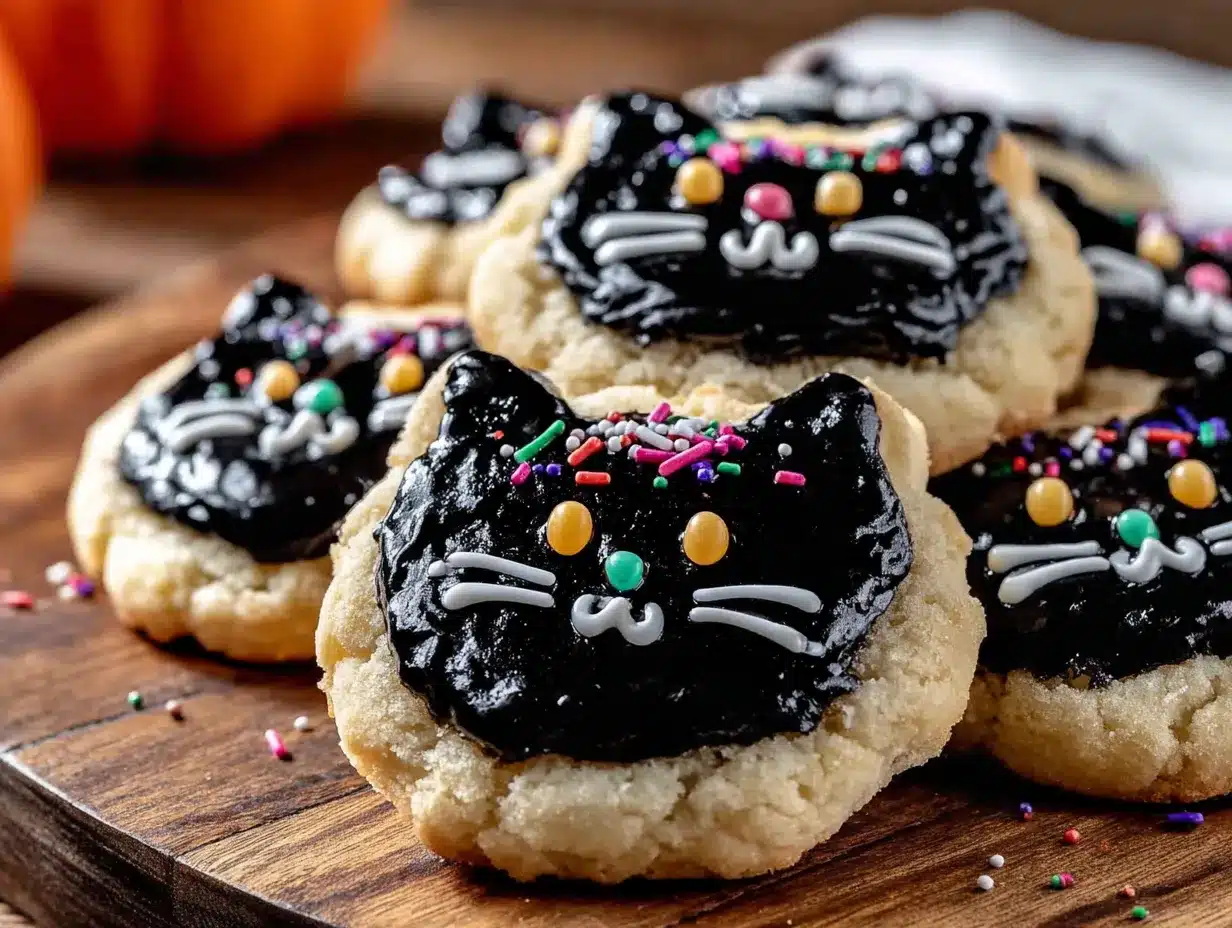
Let me walk you through this step by step. I have made this recipe so many times that I have the process memorized, and I promise it is easier than it looks.
- Make the cookie dough. In a large bowl, cream together the softened butter and granulated sugar until the mixture is light and fluffy—about 3 minutes with an electric mixer. Add the egg, egg yolk, and vanilla extract, and beat until everything is well combined. In a separate bowl, whisk together the flour, baking powder, and salt. Gradually add the dry ingredients to the wet ingredients, mixing on low speed until a soft dough forms. Do not overmix—stop as soon as the flour disappears.
- Chill the dough. Divide the dough into two discs, wrap each in plastic wrap, and refrigerate for at least 1 hour. This step is non-negotiable, I am telling you. Chilled dough is so much easier to roll out, and it helps the cookies hold their shape in the oven. If you try to roll warm dough, it will stick to everything and your cats will come out looking like blobs.
- Preheat and prepare. When you are ready to bake, preheat your oven to 350°F (175°C). Line your baking sheets with parchment paper.
- Roll and cut. On a lightly floured surface, roll out one disc of dough to about ¼-inch thickness. Cut out your cat shapes and place them on the prepared baking sheets, spacing them about 2 inches apart. Gather the scraps, re-roll, and cut again. I usually get about 24 cookies from one batch.
- Bake. Bake for 8 to 10 minutes, or until the edges are just barely golden. The centers should still look slightly soft and puffy. Let the cookies cool on the baking sheet for 5 minutes, then transfer them to a wire rack to cool completely. Do not even think about frosting warm cookies—the frosting will slide right off.
- Make the frosting. While the cookies cool, beat the softened butter until smooth and creamy. Gradually add the powdered sugar, beating on low speed until combined. Add the heavy cream and vanilla extract, then beat on medium-high speed for 2 minutes until the frosting is light and fluffy. Add the black gel food coloring one drop at a time, mixing thoroughly after each addition, until you reach your desired shade of black.
- Decorate the cats. Transfer the black frosting to a piping bag or zip-top bag with a tiny corner snipped off. Pipe a thin outline around the edge of each cookie, then fill in the center. Use a toothpick to drag the frosting outward from the top of the head to create two pointed ears. Then drag a tiny bit from the bottom to create a curled tail. Add a tiny dot of yellow frosting or a yellow candy melt for each eye.
- Let the frosting set. Allow the decorated cookies to sit at room temperature for about 30 minutes so the frosting can firm up. Then serve or store them in an airtight container.
Cooking Tips & Techniques
I have made every mistake you can imagine with these cookies, so let me save you some trouble. First, do not skip the chilling step—I know it is tempting, but warm dough is sticky dough, and sticky dough leads to frustration. I learned this the hard way when I tried to rush a batch for a last-minute Halloween party and ended up with a sticky mess all over my counter.
Another thing I have learned is that less flour is more when you are rolling out the dough. You only need a light dusting on your surface and your rolling pin. Too much flour will dry out your cookies and make them tough. If the dough starts sticking, pop it back in the fridge for 10 minutes instead of adding more flour.
For the frosting, patience is key. Black food coloring can be tricky because it takes more than you think to get a true black color. Add it drop by drop and keep mixing—the color will deepen as you go. If your frosting gets too thin from too much coloring, just add a little more powdered sugar to thicken it back up.
And here is a tip I wish someone had told me years ago: use a scribe tool or a wooden skewer instead of a toothpick if you are making a large batch. Toothpicks work fine for a dozen cookies, but they get soggy fast. A metal scribe tool gives you more control and lasts through the whole batch.
Variations & Adaptations
One of the best things about this recipe is how easy it is to customize. Here are a few variations I have tried over the years:
- Gluten-Free Version : Swap the all-purpose flour for a 1:1 gluten-free baking flour blend. I have tested this with King Arthur’s Gluten-Free Measure for Measure flour, and the texture is remarkably close to the original.
- Vegan Black Cat Cookies : Use vegan butter sticks and a flax egg (1 tablespoon ground flaxseed mixed with 3 tablespoons water) instead of the egg and egg yolk. The cookies will be slightly more crumbly, but they still taste fantastic.
- Chocolate Black Cats : Replace ¼ cup of the flour with unsweetened cocoa powder for a chocolate version. These look especially spooky with the black frosting on top.
- Spice It Up : Add 1 teaspoon of pumpkin pie spice to the dough for a fall-flavored twist. The warm spices pair beautifully with the vanilla frosting.
- Different Shapes : If you cannot find a cat cookie cutter, use a round cutter and pipe the ears and tail directly onto the cookie. I have also made these as ghost-shaped cookies with white frosting—same technique, completely different look.
Serving & Storage Suggestions
These cookies are best served at room temperature, and they are perfect for Halloween parties, classroom treats, or just a fun weekend baking project. I like to arrange them on a platter with some fake spiderwebs and plastic spiders for a spooky presentation. They also make great gifts—just stack them in a clear cellophane bag tied with a black ribbon.
For storage, keep the cookies in an airtight container at room temperature for up to 5 days. Do not refrigerate them—the fridge dries out the cookies and makes the frosting lose its shine. If you need to store them longer, you can freeze the undecorated cookies for up to 3 months. Just wrap them tightly in plastic wrap and then foil. When you are ready to decorate, let them thaw at room temperature and then frost as directed.
The frosting itself will firm up nicely after about an hour, so you can stack the cookies without worrying about smudging. I have even mailed these cookies to friends across the country, and they arrived in perfect condition.
Nutritional Information & Benefits
Let’s be real—these are cookies, not health food. But I do think there is something to be said for the joy that comes from baking and sharing treats with the people you love. Each cookie (with frosting) contains approximately 220 calories, 11 grams of fat, 29 grams of carbohydrates, and 2 grams of protein. The butter and eggs provide a small amount of vitamin A and protein, but honestly, these are about indulgence, not nutrition.
If you are looking for a slightly lighter option, you can reduce the sugar in the dough by ¼ cup—the cookies will still be sweet enough to enjoy. And if you have dietary restrictions, the gluten-free and vegan variations above work beautifully. Just be aware that the frosting is not dairy-free unless you use vegan butter and coconut cream.
These cookies also contain gluten, dairy, and eggs, so they are not suitable for anyone with allergies to those ingredients. Always check your food coloring labels too—some brands contain allergens like soy.
Conclusion
These black cat sugar cookies have become a Halloween tradition in my house, and I hope they become one in yours too. They started as a mistake—a happy accident that could have ended in the trash—but now they are the first thing I think of when October rolls around. There is something so satisfying about pulling a tray of these little cats out of the oven, all perfectly shaped and ready to be transformed into something spooky and cute.
I would love to hear how yours turn out. Did your cats come out looking elegant and refined, or did they end up a little crooked and goofy like mine always do? Either way, they are going to taste amazing. Tag me in your photos, leave a comment below, and let me know what variations you tried. Happy Halloween, and happy baking—you have got this.
Frequently Asked Questions
Can I use store-bought sugar cookie dough instead of making it from scratch?
Yes, you absolutely can. The homemade dough gives you a better texture and flavor, but in a pinch, refrigerated sugar cookie dough from the store works fine. Just follow the package instructions for baking and let the cookies cool completely before decorating.
How do I get the frosting to be really black instead of dark gray?
Use gel food coloring instead of liquid drops, and add it gradually. Start with a few drops, mix thoroughly, and keep adding until you reach the desired shade. If your frosting starts to get too thin, add a little more powdered sugar to thicken it back up.
My cookies spread too much in the oven. What did I do wrong?
This usually happens when the dough is not chilled enough or the butter was too soft. Make sure your dough chills for at least 1 hour, and if your kitchen is warm, pop the cut-out cookies in the fridge for 10 minutes before baking.
Can I freeze these cookies after decorating them?
I do not recommend freezing decorated cookies because the frosting can develop condensation when it thaws. Freeze the undecorated cookies instead, then thaw and frost them when you are ready to serve.
How far in advance can I make these cookies?
You can make the dough up to 3 days ahead and keep it wrapped in the fridge. Baked, undecorated cookies can be stored at room temperature for up to a week. Decorated cookies are best eaten within 3 to 5 days.
Pin This Recipe!

Easy Black Cat Sugar Cookies – Perfect Halloween Treat
These spooky and cute black cat sugar cookies are made with a simple buttercream frosting and a foolproof decorating technique. Perfect for Halloween parties, they start with a soft sugar cookie base and are transformed into adorable black cats with just a toothpick.
- Prep Time: 1 hour 15 minutes
- Cook Time: 10 minutes
- Total Time: 1 hour 55 minutes
- Yield: 24 servings 1x
- Category: Dessert
- Cuisine: American
Ingredients
- 1 cup (2 sticks) unsalted butter, softened
- 1 cup granulated sugar
- 1 large egg plus 1 egg yolk, room temperature
- 2 teaspoons vanilla extract
- 2 ¾ cups all-purpose flour
- 1 teaspoon baking powder
- ½ teaspoon salt
- ½ cup unsalted butter, softened (for frosting)
- 2 cups powdered sugar (for frosting)
- 2 tablespoons heavy cream (for frosting)
- 1 teaspoon vanilla extract (for frosting)
- Black gel food coloring
- Yellow gel food coloring or yellow candy melts (for eyes)
Instructions
- Make the cookie dough: In a large bowl, cream together the softened butter and granulated sugar until light and fluffy, about 3 minutes. Add the egg, egg yolk, and vanilla extract, and beat until well combined. In a separate bowl, whisk together the flour, baking powder, and salt. Gradually add the dry ingredients to the wet ingredients, mixing on low speed until a soft dough forms. Do not overmix.
- Chill the dough: Divide the dough into two discs, wrap each in plastic wrap, and refrigerate for at least 1 hour.
- Preheat and prepare: Preheat oven to 350°F (175°C). Line baking sheets with parchment paper.
- Roll and cut: On a lightly floured surface, roll out one disc of dough to about ¼-inch thickness. Cut out cat shapes and place on prepared baking sheets, spacing about 2 inches apart. Gather scraps, re-roll, and cut again.
- Bake: Bake for 8 to 10 minutes, until edges are just barely golden. Let cool on baking sheet for 5 minutes, then transfer to a wire rack to cool completely.
- Make the frosting: Beat softened butter until smooth. Gradually add powdered sugar, beating on low speed until combined. Add heavy cream and vanilla extract, then beat on medium-high speed for 2 minutes until light and fluffy. Add black gel food coloring one drop at a time, mixing thoroughly, until desired shade of black is reached.
- Decorate the cats: Transfer black frosting to a piping bag or zip-top bag with a tiny corner snipped off. Pipe a thin outline around the edge of each cookie, then fill in the center. Use a toothpick to drag frosting outward from the top to create two pointed ears, and from the bottom to create a curled tail. Add a tiny dot of yellow frosting or a yellow candy melt for each eye.
- Let the frosting set: Allow decorated cookies to sit at room temperature for about 30 minutes until frosting firms up. Serve or store in an airtight container.
Notes
Do not skip chilling the dough—it prevents spreading and makes rolling easier. Use gel food coloring for the frosting to achieve a true black color without thinning. For large batches, use a metal scribe tool instead of toothpicks. Store undecorated cookies in the freezer for up to 3 months.
Nutrition
- Serving Size: 1 cookie
- Calories: 220
- Sugar: 18
- Sodium: 95
- Fat: 11
- Saturated Fat: 7
- Carbohydrates: 29
- Protein: 2
Keywords: Halloween cookies, black cat cookies, sugar cookies, easy Halloween treats, buttercream cookies


