Half a bag of shredded mozzarella staring at me from the fridge, and the clock ticking down to kickoff. I had promised a game day spread for a bunch of friends, and somehow, I had completely overestimated my prep time. The dip was done, the wings were ordered, but I needed something central—something that looked impressive without a ton of effort. You know that panic when you realize you’ve got the ingredients but not the plan? That was me, staring at that cheese like it held all the answers.
Then it hit me. Why not build the whole snack board around the game itself? I grabbed a baking sheet, dumped the mozzarella in a heap, and started shaping it. It was a little messy, honestly—cheese everywhere—but once I shoved it under the broiler, something magical happened. It melted into a golden, bubbly puddle, and I knew I was onto something. I sprinkled pepperoni on top, let it cool for a minute, and suddenly, I had a football-shaped cheesy masterpiece that everyone went nuts over.
That first attempt was a total accident, but it became the star of the party. This Easy Cheesy Pepperoni Football Charcuterie Board is now my go-to for any game day gathering. It’s the kind of recipe that makes you look like a hero without breaking a sweat—a warm, melty, pepperoni-studded centerpiece that pulls everyone in. Honestly, it’s the best kind of kitchen win: born from chaos, perfected by cravings.
Why You’ll Love This Recipe
I’ve tested this board more times than I can count, and it never fails to deliver. It’s not just another appetizer—it’s the appetizer that disappears first. Here’s why this one’s a keeper.
- Quick & Easy: From fridge to table in under 20 minutes. No complicated steps, just melt, arrange, and serve. Perfect for last-minute game day plans or when you just want to relax with your guests.
- Simple Ingredients: You probably have most of this in your kitchen right now. Mozzarella, pepperoni, crackers—no fancy grocery runs required. It’s the kind of recipe that saves you when you’re in a pinch.
- Perfect for Game Day: This board is literally shaped like a football. It’s the ultimate crowd-pleaser for Super Bowl parties, tailgates, or any sports gathering. It sets the tone before the first whistle blows.
- Crowd-Pleaser: Kids and adults alike go crazy for it. The warm, gooey cheese paired with crispy pepperoni is a combo that never gets old. I’ve seen people fight over the last corner piece.
- Unbelievably Delicious: The texture is next-level—crispy edges, melty center, and salty bites of pepperoni in every scoop. It’s comfort food at its finest, and it tastes like you spent way more time than you actually did.
What makes this different from every other cheese board out there? It’s the shape, sure, but it’s also the technique. Melting the cheese into a single sheet creates this incredible crust that’s both chewy and crispy. And the pepperoni? I tuck some under the cheese and leave some on top so every bite has that perfect balance. It’s not just another version—it’s my best version, perfected after many game days.
This recipe connects because it’s about more than food. It’s about gathering around something warm and shareable, about the joy of watching a game with people you love. It’s comfort food reimagined—faster, simpler, but with the same soul-soothing satisfaction. Perfect for impressing without stress, or turning a simple snack into something memorable.
What Ingredients You Will Need
This recipe uses simple, pantry-friendly ingredients to create a bold, satisfying snack board. The beauty of it is in the simplicity—each component plays a key role without needing anything complicated.
- 8 oz shredded low-moisture mozzarella cheese – This is the backbone of the board. Low-moisture melts into that perfect stretchy, golden sheet without getting watery. I prefer Sargento or Kraft for consistent results, but any brand works fine.
- 4 oz sliced pepperoni – The star of the show. Look for regular-sized slices—not the mini ones—so they lay flat and crisp up nicely. I usually grab Hormel or store-brand; both work great. For extra flavor, try turkey pepperoni for a lighter option.
- 1/2 cup shredded parmesan cheese – This adds a salty, nutty kick and helps create that crispy edge. Freshly grated is best, but the pre-shredded stuff in the green can works in a pinch.
- 1 tablespoon olive oil – Just enough to grease the pan and help the cheese crisp up without sticking. Extra virgin is fine, but regular works too.
- 1 teaspoon garlic powder – Optional but recommended. It adds a subtle savory depth that complements the cheese and pepperoni beautifully.
- 1/2 teaspoon dried oregano – A little Italian flair that makes the board feel more authentic. You can skip it, but I love the aroma it brings.
- For serving: crackers, breadsticks, veggie sticks, and dipping sauces – Think of these as the supporting cast. I like buttery crackers, crunchy breadsticks, and crisp celery or carrot sticks. For dips, marinara sauce and ranch dressing are my go-tos.
When choosing your ingredients, keep these tips in mind. For the mozzarella, avoid fresh mozzarella balls—they’re too watery and won’t melt into a cohesive sheet. Stick with the low-moisture shredded kind. For the pepperoni, if you can find the larger slices, they create a better visual effect. I also like to use a mix of regular and spicy pepperoni for a little heat. And if you’re feeling adventurous, swap in some cooked crumbled sausage or chopped bacon for a different twist. The possibilities are endless, but this base combo is foolproof.
Equipment Needed
You don’t need a lot of fancy gear for this recipe, which is part of its charm. Here’s what you’ll need to pull it off.
- Baking sheet or oven-safe skillet – A standard half-sheet pan works perfectly. I’ve used a 10-inch cast iron skillet too, and it gives the cheese a nice rustic edge. If you don’t have a baking sheet, a large oven-safe dish will do.
- Parchment paper or silicone baking mat – Essential for easy cleanup and preventing the cheese from sticking. I’ve learned the hard way that foil doesn’t cut it—the cheese will bond to it like glue.
- Small spatula – For shaping the melted cheese into a football shape while it’s still warm. A silicone spatula works best because it won’t scratch your pan.
- Serving board or platter – Something large enough to hold the football cheese sheet plus all your dippers. I use a wooden cutting board for that casual, rustic look.
- Small bowls – For holding your dips like marinara and ranch. I like to nestle them right into the board for easy access.
If you don’t have a baking sheet, try a pizza pan or even a large ovenproof plate. Just make sure it has a rim to catch any cheese that might bubble over. And for the silicone mat—if you don’t have one, parchment paper is your best friend. I’ve ruined a few pans before I figured that out!
Preparation Method
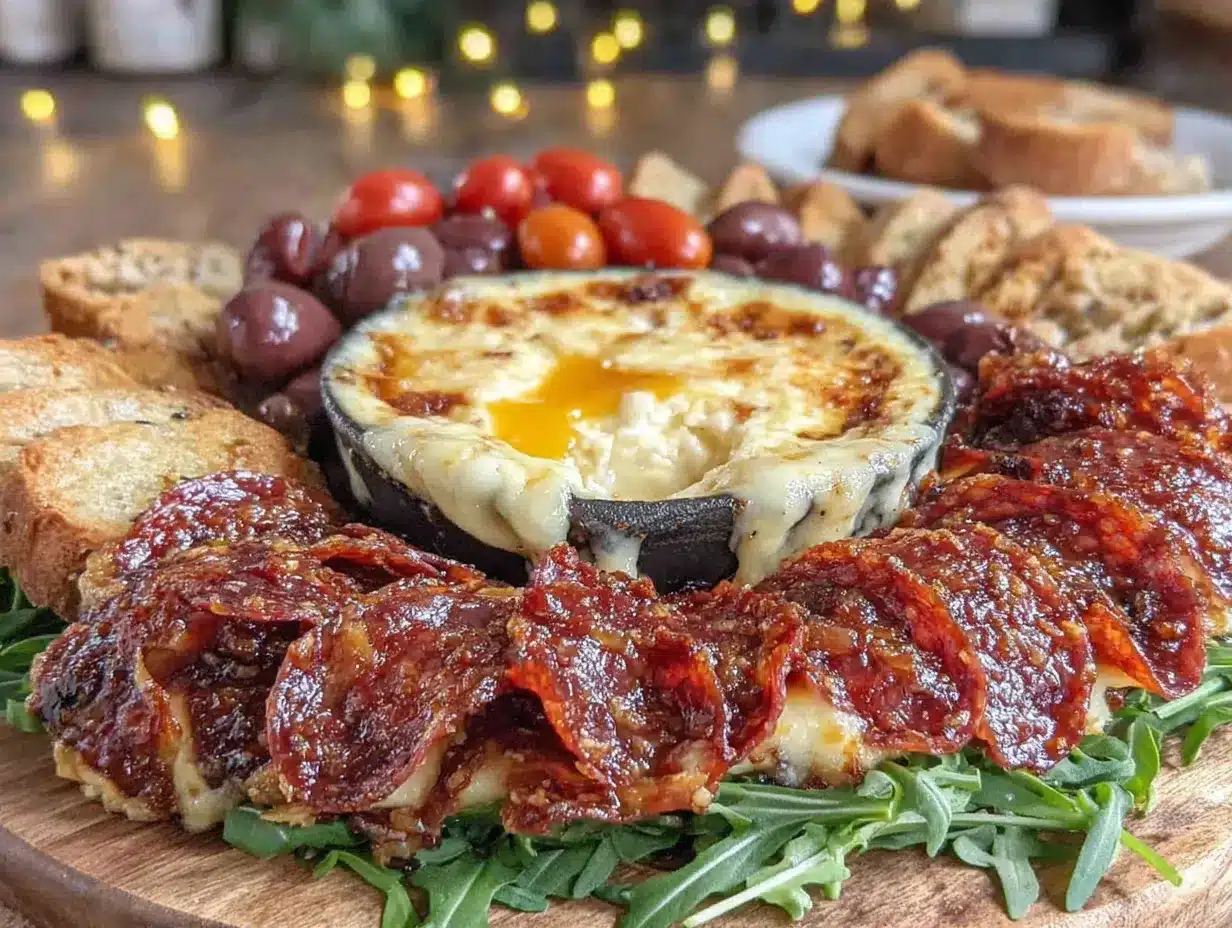
Let’s get to the fun part—making this cheesy football come to life. I’ve broken it down step by step so you can nail it on your first try.
- Preheat your oven to 400°F (200°C). While it’s heating, line your baking sheet with parchment paper or a silicone mat. This is non-negotiable—trust me, you don’t want to scrape melted cheese off a pan.
- Shape the cheese mixture. In a small bowl, toss together the shredded mozzarella, parmesan, garlic powder, and oregano. Dump the mixture onto the prepared baking sheet and use your hands to form it into a rough football shape—about 10 inches long and 6 inches wide at the center. Don’t worry about perfection; it’ll spread as it melts.
- Add the pepperoni. Arrange half of the pepperoni slices on top of the cheese mound, pressing them in gently. Reserve the other half for after baking. I like to tuck a few slices under the cheese too, so they get melty and crispy.
- Bake until golden and bubbly. Slide the sheet into the oven and bake for 10-12 minutes, or until the cheese is fully melted and the edges are turning golden brown. Keep an eye on it—ovens vary, and you want it bubbly but not burnt. The cheese will smell amazing at this point.
- Shape the football while warm. Remove the sheet from the oven and let it cool for about 2 minutes. Using a small spatula, gently push the edges inward to form a tighter football shape. The cheese will be pliable but not too hot to handle. If it starts to set too fast, pop it back in the oven for 30 seconds.
- Add the remaining pepperoni. While the cheese is still warm, press the reserved pepperoni slices onto the top. This creates a beautiful layered look with some pepperoni crispy from the oven and some soft and chewy.
- Transfer to a serving board. Carefully slide the parchment paper onto your serving board or platter. You can also use a large spatula to lift it directly onto the board. Arrange your crackers, breadsticks, veggie sticks, and dips around it.
- Serve immediately. This board is best enjoyed warm, when the cheese is still stretchy and the pepperoni is at its peak. Let everyone dig in with crackers or breadsticks—it’s a hands-on experience!
Here’s a pro tip: if you want extra crispy edges, bake the cheese for an additional 2 minutes. The parmesan will create a lace-like crust that’s irresistible. And if you’re making this ahead, don’t bake it until just before serving—it’s truly best fresh from the oven.
Cooking Tips & Techniques
I’ve made this board more times than I can count, and I’ve picked up a few tricks along the way. These tips will help you avoid the mistakes I made in the beginning.
Watch your oven temperature. I once cranked the oven to 450°F thinking it would speed things up. Big mistake. The cheese browned too fast on the edges while the center was still not fully melted. Stick with 400°F and let it do its thing. If your oven runs hot, check it at the 8-minute mark.
Don’t skip the parchment paper. I know it’s tempting to just grease the pan, but I’ve been there—spending 20 minutes scrubbing burnt cheese off a baking sheet. Parchment paper or a silicone mat makes cleanup a breeze and ensures the cheese slides off easily.
Shape the cheese while it’s warm. The cheese sets quickly as it cools, so work fast. Have your spatula ready and shape it within the first 2-3 minutes after it comes out of the oven. If it starts to firm up, a quick 30-second return to the oven will loosen it up again.
Balance your toppings. Don’t overload the cheese with pepperoni before baking—too much can prevent the cheese from melting evenly. I like to use half before and half after for the best texture and visual appeal.
Use room temperature ingredients. If you take the mozzarella straight from the fridge, it takes longer to melt. Let it sit on the counter for 10 minutes before shaping. It makes a noticeable difference in how evenly it melts.
One of my biggest failures? I tried using pre-shredded mozzarella with anti-caking agents. It worked okay, but the texture wasn’t as smooth. If you can, shred your own from a block—it melts into a creamier, more cohesive sheet. But honestly, pre-shredded works in a pinch, so don’t stress if that’s what you have.
Variations & Adaptations
This recipe is incredibly versatile, and I’ve tried several twists over the years. Here are some of my favorite ways to change it up.
- Spicy Football: Swap half the regular pepperoni for spicy pepperoni or add a pinch of red pepper flakes to the cheese mixture. I did this for a group of spice lovers, and it was gone in minutes.
- Veggie Lover’s Board: Skip the pepperoni and top the cheese with sliced roasted red peppers, artichoke hearts, and olives before baking. It’s a great vegetarian option that still feels indulgent.
- Breakfast Football: Use shredded cheddar instead of mozzarella, and top with crispy bacon bits and chives. Serve with toast points for a game day brunch twist. I tried this for a morning tailgate, and it was a hit.
- Gluten-Free Option: The cheese base is naturally gluten-free, so just swap your crackers and breadsticks for gluten-free versions. Everything else works perfectly.
- Dairy-Free Adaptation: Use a dairy-free mozzarella alternative and skip the parmesan. I’ve tested this with a cashew-based mozzarella, and while the texture is a bit different, it’s still delicious.
For a fun seasonal twist, try adding a drizzle of hot honey after baking for a sweet-spicy kick. Or, during the holidays, shape the cheese into a Christmas tree or pumpkin instead of a football. The technique is the same—just change the shape and toppings to match the occasion.
Serving & Storage Suggestions
This board is best served warm, straight from the oven. The cheese is at its stretchiest and most flavorful within the first 10 minutes. Arrange it on a large platter or wooden board with your dippers artfully placed around it. I like to put small bowls of marinara and ranch at opposite ends so everyone can reach them easily.
What to serve with it: Buttery crackers, crunchy breadsticks, sliced baguette, celery sticks, carrot sticks, and bell pepper strips all work beautifully. For dips, marinara sauce, ranch dressing, or a spicy aioli are my top choices. If you’re feeling fancy, add some olives or pickled peppers on the side for a tangy contrast.
Storage: If you have leftovers (unlikely, but possible!), let the cheese cool completely, then transfer it to an airtight container. It will keep in the fridge for up to 3 days. The texture changes when chilled—it becomes firmer and less stretchy—but it’s still tasty.
Reheating: To bring it back to life, place the cheese sheet on a baking sheet and reheat in a 350°F oven for 5-7 minutes, or until warm and bubbly again. Avoid the microwave—it makes the cheese rubbery and uneven. I’ve tried it, and it’s just not the same.
The flavors actually meld together nicely after a day in the fridge, so leftovers make a great cold snack too. Just slice it into strips and eat it like cheese crackers. It’s a different experience, but still delicious.
Nutritional Information & Benefits
This board is indulgent, but it’s made with real, whole ingredients. Here’s a rough estimate per serving (based on 8 servings, with dippers not included).
- Calories: Approximately 280 per serving
- Protein: 18g – Thanks to the mozzarella and pepperoni, this is a protein-packed snack that keeps you full.
- Fat: 22g – Mostly from cheese and pepperoni, but it’s satisfying in moderation.
- Carbohydrates: 3g – Very low carb, making it suitable for keto or low-carb diets.
- Calcium: 35% of daily value – Cheese is a great source of calcium for bone health.
The mozzarella provides a good dose of protein and calcium, while the pepperoni adds a bit of iron. If you use turkey pepperoni, you can cut the fat and calories significantly. For those watching sodium, opt for low-sodium pepperoni or reduce the amount. This board is naturally gluten-free if you serve it with veggie sticks instead of crackers, making it friendly for various dietary needs. Just be mindful of the fat content if you’re on a restricted diet—it’s a treat, not an everyday snack.
Conclusion
This Easy Cheesy Pepperoni Football Charcuterie Board is the kind of recipe that makes you the MVP of any game day gathering. It’s simple, fast, and absolutely delicious—the perfect balance of crispy, melty, and salty. Whether you’re hosting a Super Bowl party or just having friends over for the big game, this board will steal the show without stealing your time.
I love how customizable it is. You can make it spicy, veggie-heavy, or even breakfast-style—it’s your board, your rules. And honestly, the shape alone is a conversation starter. People will ask how you did it, and you can just smile and say it’s easier than it looks.
I’d love to hear how yours turns out! Drop a comment below with your favorite variations or any tips you discovered. Share this with a friend who loves game day snacks, and don’t forget to tag me in your photos. Now go make that cheese melt—you’ve got a game to watch!
Frequently Asked Questions
Can I make this board ahead of time?
You can prep the cheese mixture and arrange the pepperoni on a parchment-lined baking sheet up to 24 hours in advance. Just cover it with plastic wrap and refrigerate. Bake it right before serving for the best texture.
What if I don’t have a baking sheet?
No problem! Use a large oven-safe skillet or a 9×13-inch baking dish. Just make sure it has a rim to catch any melting cheese. The shape might be slightly different, but it will taste just as good.
Can I use different cheeses?
Absolutely! Try a mix of cheddar and mozzarella for a sharper flavor, or use provolone for a milder taste. Just avoid soft cheeses like brie—they won’t hold the shape as well.
How do I keep the cheese from sticking to the pan?
Always use parchment paper or a silicone baking mat. I’ve tried greasing the pan with oil, and it still stuck. Parchment paper is your best friend here.
Can I make this in an air fryer?
Yes! Shape the cheese on a parchment round that fits your air fryer basket. Cook at 350°F for 6-8 minutes, checking frequently. It might cook faster than in the oven, so keep an eye on it.
Pin This Recipe!
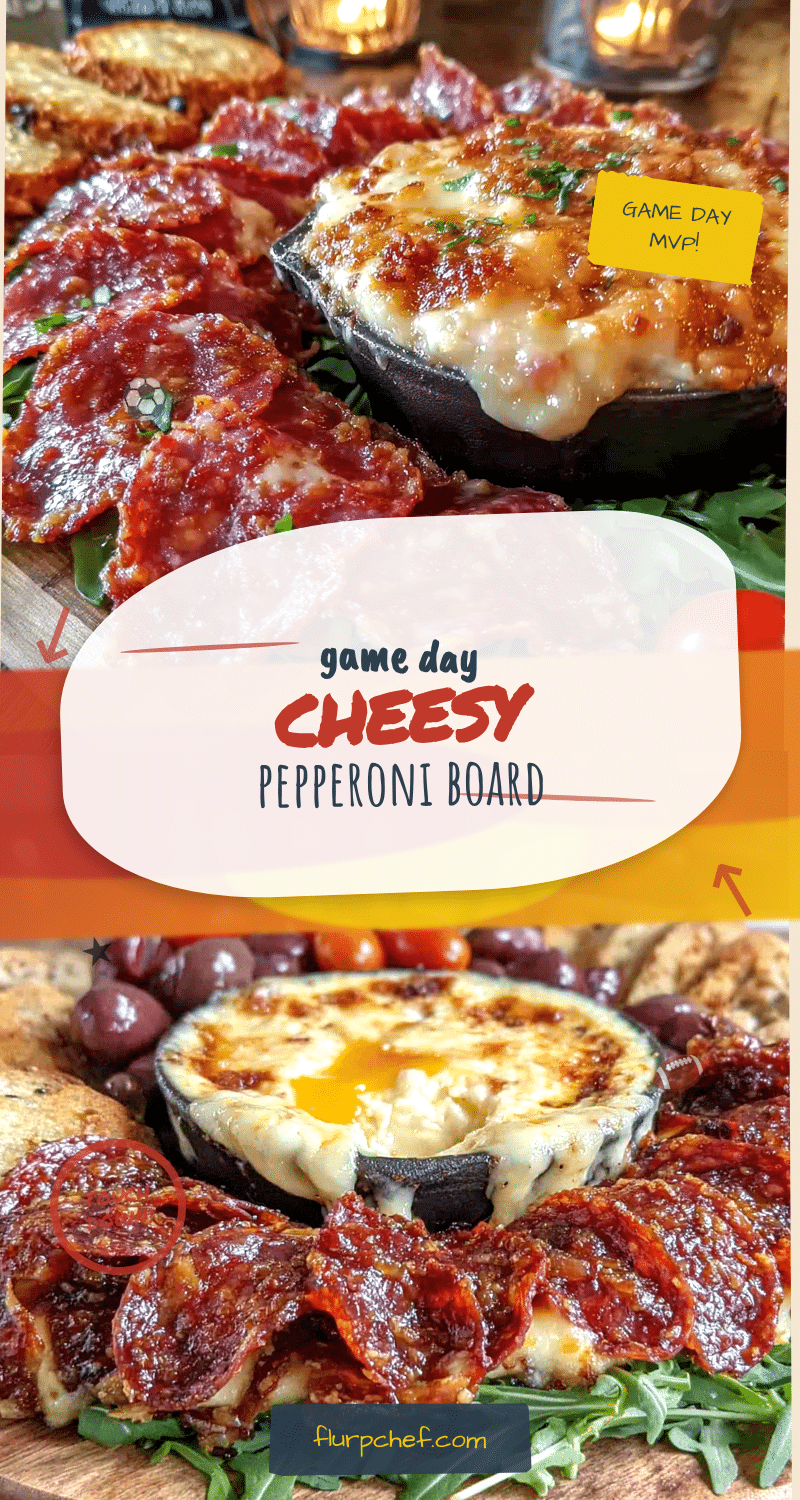
Easy Cheesy Pepperoni Football Charcuterie Board
A warm, melty, pepperoni-studded cheese board shaped like a football, perfect for game day gatherings. Quick and easy to make with simple ingredients, it’s a crowd-pleasing centerpiece that looks impressive without a ton of effort.
- Prep Time: 10 minutes
- Cook Time: 12 minutes
- Total Time: 22 minutes
- Yield: 8 servings 1x
- Category: Appetizer
- Cuisine: American
Ingredients
- 8 oz shredded low-moisture mozzarella cheese
- 4 oz sliced pepperoni
- 1/2 cup shredded parmesan cheese
- 1 tablespoon olive oil
- 1 teaspoon garlic powder
- 1/2 teaspoon dried oregano
- For serving: crackers, breadsticks, veggie sticks, and dipping sauces (marinara sauce, ranch dressing)
Instructions
- Preheat your oven to 400°F (200°C). Line a baking sheet with parchment paper or a silicone mat.
- In a small bowl, toss together the shredded mozzarella, parmesan, garlic powder, and oregano. Dump the mixture onto the prepared baking sheet and use your hands to form it into a rough football shape—about 10 inches long and 6 inches wide at the center.
- Arrange half of the pepperoni slices on top of the cheese mound, pressing them in gently. Reserve the other half for after baking.
- Bake for 10-12 minutes, or until the cheese is fully melted and the edges are turning golden brown.
- Remove from the oven and let cool for about 2 minutes. Using a small spatula, gently push the edges inward to form a tighter football shape.
- While the cheese is still warm, press the reserved pepperoni slices onto the top.
- Carefully slide the parchment paper onto a serving board or platter. Arrange crackers, breadsticks, veggie sticks, and dips around it.
- Serve immediately.
Notes
For extra crispy edges, bake for an additional 2 minutes. Use room temperature mozzarella for more even melting. If making ahead, prep the cheese mixture and pepperoni on a parchment-lined baking sheet, cover, and refrigerate up to 24 hours; bake just before serving.
Nutrition
- Serving Size: 1 serving (based on
- Calories: 280
- Sugar: 1
- Sodium: 680
- Fat: 22
- Saturated Fat: 10
- Carbohydrates: 3
- Protein: 18
Keywords: game day, football, charcuterie board, pepperoni, cheese, appetizer, party snack, Super Bowl


