There used to be a tiny bakery tucked between a laundromat and a secondhand bookstore in my old neighborhood—the kind of place with mismatched chairs and a chalkboard menu that changed with the seasons. They made an apple crisp that was pure magic. The topping had this incredible crunch, almost like a granola cookie, and the apples underneath were so tender they practically melted. When they closed suddenly two winters ago, I felt a genuine pang of loss. I mean, I actually drove by three times hoping it was just a “renovation” sign.
After twelve tries—honestly, twelve, with some truly sad, soggy disasters in between—I finally got it. This cozy one-bowl apple crisp with oat crumble is that bakery’s spirit captured in a baking dish. It took me months to figure out the secret: the oats need to be toasted just slightly before they hit the topping, and the apples need a good long maceration with the sugar and spices. Let me tell you, the first time I pulled this version out of the oven and saw that golden, craggy topping, I actually teared up a little. Maybe you’ve been there—chasing a food memory that feels just out of reach.
This recipe is my love letter to that little bakery. It’s the kind of dessert that makes your kitchen smell like cinnamon and brown sugar for hours, the kind that fills your whole house with that cozy, “everything is going to be okay” warmth. It’s simple enough for a Tuesday night but impressive enough for a holiday table. And the best part? It all comes together in one bowl—less mess, more comfort.
Why You’ll Love This Recipe
This isn’t just another apple crisp recipe floating around the internet. After years of testing (and eating my fair share of mediocre crisps), I can confidently say this version hits different. Here’s why it deserves a permanent spot in your recipe rotation:
- One-Bowl Wonder: No need to dirty multiple mixing bowls. Everything—the apple filling, the oat crumble—comes together in one bowl. Less cleanup means more time to actually enjoy your dessert.
- Perfectly Balanced Sweetness: The tartness of the apples cuts through the brown sugar and butter, so it’s sweet but not cloying. You get that deep, caramelized flavor without it feeling like a sugar bomb.
- That Irresistible Oat Crumble: The topping is the star here—crispy, buttery, with just the right amount of chew from the oats. It stays crunchy even the next day (yes, I tested this).
- Simple Pantry Ingredients: You probably have most of these ingredients in your kitchen right now. No fancy extracts, no hard-to-find flours. Just honest, wholesome staples.
- Crowd-Pleaser Guaranteed: I’ve brought this to potlucks, family dinners, and casual get-togethers. It disappears every single time. Kids love it, adults love it—it’s universal comfort food.
What makes this recipe different from the rest is the technique. I toast the oats briefly before mixing them into the crumble. It sounds like a small step, but it makes a world of difference. The oats release their nutty aroma and develop a deeper flavor that you just can’t get from raw oats. Plus, the maceration step for the apples—letting them sit with sugar and lemon juice—draws out their natural juices and creates a syrupy, almost jammy filling. It’s these little touches that transform a simple crisp into something truly memorable.
This is the kind of dessert that makes you close your eyes after the first bite. It’s comfort food at its finest—warming, familiar, and deeply satisfying. Perfect for a chilly autumn evening, a lazy Sunday afternoon, or any day that needs a little extra sweetness.
What Ingredients You Will Need
This recipe uses simple, honest ingredients to create something truly special. Most of these are pantry staples, which makes this the perfect last-minute dessert when you need a little comfort.
For the Apple Filling
- 6 medium apples, peeled, cored, and sliced (about 6 cups) – I recommend a mix of tart and sweet varieties. Granny Smith for tartness, Honeycrisp or Fuji for sweetness. The combination gives you the best flavor depth.
- 1/4 cup granulated sugar – Just enough to sweeten the apples without overpowering their natural flavor.
- 1/4 cup light brown sugar, packed – Adds a subtle molasses note that pairs beautifully with the cinnamon.
- 2 tablespoons all-purpose flour – Helps thicken the juices as the apples cook, creating that luscious, syrupy filling.
- 1 tablespoon fresh lemon juice – Brightens the flavors and prevents the apples from browning.
- 1 teaspoon ground cinnamon – The backbone of this recipe. Use a good quality cinnamon—I prefer Saigon cinnamon for its bold, warm flavor.
- 1/4 teaspoon ground nutmeg – Freshly grated if you have it. It adds a subtle warmth that complements the cinnamon.
- 1/4 teaspoon salt – Don’t skip this! Salt enhances all the other flavors and balances the sweetness.
For the Oat Crumble Topping
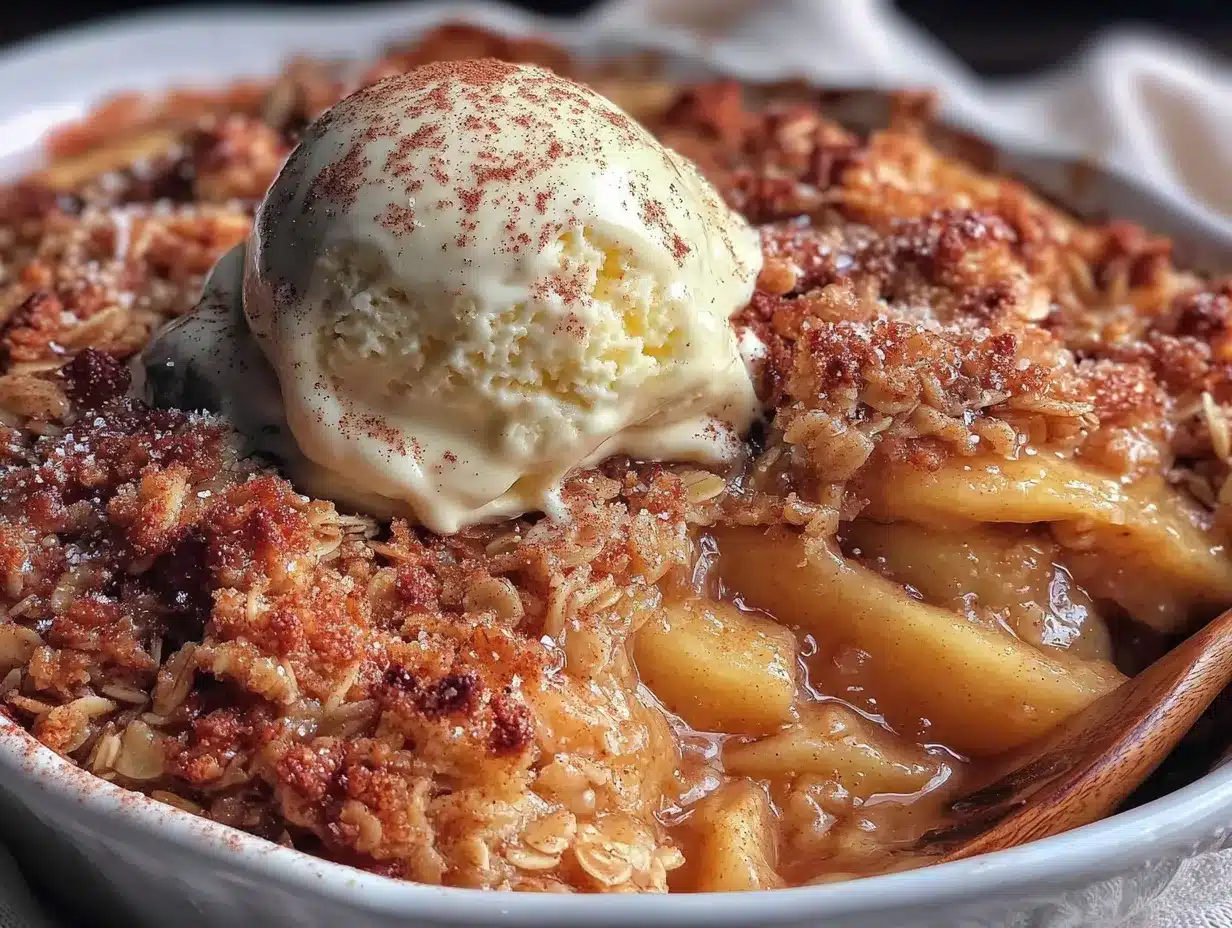
- 1 cup old-fashioned rolled oats – Not quick oats! Old-fashioned oats give you that perfect chewy texture. Quick oats will turn mushy.
- 3/4 cup all-purpose flour – Provides structure to the crumble.
- 1/2 cup light brown sugar, packed – For that deep, caramelized sweetness.
- 1/2 cup unsalted butter, cold and cut into small cubes – Cold butter is key for a crumbly texture. If you use salted butter, reduce the added salt to 1/8 teaspoon.
- 1 teaspoon ground cinnamon – Because you can never have too much cinnamon in an apple crisp.
- 1/4 teaspoon salt – Balances the sweetness and enhances the buttery flavor.
For the best results, I recommend using Land O’Lakes unsalted butter—it has a consistent fat content that gives you reliable results every time. And for the oats, Bob’s Red Mill old-fashioned rolled oats are my go-to. They have that perfect hearty texture that holds up beautifully during baking.
If you’re looking to make substitutions, here are a few options: Use coconut oil (solid, not melted) instead of butter for a dairy-free version. Swap the all-purpose flour with gluten-free all-purpose flour blend (like King Arthur Measure for Measure) for a gluten-free crisp. And if you’re out of fresh apples, frozen apples work in a pinch—just thaw and drain them first to avoid a watery filling.
Equipment Needed
The beauty of this recipe is that you don’t need any fancy equipment. Here’s what you’ll need:
- One large mixing bowl – A 3-quart bowl works perfectly. You’ll mix everything in here, from the apples to the crumble topping.
- An 8×8-inch or 9×9-inch baking dish – A square dish gives you the perfect thickness. You can also use a 9-inch pie plate or a 1.5-quart baking dish.
- A sharp knife and cutting board – For peeling and slicing the apples. A good chef’s knife makes this job so much easier.
- A vegetable peeler – Optional but helpful for peeling apples quickly.
- A pastry cutter or two forks – For cutting the cold butter into the dry ingredients. You can also use your fingers, but work quickly so the butter doesn’t soften too much.
- A rubber spatula – For folding the crumble together and scraping every last bit of goodness into the baking dish.
- Measuring cups and spoons – Accurate measurements matter in baking.
If you don’t have a pastry cutter, don’t worry. I’ve used two forks for years before I finally bought one. You can also pulse the dry ingredients and cold butter in a food processor—just be careful not to overmix. You want pea-sized pieces of butter throughout the crumble.
One tip: if you’re using a glass baking dish, place it on a baking sheet before putting it in the oven. Glass dishes can sometimes bubble over, and the baking sheet catches any drips, saving you from a messy oven cleanup. Learned that one the hard way!
Preparation Method
Let’s walk through this step by step. Trust me, if you follow these instructions, you’ll end up with a perfect apple crisp every single time.
- Preheat your oven to 350°F (175°C). Position the rack in the center of the oven. While it’s heating up, you can prep your apples and crumble.
- Prepare the apples. Peel, core, and slice your apples into even pieces—about 1/4-inch thick. You don’t need to be precise, but try to keep them relatively uniform so they cook evenly. I like to slice them into half-moons, but chunks work too.
- Maceration time! In your large mixing bowl, combine the sliced apples with the granulated sugar, brown sugar, flour, lemon juice, cinnamon, nutmeg, and salt. Toss everything together until the apples are evenly coated. Let this sit for 15-20 minutes. This step is crucial—it draws out the apples’ natural juices and creates that wonderful syrupy filling. You’ll notice the mixture getting liquidy at the bottom of the bowl. That’s exactly what you want.
- While the apples macerate, make the crumble topping. In the same bowl (yes, you can use the same bowl—just push the apples to one side or transfer them to the baking dish first), combine the oats, flour, brown sugar, cinnamon, and salt for the topping. Whisk them together until evenly mixed.
- Add the cold butter. Drop the cold butter cubes into the dry ingredients. Using a pastry cutter or two forks, cut the butter into the flour mixture until it resembles coarse meal with some pea-sized butter pieces remaining. You want some larger chunks of butter—they’ll melt during baking and create those irresistible pockets of crispiness. If you’re using your fingers, work quickly so the butter stays cold.
- Toast the oats (optional but recommended). Spread the crumble mixture on a baking sheet and toast in the preheated oven for 5-7 minutes, until lightly golden and fragrant. This step is my secret weapon. It deepens the nutty flavor of the oats and gives the topping that extra crunch. Let the crumble cool slightly while you prepare the apples.
- Assemble the crisp. Transfer the macerated apples (including all the juices) into your greased baking dish. Spread them into an even layer. Sprinkle the oat crumble evenly over the top. Don’t press it down—you want it to stay loose and craggy for maximum texture.
- Bake. Place the baking dish on a baking sheet (to catch any bubbly juices) and bake for 40-45 minutes, until the topping is golden brown and the filling is bubbling around the edges. The apples should be tender when pierced with a fork. If the topping is browning too quickly, tent the dish loosely with foil for the last 10 minutes.
- Cool slightly before serving. Let the crisp sit on a wire rack for at least 15-20 minutes. This allows the filling to set up a bit so it doesn’t run all over the plate. I know it’s hard to wait, but trust me—it’s worth it.
Sensory cues to watch for: When the apples are macerating, they should look glossy and slightly wet. The crumble should smell nutty and toasty after its brief oven stint. And when the crisp is done baking, you’ll see the juices bubbling up through the crumble—that’s how you know it’s ready.
Troubleshooting tip: If your crisp seems too watery after baking, it might need a few more minutes in the oven. The filling should be thick and syrupy, not runny. If it’s still thin, return it to the oven for another 5-10 minutes. On the flip side, if the topping is getting too dark before the apples are tender, cover it with foil and continue baking.
Cooking Tips & Techniques
Over the years, I’ve made every mistake in the book when it comes to apple crisp. Here are the lessons I’ve learned so you don’t have to repeat them.
Don’t skip the maceration step. I know it adds 15 minutes to your prep time, but it’s non-negotiable. That time allows the sugar to draw out the apples’ natural juices, which then combine with the flour to create a thick, luscious syrup. Without maceration, you’ll end up with watery, separated filling. I learned this the hard way when I tried to rush through the process one busy Tuesday night.
Cold butter is your best friend. For the crumble topping, the butter needs to be straight-from-the-fridge cold. If it softens, you’ll end up with a dense, greasy topping instead of a light, crumbly one. If your kitchen is warm, pop the crumble mixture in the fridge for 10 minutes before you assemble the crisp.
Toast the oats. This is the tip that took my apple crisp from good to “can I have the recipe?” level. Toasting the oats releases their natural oils and brings out a nutty, almost popcorn-like flavor. It takes just a few minutes, but the difference is remarkable.
Use a mix of apple varieties. Tart apples like Granny Smith hold their shape well and provide acidity, while sweeter apples like Honeycrisp or Fuji break down more and add natural sweetness. The combination gives you a complex, well-rounded filling. If you use only one type, it’ll be one-dimensional.
Let it rest before serving. I know the smell is intoxicating, but cutting into a hot apple crisp is a recipe for a soupy mess. The filling needs time to set as it cools. Fifteen minutes is the bare minimum; 30 minutes is even better. The topping also gets crunchier as it cools.
Multitasking tip: While the apples are macerating, you can make the crumble topping. While the crisp is baking, you can whip up some vanilla whipped cream or a quick no-churn vanilla ice cream. It makes the whole process feel effortless.
Variations & Adaptations
One of the best things about this recipe is how versatile it is. Here are some of my favorite ways to change it up:
Seasonal Fruit Variations: This crisp works beautifully with other fruits. In the summer, try peach and blueberry crisp—just swap the apples for 6 cups of sliced peaches and 1 cup of blueberries. In the fall, a pear and cranberry crisp is absolutely divine. Adjust the sugar based on the sweetness of your fruit.
Gluten-Free Adaptation: Use a gluten-free all-purpose flour blend (I like King Arthur Measure for Measure) in both the filling and the crumble. Make sure your oats are certified gluten-free as well. Everything else stays the same, and you honestly won’t taste the difference.
Vegan Version: Substitute the butter with cold coconut oil or a vegan butter stick (like Earth Balance). Use coconut sugar instead of brown sugar for a refined-sugar-free option. The texture will be slightly different, but still delicious.
Spice It Up: Add 1/4 teaspoon of ground cardamom or ginger to the apple filling for a warm, aromatic twist. A pinch of cloves adds depth too. For a chai-inspired version, add 1/2 teaspoon of garam masala to the filling.
Nutty Crumble: Add 1/2 cup of chopped pecans or walnuts to the oat crumble before baking. Toast them along with the oats for extra crunch and flavor. This is my personal favorite variation—the nuts add such a lovely texture.
Individual Servings: Divide the apple filling and crumble among 4-6 ramekins and bake for 20-25 minutes. Perfect for dinner parties when you want to serve something special without a lot of fuss.
Serving & Storage Suggestions
This apple crisp is wonderful on its own, but let’s be honest—it’s even better with a scoop of something cold and creamy on top.
Serving temperature: Serve warm, but not piping hot. Let it rest for at least 15 minutes after baking. The ideal serving temperature is slightly above room temperature—warm enough to melt a scoop of ice cream, but not so hot that the ice cream turns into soup instantly.
Perfect pairings: A scoop of vanilla bean ice cream is the classic choice, and for good reason—the cold creaminess contrasts beautifully with the warm, tender apples and crunchy topping. A drizzle of salted caramel sauce takes it over the top. For a lighter option, try a dollop of Greek yogurt or coconut whipped cream. And if you’re feeling indulgent, pour a little heavy cream over the top—trust me, it’s a game-changer.
Beverage suggestions: A hot cup of coffee or a chai latte is perfect alongside a bowl of this crisp. For an adult pairing, a glass of bourbon or a warm apple cider spiked with rum is lovely.
Storage: Cover the baking dish tightly with foil or plastic wrap and store in the refrigerator for up to 5 days. The topping will soften over time, but it’s still delicious.
Reheating: The best way to reheat apple crisp is in the oven at 350°F (175°C) for 10-15 minutes. This helps re-crisp the topping. You can also use the microwave in a pinch, but the topping will be soft. If you’re reheating individual portions, pop them in the air fryer at 350°F for 3-4 minutes—it works wonders for restoring the crunch.
Freezing: You can freeze the assembled (but unbaked) crisp for up to 3 months. Wrap the dish tightly in plastic wrap and then foil. Bake directly from frozen, adding 10-15 minutes to the baking time. You can also freeze the baked crisp—just let it cool completely, wrap it well, and freeze. Thaw in the refrigerator overnight and reheat in the oven.
Flavor development: Honestly, this crisp tastes even better the next day. The flavors meld together overnight, and the filling becomes even more syrupy and rich. If you can resist eating it all on day one, you’re in for a treat on day two.
Nutritional Information & Benefits
While I wouldn’t call apple crisp a health food, it does have some redeeming qualities. Here’s a rough estimate of the nutritional breakdown per serving (based on 8 servings):
| Nutrient | Amount per Serving |
|---|---|
| Calories | 380 |
| Total Fat | 16g |
| Saturated Fat | 10g |
| Carbohydrates | 58g |
| Fiber | 5g |
| Sugar | 38g |
| Protein | 4g |
Health highlights: Apples are rich in fiber and vitamin C, and they contain antioxidants that support heart health. Oats are a great source of soluble fiber, which can help lower cholesterol. Cinnamon has anti-inflammatory properties and may help regulate blood sugar. So while this is definitely a treat, you’re getting some good stuff with every bite.
Dietary considerations: This recipe can be made gluten-free and vegan with simple substitutions (see the variations section). It contains dairy and gluten in its standard form. If you’re watching your sugar intake, you can reduce the sugar in the filling by a couple of tablespoons—the apples provide plenty of natural sweetness.
Conclusion
This cozy one-bowl apple crisp with oat crumble is more than just a dessert—it’s a warm hug on a cold day, a taste of fall no matter the season, and a reminder that the best things in life are often the simplest. It’s the recipe I turn to when I need comfort, when I want to fill my home with the smell of cinnamon and brown sugar, and when I want to impress guests without breaking a sweat.
I hope you’ll give this recipe a try and make it your own. Maybe you’ll add extra cinnamon, throw in some chopped pecans, or serve it with a scoop of your favorite ice cream. However you make it, I promise it’ll be delicious. And if you do try it, I’d love to hear about it! Leave a comment below and let me know how it turned out—did you make any changes? What’s your favorite way to serve it? Your feedback helps other readers, and it honestly makes my day to hear about your baking adventures.
So go ahead. Preheat that oven, grab a bowl, and make yourself some apple crisp. You deserve it.
Frequently Asked Questions
Can I use quick oats instead of old-fashioned rolled oats?
I don’t recommend it. Quick oats are more finely processed and will absorb too much moisture, resulting in a soggy, mushy topping. Old-fashioned rolled oats give you that perfect chewy texture and hold up much better during baking.
Do I have to peel the apples?
You don’t have to, but I recommend it. The peels can become tough and chewy during baking, and they don’t break down the way the apple flesh does. If you leave the peels on, the texture of the filling will be noticeably different. That said, if you’re short on time or don’t mind the texture, go ahead and leave them on.
Why is my apple crisp watery?
This usually happens for one of three reasons: you didn’t macerate the apples long enough, you used apples that are too juicy (like McIntosh or Gala), or you didn’t bake it long enough. Make sure you let the apples sit with the sugar and flour for at least 15 minutes, and bake until the filling is bubbling and thickened. If it’s still watery, let it bake for another 5-10 minutes.
Can I make this ahead of time?
Absolutely! You can assemble the crisp (without baking) up to 24 hours in advance. Cover it tightly and refrigerate. When you’re ready to bake, add about 10 minutes to the baking time since you’re starting from a cold dish. You can also bake it a day ahead and reheat it in the oven at 350°F for 15 minutes before serving.
How do I get the topping extra crunchy?
The key is cold butter and toasting the oats. Make sure your butter is straight from the fridge when you cut it into the dry ingredients. The toasting step is also crucial—it dries out the oats slightly and gives them a head start on browning. If you want even more crunch, add 1/4 cup of chopped nuts to the crumble mixture.
Pin This Recipe!
Cozy One-Bowl Apple Crisp with Oat Crumble

This cozy one-bowl apple crisp with oat crumble is a warm, comforting dessert featuring tender, spiced apples and a crispy, buttery oat topping. It’s simple enough for a weeknight but impressive enough for a holiday table.
- Prep Time: 20 minutes
- Cook Time: 45 minutes
- Total Time: 1 hour 5 minutes
- Yield: 8 servings 1x
- Category: Dessert
- Cuisine: American
Ingredients
- 6 medium apples, peeled, cored, and sliced (about 6 cups)
- 1/4 cup granulated sugar
- 1/4 cup light brown sugar, packed
- 2 tablespoons all-purpose flour
- 1 tablespoon fresh lemon juice
- 1 teaspoon ground cinnamon
- 1/4 teaspoon ground nutmeg
- 1/4 teaspoon salt
- 1 cup old-fashioned rolled oats
- 3/4 cup all-purpose flour
- 1/2 cup light brown sugar, packed
- 1/2 cup unsalted butter, cold and cut into small cubes
- 1 teaspoon ground cinnamon
- 1/4 teaspoon salt
Instructions
- Preheat your oven to 350°F (175°C). Position the rack in the center of the oven.
- Prepare the apples: Peel, core, and slice your apples into even pieces—about 1/4-inch thick.
- In your large mixing bowl, combine the sliced apples with the granulated sugar, brown sugar, flour, lemon juice, cinnamon, nutmeg, and salt. Toss everything together until the apples are evenly coated. Let this sit for 15-20 minutes.
- While the apples macerate, make the crumble topping: In the same bowl, combine the oats, flour, brown sugar, cinnamon, and salt for the topping. Whisk them together until evenly mixed.
- Add the cold butter: Drop the cold butter cubes into the dry ingredients. Using a pastry cutter or two forks, cut the butter into the flour mixture until it resembles coarse meal with some pea-sized butter pieces remaining.
- Toast the oats (optional but recommended): Spread the crumble mixture on a baking sheet and toast in the preheated oven for 5-7 minutes, until lightly golden and fragrant. Let the crumble cool slightly.
- Assemble the crisp: Transfer the macerated apples (including all the juices) into your greased baking dish. Spread them into an even layer. Sprinkle the oat crumble evenly over the top. Don’t press it down.
- Bake: Place the baking dish on a baking sheet and bake for 40-45 minutes, until the topping is golden brown and the filling is bubbling around the edges. If the topping is browning too quickly, tent the dish loosely with foil for the last 10 minutes.
- Cool slightly before serving: Let the crisp sit on a wire rack for at least 15-20 minutes before serving.
Notes
For best results, use a mix of tart and sweet apples (e.g., Granny Smith and Honeycrisp). Toasting the oats is optional but highly recommended for extra crunch. Let the crisp rest for at least 15 minutes before serving to allow the filling to set. Store leftovers covered in the refrigerator for up to 5 days.
Nutrition
- Serving Size: 1 serving
- Calories: 380
- Sugar: 38
- Sodium: 200
- Fat: 16
- Saturated Fat: 10
- Carbohydrates: 58
- Fiber: 5
- Protein: 4
Keywords: apple crisp, oat crumble, one-bowl, fall dessert, comfort food, apple dessert


