My neighbor wasn’t trying to impress me. I’d stopped by to return a garden trowel she’d loaned me, and the smell hit me before I even got through the screen door. It was that unmistakable scent—butter, vanilla, something sweet and almost floral—the kind of smell that makes you stop mid-sentence and just breathe in. She was standing at her counter in an old t-shirt, barefoot, casually wiping a smear of batter off her wrist with the back of her hand. “Oh, that?” she said when I asked, like I’d caught her doing something completely ordinary. “It’s just a spring cake.”
Let me tell you, there was nothing “just” about it. That cake was a revelation. The crumb was so tender it practically dissolved on my tongue, and the flavor—honestly, I couldn’t get over it. It was light and rich at the same time, which makes no sense until you taste it. She handed me a slice on a paper plate, and I stood there in her kitchen, eating it while she told me about the vanilla beans she’d picked up at a little spice shop downtown. She was completely nonchalant about the whole thing, like she hadn’t just made the best cake I’d had in years. I mean, have you ever had a moment like that? Where someone makes something so good you almost forget to be polite and ask for the recipe?
I did ask, eventually. And after a few tries in my own kitchen—because, of course, I had to figure out the little things she didn’t write down—I landed on this version. This Spring’s Best Vanilla Bean Cream Cake is exactly what it sounds like: a celebration of the season in dessert form. It’s the kind of cake you make when you want something special but not fussy. It’s for the first warm weekend, the Easter brunch, the baby shower, or just a Tuesday that feels like it deserves a little more joy. And it starts with a handful of simple ingredients and one very special vanilla bean.
Why You’ll Love This Recipe
This isn’t just another vanilla cake recipe. I’ve tested this one more times than I care to admit, tweaking the ratios, playing with the temperature of the ingredients, and honestly, driving my family a little crazy with all the “taste tests.” But the result? It’s worth every single batch. Here’s why this vanilla bean cream cake stands out from the crowd:
- Quick & Easy: From start to finish, this cake comes together in about an hour. The batter takes just 15 minutes to mix, and the bake time is around 35-40 minutes. Perfect for a last-minute spring gathering.
- Simple Ingredients: You likely have almost everything in your pantry right now. The only special item is a vanilla bean, which is easy to find and totally worth the tiny splurge.
- Perfect for Spring Occasions: This cake is light enough for a bridal shower or afternoon tea, but special enough for Easter dinner. It just feels like spring on a plate.
- Crowd-Pleaser: I’ve served this to kids, grandparents, and everyone in between. It disappears every single time. No leftovers, I promise.
- Unbelievably Delicious: The texture is where this cake really shines. It’s incredibly moist with a tender, fine crumb, and the vanilla flavor is deep and aromatic thanks to the real vanilla bean. It’s next-level comfort food.
What makes this recipe different is the technique. Instead of just creaming butter and sugar, we’re using a combination of buttermilk and sour cream to create a batter that’s incredibly tender. The vanilla bean isn’t just an afterthought—it’s the star. We scrape the seeds into the sugar and rub them together to release the oils and fragrance before we even start. This little step makes a huge difference. It’s not just another vanilla cake. It’s the vanilla cake you’ll want to make all spring long.
What Ingredients You Will Need
This recipe uses simple, wholesome ingredients to deliver a cake that’s both elegant and incredibly satisfying. Most of these are pantry staples, but a few key players make all the difference. Let’s talk about what you’ll need and why each ingredient matters.
- Unsalted Butter (1 cup / 226g), softened: I always use unsalted butter so I can control the salt level. Make sure it’s truly softened to room temperature—you want it to be pliable but not melted. I recommend Kerrygold or Plugrà for their rich flavor and lower water content.
- Granulated Sugar (1 ¾ cups / 350g): This is where we’ll rub the vanilla bean seeds. The sugar acts as an abrasive to help release the vanilla’s oils and flavor. You can use organic cane sugar if you prefer.
- Vanilla Bean (1 whole bean): This is the star of the show. Look for plump, moist vanilla beans from Madagascar or Tahiti. They should be flexible, not brittle. You can also use vanilla bean paste in a pinch (about 1 ½ tablespoons), but the visual specks from the real bean are part of the magic.
- Vanilla Extract (2 teaspoons): Yes, we’re using both the bean and the extract. The extract adds a familiar, rounded vanilla flavor that backs up the more delicate, floral notes of the bean.
- Large Eggs (3), room temperature: Room temperature eggs emulsify into the batter much better than cold ones, creating a smoother, more stable cake. If you’re in a hurry, place them in a bowl of warm water for 5 minutes.
- All-Purpose Flour (2 ½ cups / 312g): I use unbleached all-purpose flour for this cake. Spoon it into your measuring cup and level it off with a knife—don’t scoop directly from the bag, or you’ll end up with too much flour and a dry cake.
- Baking Powder (2 ½ teaspoons): This is our leavening agent. Make sure your baking powder is fresh—test it by dropping a little into hot water; it should bubble vigorously.
- Salt (½ teaspoon): Salt doesn’t just add saltiness; it enhances the sweetness and rounds out all the flavors. I use fine sea salt.
- Buttermilk (1 cup / 240ml), room temperature: Buttermilk adds a subtle tang and reacts with the baking powder to create a tender crumb. You can make a quick substitute by adding 1 tablespoon of lemon juice or white vinegar to 1 cup of milk and letting it sit for 5 minutes.
- Sour Cream (½ cup / 120g), room temperature: This is my secret ingredient for an incredibly moist cake. The fat in the sour cream adds richness without making the cake heavy. Use full-fat sour cream for the best results.
For the cream cheese frosting, you’ll need: 8 ounces (226g) full-fat cream cheese, softened; ½ cup (113g) unsalted butter, softened; 3-4 cups (360-480g) powdered sugar, sifted; 1 teaspoon vanilla extract; and a pinch of salt. I find that Philadelphia cream cheese gives the most consistent results.
Equipment Needed
You don’t need a lot of fancy equipment to make this cake, which is part of its charm. Here’s what you’ll need to have on hand:
- Two 9-inch round cake pans: I like light-colored metal pans for even baking. Dark pans can cause the edges to brown too quickly. If you only have dark pans, reduce the oven temperature by 25°F.
- Stand mixer or hand mixer: A stand mixer with the paddle attachment makes creaming the butter and sugar a breeze, but a hand mixer works perfectly fine too. You’ll just need to cream for a minute or two longer.
- Mixing bowls: You’ll need a medium bowl for the dry ingredients and a large bowl for the wet ingredients.
- Whisk: For combining the dry ingredients.
- Rubber spatula: For scraping down the bowl and folding in the final ingredients.
- Parchment paper: To line the bottom of the cake pans. This is non-negotiable for easy release.
- Wire cooling rack: For cooling the cakes completely before frosting.
- Offset spatula: Makes frosting the cake much easier and gives a beautiful finish, but a butter knife works too.
- Serrated knife: For leveling the cake layers if needed.
If you don’t have a stand mixer, don’t worry. I’ve made this cake with a hand mixer and a good bit of elbow grease, and it turns out just as delicious. The key is to make sure your butter and sugar are creamed until light and fluffy—that’s where the air comes from that makes the cake rise.
Preparation Method
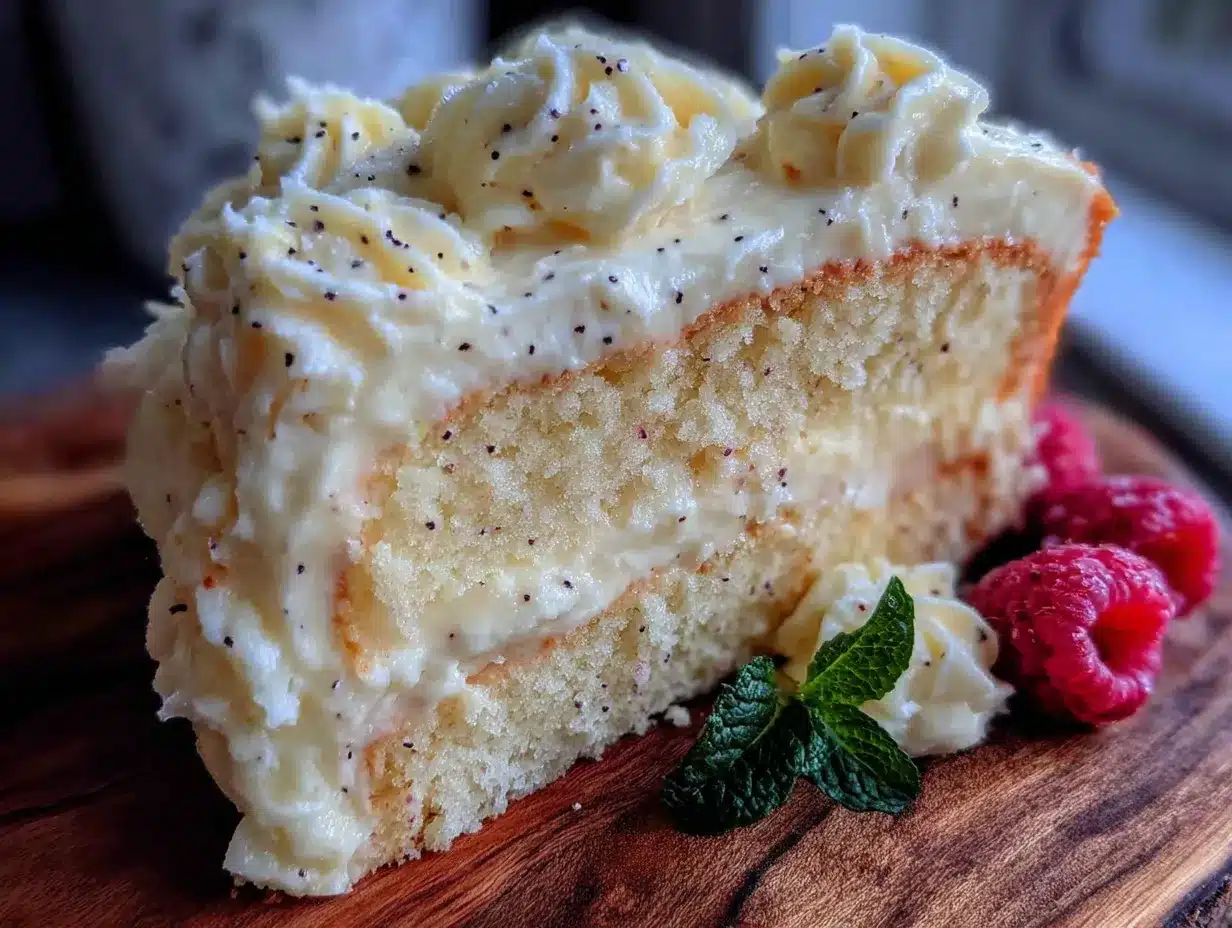
Alright, let’s get to the good part. This method is straightforward, but I’m going to walk you through every step so you get that perfect, tender crumb. Take your time, and don’t rush the creaming step.
- Preheat and Prep: Preheat your oven to 350°F (175°C). Grease two 9-inch round cake pans with butter or non-stick spray. Cut circles of parchment paper to fit the bottom of each pan and place them inside. Grease the parchment too. This extra step guarantees your cakes will come out cleanly every single time.
- Vanilla Sugar: Place the 1 ¾ cups (350g) of granulated sugar in the bowl of your stand mixer. Use a small, sharp knife to split the vanilla bean lengthwise. Scrape out the tiny black seeds with the back of the knife. Add the seeds to the sugar. Use your fingertips to rub the seeds into the sugar until the sugar is evenly speckled and smells incredibly fragrant. This takes about a minute, and it’s totally worth it.
- Cream Butter and Sugar: Add the 1 cup (226g) of softened butter to the vanilla sugar. Beat on medium speed for 3-4 minutes, until the mixture is light, fluffy, and pale in color. Scrape down the sides and bottom of the bowl with your spatula halfway through. This step is crucial—don’t skimp on the time.
- Add Eggs and Vanilla: Add the 3 room-temperature eggs one at a time, beating well after each addition. Scrape the bowl down again. Add the 2 teaspoons of vanilla extract and beat until combined. The mixture might look a little curdled at this point—that’s totally normal, especially if your eggs were slightly cooler than your butter.
- Combine Dry Ingredients: In a separate medium bowl, whisk together the 2 ½ cups (312g) all-purpose flour, 2 ½ teaspoons baking powder, and ½ teaspoon salt. Whisking aerates the flour and ensures the baking powder is evenly distributed.
- Combine Wet Ingredients: In a small bowl or large measuring cup, whisk together the 1 cup (240ml) buttermilk and ½ cup (120g) sour cream until smooth. Having them at room temperature is important—cold liquids can seize the butter in the batter.
- Alternate Additions: With the mixer on low speed, add about one-third of the flour mixture to the butter mixture. Mix until just combined. Then add half of the buttermilk mixture. Mix again. Repeat with another third of the flour, the remaining buttermilk, and finally the last of the flour. Mix each addition just until it disappears. Overmixing at this stage will develop the gluten and make your cake tough.
- Fold and Divide: Use your rubber spatula to give the batter a few final folds from the bottom of the bowl. This ensures everything is evenly mixed without overworking it. Divide the batter evenly between the two prepared pans. Use a kitchen scale for accuracy if you have one—it makes a difference in even baking.
- Bake: Bake for 35-40 minutes, or until a wooden skewer inserted into the center comes out clean or with a few moist crumbs. The tops should be golden brown and spring back lightly when touched. Rotate the pans halfway through baking if your oven has hot spots.
- Cool: Let the cakes cool in the pans on a wire rack for 15 minutes. Then run a thin knife around the edges to loosen them, invert onto the rack, peel off the parchment paper, and let them cool completely. This is very important—frosting a warm cake is a recipe for a melty mess.
- Make the Frosting: While the cakes cool, beat the 8 ounces (226g) of softened cream cheese and ½ cup (113g) of softened butter together until smooth and creamy. Gradually add the sifted powdered sugar, one cup at a time, beating on low speed. Add the 1 teaspoon of vanilla extract and a pinch of salt. Beat for another minute until light and fluffy.
- Assemble: Place one cooled cake layer on your serving plate. Spread about ¾ cup of frosting evenly on top. Place the second layer on top. Apply a thin crumb coat of frosting all over the cake, then refrigerate for 15 minutes. Finish with the remaining frosting, swirling it decoratively on top.
Cooking Tips & Techniques
I’ve made this cake more times than I can count, and I’ve learned a few things the hard way. Here are some tips to help you avoid my mistakes and get perfect results every time.
Don’t Skip the Room Temperature Step. I know, I know—it’s annoying to wait for butter and eggs to come to room temperature. But trust me on this one. Cold ingredients don’t emulsify properly, which means your batter can look curdled and your cake won’t rise as well. If you’re short on time, cut your butter into small cubes and let it sit on the counter for 20 minutes. Put your eggs in a bowl of warm (not hot) water for 5-10 minutes.
The Vanilla Bean Trick. When you rub the vanilla seeds into the sugar, you’re not just mixing them together. The sugar crystals act like tiny abrasives, breaking open the vanilla pods’ oils and releasing their full aroma. This is a technique I learned from a pastry chef friend, and it honestly changed how I approach any vanilla recipe. Don’t skip it—the difference is noticeable.
My Biggest Failure. The first time I made this cake, I was in a hurry and used cold buttermilk straight from the fridge. The batter seized up, the cake was dense, and I was so disappointed. I almost gave up on the recipe. But I tried again the next day with room temperature ingredients, and it was like night and day. That’s the kind of lesson you only learn by messing up.
Timing and Multitasking. Here’s how I like to organize things: First, set your butter, eggs, and buttermilk out on the counter. Then prep your pans. While the butter and sugar are creaming, whisk your dry ingredients together. While the eggs are being added, measure your buttermilk and sour cream. This way, everything flows smoothly without any frantic rushing around.
Consistency Check. The finished batter should be thick, smooth, and slightly glossy. It should hold its shape when you scoop it, but still be soft enough to spread easily in the pan. If it seems too stiff, your flour might have been packed too tightly. If it seems too runny, your butter might have been too soft. Adjust for next time, but this batter is pretty forgiving.
Variations & Adaptations
One of the things I love most about this cake is how versatile it is. You can change it up to suit the season, your dietary needs, or just whatever you’re in the mood for. Here are a few of my favorite variations.
- Spring Berry Version: Gently fold 1 ½ cups of fresh raspberries or sliced strawberries into the batter just before dividing it between the pans. The berries burst slightly during baking, creating little pockets of jammy fruit throughout the cake. This is my go-to for Easter brunch.
- Lemon Vanilla Bean: Add the zest of two lemons to the sugar along with the vanilla bean seeds. The lemon brightens the vanilla flavor beautifully and makes the cake feel even more spring-like. You can also add a tablespoon of fresh lemon juice to the frosting.
- Gluten-Free Adaptation: Substitute the all-purpose flour with a good quality 1:1 gluten-free baking flour blend that contains xanthan gum. I’ve had great results with Bob’s Red Mill 1:1 Baking Flour. Do not overmix the batter, as gluten-free batters can become gummy.
- Dairy-Free Version: Use a high-quality vegan butter stick (like Miyoko’s or Earth Balance) and substitute the buttermilk with unsweetened almond or oat milk mixed with 1 tablespoon of lemon juice. Use a dairy-free cream cheese for the frosting. The texture will be slightly different, but it’s still delicious.
- Cupcake Adaptation: This batter makes about 24 cupcakes. Bake them at 350°F (175°C) for 18-20 minutes. The vanilla bean cream cheese frosting is absolutely perfect on top of these little guys.
I’ve tried the lemon variation myself, and honestly, it might be my new favorite. The combination of bright citrus and floral vanilla is just perfect for those early spring days when you’re craving something fresh and sunny.
Serving & Storage Suggestions
This cake is wonderful at room temperature, which makes it perfect for serving at gatherings. Here are my best tips for serving and storing it so every slice is as good as the first.
Serving Temperature: For the best flavor and texture, let the cake sit at room temperature for about 30 minutes before serving. The crumb softens slightly, and the vanilla flavor really opens up. If you’ve refrigerated the frosted cake, this step is essential.
Presentation Ideas: I like to keep the decoration simple to let the cake shine. A sprinkle of fresh edible flowers (like pansies or violets) on top is gorgeous for spring. A few fresh berries and a light dusting of powdered sugar also look beautiful. For a more elegant presentation, pipe rosettes of frosting around the top edge.
What to Serve With It: This cake is lovely on its own, but it pairs wonderfully with a cup of hot tea, a latte, or a glass of cold milk. For a more decadent dessert, serve it with a scoop of vanilla bean ice cream or a dollop of lightly sweetened whipped cream and fresh strawberries.
Storage Instructions: Store any leftover cake in an airtight container in the refrigerator for up to 4 days. The cream cheese frosting needs to be kept cold. Let slices sit at room temperature for 15-20 minutes before eating to soften the crumb.
Freezing: You can freeze the unfrosted cake layers for up to 3 months. Wrap them tightly in plastic wrap and then in aluminum foil. Thaw at room temperature before frosting. The frosted cake can also be frozen, but the texture of the cream cheese frosting may change slightly upon thawing.
Flavor Development: Here’s a little secret—this cake actually tastes even better the day after it’s made. The flavors have time to meld together, and the crumb becomes even more tender. So don’t be afraid to make it a day ahead for your event.
Nutritional Information & Benefits
Let’s be real—this is a celebration cake, not a health food. But that doesn’t mean we can’t talk about what’s in it. Here’s a rough estimate of the nutritional information per slice (based on 12 servings).
| Nutrient | Amount Per Slice |
|---|---|
| Calories | 485 |
| Total Fat | 28g |
| Saturated Fat | 17g |
| Cholesterol | 115mg |
| Sodium | 300mg |
| Total Carbohydrates | 55g |
| Sugars | 40g |
| Protein | 6g |
While this isn’t a low-calorie dessert, it does use real, recognizable ingredients. The butter and eggs provide some fat-soluble vitamins, and the buttermilk and sour cream add a little calcium and protein. The vanilla bean itself contains trace amounts of antioxidants. My philosophy is that food should be enjoyed, and this cake is absolutely worth every single bite. It’s made with love and real ingredients, and that counts for something.
Dietary Considerations: This recipe contains dairy, eggs, and gluten. For a gluten-free or dairy-free option, please see the variations section above. It is nut-free as written.
Conclusion
This Spring’s Best Vanilla Bean Cream Cake is more than just a recipe—it’s a moment. It’s the smell that greets you when you walk into a friend’s kitchen on a warm afternoon. It’s the first bite that makes you close your eyes and just enjoy. It’s the kind of cake that doesn’t need a special occasion to be made, but somehow makes any occasion feel special.
I hope you give this one a try. Don’t be intimidated by the vanilla bean—it’s easier to work with than you think, and the result is so worth it. And remember, the cake doesn’t have to be perfect. A few swirls in the frosting, a slightly uneven layer—that’s what makes it homemade and real. That’s what makes it yours.
I’d love to hear how it turns out for you. Did you add berries? Try the lemon version? Make it for a birthday or a Tuesday? Drop a comment below and let me know. And if you share a photo on Pinterest, tag me—I want to see your beautiful spring cakes! Happy baking, friends!
Frequently Asked Questions
Can I use vanilla extract instead of a vanilla bean?
Yes, you can substitute the vanilla bean with 1 ½ tablespoons of vanilla extract or vanilla bean paste. However, you’ll miss the beautiful black specks and the slightly more floral flavor that the real bean provides. If using extract, add it along with the eggs.
Why did my cake sink in the middle?
A sunken middle usually means the cake was underbaked or the oven door was opened too early. Make sure your oven is fully preheated and try not to open the door for the first 30 minutes of baking. Also, check that your baking powder is fresh.
Can I make this cake ahead of time?
Absolutely! This cake is actually better the next day. You can bake the cake layers a day ahead, wrap them tightly, and store them at room temperature. Frost the cake the day you plan to serve it for the best presentation.
How do I get clean slices of cake?
Use a long, sharp serrated knife. Run it under hot water, wipe it dry, then make your cut. Clean the knife between each slice. This will give you beautiful, clean pieces without dragging the frosting.
Can I use this recipe for a layer cake with more than two layers?
Yes! This recipe makes enough batter for two 9-inch layers. If you want three 8-inch layers, you can make 1.5 times the recipe. Just be sure to adjust your baking time, as smaller layers will bake faster—start checking at 25 minutes.
Pin This Recipe!
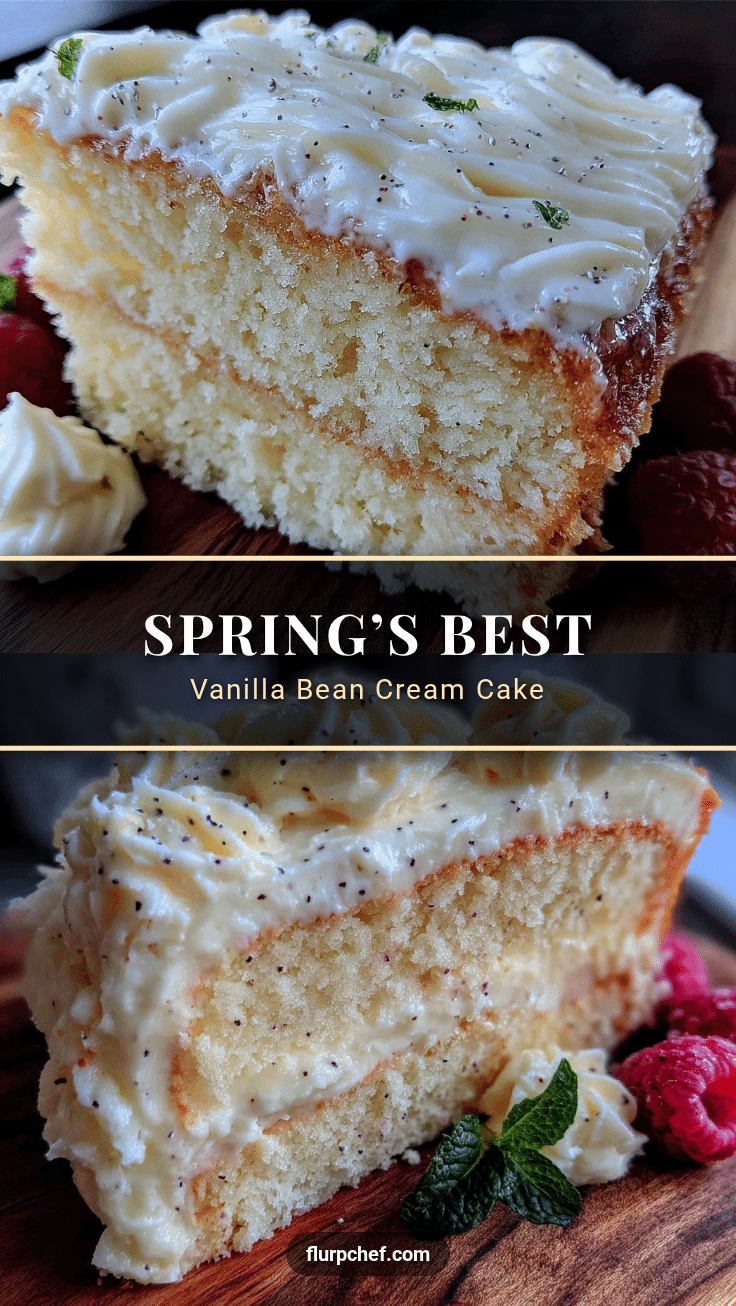
Best Vanilla Bean Cream Cake – Easy Spring Dessert Recipe
This Spring’s Best Vanilla Bean Cream Cake is a celebration of the season in dessert form. It’s the kind of cake you make when you want something special but not fussy, with a tender crumb and deep vanilla flavor from real vanilla beans.
- Prep Time: 15 minutes
- Cook Time: 35-40 minutes
- Total Time: 1 hour
- Yield: 12 servings 1x
- Category: Dessert
- Cuisine: American
Ingredients
- 1 cup (226g) unsalted butter, softened
- 1 ¾ cups (350g) granulated sugar
- 1 whole vanilla bean
- 2 teaspoons vanilla extract
- 3 large eggs, room temperature
- 2 ½ cups (312g) all-purpose flour
- 2 ½ teaspoons baking powder
- ½ teaspoon salt
- 1 cup (240ml) buttermilk, room temperature
- ½ cup (120g) sour cream, room temperature
- 8 ounces (226g) full-fat cream cheese, softened
- ½ cup (113g) unsalted butter, softened
- 3–4 cups (360-480g) powdered sugar, sifted
- 1 teaspoon vanilla extract
- Pinch of salt
Instructions
- Preheat oven to 350°F (175°C). Grease two 9-inch round cake pans with butter or non-stick spray. Line bottoms with parchment paper and grease parchment.
- Place 1 ¾ cups (350g) granulated sugar in the bowl of a stand mixer. Split vanilla bean lengthwise, scrape seeds, and rub seeds into sugar with fingertips until evenly speckled and fragrant.
- Add 1 cup (226g) softened butter to vanilla sugar. Beat on medium speed for 3-4 minutes until light, fluffy, and pale. Scrape bowl halfway through.
- Add 3 room-temperature eggs one at a time, beating well after each. Scrape bowl. Add 2 teaspoons vanilla extract and beat until combined.
- In a medium bowl, whisk together 2 ½ cups (312g) all-purpose flour, 2 ½ teaspoons baking powder, and ½ teaspoon salt.
- In a small bowl, whisk together 1 cup (240ml) buttermilk and ½ cup (120g) sour cream until smooth.
- With mixer on low, add one-third of flour mixture to butter mixture, mixing until just combined. Add half of buttermilk mixture, mix. Repeat with another third of flour, remaining buttermilk, and last of flour. Mix each addition just until combined.
- Fold batter a few times with a rubber spatula. Divide evenly between prepared pans.
- Bake for 35-40 minutes until a skewer inserted in center comes out clean or with moist crumbs. Rotate pans halfway through.
- Cool cakes in pans on a wire rack for 15 minutes. Run a knife around edges, invert onto rack, peel off parchment, and cool completely.
- For frosting: Beat 8 ounces (226g) softened cream cheese and ½ cup (113g) softened butter until smooth. Gradually add 3-4 cups (360-480g) sifted powdered sugar, beating on low. Add 1 teaspoon vanilla extract and a pinch of salt. Beat until light and fluffy.
- Assemble: Place one cooled cake layer on serving plate. Spread about ¾ cup frosting on top. Place second layer on top. Apply thin crumb coat, refrigerate 15 minutes, then finish with remaining frosting.
Notes
Don’t skip rubbing vanilla seeds into sugar—it releases oils and fragrance. Use room temperature ingredients for best texture. Cake tastes even better the next day.
Nutrition
- Serving Size: 1 slice
- Calories: 485
- Sugar: 40
- Sodium: 300
- Fat: 28
- Saturated Fat: 17
- Carbohydrates: 55
- Protein: 6
Keywords: vanilla bean cake, spring dessert, cream cake, easy cake recipe, vanilla cake


