My neighbor, a lovely woman named Carol, had been telling me for years that pumpkin bread was “fine, but nothing special.” She said it with this polite little shrug, like it was a dish you made because you had to, not because you wanted to. For three autumns, I listened to her say this while I baked batch after batch, trying to crack some code I didn’t even know existed. Then last October, I made a version just for myself on a quiet Tuesday afternoon. I browned the butter, added a pinch more cinnamon than usual, and drizzled a maple glaze over the top while the loaf was still warm. I turned my back for maybe two minutes to wipe down the counter, and when I looked up, Carol was standing in my kitchen doorway with a fork in her hand. She had let herself in through the back door, which she’d never done before. “I smelled something,” she said, cutting another slice. “I don’t know what this is, but it isn’t pumpkin bread.” Honestly, that was the best compliment I could have gotten. She ate three slices standing at my counter, and I just stood there holding the dish towel, trying not to look too smug.
You know that feeling when you bite into something and it stops you mid-conversation? That’s what this bread does. The brown butter gives it this nutty, almost caramel-like depth that regular pumpkin bread just doesn’t have. And the maple glaze — let me tell you, it’s not just a drizzle. It seeps into the warm crumb and creates these little pockets of sweetness that catch you off guard. I’ve made this bread for fall brunches, for Thanksgiving morning, and for no reason at all except that the weather turned cool and I wanted the house to smell like something good. Every single time, someone asks for the recipe. And every single time, I think about Carol standing in my kitchen with that fork, proving herself wrong one bite at a time. That’s why this recipe stayed with me. It’s not just good pumpkin bread. It’s the kind that changes minds.
Why You’ll Love This Recipe
This isn’t your average pumpkin bread, and I say that with zero arrogance — just the confidence of someone who has tested this recipe about eleven times to get it right. The brown butter is the game-changer here. It adds a richness that makes the bread taste almost like it has a secret ingredient, but it’s just butter that you toasted in a pan for a few minutes. You don’t need a stand mixer or any fancy equipment either, which is honestly my favorite kind of baking.
- Quick & Easy : From start to finish, this comes together in about an hour and fifteen minutes. The hands-on time is maybe twenty minutes, and the rest is just the oven doing its thing.
- Simple Ingredients : You probably have most of these in your pantry right now. Pumpkin puree, flour, sugar, eggs, butter, and maple syrup. No weird extracts or hard-to-find spices.
- Perfect for Fall Gatherings : This bread was made for cozy mornings, Thanksgiving brunches, or dropping off at a friend’s house just because. It travels well and stays moist for days.
- Crowd-Pleaser : I’ve served this to people who “don’t like pumpkin” and watched them go back for seconds. The brown butter changes the flavor profile enough that even pumpkin skeptics get on board.
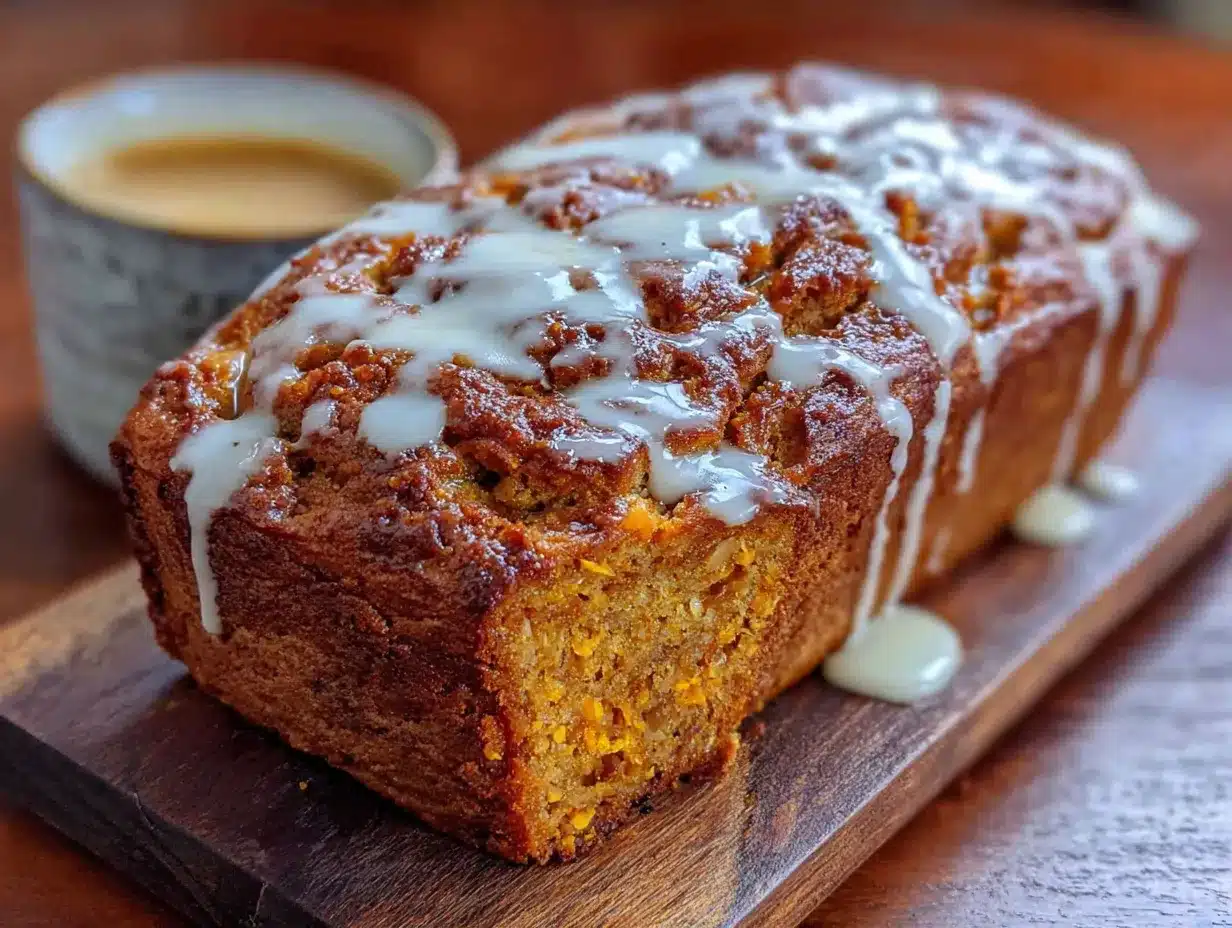
- Unbelievably Delicious : The texture is tender and moist without being gummy. The crust gets this slight crackle from the glaze, and the inside stays soft. It’s the kind of bread you eat with your eyes closed.
What makes this recipe different from the dozens of pumpkin breads out there is the technique. Browning the butter isn’t complicated, but it adds a layer of flavor that you cannot get any other way. And the maple glaze isn’t just a pretty topping — it soaks into the warm bread and creates this sweet, nutty harmony that tastes like fall in every bite. This is comfort food reimagined: richer in flavor, but made with simple, real ingredients. It’s the kind of bread that makes you feel like you have your life together, even if you’re eating it over the sink at 10 PM. Not that I’ve done that. Okay, I’ve done that.
What Ingredients You Will Need
This recipe uses simple, wholesome ingredients that work together to create something genuinely special. The magic is in the technique, not the shopping list — most of these are pantry staples you probably already have on hand.
For the Brown Butter Pumpkin Bread
- 1/2 cup (113 g) unsalted butter — Use a good quality butter here since you’re browning it. I prefer Kerrygold or Plugrà for the best flavor. The milk solids are what create that nutty aroma, so don’t skimp.
- 1 cup (200 g) granulated sugar — Regular white sugar works perfectly. You could substitute coconut sugar for a deeper flavor, but the texture will be slightly denser.
- 1/2 cup (100 g) light brown sugar, packed — This adds moisture and a hint of molasses flavor that pairs beautifully with the pumpkin. Dark brown sugar works too if that’s what you have.
- 2 large eggs — Room temperature eggs incorporate better into the batter. If you forgot to take them out, place them in a bowl of warm water for 5 minutes.
- 1 cup (245 g) pumpkin puree — Not pumpkin pie filling! Make sure you grab 100% pure pumpkin puree. Libby’s is my go-to brand for consistent results. If using homemade pumpkin puree, drain off any excess liquid first.
- 1/3 cup (80 ml) milk — Whole milk gives the richest texture, but 2% or even oat milk works fine. I’ve used almond milk in a pinch and it was still delicious.
- 1 teaspoon vanilla extract — Pure vanilla extract is worth the splurge here. The flavor really comes through in the finished bread.
For the Dry Ingredients
- 1 3/4 cups (220 g) all-purpose flour — Spoon and level your flour for the most accurate measurement. Scooping directly from the bag can pack in too much flour and make the bread dry.
- 1 teaspoon baking soda — Make sure it’s fresh. Test it by dropping a pinch into vinegar — if it fizzes vigorously, you’re good.
- 1/2 teaspoon baking powder — This gives the bread a little extra lift alongside the baking soda.
- 1/2 teaspoon salt — Fine sea salt is best. It balances the sweetness and enhances the pumpkin flavor.
- 2 teaspoons ground cinnamon — I use Saigon cinnamon for its bold, slightly spicy flavor. Regular cinnamon works perfectly too.
- 1/2 teaspoon ground nutmeg — Freshly grated nutmeg makes a noticeable difference. Just grate it directly into the bowl.
- 1/2 teaspoon ground ginger — This adds warmth without being overpowering. Skip it if you’re not a ginger fan.
- 1/4 teaspoon ground cloves — A little goes a long way. This is optional but adds that classic pumpkin spice depth.
For the Maple Glaze
- 1 cup (120 g) powdered sugar — Sift it if it’s lumpy. Nobody wants a lumpy glaze.
- 2 tablespoons pure maple syrup — Use the real stuff, not pancake syrup. Grade A dark amber gives the strongest maple flavor.
- 1-2 tablespoons milk — Start with one tablespoon and add more until you reach your desired consistency. The glaze should be thick but pourable.
- Pinch of salt — This balances the sweetness and makes the maple flavor pop.
Equipment Needed
The beauty of this recipe is that it doesn’t require a lot of fancy tools. Here’s what you’ll need:
- 9×5-inch loaf pan — A standard metal or glass loaf pan works perfectly. If you use a dark non-stick pan, keep an eye on the bread during the last 10 minutes of baking as it may brown faster.
- Small saucepan — For browning the butter. A light-colored pan helps you see the color change more easily.
- Large mixing bowl — For combining the wet and dry ingredients. Any bowl works, but a wide one makes mixing easier.
- Medium bowl — For whisking the dry ingredients together.
- Whisk and wooden spoon or rubber spatula — A whisk for the dry ingredients and a spatula for folding the batter together gently.
- Parchment paper — Lining the pan makes lifting the bread out so much easier. I learned this the hard way after one too many stuck loaves.
- Cooling rack — Essential for even cooling and preventing a soggy bottom. If you don’t have one, you can use the oven rack turned upside down in a pinch.
- Small bowl for the glaze — Any small bowl works. I use a liquid measuring cup for easy pouring.
I’ve made this bread with a hand mixer and without one, and honestly, mixing by hand gives you better control. Over-mixing is the enemy of tender bread, and your arm will naturally slow down before a mixer will. Plus, fewer dishes to wash.
Preparation Method
Preheat your oven to 350°F (175°C). Grease a 9×5-inch loaf pan and line it with parchment paper, leaving some overhang on the long sides. This little trick makes lifting the bread out effortless. Trust me on this.
Step 1: Brown the butter. Place the 1/2 cup of unsalted butter in a small saucepan over medium heat. Let it melt completely, then continue cooking, swirling the pan occasionally. After about 5-7 minutes, the butter will start to foam and you’ll see little brown specks forming at the bottom. The smell will shift from buttery to nutty and almost toasty. Once the specks are golden brown and the butter smells amazing, remove it from the heat immediately. Pour it into a heat-safe bowl to stop the cooking process. Don’t walk away from this — brown butter can go from perfect to burnt in about 15 seconds. I learned this the hard way on my third attempt.
Step 2: Mix the wet ingredients. In a large mixing bowl, whisk together the browned butter, granulated sugar, and brown sugar until well combined. The mixture will look slightly grainy, and that’s fine. Add the eggs one at a time, whisking well after each addition. Stir in the pumpkin puree, milk, and vanilla extract. The batter will be smooth and a beautiful orange-amber color. Take a second to smell it — that brown butter and pumpkin combination is already intoxicating.
Step 3: Combine the dry ingredients. In a separate medium bowl, whisk together the flour, baking soda, baking powder, salt, cinnamon, nutmeg, ginger, and cloves. Whisking ensures everything is evenly distributed so you don’t end up with a pocket of baking soda in one slice. Yes, that happened to me once. It was not pleasant.
Step 4: Fold the dry ingredients into the wet. Add the dry ingredients to the wet mixture in two additions, folding gently with a rubber spatula after each addition. Mix just until you no longer see streaks of flour. A few small lumps are totally fine. Over-mixing develops the gluten and makes the bread tough, so resist the urge to keep stirring. This is where the spatula is your friend.
Step 5: Bake the bread. Pour the batter into the prepared loaf pan and spread it into an even layer. Bake for 50-60 minutes, or until a toothpick inserted into the center comes out clean or with just a few moist crumbs. If the top is browning too quickly around the 40-minute mark, tent the pan loosely with foil. Every oven runs a little differently, so start checking at 50 minutes. My oven takes exactly 55 minutes, but yours might be faster or slower.
Step 6: Cool the bread. Let the bread cool in the pan for about 15 minutes. Then use the parchment paper overhang to lift it out and transfer it to a cooling rack. Let it cool for at least 20 minutes before adding the glaze. If you add the glaze while the bread is too hot, it will melt right off and pool at the bottom. Not the end of the world, but not as pretty.
Step 7: Make the maple glaze. In a small bowl, whisk together the powdered sugar, maple syrup, 1 tablespoon of milk, and a pinch of salt. Add more milk, one teaspoon at a time, until the glaze is thick but slowly drips off the whisk. You want it thick enough to stay on top of the bread but thin enough to drizzle beautifully.
Step 8: Glaze and serve. Drizzle the glaze over the slightly warm or completely cooled bread. Let it set for about 10 minutes before slicing. The glaze will form a delicate crust that cracks beautifully when you cut into it. Serve warm or at room temperature. The first slice is always a little messy, and that’s part of the charm.
Cooking Tips & Techniques
Let me save you some trial and error. The first time I made this bread, I was so excited about the brown butter that I forgot to let it cool before adding the eggs. The eggs scrambled slightly, and I ended up with little bits of cooked egg in my batter. Not my finest moment. Let your browned butter cool for at least 5 minutes before adding the eggs. You want it warm, not hot.
Another thing I learned the hard way: measure your pumpkin puree carefully. Too much pumpkin can make the bread dense and almost gummy in the center. Use a measuring cup and level it off. If your pumpkin puree looks watery at all, blot it with a paper towel before adding it to the batter. This is especially important with homemade pumpkin puree, which tends to have more moisture than canned.
For the most even bake, place your loaf pan in the center of the oven. If you’re baking multiple loaves, rotate them halfway through. And here’s a pro tip I picked up from a pastry chef friend: let the bread cool completely in the pan for the first 15 minutes, then remove it to a rack. This allows the steam to redistribute evenly, which keeps the bread from sinking in the middle.
Timing is everything with the glaze. You want the bread to be warm enough that the glaze seeps in slightly, but cool enough that it doesn’t run off completely. I usually wait about 20 minutes after the bread comes out of the pan. The glaze will set into a beautiful, slightly crackly top that makes the bread look like it came from a bakery.
If you’re making this ahead, don’t add the glaze until right before serving. The glaze can make the top of the bread slightly sticky if it sits for too long, especially in humid weather. Store the unglazed bread wrapped tightly in plastic wrap, then glaze it fresh when you’re ready to serve.
Variations & Adaptations
One of the things I love about this recipe is how flexible it is. I’ve played around with it quite a bit, and here are some of my favorite variations:
Gluten-Free Version: Substitute the all-purpose flour with a 1:1 gluten-free baking flour blend. I’ve had good results with Bob’s Red Mill and King Arthur brands. Add 1/4 teaspoon of xanthan gum if your blend doesn’t already include it. The texture will be slightly more tender, but the flavor is still fantastic.
Dairy-Free Adaptation: Use vegan butter or coconut oil in place of the regular butter for browning. Coconut oil browns differently than butter, so watch it carefully. Use oat milk or almond milk in both the batter and the glaze. The maple flavor becomes even more pronounced without the dairy, which is a nice bonus.
Add-In Options: Fold in 1/2 cup of chopped pecans or walnuts after the dry ingredients are incorporated. The nuts add a lovely crunch that contrasts with the soft crumb. You can also add 1/2 cup of chocolate chips for a sweeter, more indulgent version. I once added dried cranberries and white chocolate chips, and it tasted like a pumpkin scone in bread form. Highly recommend.
Spice Adjustment: If you prefer a milder spice profile, reduce the ginger and cloves by half. If you want a bolder pumpkin spice flavor, add 1/4 teaspoon of allspice and a pinch of cardamom. Cardamom and pumpkin are an underrated combination, honestly.
Mini Loaves or Muffins: This batter works beautifully in mini loaf pans or a muffin tin. For mini loaves, bake for 30-35 minutes. For muffins, bake for 18-22 minutes. The glaze is still amazing drizzled over muffins, though I recommend using a spoon rather than trying to pour it over a dozen tiny surfaces.
Serving & Storage Suggestions
This bread is best served slightly warm, when the glaze is still a little soft and the crumb is tender. I like to slice it thick — about an inch and a half — and serve it on a plate with a pat of butter on the side, because why not go all in? It pairs beautifully with a hot cup of coffee or a chai latte. For a more decadent breakfast, toast a slice lightly and spread it with a little extra butter or cream cheese. The toasted edges get slightly crisp while the inside stays soft, and the glaze caramelizes just a bit. It’s dangerous how good this is.
For storage, wrap the unglazed bread tightly in plastic wrap or aluminum foil and keep it at room temperature for up to 4 days. If you’ve already glazed the bread, store it in an airtight container to keep the glaze from getting sticky. The bread actually gets better on the second day as the flavors meld together. The pumpkin and spice flavors deepen, and the brown butter notes become more pronounced.
This bread freezes beautifully. Wrap the cooled, unglazed loaf in a layer of plastic wrap, then a layer of foil, and freeze for up to 3 months. When you’re ready to enjoy it, thaw it overnight in the refrigerator or on the counter for a few hours. Warm it in a 300°F oven for about 10 minutes, then glaze it fresh. Nobody will ever know it was frozen. I’ve brought this to Thanksgiving dinners straight from the freezer, and everyone thought I’d baked it that morning.
If you have leftovers that are starting to dry out, turn them into bread pudding or French toast. Cube the bread, soak it in a mixture of eggs, milk, and a little maple syrup, and bake until golden. It’s a whole new dessert that tastes nothing like the original but is equally delicious.
Nutritional Information & Benefits
Here’s the honest truth: this is not health food, and I’m not going to pretend it is. But it does have some redeeming qualities. Pumpkin is packed with vitamin A and fiber, which supports eye health and digestion. The brown butter adds healthy fats that help you feel satisfied, and the maple syrup in the glaze provides antioxidants that refined sugar doesn’t have. So it’s not all bad, right?
Per slice (based on 10 slices):
- Calories: approximately 320
- Fat: 14g
- Carbohydrates: 47g
- Fiber: 2g
- Sugar: 32g
- Protein: 4g
For a lighter option, you can reduce the sugar to 3/4 cup total and use a sugar-free maple syrup in the glaze. The bread will be slightly less sweet, but the pumpkin and spice flavors will shine through more. You can also swap half the all-purpose flour for whole wheat pastry flour for a bit more fiber. The texture will be a little denser, but still delicious.
This recipe contains gluten, dairy, and eggs. For allergen-friendly versions, see the variations section above. Always check your ingredient labels, especially for gluten-free blends and dairy-free butter substitutes.
Conclusion
This brown butter pumpkin bread with maple glaze is the kind of recipe that becomes a tradition. It’s the bread you make when the leaves start changing, when you need something warm and sweet to get through a rainy afternoon, or when you want to show up at a friend’s house with something that says “I thought of you.” The brown butter adds a depth that surprises everyone, and the maple glaze is just the right amount of sweet without being overwhelming.
I hope you make this bread and make it your own. Maybe you’ll add nuts, maybe you’ll skip the glaze, maybe you’ll double the cinnamon like I sometimes do. The beauty of a good recipe is that it gives you a foundation to play with. So go ahead — brown that butter, smell that pumpkin, and let your kitchen fill with something wonderful. And if a neighbor shows up at your door with a fork, just smile and hand them a slice. You’ve been warned.
I’d love to hear how yours turns out! Drop a comment below and let me know if you tried any variations or if this bread converted a pumpkin skeptic in your life. Share it with someone who needs a little coziness today. Happy baking, friends!
Frequently Asked Questions
Can I use pumpkin pie filling instead of pumpkin puree?
No, please don’t. Pumpkin pie filling has added sugar and spices that will throw off the balance of this recipe. Stick with 100% pure pumpkin puree for the best results. Your bread will be too sweet and the texture will be off if you use the pre-sweetened filling.
Why did my bread sink in the middle?
This usually happens for one of three reasons: the oven wasn’t hot enough, the batter was over-mixed, or you opened the oven door too early. Make sure your oven is fully preheated to 350°F, mix just until combined, and resist the urge to peek until the 50-minute mark.
Can I make this recipe without browning the butter?
You can, but you’ll lose a lot of the flavor that makes this bread special. If you’re short on time, just melt the butter and proceed with the recipe. It will still be good pumpkin bread — just not the mind-changing kind that Carol couldn’t resist.
How do I know when the bread is fully baked?
Insert a toothpick or a thin knife into the center of the loaf. If it comes out clean or with just a few moist crumbs attached, it’s done. If the toothpick has wet batter on it, bake for another 5 minutes and check again. The top should also spring back lightly when you press it.
Can I double this recipe?
Absolutely. This recipe doubles beautifully. Just use two loaf pans and rotate them halfway through baking. You may need to add 5-10 minutes to the baking time. If you’re making a double batch for a crowd, this is the bread everyone will ask about.
PrintCozy Brown Butter Pumpkin Bread with Easy Maple Glaze
This brown butter pumpkin bread with maple glaze is a game-changer. The nutty, caramel-like depth from browned butter and the sweet maple glaze that seeps into the warm crumb create a tender, moist loaf that even pumpkin skeptics love.
- Prep Time: 20 minutes
- Cook Time: 55 minutes
- Total Time: 1 hour 15 minutes
- Yield: 10 servings 1x
- Category: Dessert
- Cuisine: American
Ingredients
- 1/2 cup (113 g) unsalted butter
- 1 cup (200 g) granulated sugar
- 1/2 cup (100 g) light brown sugar, packed
- 2 large eggs
- 1 cup (245 g) pumpkin puree
- 1/3 cup (80 ml) milk
- 1 teaspoon vanilla extract
- 1 3/4 cups (220 g) all-purpose flour
- 1 teaspoon baking soda
- 1/2 teaspoon baking powder
- 1/2 teaspoon salt
- 2 teaspoons ground cinnamon
- 1/2 teaspoon ground nutmeg
- 1/2 teaspoon ground ginger
- 1/4 teaspoon ground cloves
- 1 cup (120 g) powdered sugar
- 2 tablespoons pure maple syrup
- 1–2 tablespoons milk
- Pinch of salt
Instructions
- Preheat oven to 350°F (175°C). Grease a 9×5-inch loaf pan and line with parchment paper, leaving overhang on the long sides.
- Brown the butter: Place 1/2 cup unsalted butter in a small saucepan over medium heat. Cook, swirling occasionally, until butter foams and brown specks form (about 5-7 minutes). Remove from heat immediately and pour into a heat-safe bowl to cool.
- Mix wet ingredients: In a large bowl, whisk together browned butter, granulated sugar, and brown sugar until combined. Add eggs one at a time, whisking well. Stir in pumpkin puree, milk, and vanilla extract until smooth.
- Combine dry ingredients: In a separate bowl, whisk together flour, baking soda, baking powder, salt, cinnamon, nutmeg, ginger, and cloves.
- Fold dry ingredients into wet in two additions, mixing just until no streaks of flour remain. Do not over-mix.
- Pour batter into prepared loaf pan and spread evenly. Bake for 50-60 minutes, until a toothpick inserted in the center comes out clean or with a few moist crumbs. Tent with foil if browning too quickly.
- Cool bread in pan for 15 minutes, then lift out using parchment and transfer to a cooling rack. Cool for at least 20 minutes before glazing.
- Make glaze: In a small bowl, whisk together powdered sugar, maple syrup, 1 tablespoon milk, and a pinch of salt. Add more milk, 1 teaspoon at a time, until thick but pourable.
- Drizzle glaze over slightly warm or cooled bread. Let set for 10 minutes before slicing. Serve warm or at room temperature.
Notes
Let browned butter cool for at least 5 minutes before adding eggs to prevent scrambling. Measure pumpkin puree carefully; blot excess moisture if using homemade. For best results, place loaf pan in center of oven. Glaze just before serving if making ahead. Bread freezes well (unglazed) for up to 3 months.
Nutrition
- Serving Size: 1 slice
- Calories: 320
- Sugar: 32
- Sodium: 280
- Fat: 14
- Saturated Fat: 8
- Carbohydrates: 47
- Fiber: 2
- Protein: 4
Keywords: pumpkin bread, brown butter, maple glaze, fall baking, pumpkin recipe, easy bread


