My neighbor Karen wasn’t trying to impress anyone. I’d stopped by to borrow a bundt pan—mine had mysteriously vanished after a particularly chaotic Thanksgiving—and the smell hit me before I even got to her screen door. Something warm. Something buttery. Something that made me forget all about the stupid bundt pan.
She was standing at her kitchen counter, flour dusted across her favorite faded apron, rolling out dough like it was the most ordinary Tuesday afternoon in November. “Oh, these?” she said when I asked, barely looking up. “Just cookies. My grandmother’s recipe. I make them every year for the kids.”
Just cookies. Let me tell you—there was nothing “just” about them. The kitchen was filled with the gentle scent of vanilla and nutmeg, and on the counter, a row of perfectly shaped leaves sat cooling, their edges catching the afternoon light. She had this little system going: roll, cut, bake, cool, ice. Repeat. She made it look effortless, like she’d done it a thousand times before. And honestly? She probably had.
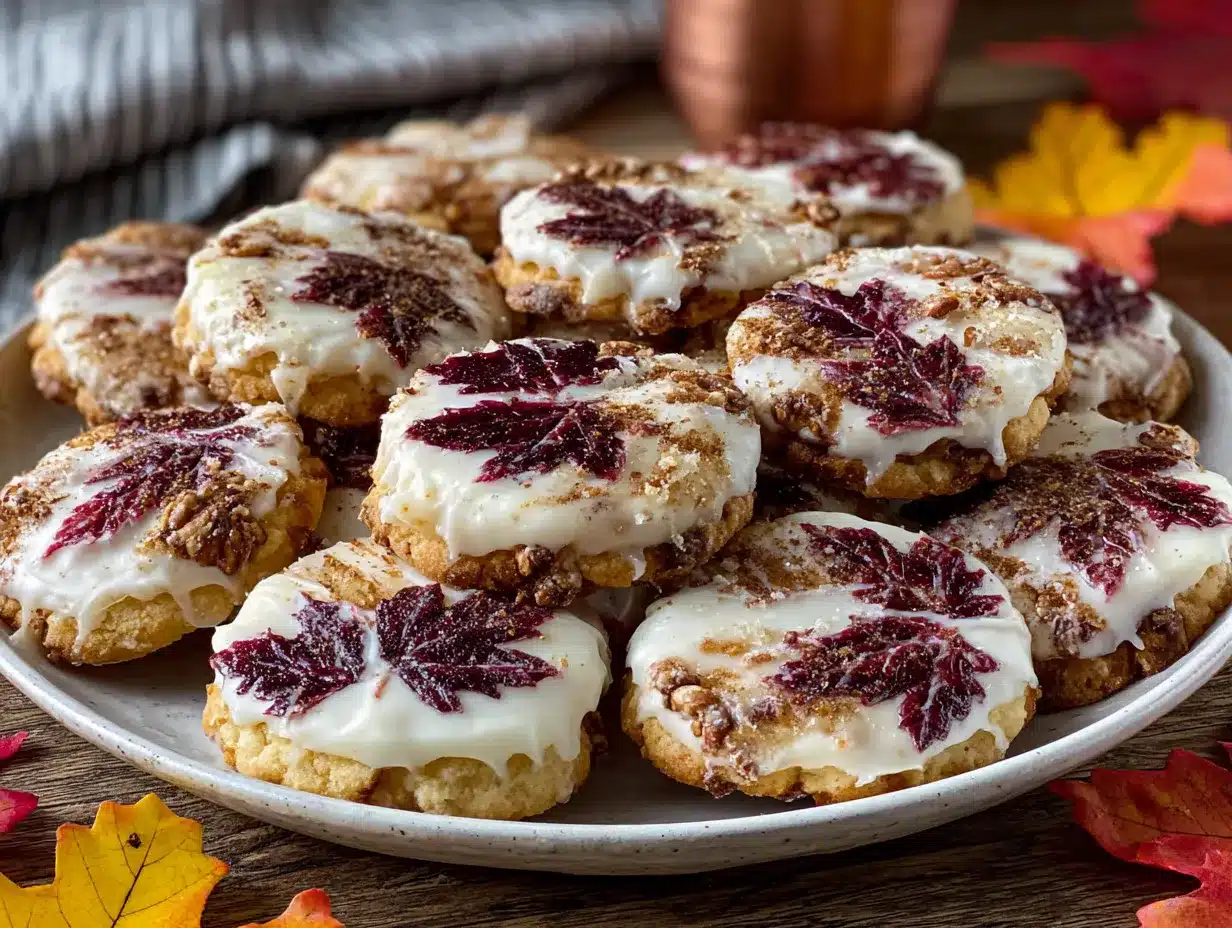
I stood there watching her pipe royal icing onto a maple leaf cookie with the kind of steady hand I could only dream of. “You want to try one?” she asked, sliding a finished cookie toward me. I took a bite, and I mean this—I actually closed my eyes. The cookie was soft in the center, just barely crisp at the edges, and that royal icing had set to the perfect snap. It was the kind of cookie that tastes like a memory you didn’t know you had.
I asked her for the recipe, of course. She shrugged and scribbled it on a scrap of envelope she fished out of her junk drawer. No fuss. No drama. Just a neighbor sharing something special without even realizing how special it was. I’ve been making these cozy Thanksgiving sugar cookies with royal icing leaves every year since, and they’ve become my own little tradition. Maybe you’ve been there—stumbling into something wonderful when you weren’t looking for it at all.
Why You’ll Love This Recipe
These aren’t just another sugar cookie. I’ve tested this recipe more times than I care to admit, tweaking the butter-to-sugar ratio, adjusting the baking time, even swapping flours just to see what would happen. What I landed on is something special—a cookie that holds its shape beautifully for decorating but stays impossibly soft when you bite into it.
- Perfect for Thanksgiving Baking: These cookies are made for cozy afternoons when you want to fill your kitchen with warm, spiced aromas. They’re the ultimate fall baking project.
- Simple Ingredients: You probably already have everything you need in your pantry. No weird specialty items or expensive extracts.
- Kid-Friendly Activity: My niece helped me decorate a batch last year, and honestly, her lopsided pumpkins were my favorites. This is the kind of recipe that brings people together.
- Make-Ahead Friendly: The dough freezes beautifully, and the decorated cookies stay fresh for over a week. Perfect for spreading out the Thanksgiving prep.
- Crowd-Pleasing Presentation: These cookies look absolutely stunning on a dessert table. The royal icing leaves catch the light, and everyone always asks where you bought them.
What makes this recipe different from all the others? It’s the combination of a tender, flavorful cookie base with a royal icing that actually sets properly—no sticky mess, no smudged designs. I’ve included every tip I’ve learned the hard way so you can skip the frustration and get straight to the beautiful results. This is comfort food at its finest: warm, nostalgic, and made with love.
What Ingredients You Will Need
This recipe uses simple, wholesome ingredients to deliver a sugar cookie that’s both sturdy enough for decorating and tender enough to melt in your mouth. Most of these are pantry staples, which makes this perfect for spontaneous baking sessions on chilly November afternoons.
For the Sugar Cookies
- 3 cups all-purpose flour (spooned and leveled—this matters more than you think)
- 1 teaspoon baking powder (aluminum-free for best flavor)
- 1/2 teaspoon salt (fine sea salt works best)
- 1 cup unsalted butter, softened to room temperature (I use Kerrygold for the rich flavor)
- 1 cup granulated sugar
- 1 large egg, room temperature
- 1 teaspoon vanilla extract (pure, not imitation)
- 1/2 teaspoon almond extract (this is my secret ingredient—don’t skip it)
- 1/2 teaspoon ground cinnamon (for that cozy Thanksgiving warmth)
- 1/4 teaspoon ground nutmeg (freshly grated if you have it)
For the Royal Icing
- 4 cups powdered sugar, sifted (lumps are the enemy of smooth icing)
- 3 tablespoons meringue powder (I recommend Wilton brand for consistent results)
- 5-6 tablespoons warm water (add gradually—you might not need all of it)
- 1/2 teaspoon vanilla extract (or clear vanilla if you want pure white icing)
- Gel food coloring in fall colors: warm brown, burnt orange, deep red, golden yellow (avoid liquid food coloring—it thins the icing too much)
Ingredient Tips: For the softest cookies, make sure your butter is truly at room temperature—it should dent easily when you press it, but not be greasy or melted. I learned this the hard way after a batch of flat, greasy cookies that spread into blobs. Also, if you don’t have almond extract, you can use all vanilla, but the almond adds this subtle, nutty warmth that pairs beautifully with the fall spices.
Substitution Guidance: Need a dairy-free option? Use high-quality vegan butter sticks (not the spreadable kind in a tub). For gluten-free, I’ve had good results with Cup4Cup all-purpose gluten-free flour blend, though the cookies will be slightly more delicate. And if meringue powder isn’t available, you can substitute 2 large egg whites plus 1/4 teaspoon cream of tartar—but the meringue powder version is more stable and food-safe for sharing.
Equipment Needed
You don’t need a fancy bakery setup to make these cookies shine. Here’s what you’ll actually use:
- Stand mixer or hand mixer (either works; I’ve used both and prefer my KitchenAid for the dough but a hand mixer for the royal icing)
- Rolling pin (a standard wooden one is fine, but adjustable rolling rings are a game-changer for even thickness)
- Leaf-shaped cookie cutters (a set of 3-4 different leaf sizes gives variety; I found mine at a craft store for under $8)
- Baking sheets (light-colored metal sheets work best—dark ones can over-brown the bottoms)
- Parchment paper or silicone baking mats (parchment is cheaper; silicone mats are reusable and give slightly softer bottoms)
- Piping bags or squeeze bottles (I actually prefer squeeze bottles for flooding—less hand fatigue)
- Small round piping tips (size 2 or 3 for outlining, size 1 for detail work)
- Cooling rack (absolutely essential for even cooling and royal icing setting)
- Offset spatula (helpful for transferring delicate cookies)
- Toothpicks (for popping air bubbles in the icing and dragging designs)
If you don’t have leaf cutters, you can freehand shapes with a paring knife around a cardboard template—I did this my first year and the cookies actually looked charmingly rustic. And if you’re just starting out, a basic piping set from the grocery store will work fine. You don’t need to spend a fortune to make beautiful cookies.
Preparation Method
Take your time with these steps. I promise the result is worth every minute.
Step 1: Make the Cookie Dough
In a medium bowl, whisk together the flour, baking powder, salt, cinnamon, and nutmeg. Set aside. In the bowl of your stand mixer fitted with the paddle attachment, beat the softened butter and granulated sugar on medium speed until light and fluffy—about 3 minutes. You’re looking for a pale, creamy texture. Scrape down the sides of the bowl halfway through.
Add the egg, vanilla extract, and almond extract. Beat on medium until fully combined, about 30 seconds. The mixture might look slightly curdled at this point—that’s normal, don’t panic.
With the mixer on low, gradually add the dry ingredients. Mix just until the dough comes together and no streaks of flour remain. Overmixing here will make your cookies tough. The dough should be soft but not sticky.
Step 2: Chill the Dough
Divide the dough into two equal discs, wrap each tightly in plastic wrap, and flatten into a disc about 1 inch thick. Refrigerate for at least 2 hours, or overnight. I know it’s tempting to skip this step, but please don’t. Chilled dough spreads less, holds its shape better during baking, and gives you cleaner edges on your leaf cutouts.
Step 3: Roll and Cut
Preheat your oven to 350°F (175°C). Line two baking sheets with parchment paper. Remove one disc of dough from the fridge and let it sit at room temperature for about 5 minutes—just enough to be rollable without cracking.
Lightly flour your work surface and rolling pin. Roll the dough to an even 1/4-inch thickness. If you have adjustable rolling rings, set them to 1/4 inch. If not, use two wooden spoons or rulers on either side as guides—I learned this trick from a pastry chef and it changed my baking life.
Cut out your leaf shapes, re-rolling scraps only once. Too many re-rolls make the dough tough. Use an offset spatula to transfer cookies to the prepared baking sheets, spacing them about 2 inches apart.
Step 4: Bake
Bake for 8-10 minutes, rotating the pan halfway through. The cookies are done when the edges are just barely golden—the centers should look set but not browned. They will continue to firm up as they cool. Let them rest on the baking sheet for 5 minutes, then transfer to a wire rack to cool completely. Do not even think about icing them until they’re completely cool, or your royal icing will melt into a sad, runny mess.
Step 5: Make the Royal Icing
In the bowl of your stand mixer fitted with the whisk attachment, combine the sifted powdered sugar and meringue powder. Add 5 tablespoons of warm water and the vanilla extract. Mix on low until combined, then increase to medium-high and beat for 4-5 minutes. The icing should be thick, glossy, and hold stiff peaks.
For outlining, keep the icing thick—it should hold its shape when piped. For flooding (filling in the leaves), thin a portion of the icing by adding water a few drops at a time until it reaches a “10-second consistency”: when you lift the spoon, the icing should flow back into itself and smooth out in about 10 seconds.
Step 6: Decorate the Leaves
Divide your icing into bowls and color each with gel food coloring. I usually make: warm brown for the stems and veins, burnt orange for maple leaves, deep red for oak leaves, and golden yellow for simple leaf shapes.
Fit piping bags with small round tips. Outline each cookie with the thicker icing, then fill in with the thinner flooding icing. Use a toothpick to spread the icing into corners and pop any air bubbles. While the icing is still wet, pipe vein lines or dots for texture. Let the cookies dry completely—this takes 4-6 hours at room temperature, or overnight for best results.
Cooking Tips & Techniques
After countless batches, here’s what I’ve learned the hard way so you don’t have to.
Don’t overbake. I cannot stress this enough. The first time I made these, I left them in the oven an extra two minutes because I was distracted by a phone call. They came out dry and crumbly—still tasty, but not the soft, tender cookies I was going for. Pull them out when the edges are just barely golden, even if the centers look slightly underdone.
Chill your cut-out shapes. Here’s a pro tip: after you cut the cookies and place them on the baking sheet, pop the whole sheet in the fridge for 15 minutes before baking. This firms up the butter again and gives you the sharpest edges possible. I do this every time now and the difference is remarkable.
Master the royal icing consistency. This is the trickiest part, honestly. Too thick and it won’t flow smoothly; too thin and it’ll run right off the cookie. Test your flooding icing by drizzling a small amount back into the bowl—it should form a ribbon that disappears into the surface in about 10 seconds. If it’s too thick, add water one drop at a time. Too thin? Add more sifted powdered sugar.
Work in batches. Don’t try to ice all the cookies at once if you’re a beginner. The icing can start to dry out in the piping bag, leading to clogged tips. Fill your bags halfway and refresh the icing as needed. I keep a damp paper towel over the bowl of icing I’m not actively using.
Use a scribe tool. A simple toothpick or a dedicated scribe tool is your best friend for fixing mistakes, spreading icing, and creating texture. I keep a cup of toothpicks next to my work station at all times.
Variations & Adaptations
One of the best things about this recipe is how flexible it is. Here are some ways I’ve adapted it over the years:
Flavor Variations
- Pumpkin Spice Cookies: Add 2 teaspoons pumpkin pie spice to the flour mixture and replace 1/4 cup of the granulated sugar with brown sugar. The molasses in the brown sugar adds a deeper, cozier flavor.
- Citrus Zest Version: Add 1 tablespoon of fresh orange zest to the dough and replace the almond extract with orange extract. The bright citrus cuts through the richness beautifully and pairs wonderfully with fall flavors.
- Chocolate Leaf Cookies: Replace 1/4 cup of the all-purpose flour with 1/4 cup of Dutch-process cocoa powder. These look stunning with gold royal icing veins.
Dietary Adaptations
- Gluten-Free: Use a high-quality 1:1 gluten-free flour blend. I’ve tested this with King Arthur Measure for Measure and the results were excellent—just add an extra tablespoon of milk to the dough if it seems dry.
- Vegan: Substitute the butter with vegan butter sticks, use a flax egg (1 tablespoon ground flaxseed + 3 tablespoons water, let sit for 5 minutes), and use aquafaba instead of meringue powder for the royal icing. The texture is slightly different but still delicious.
- Reduced Sugar: You can reduce the sugar in the cookie dough to 3/4 cup without affecting the texture too much, but I wouldn’t go lower than that. The royal icing needs the full amount of powdered sugar to set properly.
Decorating Style Variations
If piping isn’t your thing, try this: after the cookies have cooled, brush them with a thin layer of warmed apricot jam and sprinkle with coarse sanding sugar in fall colors. It’s quicker, easier, and looks like stained glass. I did this for a cookie swap one year and they were a huge hit.
Serving & Storage Suggestions
These cookies are best served at room temperature, which lets the royal icing set to that perfect snappy texture while the cookie stays soft. Arrange them on a wooden board or a vintage platter for maximum cozy Thanksgiving vibes.
For a Thanksgiving dessert table, pair these cookies with a warm apple cider, pumpkin pie, and a plate of spiced nuts. They also make beautiful place settings—tie a cookie in a small cellophane bag with a cinnamon stick and place it at each setting as a favor.
Storage: Store undecorated cookies in an airtight container at room temperature for up to 2 weeks. Decorated cookies should be stored in a single layer in an airtight container, separated by parchment paper, for up to 1 week. Do not refrigerate them—the humidity will make the icing sticky and the cookies soft.
Freezing: You can freeze the unbaked cookie dough discs for up to 3 months. Wrap them tightly in plastic wrap and then foil. Thaw overnight in the refrigerator before rolling and cutting. Baked, undecorated cookies also freeze well for up to 2 months. Thaw at room temperature before decorating.
Reheating: These cookies are meant to be eaten at room temperature, but if you want a warm cookie, pop an undecorated one in a 300°F oven for 3-4 minutes. Do not microwave decorated cookies—the icing will melt into a puddle.
Flavor development: Here’s something I love—the flavors actually deepen after a day or two. The spices meld together, the vanilla becomes more pronounced, and the cookies develop this lovely, complex warmth. So don’t feel like you have to serve them immediately. Baking them a day or two ahead actually improves the flavor.
Nutritional Information & Benefits
Let’s be real—these are sugar cookies with royal icing. They’re a treat, not a health food. But here’s what I can tell you:
One cookie (using a medium leaf cutter and standard icing) contains approximately 120-150 calories, 6g fat, 18g carbohydrates, and 1g protein. The exact numbers will vary depending on the size of your cutters and how much icing you use.
The brighter side: The cinnamon and nutmeg in these cookies offer anti-inflammatory properties and a touch of warmth that’s genuinely comforting on a cold day. And honestly? There’s something to be said for the mental health benefits of spending an afternoon baking. The rhythmic motion of rolling dough, the focus required for piping, the satisfaction of creating something beautiful—it’s meditative in its own way.
Dietary considerations: These cookies contain gluten, dairy, and eggs. For allergen-friendly versions, check the variations section above. The royal icing made with meringue powder is safe for those concerned about raw eggs.
My personal take? I believe in balance. These cookies are part of a Thanksgiving celebration—a day of gratitude, connection, and joy. One beautiful cookie isn’t going to derail anyone’s health goals. It’s going to make someone smile. And that has its own nutritional value.
Conclusion
These cozy Thanksgiving sugar cookies with royal icing leaves have become a non-negotiable part of my fall baking rotation. Every year, as the weather turns crisp and the leaves start to change, I think about Karen’s kitchen—the flour on her apron, the way she shrugged off my compliments, the scrap of envelope with her grandmother’s handwriting.
This recipe is more than just cookies. It’s a way to slow down, to create something beautiful with your hands, to fill your home with the kind of warmth that makes people want to linger. Whether you’re an experienced decorator or a complete beginner, I promise you can make these. Start simple. Use just one color of icing if piping intimidates you. The cookies will still taste amazing, and you’ll get better with each batch.
I’d love to see your creations! Tag me in your photos, leave a comment below telling me which leaf shape was your favorite to decorate, or share your own twist on the recipe. Did you add cardamom? Use maple extract? Pipe little acorns alongside the leaves? Tell me everything. Happy Thanksgiving baking, friend. May your kitchen be warm, your icing be smooth, and your cookies be devoured with joy.
Frequently Asked Questions
Can I make these cookies ahead of time for Thanksgiving?
Absolutely! You have several options: make the dough up to 3 days ahead and keep it refrigerated, bake the cookies up to 2 weeks ahead and store undecorated, or fully decorate them up to 1 week ahead. I usually bake the cookies on Monday, decorate on Tuesday, and serve on Thursday. The flavors actually improve after a day or two.
Why did my royal icing turn out runny?
This usually happens when too much water is added at once. Royal icing is finicky—add water literally a few drops at a time. If you’ve already made it too thin, you can fix it by adding more sifted powdered sugar, 1 tablespoon at a time, until it reaches the right consistency. Also, make sure you’re using gel food coloring, not liquid, which thins the icing.
My cookies spread during baking. What went wrong?
The most common culprit is dough that wasn’t chilled long enough. Make sure you chill the dough for at least 2 hours before rolling, and consider chilling the cut-out shapes on the baking sheet for 15 minutes before baking. Also, check that your butter was truly at room temperature—if it was too soft, the cookies will spread.
Can I freeze the decorated cookies?
I don’t recommend freezing decorated cookies because the royal icing can crack or become sticky when thawed. However, you can freeze undecorated baked cookies for up to 2 months, or freeze the unbaked dough for up to 3 months. Decorate after thawing for the best results.
How do I get clean, sharp edges on my leaf cookies?
Three things help: use a sharp cookie cutter and press straight down without twisting, chill the cut-out cookies before baking, and make sure your royal icing is the right consistency—not too thin, or it will run off the edges. Also, outline each cookie with thicker icing first and let it set for a few minutes before flooding the center.
Pin This Recipe!

Cozy Thanksgiving Sugar Cookies with Royal Icing Leaves

These tender, buttery sugar cookies are infused with warm fall spices and decorated with beautiful royal icing leaves. Perfect for Thanksgiving baking, they hold their shape beautifully and taste like a cozy memory.
- Prep Time: 30 minutes
- Cook Time: 10 minutes
- Total Time: 2 hours 40 minutes (includes 2 hours chilling)
- Yield: 24 cookies 1x
- Category: Dessert
- Cuisine: American
Ingredients
- 3 cups all-purpose flour (spooned and leveled)
- 1 teaspoon baking powder (aluminum-free)
- 1/2 teaspoon fine sea salt
- 1 cup unsalted butter, softened to room temperature
- 1 cup granulated sugar
- 1 large egg, room temperature
- 1 teaspoon pure vanilla extract
- 1/2 teaspoon almond extract
- 1/2 teaspoon ground cinnamon
- 1/4 teaspoon ground nutmeg (freshly grated if possible)
- 4 cups powdered sugar, sifted
- 3 tablespoons meringue powder
- 5–6 tablespoons warm water
- 1/2 teaspoon vanilla extract (or clear vanilla for pure white icing)
- Gel food coloring in fall colors: warm brown, burnt orange, deep red, golden yellow
Instructions
- Make the cookie dough: In a medium bowl, whisk together flour, baking powder, salt, cinnamon, and nutmeg. Set aside. In the bowl of a stand mixer fitted with the paddle attachment, beat softened butter and granulated sugar on medium speed until light and fluffy, about 3 minutes. Scrape down the sides. Add egg, vanilla extract, and almond extract; beat on medium until fully combined, about 30 seconds. With mixer on low, gradually add dry ingredients, mixing just until dough comes together and no …
- Chill the dough: Divide dough into two equal discs, wrap each tightly in plastic wrap, and flatten into a disc about 1 inch thick. Refrigerate for at least 2 hours, or overnight.
- Roll and cut: Preheat oven to 350°F (175°C). Line two baking sheets with parchment paper. Remove one disc of dough from fridge and let sit at room temperature for about 5 minutes. Lightly flour work surface and rolling pin. Roll dough to an even 1/4-inch thickness. Cut out leaf shapes, re-rolling scraps only once. Use an offset spatula to transfer cookies to prepared baking sheets, spacing them about 2 inches apart.
- Bake: Bake for 8-10 minutes, rotating the pan halfway through. Cookies are done when edges are just barely golden; centers should look set but not browned. Let rest on baking sheet for 5 minutes, then transfer to a wire rack to cool completely.
- Make the royal icing: In the bowl of a stand mixer fitted with the whisk attachment, combine sifted powdered sugar and meringue powder. Add 5 tablespoons warm water and vanilla extract. Mix on low until combined, then increase to medium-high and beat for 4-5 minutes until thick, glossy, and holding stiff peaks. For flooding, thin a portion of icing by adding water a few drops at a time until it reaches a ’10-second consistency’ (flows back into itself and smooths out in about 10 seconds).
- Decorate the leaves: Divide icing into bowls and color each with gel food coloring. Fit piping bags with small round tips. Outline each cookie with thicker icing, then fill in with thinner flooding icing. Use a toothpick to spread icing into corners and pop air bubbles. While icing is still wet, pipe vein lines or dots for texture. Let cookies dry completely, 4-6 hours at room temperature or overnight.
Notes
For best results, chill the cut-out cookies on the baking sheet for 15 minutes before baking to ensure sharp edges. Do not overbake; pull cookies when edges are just barely golden. Royal icing should be tested for ’10-second consistency’ before flooding. Store decorated cookies in a single layer in an airtight container at room temperature for up to 1 week. Do not refrigerate.
Nutrition
- Serving Size: 1 cookie
- Calories: 135
- Sugar: 12
- Sodium: 75
- Fat: 6
- Saturated Fat: 3.5
- Carbohydrates: 18
- Protein: 1
Keywords: Thanksgiving cookies, sugar cookies, royal icing, leaf cookies, fall baking, holiday cookies


