I wasn’t supposed to be there that Tuesday. My car was in the shop, and my neighbor across the hall, a quiet woman named Mrs. Chen who I’d only ever exchanged nods with, had offered me a ride to the grocery store. I knocked on her door a little early, and the smell hit me before she even opened it. It wasn’t a fancy perfume or a scented candle. It was butter, brown sugar, and something warm and spicy—like autumn had been distilled into a single, perfect breath.
She was making cookies. Not for a bake sale, not for a holiday party. Just because she had a half-can of pumpkin puree in her fridge and didn’t want it to go to waste. “They’re just little things,” she said with a shrug, waving me into her kitchen. The “little things” were these perfect, bite-sized rounds of joy. A buttery sugar cookie base, so tender it practically dissolved, topped with a dollop of spiced pumpkin filling that had caramelized just slightly on the edges. She wasn’t trying to impress anyone, you know? She was just making cookies on a random Tuesday. And honestly, I think that’s the only way a recipe this good gets made—with zero pressure and a whole lot of casual love.
I stood there, holding a warm one, and I swear I closed my eyes for a second. It was that good. I asked her for the recipe, and she scribbled it on a sticky note. The paper was a little smudged, and I’ve been making them ever since. This is that recipe. The one that turns a random Tuesday into something worth remembering.
Why You’ll Love This Recipe
Let’s be real for a second. There are a million pumpkin cookie recipes out there. But these little guys? They’re different. They’re not just another version of the same thing. They are, without a doubt, my best version of a fall cookie. Here is why you are going to absolutely love them.
- Quick & Easy: From start to finish, you are looking at about 35 minutes. No chilling the dough, no complicated steps. Perfect for when that pumpkin craving hits out of nowhere on a busy weeknight.
- Simple Ingredients: You probably have 90% of these in your pantry right now. No weird extracts, no hard-to-find spices. Just good, honest baking staples.
- Perfect for Cozy Evenings: These are the ultimate comfort food for a slow night in. Pair them with a cup of hot cider or a chai latte, and you have instant hygge.
- Crowd-Pleaser: I have brought these to potlucks, to work, and to family dinners. They disappear. Kids love the small size, and adults love that they can eat three without feeling guilty.
- Unbelievably Delicious: The texture is the real star here. You get a soft, almost melt-in-your-mouth sugar cookie base, topped with a creamy, spiced pumpkin filling. The edges get a tiny bit chewy, and the center stays soft. It is next-level comfort food in a single bite.
This recipe isn’t just good. It is the kind that makes you close your eyes after the first bite. It is comfort food reimagined—faster and simpler, but with the same soul-soothing satisfaction. Perfect for impressing guests without stress, or turning a simple Tuesday evening into something memorable.
What Ingredients You Will Need
This recipe uses simple, wholesome ingredients to deliver bold fall flavor and a satisfying texture without any fuss. Most of these are pantry staples, which makes this the perfect last-minute baking project.
- For the Sugar Cookie Base:
- 1 cup (2 sticks) unsalted butter, softened – (adds richness and tenderness). I personally prefer using Kerrygold for its higher butterfat content, which makes the cookies incredibly soft.
- ¾ cup granulated sugar – For sweetness and a slightly crisp edge.
- 1 large egg, room temperature – Room temperature is key here! It emulsifies into the butter much better, creating a smoother dough.
- 1 teaspoon vanilla extract – Use pure vanilla extract if you have it. It makes a difference.
- 2 cups all-purpose flour – Spoon and level your flour for the best results. Scooping directly can pack in too much flour, making the cookies dry.
- ½ teaspoon baking powder – For a little lift so the cookies aren’t too dense.
- ¼ teaspoon salt – Balances the sweetness and enhances the other flavors.
- For the Pumpkin Topping:
- ½ cup pumpkin puree – Make sure you are using 100% pumpkin puree, not pumpkin pie filling. The pie filling has added sugar and spices that will throw off the balance.
- ¼ cup packed light brown sugar – (adds moisture and a deep, caramel-like sweetness).
- 1 large egg yolk – This gives the topping a rich, almost custard-like texture.
- 1 teaspoon pumpkin pie spice – You can use store-bought, but I love making my own blend with cinnamon, nutmeg, ginger, and a tiny pinch of cloves.
- 2 tablespoons heavy cream – (adds creaminess). You can substitute with whole milk, but heavy cream makes it extra luxurious.
- For the Glaze (Optional but Recommended):
- ½ cup powdered sugar
- 1-2 tablespoons milk – Add slowly until you reach a drizzling consistency.
- ¼ teaspoon vanilla extract
Equipment Needed
You don’t need a fancy bakery setup for these cookies. Here is what you will need to get the job done.
- Mixing Bowls: You will need at least two—one for the dry ingredients and one for the wet ingredients. I have a set of nesting glass bowls I use for everything.
- Electric Mixer: A hand mixer or a stand mixer with a paddle attachment works perfectly. You could do this by hand with a wooden spoon, but your arm will get a workout creaming the butter and sugar.
- Mini Muffin Pan: This is non-negotiable for the shape. A standard 24-cup mini muffin pan is ideal. I have a non-stick one from Wilton that I have used for years, and it works like a charm.
- Small Cookie Scoop: A 1-tablespoon scoop makes portioning the dough incredibly easy and ensures all your cookies are the same size. If you don’t have one, just use a spoon and try to be consistent.
- Piping Bag or Small Spoon: For adding the pumpkin filling to the dough cups. A small spoon works just fine, but a piping bag (or even a zip-top bag with a corner snipped off) makes it much cleaner and faster.
- Cooling Rack: Essential for letting the cookies cool completely so the glaze sets properly.
Preparation Method
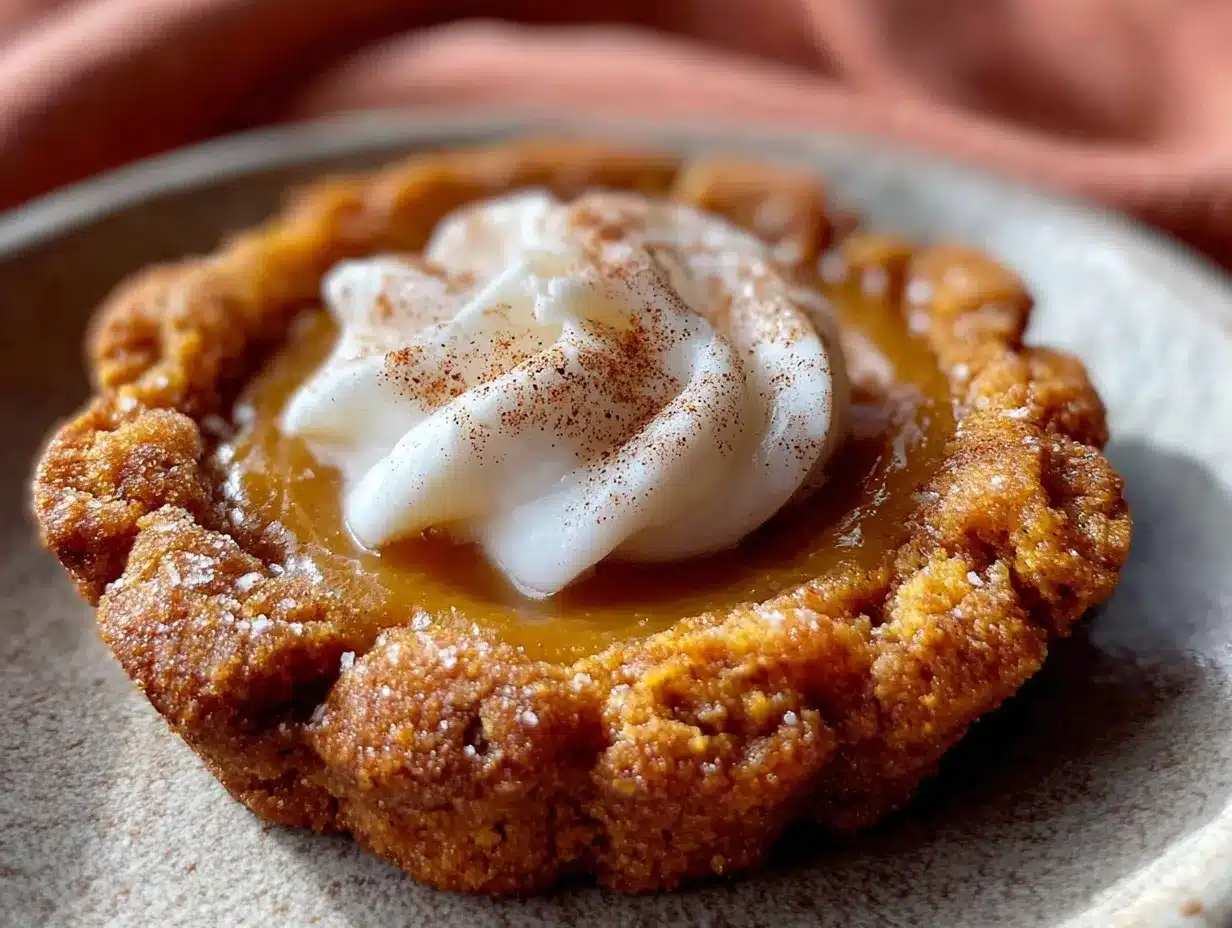
Alright, let’s get to the fun part. Follow these steps, and you will have a batch of these little beauties in no time. I have made these so many times that I have the process down to a science.
- Preheat and Prep: Preheat your oven to 350°F (175°C). Generously grease a 24-cup mini muffin pan with butter or non-stick spray. Do not skip this step, or you will be fighting to get the cookies out later.
- Make the Cookie Dough: In a large bowl, beat the softened butter and granulated sugar together with your electric mixer on medium speed until it is light and fluffy—about 2-3 minutes. Scrape down the sides of the bowl. Add the egg and vanilla extract, and beat until well combined.
- Combine Dry Ingredients: In a separate, smaller bowl, whisk together the all-purpose flour, baking powder, and salt. Slowly add the dry ingredients to the wet mixture, mixing on low speed until just combined. Do not overmix! The dough will be soft and slightly sticky, which is exactly what you want. If it feels too sticky to handle, pop it in the fridge for 10 minutes.
- Portion the Dough: Using your 1-tablespoon cookie scoop, portion out the dough and roll it into balls. Place each ball into a greased mini muffin cup. You want the dough to fill the cup about halfway.
- Create the Well: Using your thumb or the back of a small teaspoon, gently press down into the center of each dough ball to create a little well. Don’t press all the way through to the bottom—just create a nice, deep indent for the filling to sit in.
- Make the Pumpkin Topping: In a small bowl, whisk together the pumpkin puree, light brown sugar, egg yolk, pumpkin pie spice, and heavy cream until smooth. The mixture should be thick, not runny.
- Fill the Cookies: Carefully spoon or pipe the pumpkin filling into each well. Fill them almost to the top, but be careful not to overflow them, as the filling will puff up a little as it bakes.
- Bake to Perfection: Bake for 12-15 minutes, or until the edges of the cookie are just starting to turn a light golden brown. The center will still look slightly soft and set. Do not overbake, or the cookies will be dry. The smell coming from your oven at this point is absolutely intoxicating.
- Cool Completely: Let the cookies cool in the pan for 5 minutes. This is crucial—they need this time to set. After 5 minutes, carefully run a knife around the edges to loosen them, and transfer them to a cooling rack to cool completely.
- Glaze (Optional): Once the cookies are completely cool, whisk together the powdered sugar, milk, and vanilla extract in a small bowl. Drizzle the glaze over the tops of the cookies using a spoon or a fork. Let the glaze set for about 10 minutes before serving.
Cooking Tips & Techniques
I have learned a few things the hard way so you don’t have to. Here are my best tips for getting these cookies perfect every single time.
- Don’t Skip the Room Temperature Egg: I know it seems like a small thing, but a cold egg can seize the butter and make your dough lumpy. Trust me on this one. Just leave your egg on the counter for 30 minutes before you start.
- The Thumbprint Technique: I used to just press a spoon into the dough, but I found that my thumb actually works better. It creates a more natural, even well. Just make sure your hands are clean and a little dry.
- Watch the Bake Time: Every oven runs a little differently. My old oven used to run hot, and I would burn the bottoms of these cookies before I knew what happened. Start checking at the 12-minute mark. You want the edges to be golden, not brown.
- Let Them Cool in the Pan: This is not a step you want to rush. If you try to take them out too early, they will crumble. Those 5 minutes in the pan are what allow the structure to set. I learned this lesson when I had a whole batch fall apart on my counter. It was a sad day.
- Multitasking is Your Friend: While the first batch is baking, you can easily prep the glaze or clean up your mixing bowls. It makes the whole process feel much less chaotic.
Variations & Adaptations
One of the best things about this recipe is how easily it adapts. Here are a few ways I have played around with it.
- Gluten-Free Version: I swapped the all-purpose flour with a 1:1 gluten-free baking flour blend (the one with xanthan gum), and it worked beautifully. The texture was slightly more delicate, but just as delicious.
- Dairy-Free Adaptation: Use a high-quality vegan butter stick (like Miyoko’s) and swap the heavy cream with full-fat coconut cream. The flavor is a little different, but still incredibly rich and satisfying.
- Spice It Up: I love a little heat with my sweet. Sometimes I add a pinch of cayenne pepper or a dash of black pepper to the pumpkin filling. It gives it a lovely, unexpected warmth that pairs perfectly with the sweet cookie base.
- Chocolate Drizzle: Instead of the vanilla glaze, try drizzling the cooled cookies with melted dark chocolate. The bitterness of the chocolate against the sweet pumpkin is a match made in heaven.
- Maple Twist: Swap the vanilla extract in the glaze for maple extract. It adds another layer of cozy fall flavor that is just incredible.
Serving & Storage Suggestions
These cookies are best served at room temperature, but they are also pretty amazing slightly warm. If you can wait, let the glaze set fully for the best presentation.
I love serving these on a simple plate with a hot cup of chai latte or a mug of mulled apple cider. They are also fantastic on a dessert board alongside some fresh apple slices, a handful of pecans, and maybe some sharp cheddar cheese—the salty-sweet combo is surprisingly good.
For storage, keep them in an airtight container at room temperature for up to 3 days. I layer them with parchment paper so the glaze doesn’t stick. If you live in a humid climate, they might get a little soft after a day, but they are still delicious.
You can also freeze the unglazed cookies for up to 2 months. Just place them in a single layer on a baking sheet, freeze them until solid, then transfer them to a freezer-safe bag. When you are ready to enjoy them, let them thaw at room temperature, and then add the glaze fresh. The flavors actually seem to get a little deeper after a few days in the fridge, if you can manage to keep them around that long.
Nutritional Information & Benefits
While these are definitely a treat, there are a few bright spots in the nutritional profile. The pumpkin puree is packed with Vitamin A and fiber, which is always a good thing. The butter and egg provide some protein and healthy fats, helping to keep you full. And because they are mini, portion control is built right in!
Here is an estimated nutritional breakdown per cookie (based on 24 cookies with glaze):
- Calories: ~120
- Fat: 7g
- Carbohydrates: 14g
- Sugar: 8g
- Protein: 1g
Dietary Notes: This recipe contains gluten, dairy, and eggs. For a gluten-free option, see the variations section above. For a dairy-free option, use vegan butter and coconut cream.
Conclusion
So there you have it. My little sticky-note recipe that turned into a fall staple. These cozy mini pumpkin pie sugar cookies are everything I want in a seasonal treat: easy to make, incredibly satisfying, and just the right size for a little moment of happiness. They are the kind of cookie that makes you slow down, pour yourself a warm drink, and just enjoy the season.
I really hope you give them a try. And please, don’t be shy about making them your own. Swap in your favorite spices, try a new glaze, or just eat them plain. The best recipes are the ones that feel like yours. If you make a batch, I would love to hear about it. Drop a comment below and let me know how they turned out, or share your own twist on them. Happy baking, friend!
Frequently Asked Questions
Can I use pumpkin pie filling instead of pumpkin puree?
I wouldn’t recommend it. Pumpkin pie filling has added sugar and spices, which will make your topping way too sweet and throw off the texture. Stick with 100% pure pumpkin puree for the best results.
My dough is too sticky to handle. What should I do?
No worries! This happens sometimes, especially if your butter was a little too soft. Just pop the dough in the refrigerator for 15-20 minutes. It will firm up and be much easier to roll into balls.
Can I make these cookies ahead of time for a party?
Absolutely. You can make the dough and the filling a day ahead and keep them separate in the fridge. When you are ready to bake, just assemble and bake as directed. You might need to add an extra minute or two to the bake time if the dough is cold.
Why did my cookies spread out too much in the pan?
This usually means your butter was too soft or your dough was too warm. Make sure you are using softened butter, not melted butter. If your kitchen is very warm, chill the portioned dough balls in the pan for 10 minutes before pressing in the wells and baking.
Can I use a different spice blend?
Of course! If you don’t have pumpkin pie spice, you can make your own by mixing ½ teaspoon cinnamon, ¼ teaspoon nutmeg, ¼ teaspoon ginger, and a tiny pinch of cloves. That is my go-to mix, and it works perfectly in this recipe.
PrintEasy Mini Pumpkin Pie Sugar Cookies: Best Fall Recipe
These bite-sized cookies feature a buttery sugar cookie base topped with a spiced pumpkin filling and a vanilla glaze. They are quick, easy, and perfect for cozy fall evenings.
- Prep Time: 20 minutes
- Cook Time: 15 minutes
- Total Time: 35 minutes
- Yield: 24 cookies 1x
- Category: Dessert
- Cuisine: American
Ingredients
- 1 cup (2 sticks) unsalted butter, softened
- ¾ cup granulated sugar
- 1 large egg, room temperature
- 1 teaspoon vanilla extract
- 2 cups all-purpose flour
- ½ teaspoon baking powder
- ¼ teaspoon salt
- ½ cup pumpkin puree
- ¼ cup packed light brown sugar
- 1 large egg yolk
- 1 teaspoon pumpkin pie spice
- 2 tablespoons heavy cream
- ½ cup powdered sugar
- 1–2 tablespoons milk
- ¼ teaspoon vanilla extract
Instructions
- Preheat oven to 350°F (175°C). Generously grease a 24-cup mini muffin pan.
- In a large bowl, beat softened butter and granulated sugar with an electric mixer on medium speed until light and fluffy, about 2-3 minutes. Scrape down sides. Add egg and vanilla extract; beat until well combined.
- In a separate bowl, whisk together flour, baking powder, and salt. Slowly add dry ingredients to wet mixture, mixing on low until just combined. Do not overmix.
- Using a 1-tablespoon cookie scoop, portion dough into balls and place each into a greased mini muffin cup, filling about halfway.
- Using your thumb or the back of a small teaspoon, press down into the center of each dough ball to create a well, without pressing through to the bottom.
- In a small bowl, whisk together pumpkin puree, brown sugar, egg yolk, pumpkin pie spice, and heavy cream until smooth.
- Spoon or pipe pumpkin filling into each well, filling almost to the top but not overflowing.
- Bake for 12-15 minutes, until edges are light golden brown. Center will still look slightly soft. Do not overbake.
- Let cookies cool in pan for 5 minutes, then run a knife around edges to loosen and transfer to a cooling rack to cool completely.
- For glaze: whisk together powdered sugar, milk, and vanilla extract. Drizzle over cooled cookies. Let set for 10 minutes before serving.
Notes
Use 100% pumpkin puree, not pumpkin pie filling. Room temperature egg is important for proper emulsification. Let cookies cool in pan for 5 minutes to set structure. For gluten-free, use a 1:1 gluten-free flour blend with xanthan gum. For dairy-free, use vegan butter and coconut cream.
Nutrition
- Serving Size: 1 cookie
- Calories: 120
- Sugar: 8
- Sodium: 50
- Fat: 7
- Saturated Fat: 4
- Carbohydrates: 14
- Protein: 1
Keywords: mini pumpkin pie sugar cookies, fall cookies, pumpkin cookies, easy pumpkin recipe, thumbprint cookies


