This was supposed to be a roasted chicken dinner. I had the bird, the lemons, the garlic, the whole plan mapped out in my head. But somewhere between the grocery store and my kitchen, the universe decided I needed roasted vegetables instead. I grabbed the wrong bag—butternut squash instead of sweet potatoes—and tossed in Brussels sprouts because they were wilting in my fridge. The oven was already preheated to 425°F (I’d forgotten to turn it down after baking cookies the night before), and I was already running late for a phone call. I chopped everything in a hurry, dumped it on a sheet pan with olive oil and salt, and basically prayed for the best. What came out was nothing like the plan—and better. Honestly, I stood there eating straight off the pan, burning my tongue, not even caring. That happy accident turned into my most-requested side dish, and I’ve never looked back. Maybe you’ve been there—a kitchen fail that somehow becomes a win. This quick roasted butternut squash and Brussels sprouts medley is that story on a plate. It’s the recipe I keep making because it proves you don’t need to be perfect to make something unforgettable.
Why You’ll Love This Recipe
Let me tell you why this dish has earned a permanent spot in my weeknight rotation. I’ve tested this at least a dozen times—different temperatures, different oil ratios, different pan sizes—and this version wins every single time. It’s the one my neighbor Karen requested for our block party, and the one my kids actually ask for seconds of. That’s the kind of authority that comes from burning a few batches and learning the hard way.
- Quick & Easy: Comes together in under 35 minutes, with only 10 minutes of active prep. Perfect for those nights when you walk in the door hungry and need dinner on the table fast.
- Simple Ingredients: No fancy grocery trips needed. You likely already have olive oil, salt, and pepper in your kitchen. Just grab a butternut squash and some Brussels sprouts.
- Perfect for Weeknights: This is the side dish that makes any protein feel like a complete meal. Pair it with grilled chicken, pork chops, or even a fried egg for a quick dinner.
- Crowd-Pleaser: I’ve served this at Thanksgiving, potlucks, and casual Tuesday dinners. It always gets rave reviews from kids and adults alike. Even my picky uncle asked for the recipe.
- Unbelievably Delicious: The caramelized edges of the squash and the crispy leaves of the Brussels sprouts create a texture combo that’s next-level comfort food. You’ll find yourself eating it straight from the pan.
What makes this recipe different from the rest is the high-heat roasting technique. Most recipes tell you to roast at 400°F, but I’ve found that 425°F gives you that deep caramelization without drying out the vegetables. The squash gets creamy on the inside and golden on the outside, while the Brussels sprouts develop those irresistible crispy leaves. It’s not just another roasted vegetable recipe—it’s my best version, tested and perfected through trial and error.
What Ingredients You Will Need
This recipe uses simple, wholesome ingredients to deliver bold flavor and satisfying texture without the fuss. Most of these are pantry staples or easy to find at any grocery store. Let me walk you through what you need and why each ingredient matters.
- Butternut squash, peeled and cubed (1 medium squash, about 2 pounds) — Look for a squash that feels heavy for its size with firm, unblemished skin. I recommend buying pre-cut cubes from the store if you’re short on time (they’re a lifesaver on busy nights). The squash brings natural sweetness and a creamy texture that balances the savory Brussels sprouts.
- Brussels sprouts, trimmed and halved (1 pound) — Choose sprouts that are bright green with tightly packed leaves. Smaller sprouts tend to be sweeter and more tender. If you find sprouts with loose leaves, don’t throw them away—they’ll crisp up beautifully in the oven and become the best part.
- Olive oil (3 tablespoons) — Use a good-quality extra virgin olive oil for the best flavor. I prefer California Olive Ranch for its smooth, fruity taste. The oil helps the vegetables caramelize and prevents them from drying out.
- Garlic cloves, minced (3-4 cloves) — Fresh garlic is non-negotiable here. It adds a pungent, aromatic depth that transforms the vegetables. Pre-minced jarred garlic works in a pinch, but fresh gives you that bold flavor that makes the dish sing.
- Salt (1 teaspoon) — I use kosher salt because it distributes evenly and doesn’t clump. Diamond Crystal is my go-to brand. Salt is crucial for drawing out moisture and helping the vegetables brown.
- Black pepper, freshly ground (½ teaspoon) — Freshly ground pepper adds a warm, slightly spicy kick. Skip the pre-ground stuff—it loses its punch over time.
- Dried thyme (1 teaspoon) — Thyme adds an earthy, slightly floral note that pairs beautifully with both squash and Brussels sprouts. You can use fresh thyme if you have it (use 1 tablespoon of fresh leaves).
- Maple syrup (1 tablespoon) — This is my secret ingredient. A touch of maple syrup enhances the natural sweetness of the squash and helps create those gorgeous caramelized edges. Use pure maple syrup, not pancake syrup.
- Balsamic vinegar (1 tablespoon) — The acidity cuts through the richness and adds a tangy finish. I like to use a good aged balsamic for a deeper flavor, but any balsamic vinegar works.
- Optional: Red pepper flakes (¼ teaspoon) — If you like a little heat, add these. They don’t make the dish spicy, just give it a subtle warmth that lingers in the background.
- Optional: Fresh parsley, chopped (for garnish) — A sprinkle of fresh parsley adds a pop of color and freshness right before serving.
For the best results, try to cut the butternut squash and Brussels sprouts into similar-sized pieces. This ensures even cooking—no one wants a mushy piece next to an undercooked one. If your squash cubes are uneven, just keep an eye on the smaller pieces and remove them early if needed.
Equipment Needed
You don’t need a fancy kitchen to make this recipe. Here’s what you’ll need, along with some alternatives and tips from my own experience.
- Large baking sheet (18×13 inches or similar) — This is the most important tool. A rimmed baking sheet prevents juices from spilling and allows the vegetables to spread out in a single layer. I use Nordic Ware’s half-sheet pans—they’re sturdy, warp-resistant, and affordable. If you don’t have a large sheet, use two smaller pans to avoid overcrowding.
- Chef’s knife (8-inch) — A sharp knife makes quick work of cubing squash and halving Brussels sprouts. I learned the hard way that a dull knife is dangerous—it slips and you end up with uneven cuts. Keep your knife sharp and your fingers safe.
- Cutting board — Use a large, sturdy cutting board. I prefer wood because it’s gentle on knives, but plastic works fine too. Just make sure it doesn’t slide around while you’re chopping.
- Vegetable peeler — Peeling butternut squash is easier with a good peeler. I like the Y-shaped peelers—they’re faster and give you more control. If you’re really short on time, look for pre-peeled squash cubes at the store.
- Mixing bowl (large) — For tossing the vegetables with oil and seasonings. Any large bowl works, but I prefer a stainless steel one because it doesn’t absorb odors.
- Spatula or tongs — For flipping the vegetables halfway through roasting. Tongs give you more control, but a flat spatula works fine too.
- Parchment paper or aluminum foil — Line your baking sheet for easy cleanup. Parchment paper is my preference because it prevents sticking without adding metallic flavors. Plus, you can toss it in the compost when you’re done.
Budget-friendly option: If you don’t have a large baking sheet, use a 9×13-inch casserole dish. The vegetables will be slightly more crowded, so they’ll steam a bit instead of caramelizing fully. Just extend the cooking time by 5-10 minutes and stir halfway through.
Preparation Method
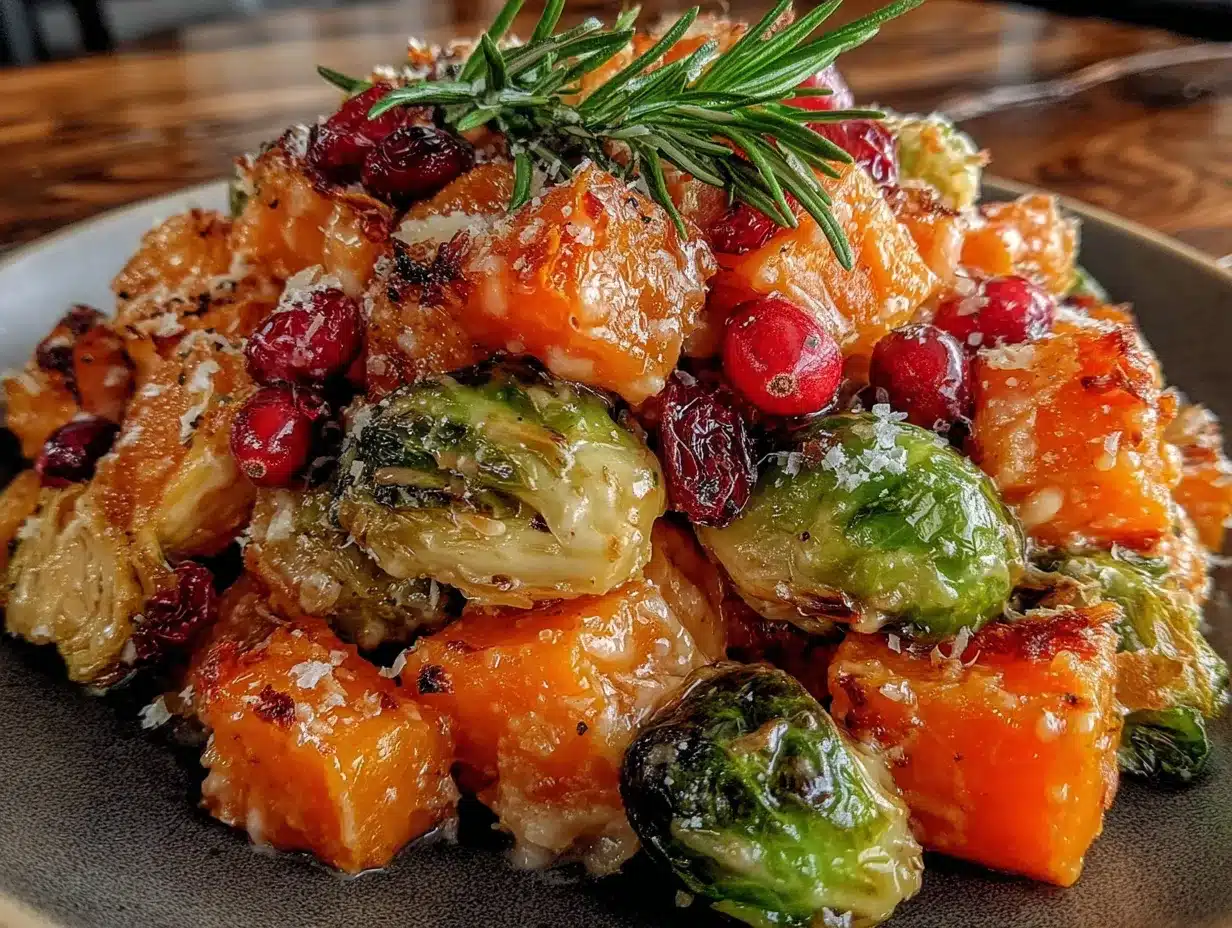
Alright, let’s get cooking. This recipe moves fast, so read through the steps before you start. I’ve included time estimates and sensory cues so you know exactly what to look for at each stage.
- Preheat your oven to 425°F (220°C). This is crucial—don’t skip it. A hot oven is what gives you those caramelized edges. While the oven heats, line your baking sheet with parchment paper or foil for easy cleanup. I usually do this step first so the oven is ready when I am.
- Prepare the butternut squash. Using a sharp vegetable peeler, remove the skin from the squash. Cut off the stem end and the base, then slice the squash in half where the narrow neck meets the bulbous bottom. Cut each half into 1-inch cubes. This takes about 5 minutes once you get the hang of it. Tip: If the squash feels too hard to cut, microwave it whole for 2 minutes to soften it slightly. I learned this trick after struggling with a particularly stubborn squash—it works like magic.
- Prepare the Brussels sprouts. Trim the tough ends off each sprout and remove any yellow or damaged outer leaves. Cut each sprout in half lengthwise through the stem. If you have very large sprouts, cut them into quarters. The goal is uniform size so everything cooks evenly. You’ll know they’re ready when the halves are about the same thickness as your squash cubes. Time: about 3 minutes.
- Combine the vegetables in a large mixing bowl. Add the cubed squash and halved Brussels sprouts. Drizzle with olive oil, then add the minced garlic, salt, pepper, and dried thyme. Toss everything with your hands or a spatula until every piece is evenly coated. This is the moment you want to see the oil glistening on the vegetables—if it looks dry, add another tablespoon of oil. The vegetables should be well-coated but not swimming in oil.
- Spread the vegetables on the prepared baking sheet. Arrange them in a single, even layer. This is non-negotiable—crowding the pan will cause the vegetables to steam instead of roast. If they’re touching too much, use two pans. You want to see space between the pieces so hot air can circulate. At this point, the vegetables should look vibrant and glossy.
- Roast for 20 minutes. Place the pan on the middle rack of your oven. Set a timer and don’t open the oven door during this time—you want the heat to stay consistent. After 20 minutes, the vegetables should be starting to brown on the edges and the kitchen should smell amazing, like caramelized squash and toasty Brussels sprouts.
- Flip the vegetables and add the maple syrup and balsamic vinegar. Remove the pan from the oven and use tongs or a spatula to flip each piece. Drizzle the maple syrup and balsamic vinegar evenly over the vegetables. Give them a gentle toss to coat. Return the pan to the oven and roast for another 10-15 minutes, or until the vegetables are tender and caramelized. The squash should be easily pierced with a fork, and the Brussels sprouts should have crispy, browned leaves on the outside. The edges should look dark golden, almost charred in spots—that’s where the flavor is.
- Finish and serve. Remove the pan from the oven. If you’re using red pepper flakes, sprinkle them over the hot vegetables and toss gently. Transfer to a serving dish and garnish with fresh parsley if desired. Let the vegetables rest for 2-3 minutes before serving—this allows the caramelization to set. Serve warm or at room temperature.
Total active time: about 10 minutes. Total roasting time: 30-35 minutes. From start to finish, you’ll have a gorgeous side dish on the table in under 45 minutes.
Cooking Tips & Techniques
Over the years, I’ve made every mistake you can imagine with roasted vegetables. Here’s what I’ve learned so you don’t have to repeat my failures.
Don’t overcrowd the pan. This is the number one mistake. When vegetables are packed too tightly, they release steam and never get that golden-brown crust. If your pan looks crowded, use two pans or roast in batches. I once tried to cram everything onto one small pan because I was too lazy to wash a second one—the result was sad, soggy vegetables that tasted more boiled than roasted. Never again.
Cut uniform pieces. Uneven sizes mean some pieces will burn while others stay undercooked. Take the extra 30 seconds to make sure your squash cubes and Brussels sprouts halves are roughly the same size. Your future self will thank you.
Use the right oil. Olive oil is perfect for roasting at 425°F because it has a smoke point of about 410°F. If you’re worried about smoking, you can use avocado oil instead (smoke point of 520°F). But honestly, I’ve never had an issue with olive oil at this temperature—just make sure you’re using regular olive oil, not extra virgin, if you’re concerned about the smoke point.
Flip halfway through. This ensures even browning. Set a timer so you don’t forget. I’ve definitely burned a batch because I got distracted by a phone call. The timer is your friend.
Add sweeteners and acids late. Maple syrup and balsamic vinegar can burn if added too early. By adding them at the 20-minute mark, you get caramelization without the risk of burning. This was a hard lesson learned after a smoky kitchen incident.
Let them rest. After roasting, let the vegetables sit on the pan for a few minutes. This allows the caramelized sugars to set and prevents them from sticking to the pan. Plus, they’re too hot to eat right away anyway (trust me on this one—I’ve burned my tongue more times than I’d like to admit).
Variations & Adaptations
This recipe is incredibly flexible. Here are some variations I’ve tried and loved.
Dietary Variations:
- Vegan: This recipe is already vegan as written. Just make sure your maple syrup is pure and your balsamic vinegar doesn’t contain any animal-derived ingredients (most don’t).
- Gluten-Free: Naturally gluten-free! No modifications needed.
- Low-Carb/Keto: Skip the maple syrup and use a sugar-free sweetener like monk fruit or stevia. The balsamic vinegar adds enough flavor on its own. You can also add a tablespoon of coconut aminos for extra depth.
- Whole30: Omit the maple syrup and use date paste or omit the sweetener entirely. The vegetables are still delicious without it.
Flavor Variations:
- Spicy Version: Add ½ teaspoon of cayenne pepper or smoked paprika along with the salt and pepper. The heat pairs beautifully with the sweetness of the squash.
- Herby Version: Swap the dried thyme for dried rosemary or sage. Fresh herbs work too—use 1 tablespoon of fresh rosemary or 2 tablespoons of fresh sage leaves, chopped.
- Cheesy Version: During the last 5 minutes of roasting, sprinkle ¼ cup of grated Parmesan cheese over the vegetables. The cheese melts and crisps up, creating a salty, umami crust that’s absolutely addictive.
- Citrusy Version: Add the zest of one orange and a squeeze of orange juice along with the maple syrup and balsamic vinegar. The citrus brightens the dish and complements the squash beautifully.
Vegetable Swaps:
- Sweet potatoes: Replace the butternut squash with cubed sweet potatoes. They roast in about the same time and have a similar sweet, creamy texture.
- Cauliflower: Add cauliflower florets along with the Brussels sprouts for extra variety. Cut them into 1-inch pieces and they’ll roast perfectly.
- Carrots: Peel and cut carrots into 1-inch pieces. They add natural sweetness and a beautiful orange color.
Different Cooking Methods:
- Air Fryer: Preheat your air fryer to 400°F. Toss the vegetables with oil and seasonings, then cook in batches for 12-15 minutes, shaking the basket halfway through. The results are even crispier than oven-roasted.
- Grill: Thread the vegetables onto skewers or use a grill basket. Grill over medium-high heat for 10-12 minutes, turning occasionally. You’ll get a lovely smoky flavor.
My personal favorite variation is the spicy-herby combo: I add smoked paprika and fresh rosemary, then finish with a squeeze of lemon juice. It’s the version I make when I want something that feels a little more special than a regular weeknight side.
Serving & Storage Suggestions
Serving Temperature and Presentation: Serve this dish warm, straight from the oven, or at room temperature. For a beautiful presentation, transfer the vegetables to a large platter and sprinkle with fresh parsley or chopped nuts like pecans or walnuts. The green and orange colors pop beautifully against a white platter. I like to serve it family-style so everyone can help themselves.
Complementary Dishes: This medley pairs beautifully with almost any protein. Try it alongside:
- Grilled chicken breast or roasted chicken thighs
- Pan-seared salmon or baked cod
- Pork chops or pork tenderloin
- Steak or roast beef
- Fried eggs for a vegetarian dinner
- Quinoa or farro for a grain bowl
For a complete meal, serve with a simple green salad dressed with lemon vinaigrette. The acidity cuts through the richness of the roasted vegetables.
Storage Instructions: Store leftovers in an airtight container in the refrigerator for up to 4 days. The vegetables will soften slightly as they sit, but the flavors actually meld and deepen overnight. I often make a double batch on Sunday just to have leftovers for weekday lunches.
Freezing Instructions: This dish freezes surprisingly well. Spread the cooled vegetables on a baking sheet and freeze until solid, then transfer to a freezer-safe bag or container. They’ll keep for up to 3 months. To reheat, spread frozen vegetables on a baking sheet and roast at 400°F for 10-15 minutes, or until heated through and crispy again.
Reheating Methods:
- Oven: Spread on a baking sheet and reheat at 400°F for 5-7 minutes. This restores some of the crispiness.
- Air Fryer: Reheat at 375°F for 3-4 minutes. This is my preferred method for leftovers—they come out almost as good as fresh.
- Microwave: Quick but the vegetables will be soft. Microwave on high for 1-2 minutes. Add a splash of water to prevent drying out.
Flavor Development: The flavors continue to develop as the vegetables sit. I actually prefer this dish the next day—the garlic and thyme have had time to meld, and the maple-balsamic glaze has soaked into every crevice. It’s a great make-ahead option for holiday meals.
Nutritional Information & Benefits
Here’s the approximate nutritional breakdown per serving (based on 4 servings):
- Calories: 180
- Total Fat: 11g
- Saturated Fat: 1.5g
- Carbohydrates: 22g
- Fiber: 5g
- Sugar: 8g
- Protein: 4g
- Sodium: 320mg
- Vitamin A: 180% of the Daily Value
- Vitamin C: 90% of the Daily Value
- Potassium: 600mg
Health Benefits: This dish is packed with nutrients. Butternut squash is rich in vitamin A (from beta-carotene), which supports eye health and immune function. Brussels sprouts are loaded with vitamin C and vitamin K, which are essential for immune health and bone health respectively. Both vegetables are high in fiber, which aids digestion and helps you feel full longer. The olive oil provides healthy monounsaturated fats that support heart health.
Dietary Considerations: This recipe is naturally vegan, gluten-free, dairy-free, and nut-free. It’s also low in saturated fat and cholesterol-free. If you’re watching your sugar intake, you can reduce or omit the maple syrup.
Potential Allergens: None of the main ingredients are common allergens. However, if you add the optional Parmesan cheese, it contains dairy. Always check labels if you’re serving someone with allergies.
Personal Wellness Perspective: I love that this dish makes eating vegetables feel like a treat. It’s not a punishment side dish—it’s the star of the meal. When I’m trying to eat more plants, this is the recipe I turn to because it satisfies my craving for something savory, sweet, and satisfying without any processed ingredients.
Conclusion
This quick roasted butternut squash and Brussels sprouts medley started as a happy accident, but it’s become a staple in my kitchen for good reason. It’s fast enough for a busy weeknight, impressive enough for guests, and forgiving enough for beginners. The combination of sweet, caramelized squash and crispy, savory Brussels sprouts is honestly hard to beat.
I hope you give this recipe a try and make it your own. Maybe you’ll add extra garlic like I do, or throw in some red pepper flakes for heat. Maybe you’ll serve it alongside grilled chicken or pile it on top of a grain bowl. However you make it, I promise it’ll become a regular in your rotation too.
I’d love to hear how it turns out for you! Drop a comment below and let me know what variations you tried, or tag me in your photos on social media. Happy cooking, friend—you’ve got this!
Frequently Asked Questions
Can I use frozen butternut squash or Brussels sprouts?
Yes, but the texture will be different. Frozen vegetables release more water as they cook, so they’ll be softer and less caramelized. If you use frozen, thaw them first and pat them dry with paper towels to remove excess moisture. You may also need to increase the roasting time by 5-10 minutes. Fresh vegetables give the best results, but frozen works in a pinch.
How do I prevent the vegetables from burning?
Watch your oven temperature—every oven runs a little differently. If your oven runs hot, reduce the temperature to 400°F. Also, make sure you’re not overcrowding the pan, and flip the vegetables halfway through. If you notice the vegetables browning too quickly, tent the pan loosely with foil for the last 10 minutes of cooking.
Can I make this recipe ahead of time?
Absolutely! You can prep the vegetables up to 24 hours in advance. Peel and cube the squash, trim and halve the Brussels sprouts, and store them separately in airtight containers in the refrigerator. When you’re ready to cook, just toss them with oil and seasonings and roast as directed. You can also roast the vegetables completely, then reheat them in the oven or air fryer before serving.
What’s the best way to peel butternut squash?
Use a sharp Y-shaped vegetable peeler for the best results. Start by cutting off both ends of the squash, then stand it upright on a cutting board. Peel from top to bottom, following the curve of the squash. If the squash is very hard, microwave it whole for 2 minutes to soften the skin slightly. You can also buy pre-peeled and cubed squash from the store to save time.
How do I get the Brussels sprouts extra crispy?
Cut them in half and place them cut-side down on the baking sheet. This maximizes contact with the hot pan, creating a crispy, caramelized surface. Also, make sure they’re dry before adding oil—any moisture will steam them instead of roasting. Finally, don’t be afraid of high heat—425°F is ideal for getting that perfect crispy texture.
PrintEasy Roasted Butternut Squash and Brussels Sprouts
A quick and easy roasted vegetable medley featuring caramelized butternut squash and crispy Brussels sprouts, tossed with garlic, thyme, maple syrup, and balsamic vinegar. Perfect as a weeknight side dish or holiday favorite.
- Prep Time: 10 minutes
- Cook Time: 30-35 minutes
- Total Time: 40-45 minutes
- Yield: 4 servings 1x
- Category: Side Dish
- Cuisine: American
Ingredients
- 1 medium butternut squash (about 2 pounds), peeled and cubed
- 1 pound Brussels sprouts, trimmed and halved
- 3 tablespoons olive oil
- 3–4 garlic cloves, minced
- 1 teaspoon kosher salt
- ½ teaspoon freshly ground black pepper
- 1 teaspoon dried thyme
- 1 tablespoon pure maple syrup
- 1 tablespoon balsamic vinegar
- ¼ teaspoon red pepper flakes (optional)
- Fresh parsley, chopped (for garnish, optional)
Instructions
- Preheat your oven to 425°F (220°C). Line a large baking sheet with parchment paper or aluminum foil.
- Prepare the butternut squash: Using a sharp vegetable peeler, remove the skin. Cut off the stem end and base, then slice the squash in half where the narrow neck meets the bulbous bottom. Cut each half into 1-inch cubes.
- Prepare the Brussels sprouts: Trim the tough ends and remove any yellow or damaged outer leaves. Cut each sprout in half lengthwise through the stem. For very large sprouts, cut into quarters.
- In a large mixing bowl, combine the cubed squash and halved Brussels sprouts. Drizzle with olive oil, then add minced garlic, salt, pepper, and dried thyme. Toss until every piece is evenly coated.
- Spread the vegetables in a single, even layer on the prepared baking sheet. Do not overcrowd; use two pans if necessary.
- Roast for 20 minutes. Do not open the oven door during this time.
- Remove the pan from the oven. Flip the vegetables using tongs or a spatula. Drizzle with maple syrup and balsamic vinegar, and toss gently to coat.
- Return the pan to the oven and roast for another 10-15 minutes, until the vegetables are tender and caramelized. The squash should be easily pierced with a fork, and the Brussels sprouts should have crispy, browned leaves.
- Remove from the oven. If using, sprinkle with red pepper flakes and toss gently. Transfer to a serving dish and garnish with fresh parsley if desired. Let rest for 2-3 minutes before serving. Serve warm or at room temperature.
Notes
For best results, cut vegetables into uniform 1-inch pieces to ensure even cooking. Do not overcrowd the pan; use two pans if needed. Add maple syrup and balsamic vinegar halfway through roasting to prevent burning. Let vegetables rest for a few minutes after roasting to allow caramelization to set. Leftovers can be stored in an airtight container in the refrigerator for up to 4 days or frozen for up to 3 months.
Nutrition
- Serving Size: 1 serving (about 1 c
- Calories: 180
- Sugar: 8
- Sodium: 320
- Fat: 11
- Saturated Fat: 1.5
- Carbohydrates: 22
- Fiber: 5
- Protein: 4
Keywords: roasted butternut squash, roasted Brussels sprouts, easy side dish, vegan, gluten-free, fall vegetables, holiday side dish


