There used to be a little farm stand on Old Mill Road, just past the covered bridge, that made the most incredible roasted pumpkin seeds I’ve ever had. When they closed after that last harvest season—the owner finally retired—I honestly felt a little lost. It sounds dramatic, I know, but those seeds were my fall ritual. After six attempts—burned batches, soggy disasters, and one that was so salty it was practically inedible—I finally cracked the code. This recipe is the result of that obsession, and let me tell you, it was worth every single failed batch.
The first time I nailed it, I was standing in my kitchen at 10 p.m. on a Tuesday. The house smelled like a carnival, and I may have eaten half the tray before they even cooled down. I mean, the crunch was just… perfect. That golden color, the way the sea salt clung to each seed—it was exactly like I remembered from that little farm stand. Honestly, recreating this recipe became a bit of a personal mission. You know that feeling when you just can’t let go of a food memory? That was me with these seeds.
This recipe is for anyone who has ever stood over a sink with a pumpkin, wondering if the effort is worth it. It is. The secret is in the prep—getting those seeds completely dry before they hit the oven. I learned that the hard way, trust me. The first batch I made was a chewy, sad mess. But now? These seeds are my go-to fall snack, and they disappear faster than I can make them. So grab your pumpkin, crank up the oven, and let’s bring back that farm stand magic right in your own kitchen.
Why You’ll Love This Recipe
Let’s face it—roasting pumpkin seeds can be a gamble. Too often, they turn out either burnt on the outside and raw in the middle, or just plain flavorless. This recipe takes all the guesswork out. It’s the kind of snack that makes you reach for “just one more” until the bowl is empty.
- Incredibly Easy: From pumpkin to snack in under an hour. No complicated techniques or fancy equipment needed.
- Perfectly Crunchy Every Time: The low-and-slow roasting method ensures every single seed is crispy through and through, not just on the outside.
- Simple, Clean Ingredients: Just pumpkin seeds, oil, and sea salt. That’s it. No weird additives or preservatives.
- Perfect for Fall Gatherings: These are a hit at Halloween parties, Thanksgiving dinners, or just cozy nights in. They make the best munching snack.
- Naturally Good For You: Pumpkin seeds are packed with magnesium, zinc, and healthy fats. This is a snack you can feel good about.
What makes this recipe different from all the others? It’s the method, plain and simple. Most recipes rush the process, using high heat that burns the outside before the inside is dry. I spent weeks testing temperatures and times to find that sweet spot. This isn’t just another seed recipe—it’s the one I wish I had from the start. It’s the one that finally made me stop missing that farm stand.
These seeds have that soul-soothing satisfaction of a perfect fall snack. They’re salty, crunchy, and just a little bit addictive. You can impress guests with a bowl of these without breaking a sweat, or keep them all to yourself for a week of afternoon snacking. No judgment here.
What Ingredients You Will Need
This recipe uses the simplest of ingredients to create something truly special. The magic is in the technique, not a long shopping list. You probably have everything you need right now.
- Fresh Pumpkin Seeds (1 ½ cups): These come straight from your pumpkin carving project. You’ll want to separate them from the stringy pulp. The fresher, the better. I find that sugar pumpkins or carving pumpkins both work well, though sugar pumpkins tend to have slightly smaller, more tender seeds.
- Unsalted Butter or Avocado Oil (2 tablespoons, melted): Butter gives a richer, toastier flavor that I personally love. Avocado oil works beautifully too, especially if you want a more neutral taste. I’ve used both, and honestly, butter edges it out by just a hair for that cozy fall flavor. If using butter, make sure it’s unsalted so you control the salt level.
- Fine Sea Salt (1 ½ teaspoons, plus more for finishing): This is where the magic happens. I use a fine sea salt for the initial seasoning because it distributes evenly. Then, I finish with a sprinkle of flaky sea salt right when they come out of the oven. The flaky salt gives little bursts of salty goodness that make each seed interesting. My favorite brand is Maldon for the finishing touch, but any flaky sea salt will do.
- Optional Add-Ins: This is where you can make the recipe your own. A pinch of smoked paprika adds a subtle warmth. A dash of garlic powder gives them a savory kick. For a sweet version, try a teaspoon of cinnamon and a tablespoon of brown sugar. I often make a double batch—one savory, one sweet—because I can never decide.
When picking your pumpkin seeds, look for ones that are plump and whole. Avoid seeds that look shriveled or have dark spots. If you’re buying pre-harvested seeds from the store, they work in a pinch, but nothing beats the flavor of seeds you scoop out yourself. There’s something satisfying about the whole process, you know?
For substitutions, you can use coconut oil for a slight tropical note, or ghee if you’re avoiding dairy. The key is to use a fat that can handle the oven temperature without burning. Olive oil can work, but I find its flavor a little too strong for these delicate seeds. Stick with something neutral or buttery.
Equipment Needed
You don’t need a lot of fancy tools for this recipe, which is part of its charm. Here’s what you’ll need:
- Colander: For rinsing the seeds and separating them from the pumpkin guts. A large mesh strainer works even better.
- Paper Towels or a Clean Kitchen Towel: For drying the seeds thoroughly. This step is non-negotiable—wet seeds steam instead of roast.
- Baking Sheet: A rimmed baking sheet is best to prevent seeds from rolling off. I use a half-sheet pan, which is the standard size.
- Parchment Paper or Silicone Baking Mat: This makes cleanup a breeze and prevents sticking. I’ve ruined a few baking sheets by skipping this step.
- Mixing Bowl: Any medium bowl will do for tossing the seeds with oil and salt.
- Spatula or Wooden Spoon: For stirring the seeds halfway through roasting.
If you don’t have parchment paper, you can lightly grease the baking sheet with a bit of oil. Just be careful—the seeds can stick if you’re not generous enough. I once used a non-stick pan without any lining, and let’s just say I spent a good ten minutes scraping seeds off the surface. Learn from my mistakes!
A kitchen scale is nice to have if you want to be precise about the seed quantity, but measuring cups work just fine. Honestly, I eyeball it most of the time. The recipe is forgiving.
Preparation Method
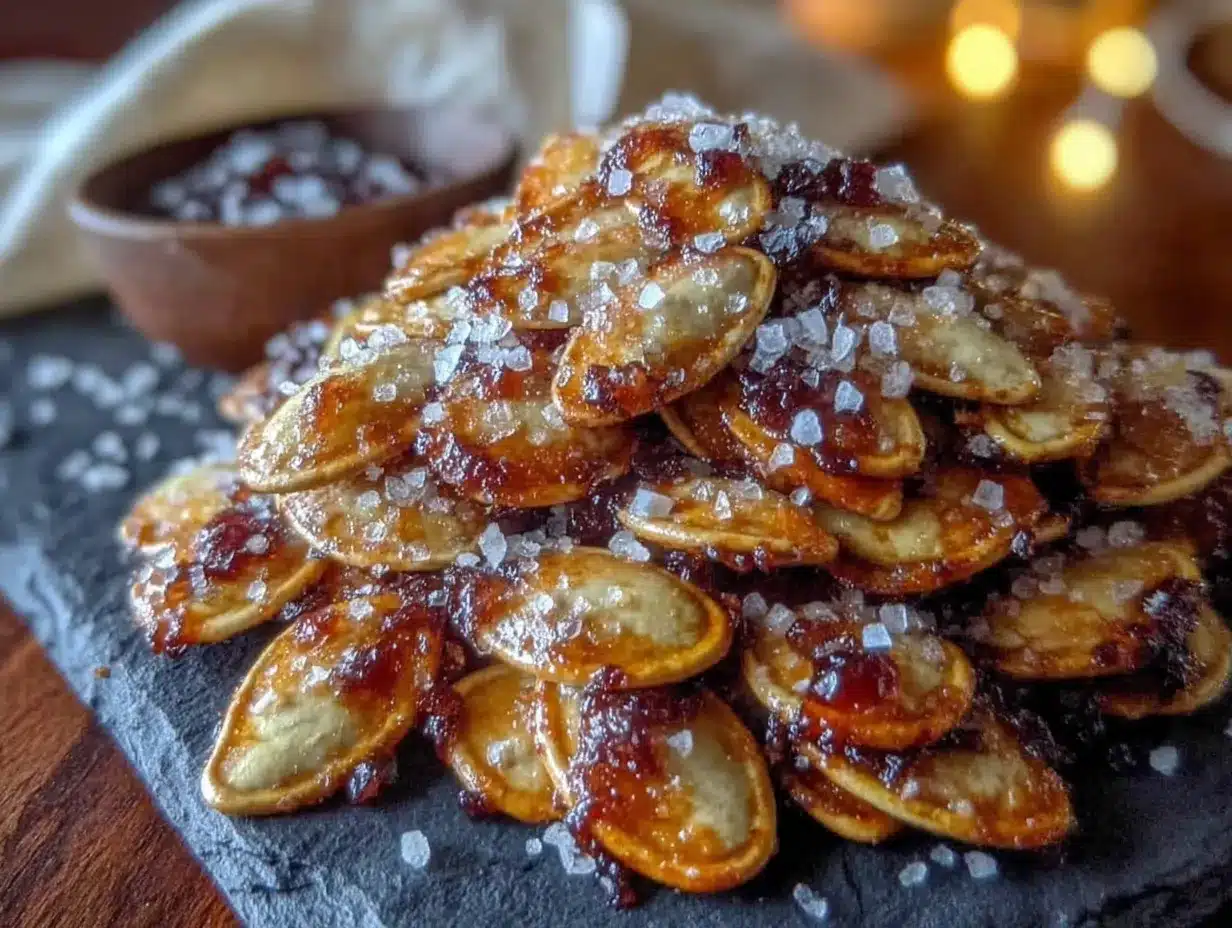
This is where the magic happens. Follow these steps, and you’ll have the crunchiest, most flavorful pumpkin seeds you’ve ever tasted.
- Preheat and Prep: Preheat your oven to 300°F (150°C). Line a rimmed baking sheet with parchment paper or a silicone mat. This low temperature is the secret to even drying without burning.
- Separate the Seeds: After carving your pumpkin, scoop out the seeds and pulp into a large bowl. Fill the bowl with cool water and use your hands to gently separate the seeds from the stringy pulp. The seeds will float to the top, and the pulp will sink. It’s a little messy, but honestly, that’s half the fun.
- Rinse and Drain: Pour the seeds into a colander and rinse them thoroughly under cold water. Pick out any remaining bits of pumpkin flesh. You want the seeds to be clean, but a little bit of fiber clinging to them is fine—it adds flavor.
- Dry, Dry, Dry: This is the most important step. Spread the rinsed seeds in a single layer on a clean kitchen towel or several layers of paper towels. Pat them completely dry. Let them sit for 10-15 minutes to air dry further. If they’re at all damp, they’ll steam in the oven instead of roasting. I learned this the hard way after my first soggy batch.
- Season the Seeds: In a medium mixing bowl, combine the dried pumpkin seeds, melted butter (or oil), and 1 ½ teaspoons of fine sea salt. Toss well to coat every seed evenly. Take your time with this—you want the seasoning to stick to every nook and cranny.
- Spread on Baking Sheet: Pour the seasoned seeds onto the prepared baking sheet. Spread them into a single, even layer. Make sure no seeds are piled on top of each other, or they won’t cook evenly. It’s okay if they’re touching, just not stacked.
- Roast Low and Slow: Place the baking sheet in the preheated oven. Roast for 25 minutes, then remove the sheet and stir the seeds with a spatula. This ensures even browning. Return to the oven and roast for another 15-25 minutes, depending on your desired level of crunch. Total time is usually 40-50 minutes.
- Check for Doneness: The seeds are done when they are golden brown and sound hollow when you tap them. They will continue to crisp up as they cool, so don’t wait until they look completely done in the oven. Take them out when they’re just a shade lighter than you want.
- Final Seasoning: As soon as the seeds come out of the oven, sprinkle them with a pinch of flaky sea salt while they’re still hot. This is the finishing touch that takes them from good to unforgettable. Let them cool completely on the baking sheet—about 20 minutes.
- Break Apart and Enjoy: Once cooled, the seeds may have stuck together in clusters. Gently break them apart with your fingers. They should separate easily. Now, dig in!
A quick note: Every oven runs a little differently. Your first batch might need a few extra minutes or a little less time. That’s normal. The key is to watch for that golden color and listen for that hollow sound. Your nose will also tell you—when the kitchen smells like toasty, buttery seeds, you’re almost there.
Cooking Tips & Techniques
Over the years, I’ve made every mistake in the book with pumpkin seeds. Here’s what I’ve learned so you don’t have to repeat my failures.
Don’t Skip the Drying Step: I cannot stress this enough. Wet seeds are the enemy of crunch. I once rushed through the drying process because I was impatient, and the result was a chewy, disappointing batch that nobody wanted to eat. Give those seeds at least 15 minutes to air dry after patting them with a towel. If you have time, let them sit out for an hour. The drier they are going in, the crunchier they come out.
Low Heat is Your Friend: I know it’s tempting to crank the oven to 400°F and speed things up. Don’t do it. High heat will burn the outside of the seeds while leaving the inside soft. The low 300°F temperature allows the moisture to evaporate slowly and evenly, resulting in a seed that’s crispy all the way through. Patience pays off here.
Stir Halfway Through: This is a small step that makes a big difference. The seeds on the edges of the pan cook faster than the ones in the middle. Giving them a stir at the 25-minute mark ensures even browning. I use a thin metal spatula for this, but a wooden spoon works just fine.
Let Them Cool Completely: The hardest part of this recipe is waiting for the seeds to cool before eating them. But trust me, it’s worth it. The seeds continue to crisp up as they cool. If you eat them warm, they’ll still have a slight chewiness to them. Give them the full 20 minutes, and you’ll be rewarded with the perfect crunch.
Batch Size Matters: Don’t overcrowd the baking sheet. If you have a large pumpkin, make two batches instead of one. Crowded seeds will steam each other, leading to uneven cooking. I learned this when I tried to cram two pumpkins’ worth of seeds onto one sheet. It was not pretty.
One more thing—if you’re making a sweet version, keep an eye on the sugar. Sugar can burn faster than salt, so you might need to lower the temperature by 25 degrees and extend the cooking time slightly. I usually check sweet seeds at the 30-minute mark to be safe.
Variations & Adaptations
Once you’ve mastered the basic recipe, the possibilities are endless. Here are some of my favorite variations.
Spicy Chili Lime Seeds: Toss the dried seeds with the butter, then add 1 teaspoon chili powder, ½ teaspoon cumin, and the zest of one lime. Finish with a squeeze of lime juice right after they come out of the oven. These are incredible for game day snacking. I made a batch for a football party last year, and they were gone before the chips.
Sweet Cinnamon Sugar Seeds: For the sweet version, swap the sea salt for 2 tablespoons of brown sugar and 1 teaspoon of cinnamon. Omit the finishing salt. These taste like a warm fall dessert. I like to add a pinch of nutmeg too, but that’s optional. They’re perfect for sprinkling over oatmeal or yogurt.
Everything Bagel Seasoning Seeds: This is my current obsession. After tossing the seeds with butter, add 2 tablespoons of everything bagel seasoning (the kind with sesame seeds, poppy seeds, garlic, and onion). The result is savory, crunchy, and completely addictive. I’ve been making double batches of these all season.
Garlic and Herb Seeds: Add 1 teaspoon garlic powder, 1 teaspoon dried rosemary, and ½ teaspoon dried thyme to the seasoning mix. These are wonderful on top of soups or salads. They add a lovely savory crunch that elevates any dish.
For dietary adaptations, this recipe is naturally gluten-free and can be made dairy-free by using avocado oil or coconut oil instead of butter. If you’re watching your sodium, reduce the salt to 1 teaspoon total and skip the finishing salt. The seeds will still be delicious, just a little milder.
You can also experiment with different types of salt. Smoked salt adds a lovely depth, while pink Himalayan salt gives a subtle mineral flavor. I once used truffle salt as a finishing touch, and it was absolutely decadent—though maybe not an everyday option.
Serving & Storage Suggestions
These seeds are best served at room temperature, straight from the cooling sheet if you can resist. But they’re also wonderful in so many other ways.
How to Serve: Pile them into a bowl for snacking, or use them as a crunchy topping for butternut squash soup, roasted vegetables, or fall salads. They’re fantastic on a charcuterie board alongside sharp cheddar and apple slices. I also love sprinkling them over a bowl of vanilla ice cream for a sweet-salty treat that’s absolutely divine.
Storage Instructions: Store completely cooled seeds in an airtight container at room temperature. They will stay fresh and crunchy for up to two weeks—if they last that long. Mine never do. Do not refrigerate them, as the moisture in the fridge can make them soft.
Freezer Instructions: For longer storage, you can freeze the seeds in a freezer-safe bag or container. They’ll keep for up to three months. To refresh them, spread them on a baking sheet and warm them in a 300°F oven for 5-7 minutes. They’ll crisp right back up.
Reheating Tips: If your seeds lose their crunch over time, don’t throw them out! Spread them on a baking sheet and pop them in a 300°F oven for 5 minutes. Let them cool completely, and they’ll be as good as new. I’ve done this many times, and it works like a charm.
One thing I’ve noticed—the flavors actually deepen after a day or two. The salt and any spices meld together, and the seeds become even more flavorful. So if you can manage to save some for the next day, you’re in for a treat.
Nutritional Information & Benefits
Pumpkin seeds are a nutritional powerhouse, and this recipe keeps them in their healthiest form. Here’s what you’re getting in a ¼-cup serving (about 30 grams):
- Calories: Approximately 180
- Protein: 9 grams
- Healthy Fats: 15 grams (mostly unsaturated)
- Fiber: 2 grams
- Magnesium: 37% of the Daily Value
- Zinc: 23% of the Daily Value
- Iron: 14% of the Daily Value
These little seeds are packed with magnesium, which supports muscle function and sleep quality. The zinc content is great for immune health—perfect for the cold and flu season. And the healthy fats help keep you full and satisfied between meals.
This recipe is naturally gluten-free, dairy-free if you use oil instead of butter, and suitable for most dietary patterns. The only potential allergen is the butter, which contains dairy. For a vegan version, simply substitute with avocado oil or coconut oil.
I personally love knowing that my snack is doing something good for my body while also satisfying that salty crunch craving. It’s a win-win in my book.
Conclusion
There’s something deeply satisfying about turning a Halloween pumpkin’s leftovers into a snack this good. These oven-roasted sea salt pumpkin seeds are everything I loved about that farm stand version—crunchy, salty, and full of fall flavor. They’re proof that the simplest recipes are often the best ones.
I encourage you to make this recipe your own. Play with the seasonings, try different salts, experiment with sweet and savory versions. That’s the beauty of a basic recipe like this—it’s a canvas for your creativity. And honestly, there are no wrong answers here. Even a failed batch is still pretty tasty.
This recipe has become my fall tradition, and I hope it becomes yours too. There’s nothing quite like the smell of roasting pumpkin seeds filling your kitchen on a crisp October afternoon. It’s comfort, pure and simple.
I’d love to hear how yours turn out! Drop a comment below and let me know what variations you tried. Did you go sweet or savory? Did you add any unexpected spices? Share your creations, and don’t forget to tag me if you post a photo. Happy roasting, friends!
Frequently Asked Questions
Can I use store-bought pumpkin seeds instead of fresh ones?
Absolutely! If you don’t have a pumpkin to carve, you can use raw, unsalted pumpkin seeds from the store. Just skip the cleaning and drying steps, and proceed with seasoning and roasting. The cooking time may be slightly shorter since store-bought seeds are often already partially dried.
Why are my pumpkin seeds chewy instead of crunchy?
This usually happens for one of two reasons: either the seeds weren’t dried thoroughly before roasting, or they weren’t cooked long enough. Make sure to pat them completely dry and give them the full roasting time. Remember, they’ll crisp up more as they cool, so don’t pull them out too early.
How do I get the salt to stick to the seeds?
The key is to toss the seeds with oil or melted butter before adding the salt. The fat acts as a glue, helping the salt adhere to the seeds. Adding a final sprinkle of flaky salt while the seeds are still warm also helps it stick beautifully.
Can I roast pumpkin seeds at a higher temperature to save time?
I wouldn’t recommend it. High heat tends to burn the outside of the seeds before the inside is dry and crunchy. The low 300°F temperature is what gives you that perfect, even crunch throughout. It’s worth the extra 15 minutes, I promise.
How long do homemade roasted pumpkin seeds last?
Stored in an airtight container at room temperature, they’ll stay fresh and crunchy for up to two weeks. If they start to lose their crunch, simply reheat them in a 300°F oven for 5 minutes and let them cool completely. They’ll be good as new!
PrintPerfect Fall Oven-Roasted Sea Salt Pumpkin Seeds: Easy, Crunchy Snack
This recipe delivers perfectly crunchy, golden pumpkin seeds with a simple sea salt seasoning, inspired by a beloved farm stand. It’s an easy, foolproof method for a healthy, addictive fall snack.
- Prep Time: 20 minutes
- Cook Time: 40-50 minutes
- Total Time: 1 hour 10 minutes
- Yield: 4 servings 1x
- Category: Snack
- Cuisine: American
Ingredients
- 1 ½ cups fresh pumpkin seeds
- 2 tablespoons unsalted butter or avocado oil, melted
- 1 ½ teaspoons fine sea salt, plus more for finishing
- Optional: smoked paprika, garlic powder, cinnamon, brown sugar
Instructions
- Preheat oven to 300°F (150°C). Line a rimmed baking sheet with parchment paper or a silicone mat.
- Separate seeds from pumpkin pulp by soaking in water, then rinsing in a colander.
- Dry seeds thoroughly with paper towels or a clean kitchen towel; let air dry for 10-15 minutes.
- In a bowl, toss dried seeds with melted butter or oil and 1 ½ teaspoons fine sea salt until evenly coated.
- Spread seeds in a single layer on the prepared baking sheet.
- Roast for 25 minutes, then stir seeds. Continue roasting for 15-25 minutes until golden brown and hollow-sounding when tapped.
- Remove from oven and immediately sprinkle with flaky sea salt. Let cool completely on the baking sheet (about 20 minutes).
- Break apart any clusters and serve.
Notes
The key to crunch is thoroughly drying the seeds before roasting. Low heat (300°F) ensures even cooking. Seeds continue to crisp as they cool. For sweet versions, reduce oven temperature by 25°F and watch closely to prevent burning.
Nutrition
- Serving Size: 1/4 cup (about 30 gr
- Calories: 180
- Sugar: 1
- Sodium: 350
- Fat: 15
- Saturated Fat: 3
- Carbohydrates: 5
- Fiber: 2
- Protein: 9
Keywords: pumpkin seeds, roasted pumpkin seeds, sea salt pumpkin seeds, fall snack, crunchy snack, healthy snack


