My husband had refused to eat chocolate chip cookies for almost a decade. Let me tell you, it was a point of pride with him. He’d wave a hand at bakery displays, scoff at the cookies I’d bring home from work events, and declare that they were “never worth the calories.” I honestly thought he was just being dramatic. Then I found him one rainy Tuesday evening, standing at the kitchen counter, eating one of my experimental test batches with this look of pure confusion on his face. He didn’t even notice I’d walked in until I cleared my throat. “These are… different,” he mumbled, reaching for another one.
That’s the thing about small-batch chocolate chip cookies. They have this quiet power. They aren’t trying to feed a crowd or impress a bake sale committee. They’re just for you. Or for you and one other person. Maybe two if you’re feeling generous. I developed this recipe on a cold January afternoon when I wanted something warm but didn’t want to deal with the commitment of a full batch. You know that feeling when you just need one good cookie, not thirty? That was the moment this recipe was born.
I mean, honestly, I was tired of recipes that assumed I had a stand mixer full of butter and a whole afternoon to kill. Sometimes you just want a cookie in under an hour with minimal dishes. This one delivers. It’s got that perfect balance—crispy edges, soft center, melty chocolate in every bite. My husband still claims he doesn’t like cookies, but I’ve caught him sneaking these from the tin more times than I can count. That’s the kind of win that makes a food blogger’s day.
Why You’ll Love This Recipe
Let me tell you why this recipe has become my go-to for those cozy nights when only a cookie will do. I’ve tested this more times than I care to admit, and it never disappoints.
- Quick & Easy: From start to finish, you’re looking at about 25 minutes. No chilling required. I mean it. You can have warm cookies in your hands before you finish watching one episode of your favorite show.
- Simple Ingredients: You probably have everything in your kitchen right now. Butter, sugar, an egg, flour, chocolate chips. That’s it. No weird specialty ingredients or trips to three different stores.
- Perfect for Cozy Evenings: This is the cookie you make when it’s raining outside, or you’re having a rough day, or you just want something warm and comforting without the fuss of a big baking project.
- Crowd-Pleaser: Even self-proclaimed cookie skeptics (like my husband) love these. They have that nostalgic bakery taste that makes people close their eyes after the first bite.
- Unbelievably Delicious: The ratio of crispy edges to chewy center is spot on. The chocolate gets all melty and pools in the best way. It’s comfort in cookie form.
What makes this different from every other chocolate chip cookie recipe out there? It’s the technique. I use melted butter instead of creaming it with sugar, which gives you that chewy texture without the extra work. And I let the dough rest for just five minutes before baking—long enough for the flavors to meld, but not so long that you lose patience. It’s the best of both worlds.
This isn’t just another cookie recipe. It’s the one you’ll come back to on those nights when you need something warm and familiar. It’s the one that makes your kitchen smell like home. And honestly? It’s the one that changed my husband’s mind about cookies completely. If that’s not a win, I don’t know what is.
What Ingredients You Will Need
This recipe uses simple, pantry-friendly ingredients to create cookies that taste anything but basic. Here’s what you’ll need and why each ingredient matters.
For the Cookie Dough
- Unsalted butter, melted (4 tablespoons / 57g): Melting the butter is the secret to that chewy, dense texture. It also means you don’t need to wait for butter to soften. I use Land O’Lakes, but any good-quality unsalted butter works. If you only have salted butter, reduce the added salt to ¼ teaspoon.
- Granulated sugar (3 tablespoons / 38g): This adds sweetness and helps create those crispy edges. Don’t skip it—it’s essential for the texture.
- Light brown sugar, packed (3 tablespoons / 43g): This is where the magic happens. Brown sugar adds moisture and that deep, caramel-like flavor. I always pack it firmly into the measuring spoon. You can use dark brown sugar for an even richer flavor.
- One large egg yolk (about 1 tablespoon / 15g): Just the yolk. No whites. This gives you richness and tenderness without making the dough too wet. Save the egg white for breakfast or add it to a scramble.
- Vanilla extract (½ teaspoon): Use pure vanilla extract if you can. It makes a difference. I like Nielsen-Massey, but any brand you have is fine.
- All-purpose flour (⅓ cup plus 1 tablespoon / 55g): Spoon and level your flour—don’t scoop directly from the bag. Too much flour makes dry cookies. If you’re gluten-sensitive, you can use a 1:1 gluten-free baking flour blend.
- Baking soda (¼ teaspoon): This helps the cookies spread just enough and gives them that slight lift. Make sure your baking soda is fresh—test it by dropping a bit into vinegar; it should fizz.
- Salt (¼ teaspoon): Salt balances the sweetness and enhances the chocolate flavor. I use fine sea salt. If you’re using kosher salt, increase to ⅓ teaspoon.
- Semi-sweet chocolate chips (⅓ cup / 60g): I prefer Ghirardelli semi-sweet chips for their balanced flavor and good melt. But use whatever you love—milk chocolate, dark chocolate, or even chopped chocolate bars for those fancy puddles of chocolate.
Optional add-ins: A pinch of flaky sea salt on top before baking takes these to another level. Or add ¼ cup of chopped nuts (walnuts or pecans work great). You could even throw in some white chocolate chips or butterscotch chips for a twist.
Ingredient tips: If your kitchen is warm, pop the dough in the fridge for 10 minutes before baking. This prevents excessive spreading. And if you’re out of brown sugar, you can mix 3 tablespoons of granulated sugar with 1 teaspoon of molasses as a quick substitute. It won’t be exact, but it works in a pinch.
Equipment Needed
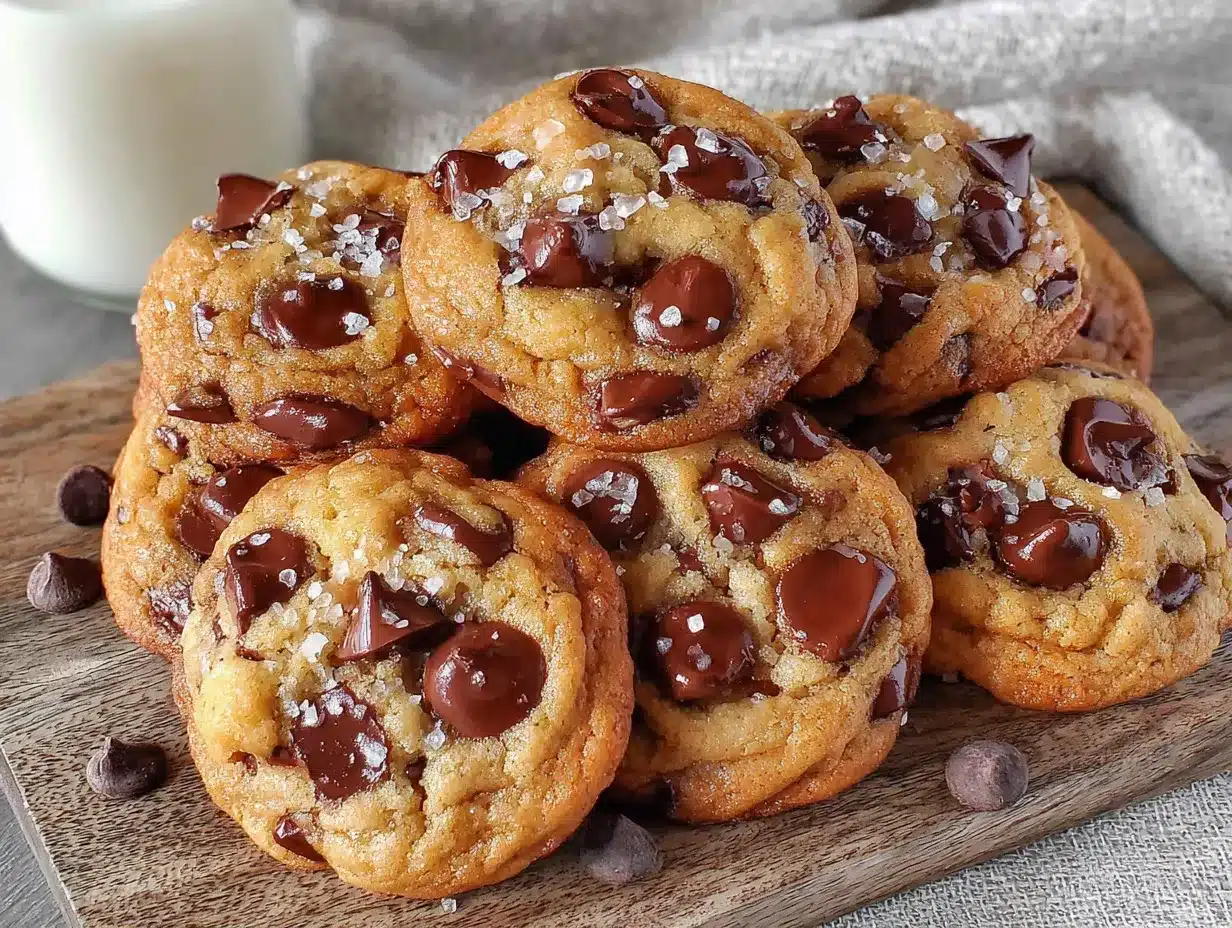
You don’t need a fancy kitchen to make these cookies. Here’s what you’ll need:
- Mixing bowl (medium-sized): Any bowl works. I use a glass Pyrex bowl because it’s easy to see when everything is combined.
- Whisk or fork: For mixing the wet ingredients. A fork works just fine if you don’t have a whisk.
- Rubber spatula or wooden spoon: For folding in the flour and chocolate chips. A spatula is gentler and helps avoid overmixing.
- Baking sheet: A standard half-sheet pan works perfectly. No need for anything fancy.
- Parchment paper or silicone baking mat: Parchment paper is my go-to. It prevents sticking and makes cleanup a breeze. Silicone mats work too, but cookies might spread slightly more.
- Cookie scoop or tablespoon: A 1.5-tablespoon cookie scoop gives you perfectly even cookies. If you don’t have one, use a regular tablespoon and shape the dough balls with your hands.
- Cooling rack: Optional but helpful. If you don’t have one, let the cookies cool on the baking sheet for a few minutes, then transfer to a plate.
- Measuring cups and spoons: You’ll need standard measuring cups and spoons. A kitchen scale is nice for accuracy, but not required.
Budget-friendly tip: Don’t have a cookie scoop? Use two spoons to portion the dough, or just roll it into balls with your hands. And if you don’t have parchment paper, lightly grease your baking sheet with butter or non-stick spray. Your cookies might spread a tiny bit more, but they’ll still be delicious.
Preparation Method
Ready to make the best small-batch chocolate chip cookies of your life? Let’s go.
- Preheat your oven to 350°F (175°C). Line a baking sheet with parchment paper. Do this first so your oven is ready when you are.
- Melt the butter. In a medium microwave-safe bowl, melt 4 tablespoons of butter in 20-second bursts. You want it just melted—not hot. Let it cool for a minute. It should be warm to the touch but not steaming.
- Mix the sugars and butter. Add 3 tablespoons granulated sugar and 3 tablespoons packed light brown sugar to the melted butter. Whisk until combined. It’ll look a bit grainy, and that’s perfect. Whisk for about 30 seconds until it comes together.
- Add the egg yolk and vanilla. Drop in the egg yolk and ½ teaspoon vanilla extract. Whisk vigorously until the mixture is smooth and slightly thickened, about 1 minute. This is where the texture starts to develop. You’ll see it get a little shiny.
- Combine the dry ingredients. In a small bowl, whisk together ⅓ cup plus 1 tablespoon all-purpose flour, ¼ teaspoon baking soda, and ¼ teaspoon salt. Make sure there are no lumps.
- Fold in the flour mixture. Add the dry ingredients to the wet ingredients. Use a rubber spatula to fold gently. Stop as soon as you don’t see any more white streaks. Overmixing makes tough cookies, so be gentle.
- Add the chocolate chips. Fold in ⅓ cup semi-sweet chocolate chips. Reserve a few chips to press on top of the dough balls before baking—this makes them look bakery-perfect.
- Portion the dough. Use a 1.5-tablespoon cookie scoop or a regular tablespoon to scoop 6 equal portions of dough. Roll each into a ball with your hands. Place them on the prepared baking sheet, spacing them about 2 inches apart. They’ll spread, so give them room.
- Press extra chips on top. Take those reserved chocolate chips and gently press a few into the top of each dough ball. This is optional, but it makes the cookies look gorgeous.
- Bake for 10-12 minutes. Bake until the edges are golden brown and the centers look slightly underdone. They’ll continue cooking on the hot baking sheet after you pull them out. For softer cookies, bake for 10 minutes. For crispier edges, go for 12 minutes.
- Cool on the baking sheet. Let the cookies rest on the baking sheet for 5 minutes. This is crucial. They’re fragile when hot, and this rest time lets them set up properly.
- Transfer to a cooling rack. After 5 minutes, use a spatula to move the cookies to a cooling rack. Or just eat them warm. I won’t judge.
Sensory cues: Your kitchen should smell like butter and vanilla by step 4. When you fold in the flour, the dough should be soft but not sticky. When you shape the balls, they should hold together without being wet. And when the cookies come out of the oven, the edges should be a deep golden brown while the centers look puffy and soft.
Cooking Tips & Techniques
I’ve made this recipe more times than I can count, and I’ve learned a few things along the way. Here are my best tips for perfect cookies every time.
Don’t overmix the dough. This is the number one mistake I see. Once you add the flour, mix just until it disappears. Overmixing develops gluten, which makes cookies tough and cakey. You want them tender and chewy.
Use a cookie scoop for even cookies. I learned this the hard way after years of unevenly sized cookies. A scoop ensures every cookie bakes at the same rate. If you don’t have one, use a tablespoon and shape the balls as evenly as possible.
Chill the dough if your kitchen is warm. On hot days, the butter can get too soft, and your cookies will spread into flat puddles. If your kitchen is above 75°F, pop the dough balls in the fridge for 10-15 minutes before baking. It makes a huge difference.
Underbake slightly for soft cookies. I pull my cookies out when the centers still look slightly underdone. They set up as they cool, and you get that perfect soft center. If you wait until the centers look fully baked, they’ll be crispy all the way through.
Let them rest on the baking sheet. I know it’s tempting to move them immediately, but don’t. Those 5 minutes on the hot sheet are when the cookies finish baking and set their structure. Move them too soon, and they’ll fall apart.
Use room temperature ingredients. Your egg yolk should be at room temperature for the best emulsion. If you forgot to take it out of the fridge, place it in a bowl of warm water for 5 minutes. It makes a difference in how the dough comes together.
One time I forgot the baking soda. I was rushing and threw the dough in the oven without it. The cookies came out flat and dense. Not my finest moment. Now I always double-check my dry ingredients before mixing.
Variations & Adaptations
This recipe is incredibly versatile. Here are some ways to make it your own.
Double Chocolate Chip: Replace 1 tablespoon of the flour with 1 tablespoon of unsweetened cocoa powder. Use dark chocolate chips instead of semi-sweet. You get a rich, fudgy cookie that tastes like a brownie.
Gluten-Free: Use a 1:1 gluten-free baking flour blend. I’ve tested this with Bob’s Red Mill and King Arthur Flour blends, and both work perfectly. No other adjustments needed.
Vegan: Use vegan butter (I like Miyoko’s) and a flax egg (1 tablespoon ground flaxseed mixed with 3 tablespoons water, let sit for 5 minutes). The texture is slightly different—a bit more cakey—but still delicious.
Nutty Delight: Add ¼ cup of toasted chopped walnuts or pecans along with the chocolate chips. Toast the nuts in a dry pan for 2-3 minutes until fragrant, then let them cool before adding. The crunch is amazing.
Sea Salt Finish: Sprinkle a tiny pinch of flaky sea salt on each cookie right after they come out of the oven. The salt cuts through the sweetness and makes the chocolate pop. I use Maldon salt, but any flaky sea salt works.
Brown Butter Version: Brown the butter before using it. Melt the butter in a small saucepan over medium heat, swirling occasionally, until it turns golden brown and smells nutty, about 3-4 minutes. Let it cool completely before using. This adds a deep, toasty flavor that’s incredible.
My personal favorite variation: I sometimes add a tablespoon of peanut butter to the dough along with the wet ingredients. It gives the cookies a subtle nutty flavor and makes them extra chewy. Just reduce the butter to 3 tablespoons to account for the extra fat.
Serving & Storage Suggestions
These cookies are best served warm, straight from the oven. That moment when the chocolate is still melty and the edges are perfectly crisp? That’s cookie heaven.
Serving ideas: Serve with a cold glass of milk, a scoop of vanilla ice cream, or a hot cup of coffee. They’re also amazing crumbled over yogurt or ice cream for an impromptu dessert. For a cozy presentation, stack a few on a small plate and dust with powdered sugar.
Storage: Store leftover cookies in an airtight container at room temperature for up to 3 days. Place a slice of bread in the container to keep them soft—the cookies will absorb moisture from the bread. Just replace the bread slice every day or two.
Freezing: These cookies freeze beautifully. You can freeze the baked cookies for up to 3 months. Wrap them individually in plastic wrap, then place in a freezer bag. Thaw at room temperature for about 15 minutes, then warm in a 300°F oven for 5 minutes.
Freezing dough: Even better, freeze the dough balls. Portion the dough, place the balls on a baking sheet, and freeze until solid (about 1 hour). Transfer to a freezer bag. Bake from frozen, adding 2-3 minutes to the baking time. Fresh cookies anytime you want them.
Reheating: To revive day-old cookies, pop them in a 300°F oven for 3-4 minutes. Or microwave for 10-15 seconds for that just-baked softness. The microwave method is faster, but the oven gives you back some of that crispy edge texture.
Flavor development: Honestly, these cookies taste even better the next day. The flavors meld overnight, and the texture becomes perfectly balanced. If you can resist eating them all immediately, you’re in for a treat.
Nutritional Information & Benefits
Here’s the approximate nutritional breakdown for one cookie (based on 6 cookies per batch):
| Nutrient | Amount per Cookie |
|---|---|
| Calories | 210 |
| Total Fat | 12g |
| Saturated Fat | 7g |
| Cholesterol | 45mg |
| Sodium | 180mg |
| Total Carbohydrates | 25g |
| Dietary Fiber | 1g |
| Sugars | 16g |
| Protein | 3g |
Dietary considerations: This recipe contains wheat, dairy, and eggs. For gluten-free and vegan options, see the variations section. The cookies are nut-free if you skip the optional nuts, but check your chocolate chip labels for potential cross-contamination.
Health benefits: While these are definitely a treat, they do have some redeeming qualities. Dark chocolate contains antioxidants and can help improve mood (I mean, it certainly improves mine). The butter provides vitamin A, and the egg yolk is rich in choline, which supports brain health. Plus, making cookies from scratch means you control exactly what goes into them—no preservatives or artificial ingredients.
My perspective: I believe in balance. These cookies are meant to be enjoyed as part of a varied diet. They’re not an everyday food, but they’re perfect for those moments when you need a little comfort. And honestly, the joy they bring is good for your mental health too.
Conclusion
These small-batch chocolate chip cookies have become a staple in my kitchen for a reason. They’re quick, they’re easy, and they deliver that perfect combination of crispy edges and soft centers every single time. Whether you’re baking for yourself on a quiet evening or surprising someone special with warm cookies, this recipe never disappoints.
I love how this recipe proves that you don’t need a big batch or complicated techniques to make something truly wonderful. It’s just you, a few simple ingredients, and about 25 minutes. That’s all it takes to fill your kitchen with the smell of butter and chocolate and to create something that feels like a hug in food form.
I’d love to hear how these turn out for you. Did you try any variations? Did you catch anyone sneaking cookies from the tin? Drop a comment below and let me know. And if you share your cookies on social media, tag me—I love seeing your baking adventures. Happy baking, friend. You deserve these cookies.
Frequently Asked Questions
Can I double this recipe?
Absolutely. Just double all the ingredients and bake in batches. The recipe scales perfectly.
Why did my cookies spread too much?
Your butter might have been too warm, or your baking sheet was hot from a previous batch. Chill the dough for 10 minutes before baking, and always use a cool baking sheet.
Can I use margarine instead of butter?
You can, but the texture will be different. Butter gives the best flavor and texture. If you use margarine, expect cookies that spread more and have a slightly different taste.
How do I know when the cookies are done?
The edges should be golden brown, and the centers should look slightly underdone and puffy. They’ll continue baking on the hot sheet for a few minutes after you remove them from the oven.
Can I make these cookies without an electric mixer?
Yes! This recipe is designed to be made by hand. Just use a whisk for the wet ingredients and a spatula for folding in the dry ingredients. No mixer needed.
Pin This Recipe!

Perfect Small-Batch Chocolate Chip Cookies

These small-batch chocolate chip cookies have crispy edges, soft centers, and melty chocolate in every bite. Made with simple ingredients and no chilling required, you can have warm cookies in about 25 minutes.
- Prep Time: 10 minutes
- Cook Time: 12 minutes
- Total Time: 22 minutes
- Yield: 6 cookies 1x
- Category: Dessert
- Cuisine: American
Ingredients
- 4 tablespoons (57g) unsalted butter, melted
- 3 tablespoons (38g) granulated sugar
- 3 tablespoons (43g) light brown sugar, packed
- 1 large egg yolk (about 1 tablespoon / 15g)
- ½ teaspoon vanilla extract
- ⅓ cup plus 1 tablespoon (55g) all-purpose flour
- ¼ teaspoon baking soda
- ¼ teaspoon salt
- ⅓ cup (60g) semi-sweet chocolate chips
Instructions
- Preheat your oven to 350°F (175°C). Line a baking sheet with parchment paper.
- In a medium microwave-safe bowl, melt 4 tablespoons of butter in 20-second bursts. Let it cool for a minute until warm but not steaming.
- Add 3 tablespoons granulated sugar and 3 tablespoons packed light brown sugar to the melted butter. Whisk until combined, about 30 seconds.
- Drop in the egg yolk and ½ teaspoon vanilla extract. Whisk vigorously until the mixture is smooth and slightly thickened, about 1 minute.
- In a small bowl, whisk together ⅓ cup plus 1 tablespoon all-purpose flour, ¼ teaspoon baking soda, and ¼ teaspoon salt.
- Add the dry ingredients to the wet ingredients. Use a rubber spatula to fold gently until no white streaks remain.
- Fold in ⅓ cup semi-sweet chocolate chips. Reserve a few chips to press on top of the dough balls before baking.
- Use a 1.5-tablespoon cookie scoop or a regular tablespoon to scoop 6 equal portions of dough. Roll each into a ball and place on the prepared baking sheet, spacing them about 2 inches apart.
- Press a few reserved chocolate chips into the top of each dough ball.
- Bake for 10-12 minutes until the edges are golden brown and the centers look slightly underdone.
- Let the cookies rest on the baking sheet for 5 minutes.
- Transfer to a cooling rack or serve warm.
Notes
For softer cookies, bake for 10 minutes. For crispier edges, bake for 12 minutes. If your kitchen is warm, chill the dough balls for 10 minutes before baking to prevent excessive spreading. Let cookies rest on the baking sheet for 5 minutes after baking to set properly.
Nutrition
- Serving Size: 1 cookie
- Calories: 210
- Sugar: 16
- Sodium: 180
- Fat: 12
- Saturated Fat: 7
- Carbohydrates: 25
- Fiber: 1
- Protein: 3
Keywords: small-batch cookies, chocolate chip cookies, easy cookie recipe, no chill cookies, quick cookies


