My neighbor Jen wasn’t trying to impress anyone. I’d stopped by to borrow a cookie sheet—mine had mysteriously vanished during a baking marathon—and the smell of chocolate and vanilla hit me before I even got her storm door closed. She was standing at her kitchen island, hands covered in black sanding sugar, looking like she’d just finished a craft project rather than prepping for a Halloween party.
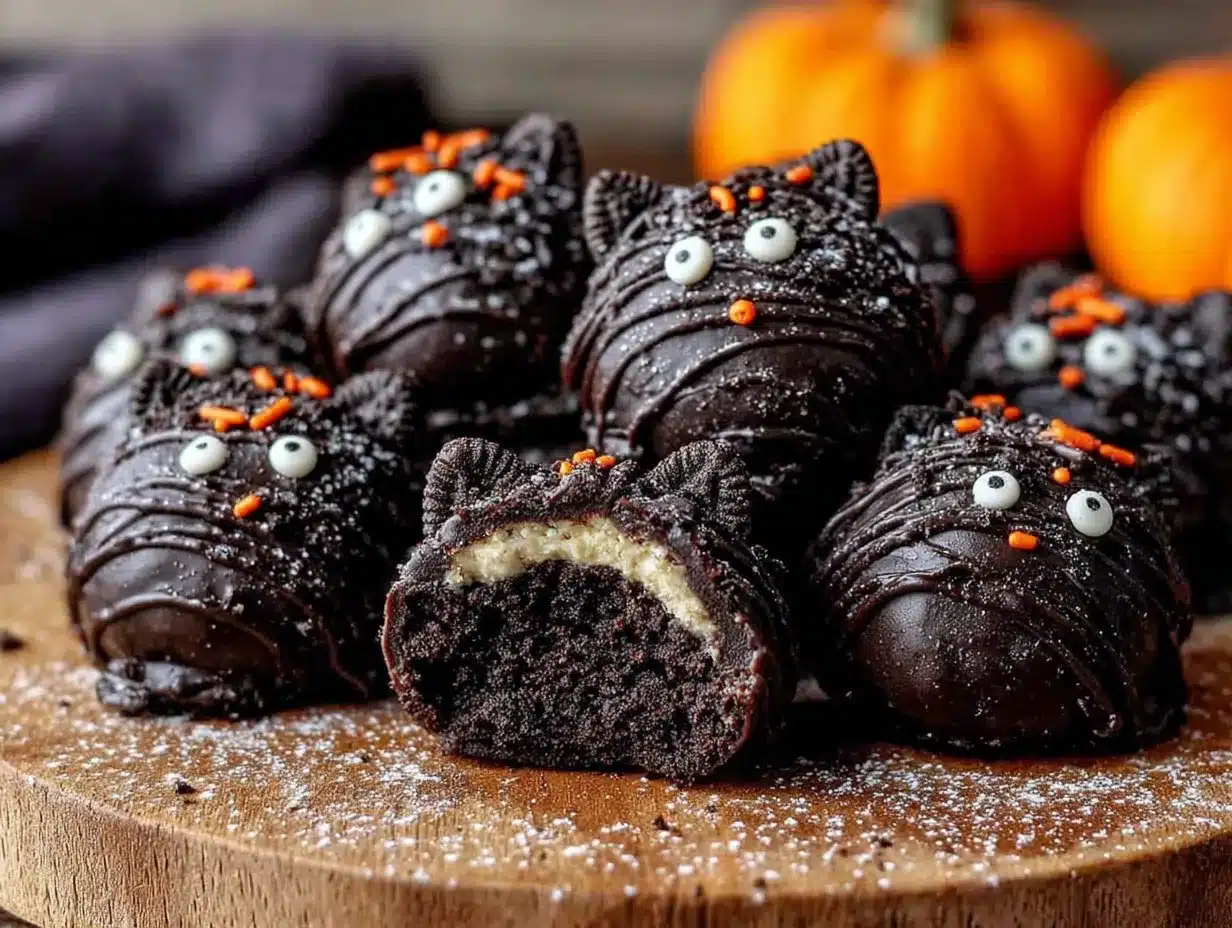
“Oh, these?” she said when I asked about the little black cat heads lined up on parchment paper. “They’re just Oreo truffles. My niece calls them the black cat ones.” She shrugged like it was nothing. But let me tell you, I stood there for a solid five minutes watching her dip and decorate, completely mesmerized. The way she flicked those candy eyes on without even looking—like it was muscle memory—made me realize this wasn’t a recipe she’d found online that morning. This was something she’d been making for years. Maybe you’ve been there, watching someone cook something so effortlessly perfect that you immediately start mentally rearranging your weekend plans so you can try it yourself.
I practically begged her for the method, and she scribbled it on the back of a receipt while I pretended to be calm about it. Honestly, I think I forgot why I’d even come over. The cookie sheet stayed at her house for two more days while I tested these truffles in my own kitchen, trying to get the cat face just right. And now? These Black Cat Oreo Truffles are my go-to Halloween party trick. They’re creepy-cute, ridiculously easy, and they disappear faster than anything else on the dessert table. Every time I bring them somewhere, someone asks for the recipe. And I always smile, thinking about Jen’s nonchalant shrug, and say, “Oh, these? They’re nothing.” But we both know that’s a lie.
Why You’ll Love This Recipe
Look, I’ve tested a lot of Halloween desserts over the years. Some look amazing but taste like cardboard. Others taste incredible but require a pastry degree and three hours of free time. These Black Cat Oreo Truffles hit that sweet spot where they’re both impressive and ridiculously simple. Here’s why they’re a total winner:
- No-Bake & Quick: You don’t even turn on the oven. From start to finish, you’re looking at about 30 minutes of active work, plus chilling time. Perfect for those “I need a Halloween treat NOW” moments.
- Simple Ingredients: Oreos, cream cheese, chocolate, and a few decorations. That’s it. No weird specialty items that you’ll use once and forget about.
- Perfect for Halloween Parties: These little guys are the star of any spread. They’re handheld, portion-controlled, and they fit the spooky theme without being gory or scary.
- Crowd-Pleaser: I’ve brought these to work potlucks, family gatherings, and neighborhood block parties. Kids love them, adults love them, and they always get the “wait, these are homemade?” reaction.
- Unbelievably Delicious: The creamy, slightly tangy filling wrapped in chocolate with that Oreo crunch? It’s next-level comfort food disguised as a Halloween decoration.
What makes this recipe different from the hundreds of Oreo truffle recipes out there is the attention to detail. I’ve experimented with the chocolate-to-cream cheese ratio until it’s perfectly scoopable without being greasy. I’ve figured out the best way to shape those little cat ears so they actually look like a cat, not a weird blob. And I’ve learned the trick for getting the candy eyes to stay put without sliding off. This isn’t just another version—it’s the version I’d make for my own Halloween party, and I’ve already made it about fifty times to prove it.
These truffles have that magic quality where they feel special—like you put in way more effort than you actually did. That’s the kind of recipe I love sharing. The kind that makes you look like a rockstar host without the stress.
What Ingredients You Will Need
This recipe uses simple, pantry-friendly ingredients to create something that looks like it came from a fancy bakery. Most of these are probably already in your kitchen, which is exactly how I like it.
For the Truffle Base
- 1 package (14.3 oz) regular Oreo cookies – Not Double Stuf, not thin. The classic ones have the perfect cookie-to-creme ratio for truffles. I’ve tested this with generic chocolate sandwich cookies, and honestly, Oreos just work better. They have that specific crumb texture that binds perfectly with cream cheese.
- 8 oz cream cheese, softened – Full-fat is non-negotiable here. Low-fat or Neufchâtel makes the mixture too soft and sticky. Let it sit on the counter for about 30 minutes before you start. Trust me on this.
- Pinch of salt – Just a tiny one. It balances the sweetness and makes the chocolate flavor pop.
For the Coating
- 2 cups (12 oz) black candy melts or dark chocolate melting wafers – I prefer Wilton brand candy melts for the best black color. Regular dark chocolate chips work too, but you’ll need to add a tiny bit of coconut oil to thin them out. Black cocoa powder is also an option if you’re feeling fancy.
- 1 tablespoon coconut oil or shortening – This helps thin the chocolate for smoother dipping. Skip this if you’re using candy melts that are already formulated for melting.
For the Decoration
- Yellow candy eyes – You can find these at craft stores or online. They’re specifically for baking. If you can’t find yellow, white candy eyes work too. Just make sure they’re edible.
- Black sanding sugar or black sprinkles – This is what gives the truffles that “fur” texture. I’ve used black jimmies before, but sanding sugar looks more like actual cat fur.
- Pink candy melts or pink icing – For the little noses and inner ears. A tiny dot makes all the difference.
One thing I learned the hard way: don’t skimp on the candy melts. I once tried using regular milk chocolate with black food coloring, and it turned this weird grayish-purple color that looked nothing like a black cat. Stick with actual black candy melts or dark chocolate. Your cats will thank you.
Equipment Needed
- Food processor – For crushing the Oreos into fine crumbs. A high-speed blender works too, but a food processor is easier to control. If you don’t have either, put the cookies in a zip-top bag and go to town with a rolling pin. It’s a good arm workout.
- Large mixing bowl – For combining the crumbs and cream cheese.
- Baking sheet lined with parchment paper – For chilling the truffle balls before dipping.
- Microwave-safe bowl or double boiler – For melting the chocolate. I use a microwave because it’s faster, but a double boiler gives you more control.
- Fork or dipping tool – For dipping the truffles in chocolate. A regular fork works fine, but dedicated candy dipping tools have those little loops that let excess chocolate drip off more easily.
- Small piping bag or toothpick – For applying the eyes and noses. A toothpick is honestly easier for the tiny details.
- Refrigerator – For setting the chocolate. Patience is key here.
I bought a cheap set of candy dipping tools from a craft store for about five dollars, and they’ve been worth every penny. If you make these truffles regularly—and you will—it’s a smart investment.
Preparation Method
- Crush the Oreos. Place the entire package of Oreos (filling included) in your food processor. Pulse until you have fine, sand-like crumbs. Don’t overdo it—you don’t want Oreo dust flying everywhere. If you’re using the bag-and-rolling-pin method, make sure there are no large chunks left. This takes about 5 minutes of solid rolling.
- Mix with cream cheese. In a large bowl, combine the Oreo crumbs with the softened cream cheese and a pinch of salt. Use a spatula or your hands (clean ones!) to mix until everything is fully combined. The mixture should be uniform in color and hold together when pressed. If it feels too dry, add another tablespoon of cream cheese. If it’s too sticky, add a few more crushed Oreos.
- Shape the truffle bodies. Scoop out about 1 tablespoon of the mixture and roll it into a ball. Place it on your parchment-lined baking sheet. Repeat until all the mixture is used. You should get about 24 to 28 truffles, depending on how generous you are with your scoops. Now, here’s the cat part: gently pinch two small points on the top of each ball to form ears. Don’t make them too big—they should look like little cat heads, not bats. Pop the tray in the refrigerator for at least 30 minutes, or until the truffles are firm to the touch.
- Melt the chocolate. About 10 minutes before you’re ready to dip, melt your black candy melts or dark chocolate. If using a microwave, heat in 30-second intervals, stirring between each, until fully melted. Add the coconut oil or shortening if needed to thin it out. The chocolate should be smooth and runny enough to coat the truffles easily.
- Dip the truffles. Remove the chilled truffles from the fridge. Working with one at a time, drop a truffle into the melted chocolate. Use a fork to gently roll it around until fully coated. Lift it out, letting the excess chocolate drip off. If the ears lose their shape a bit, don’t panic—you can reshape them gently with your finger before the chocolate sets. Place the dipped truffle back on the parchment. Work quickly but carefully. The chocolate will start to set as it cools.
- Add the decorations. While the chocolate is still wet, sprinkle black sanding sugar over each truffle for that furry texture. Gently press two yellow candy eyes onto the front of each cat head. Use a toothpick dipped in pink candy melt to add a tiny nose and inner ear details. Work in batches if needed—you don’t want the chocolate to harden before you add the decorations.
- Let them set. Place the decorated truffles back in the refrigerator for about 15 to 20 minutes, or until the chocolate is completely firm. Once set, they’re ready to serve.
A quick warning: the dipping process can get a little messy. I’ve had chocolate end up on my counter, my shirt, and once, somehow, on my ceiling. Just embrace it. The truffles will still taste amazing.
Cooking Tips & Techniques
I’ve made these Black Cat Oreo Truffles more times than I care to count, and I’ve picked up a few tricks along the way. Here’s what I wish someone had told me the first time:
Keep everything cold. The truffle mixture needs to be firm before you dip it. If it’s too soft, the chocolate will grab it and make a mess. I’ve learned to chill the shaped truffles for at least 30 minutes, and sometimes I even pop them in the freezer for 10 minutes if I’m in a hurry. Cold truffles = smooth dipping.
Don’t over-melt the chocolate. Chocolate is temperamental. If you overheat it, it seizes up and becomes a grainy, unusable mess. Low and slow is the way to go. And if you’re using a microwave, stop and stir frequently. I once got distracted by a phone call and ended up with a bowl of chocolate cement. Not my finest moment.
Work in small batches. Only take a few truffles out of the fridge at a time. If they sit out too long, they warm up and start falling apart in the chocolate. I usually work with 4 to 5 at a time, keeping the rest chilled.
Use a fork for dipping. A fork lets the excess chocolate drip off and makes it easier to slide the truffle back onto the parchment. I’ve tried spoons, tongs, and even my fingers (don’t judge), and a fork is the best tool for the job.
Fix mistakes quickly. If an ear falls off or the chocolate gets a weird smear, you can usually fix it before the chocolate sets. Just use a clean finger or a toothpick to reshape or smooth things out. Once the chocolate hardens, you’re stuck with it.
Practice the cat face. The first few truffles might look a little derpy. That’s okay. By the time you’re halfway through, you’ll have the rhythm down. I’ve had some truly hilarious-looking cats in my early batches—one-eyed, cross-eyed, nose-less. They still tasted great.
Variations & Adaptations
One of the best things about this recipe is how easy it is to change up. Here are a few variations I’ve tried and loved:
White Chocolate Cats
Swap the black candy melts for white chocolate, and use dark chocolate for the eyes and noses. They look like ghost cats or snow cats, which is a fun twist for a winter-themed party. I made these for a “Christmas in July” party once, and they were a hit.
Gluten-Free Version
Use gluten-free chocolate sandwich cookies instead of Oreos. Most generic brands have a gluten-free option. The texture might be slightly different, but the flavor is still spot-on. Just check the label on your candy melts too—some contain gluten.
Pumpkin Spice Cats
Add 1 teaspoon of pumpkin pie spice to the Oreo-cream cheese mixture. Use orange candy melts instead of black, and decorate with tiny green stems on top. These are perfect for a fall harvest party or Thanksgiving. I accidentally made these once when I grabbed the wrong spice jar, and it was a happy accident.
Vegan Option
Use vegan cream cheese and dairy-free chocolate sandwich cookies. Most dark chocolate candy melts are naturally dairy-free, but double-check the label. The texture will be slightly softer, so chill them a bit longer before dipping.
Mini Cats
If you’re making these for a party where people might want to grab multiple, try making them smaller. Use a teaspoon instead of a tablespoon for the truffle base. You’ll get about 48 mini cats, and they’re perfect for snacking without the commitment of a full-sized truffle.
Serving & Storage Suggestions
These Black Cat Oreo Truffles are best served cold, straight from the refrigerator. The chocolate stays firm and snappy, and the filling is perfectly creamy. If you’re serving them at a party, arrange them on a black or orange platter for maximum Halloween effect. I like to add a few fake spiderwebs or plastic spiders around the platter for extra spooky vibes.
For a drink pairing, these truffles go surprisingly well with hot apple cider or a pumpkin spice latte. The chocolate sweetness balances the tartness of the cider beautifully. If you’re hosting an adult party, a dark stout or a creamy milk stout is a fantastic match.
Storage: Keep the truffles in an airtight container in the refrigerator for up to a week. Layer them between sheets of parchment paper so they don’t stick together. I’ve found that the flavor actually improves after a day or two—the Oreo and cream cheese flavors meld together even more.
Freezing: These truffles freeze beautifully. Place them in a single layer on a baking sheet and freeze until solid, then transfer to a freezer-safe container. They’ll keep for up to 3 months. Thaw in the refrigerator for about an hour before serving. I always keep a batch in my freezer for unexpected Halloween guests or last-minute party invites.
Reheating: Don’t. These are meant to be served cold. If you let them sit at room temperature for too long, the chocolate can get soft and the filling can become sticky. Keep them chilled until just before serving.
Nutritional Information & Benefits
Let’s be real—these are a treat, not a health food. But here’s the approximate nutritional breakdown for one truffle (based on a batch of 24):
- Calories: 180-200
- Fat: 12g
- Carbohydrates: 20g
- Sugar: 14g
- Protein: 2g
That said, there are a few redeeming qualities. The cream cheese adds a small amount of protein and calcium. The dark chocolate (if you use it) contains antioxidants. And honestly, the portion control is built in—one or two truffles is usually enough to satisfy a sweet craving. I’ve never seen anyone eat a dozen of these in one sitting. They’re rich enough that a little goes a long way.
If you’re looking for a slightly lighter version, you can use reduced-fat cream cheese. The texture will be a bit softer, but the flavor is still great. And if you’re watching your sugar intake, you can use sugar-free chocolate chips for the coating. Just be aware that the texture might be slightly different.
These truffles are not gluten-free unless you use gluten-free cookies. They also contain dairy from the cream cheese and chocolate. If you have allergies, the vegan and gluten-free variations above are your best bet.
Conclusion
These Black Cat Oreo Truffles are the kind of recipe that makes you look like a Halloween hero without breaking a sweat. They’re cute, they’re delicious, and they’re surprisingly easy to pull off. Whether you’re hosting a big Halloween bash, bringing a treat to a potluck, or just want something fun to make with the kids, these little cats deliver every time.
I love this recipe because it reminds me of that afternoon at Jen’s house—the smell of chocolate, the casual confidence of someone who’s made something so many times it’s become second nature. Every time I make these truffles, I feel a little bit of that same ease. And I hope you do too.
So go ahead, give them a try. Make them your own. Add extra sprinkles, change the colors, experiment with the flavors. And when someone asks you for the recipe—because they will—smile and say, “Oh, these? They’re nothing.” But we’ll both know the truth.
If you make these, I’d love to hear about it. Drop a comment below and tell me how your black cats turned out. Did you add a twist? Did your kids help with the decorations? Did they disappear before the party even started? Share your stories—I read every single one.
Frequently Asked Questions
Can I use Double Stuf Oreos for this recipe?
You can, but the texture will be different. Double Stuf Oreos have more filling, which makes the truffle mixture softer and stickier. If you use them, reduce the cream cheese by about 2 tablespoons to compensate. I’ve tried it, and the truffles are still tasty, but they’re harder to shape.
How far in advance can I make these truffles?
You can make them up to a week ahead and store them in the refrigerator. They actually taste better after a day or two because the flavors have time to meld. If you’re making them for a party, I’d recommend making them 2 to 3 days in advance.
My chocolate is too thick for dipping. What should I do?
Add a little more coconut oil or shortening, about 1 teaspoon at a time, and stir until the chocolate thins out. Be careful not to add too much, or the chocolate won’t set properly. If you’re using candy melts, you can also try adding a few more wafers and melting them together.
Can I use white chocolate instead of black?
Absolutely! White chocolate cats are adorable and perfect for a winter or Christmas party. Just use dark chocolate for the eyes and noses to create contrast. The process is exactly the same.
My truffles are cracking. What went wrong?
Cracking usually happens when the truffle mixture is too cold when you dip it, or when the chocolate is too thick. Try letting the truffles sit at room temperature for 5 minutes before dipping, and make sure your chocolate is thin and smooth. If the cracks are small, you can cover them with extra sprinkles.
Pin This Recipe!

Black Cat Oreo Truffles: Easy Halloween Treat Recipe

These no-bake Black Cat Oreo Truffles are creepy-cute, ridiculously easy, and disappear faster than anything else on the dessert table. Made with just Oreos, cream cheese, and chocolate, they’re the perfect Halloween party trick.
- Prep Time: 30 minutes
- Cook Time: 0 minutes
- Total Time: 1 hour 15 minutes (including chilling)
- Yield: 24-28 truffles 1x
- Category: Dessert
- Cuisine: American
Ingredients
- 1 package (14.3 oz) regular Oreo cookies
- 8 oz cream cheese, softened
- Pinch of salt
- 2 cups (12 oz) black candy melts or dark chocolate melting wafers
- 1 tablespoon coconut oil or shortening (optional, for thinning chocolate)
- Yellow candy eyes
- Black sanding sugar or black sprinkles
- Pink candy melts or pink icing
Instructions
- Crush the Oreos: Place the entire package of Oreos (filling included) in a food processor. Pulse until you have fine, sand-like crumbs.
- Mix with cream cheese: In a large bowl, combine the Oreo crumbs with the softened cream cheese and a pinch of salt. Mix until fully combined and the mixture holds together when pressed.
- Shape the truffle bodies: Scoop out about 1 tablespoon of the mixture and roll into a ball. Place on a parchment-lined baking sheet. Gently pinch two small points on the top of each ball to form ears. Refrigerate for at least 30 minutes until firm.
- Melt the chocolate: About 10 minutes before dipping, melt the black candy melts or dark chocolate in a microwave-safe bowl in 30-second intervals, stirring between each, until smooth. Add coconut oil or shortening if needed to thin.
- Dip the truffles: Working with one at a time, drop a chilled truffle into the melted chocolate. Use a fork to roll it around until fully coated. Lift out, letting excess drip off. Place back on parchment.
- Add decorations: While chocolate is still wet, sprinkle black sanding sugar over each truffle. Gently press two yellow candy eyes onto the front. Use a toothpick dipped in pink candy melt to add a tiny nose and inner ear details.
- Let them set: Place decorated truffles back in the refrigerator for 15-20 minutes until chocolate is completely firm.
Notes
Keep everything cold for easier dipping. Work in small batches, taking only 4-5 truffles out of the fridge at a time. Don’t over-melt the chocolate. The first few truffles might look derpy, but you’ll get the hang of it. These are best served cold.
Nutrition
- Serving Size: 1 truffle
- Calories: 190
- Sugar: 14
- Sodium: 120
- Fat: 12
- Saturated Fat: 6
- Carbohydrates: 20
- Fiber: 1
- Protein: 2
Keywords: Halloween treats, Oreo truffles, black cat truffles, no-bake dessert, easy Halloween recipe, chocolate truffles, spooky desserts


