Jen wasn’t trying to impress anyone. I’d stopped by to grab my mail from her porch—she collects it when we’re out of town—and the smell of vanilla and sugar hit me before I even got to the top step. Through her kitchen window, I could see her piping these tiny white peaks onto a baking sheet, and honestly, I pressed my face against the glass like a weirdo.
She laughed when she let me in, wiping her hands on her apron. “Oh, these? They’re just ghost cookies for the kids’ Halloween party. Nothing fancy.” Nothing fancy. She said it like she hadn’t just created the cutest things I’d ever seen in a kitchen. Little white ghosts with tiny chocolate eyes staring back at me. I mean, I’d been stressing over what to bring to my own Halloween get-together, and here she was, whipping up something magical like it was no big deal.
She let me try one while they were still warm—crispy on the outside, chewy in the middle, melting on my tongue. I asked for the recipe right there, and she shrugged and scribbled it on a napkin. That napkin is still stuck to my fridge with a magnet, a little stained but totally legible. Maybe you’ve been there—standing in someone’s kitchen, watching them make something that looks impossible, only to realize it’s actually the simplest thing in the world.
That’s the thing about these quick ghost meringue cookies for Halloween parties. They look like you spent hours, but they come together in minutes. And honestly? That’s exactly the kind of magic we all need in our lives.
Why You’ll Love This Recipe
Let me tell you why these ghost meringue cookies for Halloween parties have become my go-to. I’ve tested this recipe at least a dozen times, tweaking the sugar ratio and oven temperature until it was absolutely foolproof. Here’s what makes them special:
- Quick & Easy: From start to finish, these cookies take about 25 minutes of active time. The oven does the rest. Perfect for those nights when you remember the party is tomorrow and you have nothing to bring.
- Simple Ingredients: You probably have everything in your kitchen right now. Egg whites, sugar, vanilla, and chocolate chips. That’s it. No fancy grocery store trips required.
- Perfect for Halloween Parties: These little ghosts are the star of any dessert table. Kids go nuts for them, and adults can’t resist grabbing one (or three) when they think no one is looking.
- Crowd-Pleaser: I’ve brought these to five different Halloween gatherings now, and every single time, someone asks for the recipe. They’re gluten-free, which makes them a safe bet for guests with dietary restrictions.
- Unbelievably Delicious: The texture is what gets everyone. That light, airy crunch that melts into sweetness on your tongue. It’s next-level comfort food disguised as a cute little ghost.
What makes this recipe different from all the other meringue recipes out there? It’s the technique. Most recipes tell you to bake them low and slow for hours. But I figured out a faster method that still gives you that perfect crisp exterior and soft center. No waiting around all afternoon. You get that same soul-soothing satisfaction without the stress.
This isn’t just another version of a Halloween cookie. It’s the version you’ll come back to year after year, the one that makes you close your eyes after that first bite and think, “Yeah, this is the one.”
What Ingredients You Will Need
This recipe uses simple, wholesome ingredients to deliver that light, airy texture and sweet vanilla flavor without any fuss. Most of these are pantry staples, which is exactly what you want when you’re scrambling to get something together for a party.
- Large egg whites (4, room temperature) — Room temperature egg whites whip up much better than cold ones. I learned this the hard way after a few flat batches. Set them out on the counter about 30 minutes before you start.
- Granulated sugar (1 cup, 200g) — Regular white sugar works perfectly here. Don’t use powdered sugar; it doesn’t dissolve the same way and can leave your meringue grainy.
- Cream of tartar (1/2 teaspoon) — This stabilizes the egg whites and helps them hold their shape. If you don’t have it, you can use 1 teaspoon of lemon juice or white vinegar instead.
- Vanilla extract (1 teaspoon) — Pure vanilla extract gives the best flavor, but imitation works fine too. I actually prefer the clear imitation vanilla for these because it keeps the meringues perfectly white.
- Mini chocolate chips (1/4 cup, for the eyes) — You’ll use two chips per ghost to make the eyes. Dark chocolate chips give a nice contrast against the white meringue, but milk chocolate works too.
- Salt (a pinch) — Just a tiny pinch balances the sweetness and helps the egg whites whip up more stable.
For the best texture, I recommend using fresh eggs. Older eggs tend to be more watery, and your meringue won’t hold its shape as well. If you’re not sure how old your eggs are, do the float test—fresh eggs sink, older eggs float.
One thing I’ve learned from making these ghost meringue cookies for Halloween parties over and over: the quality of your vanilla matters. I use Nielsen-Massey pure vanilla extract, but honestly, any brand you trust will work. Just avoid the artificial stuff with added corn syrup if you can help it.
Equipment Needed
You don’t need much fancy equipment for these cookies, which is part of the appeal. Here’s what you’ll need:
- Electric mixer (stand mixer or hand mixer) — You can whip egg whites by hand, but your arm will hate you. A hand mixer works perfectly fine and is easier to clean.
- Large mixing bowl — Make sure it’s completely clean and dry. Any grease or moisture will prevent your egg whites from whipping up properly.
- Baking sheet — A standard half-sheet pan works great. Line it with parchment paper or a silicone baking mat.
- Piping bag (or zip-top bag) — A piping bag with a round tip gives you the most control, but a zip-top bag with the corner snipped off works in a pinch.
- Parchment paper — Don’t skip this. The meringues will stick to an unlined pan.
- Measuring cups and spoons — Precision matters with meringue, so use proper measuring tools.
If you don’t have a piping bag, honestly, just use a sturdy zip-top bag. I’ve done it that way plenty of times when I couldn’t find my piping tips. Just snip a small corner off and you’re good to go. The ghosts might look a little more rustic, but that’s part of the charm.
Preparation Method
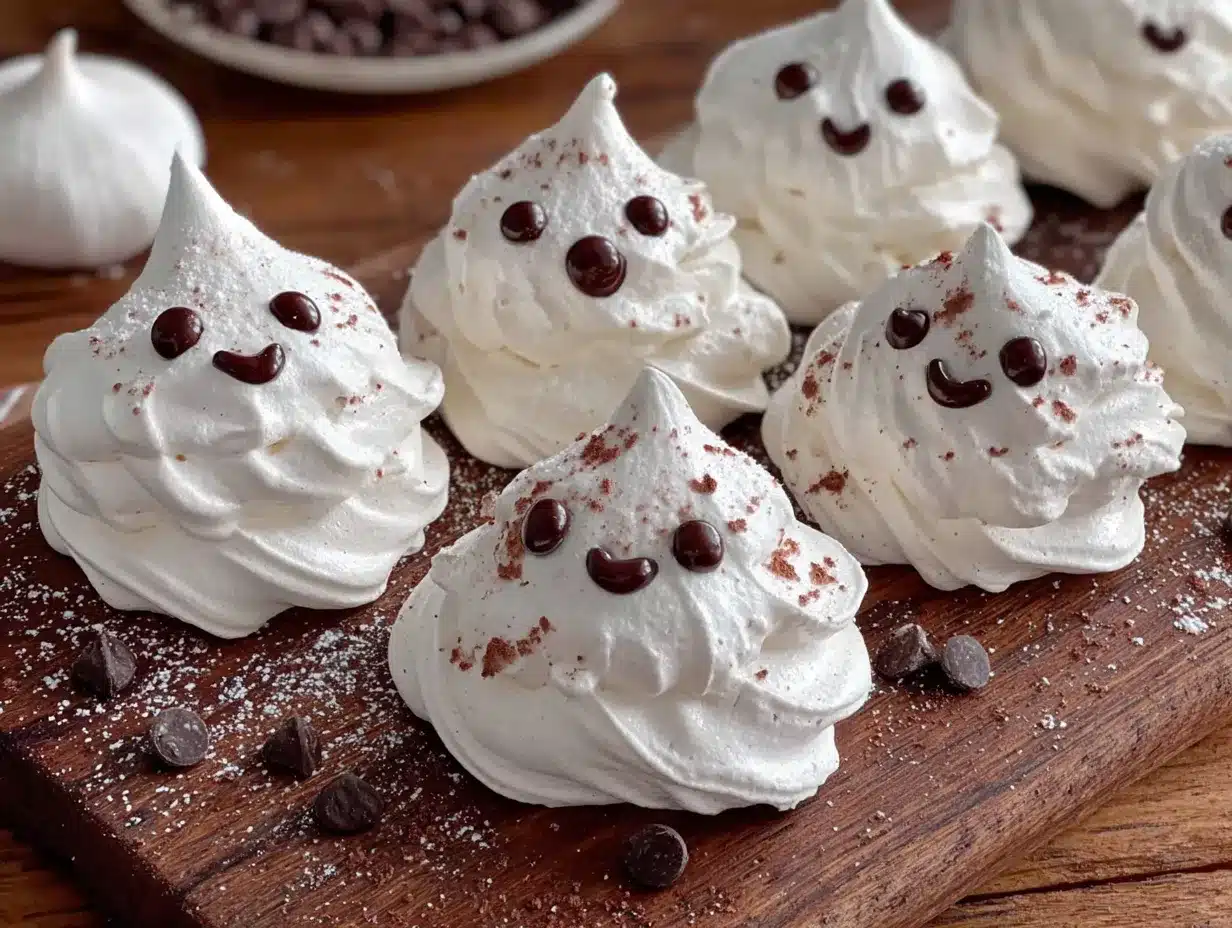
Okay, let’s get into the actual making of these ghost meringue cookies for Halloween parties. I’ve broken this down step by step so you can follow along easily.
- Preheat your oven to 200°F (95°C). Yes, that’s low. We’re not baking these so much as drying them out. Line your baking sheet with parchment paper and set it aside.
- Clean your bowl and beaters thoroughly. This is crucial. Any trace of grease or yolk will ruin your meringue. Wipe everything down with a little lemon juice or vinegar on a paper towel if you’re worried about residue.
- Separate your eggs carefully. Crack each egg and let the white fall into a small bowl first, then transfer it to your mixing bowl. This way, if you accidentally get yolk in one, you haven’t ruined the whole batch. I’ve lost count of how many times this has saved me.
- Add the cream of tartar and salt. Start beating the egg whites on medium speed until they become frothy and bubbly, about 1 minute. You should see small bubbles forming on the surface.
- Gradually add the sugar. With the mixer running on medium-high, add the sugar one tablespoon at a time. This takes patience, but it’s important. Adding it too fast can deflate your meringue. Keep beating until the sugar is completely dissolved—about 3 to 4 minutes.
- Test for the right consistency. Rub a tiny bit of the meringue between your fingers. If it feels gritty, keep beating. If it’s smooth, you’re good. The meringue should be stiff and glossy, holding firm peaks when you lift the beaters.
- Add the vanilla. Beat in the vanilla extract on low speed just until combined. Don’t overmix at this stage, or you’ll deflate all that beautiful air you just whipped in.
- Transfer to your piping bag. Spoon the meringue into your piping bag fitted with a round tip. If you’re using a zip-top bag, snip about 1/2 inch off one corner.
- Pipe the ghosts. Hold the bag straight up and down, about 1/2 inch above the baking sheet. Pipe a small mound about 1.5 inches wide, then pull straight up to create a little peak on top. This peak is what makes them look like ghosts! Space them about 1 inch apart—they don’t spread much, but they need a little breathing room.
- Add the eyes. Before the meringue starts to set, gently press two mini chocolate chips into each ghost for eyes. Place them close together near the top of the ghost shape. Don’t press too hard, or you’ll squish the meringue.
- Bake for 45 minutes. Place the baking sheet in the preheated oven and bake for 45 minutes. The meringues should be dry to the touch and easily lift off the parchment paper. If they’re still sticky, give them another 5 to 10 minutes.
- Cool completely. Turn off the oven and leave the meringues inside with the door slightly open for about 30 minutes. This helps them dry out completely and prevents cracking from sudden temperature changes.
Your kitchen will smell amazing during this whole process—like vanilla and sugar and anticipation. The meringues should be light as air, with a crisp exterior that gives way to a slightly chewy center. If they’re too soft in the middle, they might need a few more minutes in the oven.
Cooking Tips & Techniques
I’ve made these ghost meringue cookies for Halloween parties more times than I can count, and I’ve definitely learned a few things the hard way. Here are some tips to save you the trouble:
Don’t make these on a humid day. Meringue is basically sugar and egg whites, and sugar attracts moisture like crazy. If the weather is rainy or humid, your meringues might end up sticky instead of crisp. Wait for a dry day, or crank up your air conditioning.
Room temperature eggs are non-negotiable. I tried making these once with cold eggs straight from the fridge because I was in a hurry. The meringue never got stiff, and I ended up with flat, sad ghosts. Set your eggs out 30 minutes before you start.
Don’t overbake. The first time I made these, I left them in the oven too long thinking they needed to be golden brown. Meringues should stay white. If they start turning tan, they’re overdone. Trust the 45-minute mark and check them.
Use a timer for the sugar addition. I know it sounds tedious, but adding the sugar too fast is the most common mistake people make. Set a timer for 3 minutes and add a tablespoon every 10 seconds or so. Your meringue will thank you.
Pipe with confidence. When you’re making the ghost shapes, don’t hesitate. A smooth, steady motion gives you those nice little peaks. If you stop and start, you’ll get lumpy ghosts. And honestly? Lumpy ghosts are still delicious, so don’t stress too much.
Store them properly. Meringues are sensitive to moisture. Once they’re completely cool, store them in an airtight container at room temperature. Don’t refrigerate them—the fridge is too humid and will make them sticky.
Variations & Adaptations
One of the best things about these ghost meringue cookies for Halloween parties is how easy they are to customize. Here are some variations I’ve tried:
Chocolate ghosts: Replace 2 tablespoons of the granulated sugar with cocoa powder. Sift it in with the sugar to avoid lumps. You’ll get chocolate ghosts that taste like a lighter version of chocolate meringue cookies. My nephew requested these last year, and they were a hit.
Peppermint ghosts: Add 1/2 teaspoon of peppermint extract along with the vanilla. Crush up a candy cane and sprinkle the pieces over the ghosts before baking. The red and white looks super festive, and the mint flavor is refreshing.
Vegan version: Use aquafaba (the liquid from a can of chickpeas) instead of egg whites. 1/4 cup of aquafaba replaces 2 egg whites. Whip it the same way, and it works surprisingly well. I tried this for a friend with egg allergies, and honestly, I couldn’t tell the difference.
Spooky colors: Add a drop of gel food coloring to the meringue before piping. Purple, green, or orange ghosts are super fun for Halloween. Just be careful not to overmix the color in, or you’ll deflate the meringue.
Gluten-free option: These are naturally gluten-free since there’s no flour involved. Just make sure your vanilla extract and chocolate chips are certified gluten-free if that’s a concern.
Serving & Storage Suggestions
These ghost meringue cookies for Halloween parties are best served at room temperature. They’re perfect on their own as a light, sweet treat, but here are some ideas for serving them:
On a Halloween dessert table: Arrange them on a platter with some fake spiderwebs and plastic spiders for a spooky effect. The white ghosts against black decorations look amazing.
As a topping: Crumble them over vanilla ice cream or chocolate pudding. The crunchy texture adds a nice contrast to creamy desserts.
With hot chocolate: Float a ghost on top of a mug of hot chocolate. It’ll slowly dissolve into the drink, adding sweetness and a hint of vanilla. This is my favorite way to serve them at Halloween parties.
Storage instructions: Keep them in an airtight container at room temperature for up to 2 weeks. Don’t refrigerate them—the moisture will ruin the texture. If you’re making them ahead of time for a party, they actually taste better after a day or two. The flavors have time to meld together.
Freezer option: You can freeze baked meringues in a freezer-safe container for up to 3 months. Thaw them at room temperature for about 30 minutes before serving. They might lose a little bit of their crunch, but they’ll still be delicious.
Nutritional Information & Benefits
Per ghost meringue cookie (based on 24 cookies per batch):
- Calories: 45
- Total Fat: 0.5g
- Saturated Fat: 0.3g
- Cholesterol: 0mg
- Sodium: 15mg
- Total Carbohydrates: 10g
- Sugars: 9g
- Protein: 1g
These cookies are naturally low in fat and cholesterol-free since they’re made with only egg whites. The protein from the egg whites gives them a tiny bit of staying power, though let’s be honest—these are a treat, not a health food.
They’re also gluten-free and dairy-free, which makes them a great option for guests with common dietary restrictions. Just double-check your chocolate chips if you’re serving someone with strict dietary needs.
One thing I appreciate about these cookies is that they satisfy that sweet craving without being overly heavy. You can eat two or three without feeling like you’ve overdone it. Well, maybe three is my limit, but you get the idea.
Conclusion
These ghost meringue cookies for Halloween parties have become a tradition in my house, and I hope they become one in yours too. They’re quick enough for a last-minute party, simple enough for beginners, and cute enough to impress even the pickiest Halloween guests.
I love how versatile they are—you can dress them up with different colors, flavors, and decorations. Make them your own. That’s the beauty of a simple recipe like this. It’s a blank canvas waiting for your creativity.
So go ahead, give them a try. Pipe those little ghosts, add those chocolate eyes, and watch them disappear at your next Halloween gathering. And when someone asks you for the recipe—because they will—you can smile and say, “Oh, these? Nothing fancy.” Just like Jen did.
I’d love to hear how yours turn out! Drop a comment below and let me know if you tried any fun variations. And if you have a favorite Halloween recipe, share that too. Happy Halloween, and happy baking!
Frequently Asked Questions
Can I make these ghost meringue cookies without a piping bag?
Absolutely. A zip-top bag with the corner snipped off works perfectly. You can even use a spoon to drop small mounds of meringue onto the baking sheet. They won’t look as ghost-like, but they’ll taste the same.
Why are my meringues sticky instead of crisp?
This usually happens because of humidity or underbaking. Make sure you’re making these on a dry day and that they’re fully baked. If they’re still sticky after 45 minutes, give them another 5 to 10 minutes in the oven. Also, store them in an airtight container once they’re cool.
Can I use liquid egg whites from a carton?
You can, but fresh egg whites give better results. Carton egg whites often have stabilizers added that can affect how well they whip up. If you use carton egg whites, let them come to room temperature first and add an extra pinch of cream of tartar.
How far in advance can I make these cookies?
You can make them up to 2 weeks ahead of time as long as you store them properly in an airtight container at room temperature. They actually taste better after a day or two, so making them ahead is a great idea for parties.
Can I double this recipe?
Yes, but don’t try to whip more than 4 egg whites at a time in a standard mixer. If you’re doubling the recipe, make two separate batches of meringue. It takes a little longer, but your meringue will be much more stable.
PrintPerfect Ghost Meringue Cookies for Halloween Parties
These ghost meringue cookies are quick, easy, and perfect for Halloween parties. With a crisp exterior and chewy center, they’re made with simple ingredients and come together in minutes.
- Prep Time: 25 minutes
- Cook Time: 45 minutes
- Total Time: 1 hour 40 minutes
- Yield: 24 cookies 1x
- Category: Dessert
- Cuisine: American
Ingredients
- 4 large egg whites, room temperature
- 1 cup (200g) granulated sugar
- 1/2 teaspoon cream of tartar
- 1 teaspoon vanilla extract
- 1/4 cup mini chocolate chips (for eyes)
- a pinch of salt
Instructions
- Preheat your oven to 200°F (95°C). Line a baking sheet with parchment paper.
- Clean your bowl and beaters thoroughly to remove any grease or yolk.
- Separate your eggs carefully, transferring each white to the mixing bowl.
- Add the cream of tartar and salt. Beat on medium speed until frothy and bubbly, about 1 minute.
- Gradually add the sugar one tablespoon at a time with the mixer on medium-high, beating until sugar is completely dissolved and meringue is stiff and glossy, about 3-4 minutes.
- Test for consistency by rubbing a bit between your fingers; it should be smooth, not gritty.
- Beat in the vanilla extract on low speed just until combined.
- Transfer the meringue to a piping bag fitted with a round tip (or a zip-top bag with a corner snipped off).
- Pipe small mounds about 1.5 inches wide onto the prepared baking sheet, pulling straight up to create a peak on top. Space them about 1 inch apart.
- Gently press two mini chocolate chips into each ghost for eyes before the meringue sets.
- Bake for 45 minutes, until dry to the touch and easily lifting off the parchment.
- Turn off the oven and leave the meringues inside with the door slightly open for about 30 minutes to cool completely.
Notes
Don’t make these on a humid day. Room temperature eggs are essential. Store in an airtight container at room temperature for up to 2 weeks. For best results, use fresh eggs and pure vanilla extract.
Nutrition
- Serving Size: 1 cookie
- Calories: 45
- Sugar: 9
- Sodium: 15
- Fat: 0.5
- Saturated Fat: 0.3
- Carbohydrates: 10
- Protein: 1
Keywords: ghost meringue cookies, Halloween cookies, meringue cookies, easy Halloween dessert, gluten-free cookies


