I was standing in the parking lot of a hardware store last November when the smell hit me. Not pine needles or cold air, but something else entirely—garlic and rosemary, sharp and warm, carried on a breeze from someone’s outdoor grill a few blocks away. And suddenly I was eight years old, standing in my Aunt Clara’s cramped kitchen on a Tuesday that wasn’t Thanksgiving, watching her slide a massive roasting pan into the oven. She wasn’t hosting anything. She just made turkey on random Tuesdays because she felt like it, and because she knew I’d be there after school, hungry for something that felt like a celebration.
Aunt Clara has been gone six years now, and I’ve spent every holiday season since trying to get back to that exact moment. That first bite of her herb butter turkey, where the skin cracked like glass and the meat was so tender it barely needed a knife. Honestly, I’ve failed more times than I’ve succeeded. I’ve dried out birds, overseasoned the butter until it tasted like a pine forest, and once forgot to take the giblets out until halfway through roasting—don’t ask, it was a Wednesday and I was distracted.
But this recipe? This is the one. It took me three Thanksgivings, two Christmases, and one very patient husband to get it right. The garlic gets mellow and sweet, not sharp. The rosemary doesn’t overpower—it just whispers. And the herb butter? You spread it under the skin, so every single bite is infused with that flavor. Maybe you’ve had that experience too, where you’re chasing a taste from years ago and nothing quite measures up. Let me tell you, this turkey is the one that finally did it for me. And when I brought it to last year’s family dinner, my cousin Mike—who never compliments anything—asked for seconds. Then thirds. That’s when I knew I had to share it.
Why You’ll Love This Recipe
This isn’t just another turkey recipe. This is the one that makes people stop mid-conversation and look at their plate. I’ve tested it six times over two holiday seasons, tweaking the butter ratio, adjusting the roasting time, and even swapping out different herb combinations. What I landed on is pure gold, and I say that with zero humility because it took work to get here.
- Perfect for Hosting: This bird is built for a crowd. It roasts beautifully for 12 to 16 people, and the presentation is stunning—golden brown skin, fragrant herbs, and that rich garlic aroma that fills your whole house.
- Simple Ingredients: You don’t need anything fancy. Butter, garlic, fresh rosemary, salt, pepper, and a good turkey. That’s it. No weird specialty items or trips to three different stores.
- Stress-Free Prep: Most of the work happens the night before. You rub the butter under the skin, season the bird, and let it rest in the fridge overnight. Come party day, you just pop it in the oven and relax.
- Crowd-Pleaser Guaranteed: I’ve served this to picky eaters, health-conscious relatives, and my uncle who claims he “doesn’t really like turkey.” Every single one of them went back for more. It’s that juicy, that flavorful, that impossible to resist.
- Make-Ahead Friendly: The herb butter can be made three days in advance. The turkey can be prepped and seasoned up to 24 hours ahead. You can even roast it a day early and reheat—though honestly, it’s best fresh out of the oven.
What makes this recipe different from every other herb butter turkey out there? It’s the technique. Most recipes tell you to just rub butter on the skin. That’s fine, but the flavor stays on the outside. Here, you’re going to loosen the skin and spread the butter directly onto the meat. That’s the secret. The fat melts into the breast and thighs, keeping everything moist while the garlic and rosemary infuse from the inside out. It’s not complicated—it’s just smart. And it makes all the difference when you’re trying to impress a table full of guests.
What Ingredients You Will Need
This recipe uses simple, high-quality ingredients to deliver big flavor without a lot of fuss. Most of these are pantry staples or easy to find at any grocery store. The key is using fresh herbs and real butter—no shortcuts here, because the flavor payoff is worth it.
- 1 whole turkey (12–14 pounds), thawed if frozen — I prefer a fresh turkey when I can find one, but frozen works perfectly. Just give it enough time to thaw in the fridge, about 24 hours per 4–5 pounds. Look for a bird that’s not pre-basted or injected with solution—you want pure turkey so the herb butter can do its job.
- 1 cup (2 sticks) unsalted butter, softened to room temperature — Use good quality butter here. I like Kerrygold or Plugrà for their richness. Salted butter works in a pinch, but you’ll want to reduce the added salt slightly. Let it sit out for at least an hour before mixing so it’s soft and spreadable.
- 6 cloves garlic, minced — Fresh garlic only. The pre-minced stuff in a jar has a different flavor and won’t distribute as evenly. If you’re feeling fancy, roast the garlic first for a sweeter, mellower taste—but raw works beautifully too.
- 3 tablespoons fresh rosemary, finely chopped — Dried rosemary won’t give you the same bright, piney flavor. Fresh is non-negotiable here. Strip the leaves off the woody stems and chop them fine so they blend into the butter without being prickly.
- 1 tablespoon fresh thyme leaves — Adds an earthy, slightly floral note that pairs perfectly with the rosemary. Strip the leaves from the stems and chop lightly if the leaves are large.
- 1 tablespoon fresh sage, finely chopped — Sage brings that classic poultry seasoning vibe. It’s subtle but important. If you can’t find fresh, use 1 teaspoon dried rubbed sage.
- 2 teaspoons kosher salt — I use Diamond Crystal kosher salt. If you’re using Morton’s or fine table salt, reduce to 1 ½ teaspoons. Salt is crucial for flavor and for helping the skin crisp up.
- 1 teaspoon black pepper, freshly ground — Freshly ground pepper makes a difference here. Pre-ground pepper is fine in a pinch, but the flavor won’t be as bright.
- 1 lemon, halved — Tucked inside the cavity, lemon adds brightness and helps keep the meat moist. It won’t make the turkey taste like lemon—it just balances the richness.
- 1 onion, quartered — Adds sweetness and depth to the pan drippings, which means better gravy later. Yellow or white onion both work.
- 4 sprigs fresh rosemary (for garnish and cavity) — These go inside the bird and under the roasting rack for extra aroma. They’re also beautiful for presentation when you bring the turkey to the table.
- 2 cups low-sodium chicken or turkey broth — Poured into the bottom of the roasting pan, this keeps the drippings from burning and creates the base for your gravy. Low-sodium is important so you can control the salt level.
Equipment Needed
You don’t need a professional kitchen to pull this off, but a few key tools make the job much easier. Here’s what I use every time.
- Roasting pan with a rack — A sturdy metal roasting pan is ideal. The rack lifts the turkey off the bottom so air circulates and the skin crisps evenly. If you don’t have a rack, roll up a few strips of aluminum foil into coils and place them under the bird. It’s not pretty, but it works.
- Meat thermometer — This is non-negotiable. A digital instant-read thermometer is best. I’ve ruined turkeys by guessing, and I’ll never go back. You’re looking for 165°F in the thickest part of the thigh, away from the bone.
- Kitchen twine — For trussing the legs. It helps the turkey cook evenly and keeps the presentation tidy. If you don’t have twine, you can tuck the legs under the skin flap, but twine is more secure.
- Mixing bowl and spatula — For making the herb butter. A small bowl is fine, and a rubber spatula helps you scrape every last bit of that butter onto the turkey.
- Chef’s knife and cutting board — For mincing garlic and chopping herbs. A sharp knife makes the job faster and safer. Dull knives are more dangerous than sharp ones, trust me.
- Basting brush (optional) — I use one to brush the melted butter from the pan over the turkey during roasting. You can also use a spoon. It’s not essential, but it helps with even browning.
- Aluminum foil — For tenting the turkey if the skin browns too quickly. I always have a sheet ready just in case.
Preparation Method
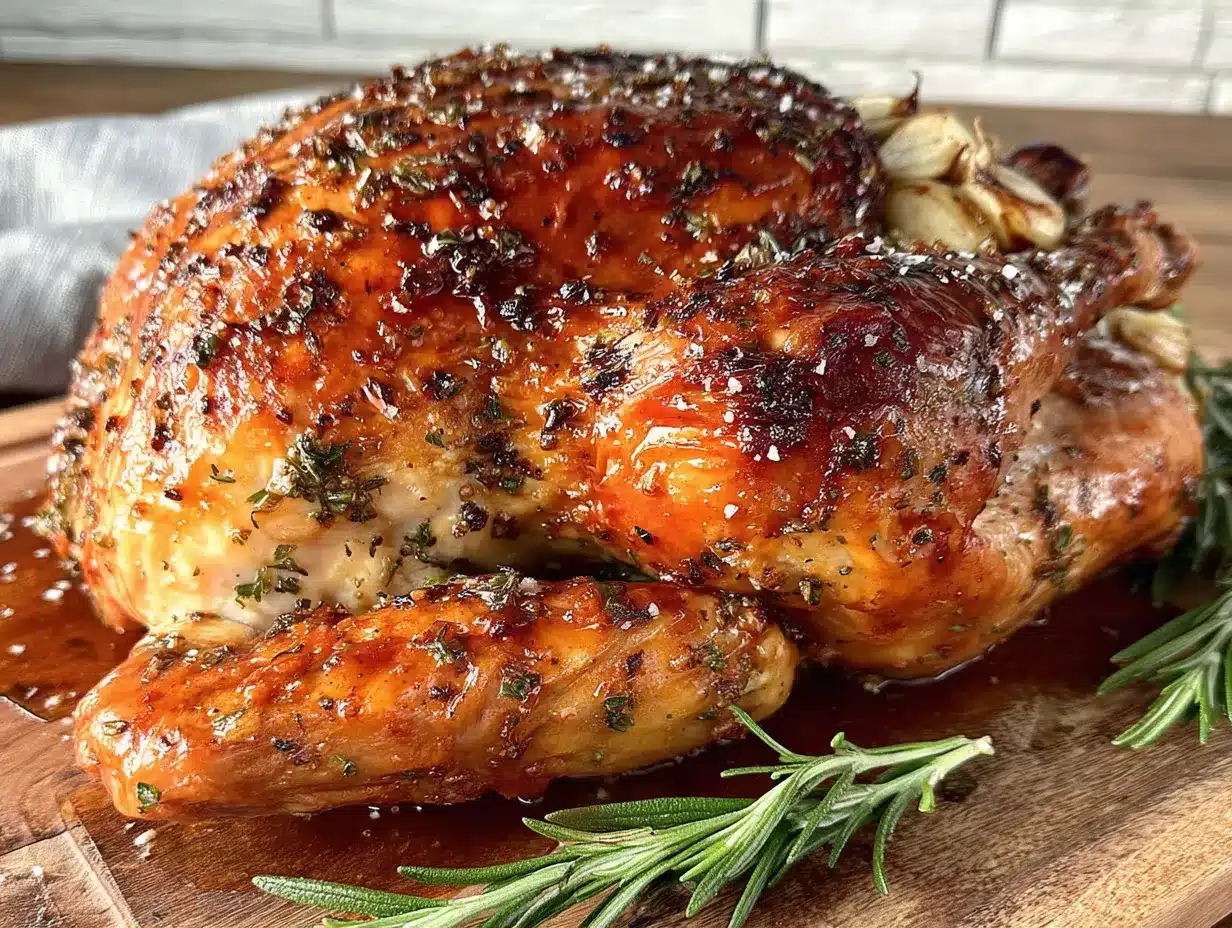
This looks like a lot of steps, but I promise it’s straightforward. The key is taking your time with the herb butter—that’s where the magic happens. Let’s break it down.
- Prep the turkey. Remove the turkey from its packaging. Take out the giblets and neck from the cavity—save them for stock or gravy if you like, or discard them. Pat the turkey completely dry with paper towels, inside and out. This is important. Moisture is the enemy of crispy skin, so dry it thoroughly. Place the turkey on a rimmed baking sheet or in your roasting pan.
- Make the herb butter. In a small bowl, combine the softened butter, minced garlic, chopped rosemary, thyme, sage, kosher salt, and black pepper. Mix until everything is evenly distributed. Taste a tiny bit—it should be savory and fragrant, with a clear garlic and rosemary presence. If it tastes flat, add another pinch of salt.
- Loosen the skin. This is the step that makes the recipe. Using your fingers, gently loosen the skin over the turkey breast and thighs. Start at the neck cavity and work your fingers under the skin, being careful not to tear it. You want to create pockets between the skin and the meat. Go slowly—if the skin tears, it’s not the end of the world, but it’s better to keep it intact.
- Spread the butter. Take about two-thirds of the herb butter and spread it directly onto the meat under the loosened skin. Use your fingers to distribute it evenly over the breast and thighs. Don’t just blob it in one spot—spread it so every bite gets flavor. Then rub the remaining butter all over the outside of the turkey, including the legs and wings. Be generous. Every inch of skin should have some butter on it.
- Stuff the cavity. Place the lemon halves, quartered onion, and a few sprigs of fresh rosemary inside the turkey cavity. Don’t pack it tight—you want air to circulate. The aromatics will steam gently from the inside, keeping the meat moist and adding subtle flavor.
- Truss the turkey. Tie the legs together with kitchen twine. Tuck the wing tips under the body so they don’t burn. Trussing isn’t just for looks—it helps the turkey cook evenly and keeps the legs from drying out.
- Season and rest overnight (optional but recommended). Place the turkey on a rack in your roasting pan. If you have time, refrigerate it uncovered for 8 to 24 hours. This dries out the skin even more, which means it will be extra crispy when it roasts. If you’re short on time, just let it sit at room temperature for 30 minutes while the oven preheats.
- Preheat and prep the pan. Preheat your oven to 425°F. Pour the 2 cups of broth into the bottom of the roasting pan. This will catch drippings and prevent them from burning. Place the turkey on the rack over the broth.
- Roast at high heat. Roast the turkey at 425°F for 30 minutes. This high initial temperature helps the skin start crisping and gives it that beautiful golden color. Don’t open the oven during this time—let the heat do its work.
- Reduce heat and continue roasting. After 30 minutes, reduce the oven temperature to 350°F. Continue roasting, basting every 30 minutes with the pan juices. Use a basting brush or a large spoon to drizzle the juices over the turkey. This keeps the meat moist and adds layers of flavor.
- Check temperature. Start checking the internal temperature after about 2 hours of total roasting time. Insert your meat thermometer into the thickest part of the thigh, away from the bone. You’re looking for 165°F. The breast should be around 160°F—it will continue cooking as it rests. A 12–14 pound turkey typically takes 2 ½ to 3 hours total.
- Tent if needed. If the skin is browning too quickly, loosely tent the turkey with aluminum foil. Don’t seal it tight—you want air to circulate. I usually tent mine about 30 minutes before it’s done to prevent over-browning.
- Rest the turkey. Once the turkey reaches the right temperature, remove it from the oven. Transfer it to a cutting board or platter, tent it loosely with foil, and let it rest for at least 20 to 30 minutes. This is crucial. Resting allows the juices to redistribute throughout the meat. If you carve too soon, all those juices will run out onto the cutting board, leaving you with dry turkey.
- Make gravy (optional but encouraged). While the turkey rests, pour the pan drippings into a fat separator or a glass measuring cup. Skim off the fat. You can use the drippings as a base for gravy—just whisk in a little flour or cornstarch slurry over medium heat until thickened. Season with salt and pepper to taste.
- Carve and serve. Carve the turkey and arrange it on a platter. Garnish with fresh rosemary sprigs and maybe some orange slices for color. Serve immediately with the gravy on the side.
Cooking Tips & Techniques
I’ve made enough mistakes with turkey to fill a small cookbook of failures. Here’s what I’ve learned so you don’t have to repeat my errors.
Don’t skip the overnight rest in the fridge. I know it takes planning, but that uncovered chill time is what gives you shatteringly crisp skin. The first time I tried it, I was nervous the turkey would dry out. It didn’t. The skin got so crispy my husband asked if I deep-fried it. That’s the power of air-drying.
Use a thermometer, not the pop-up timer. Those little plastic pop-up things that come with some turkeys are notoriously unreliable. They often pop too late, meaning your turkey is already overcooked. A good digital thermometer costs about $15 and will save you from serving dry meat. Trust me on this one—I learned the hard way at a Christmas dinner that I’d rather forget.
Baste with pan juices, not butter. I used to baste with extra melted butter, thinking more fat equals more flavor. What actually happens is the butter runs off and makes the skin soggy. Stick to basting with the pan juices—they’re flavorful enough, and they won’t ruin your crispy skin.
Let the turkey come to room temperature before roasting. If you didn’t do the overnight chill, at least let the turkey sit out for 30 to 45 minutes before it goes in the oven. A cold turkey will take longer to cook and can result in uneven cooking—the outside dries out before the inside is done.
Don’t open the oven too often. Every time you open that door, heat escapes and your cooking time gets longer. I know it’s tempting to peek, but resist. Stick to basting every 30 minutes and no more. Set a timer if you have to.
Variations & Adaptations
This recipe is flexible, and I’ve tried several variations over the years. Here are a few that worked well.
Citrus Herb Butter: Add the zest of one lemon and one orange to the herb butter. It gives the turkey a bright, fresh flavor that’s perfect for spring or summer gatherings. I tried this for an Easter dinner and got rave reviews.
Spicy Southwest Turkey: Replace the rosemary and sage with 1 tablespoon each of ground cumin, smoked paprika, and chili powder. Add a teaspoon of cayenne if you like heat. This version is fantastic with a side of black beans and rice. It’s not traditional, but it’s delicious.
Garlic and Herb Compound Butter with Parmesan: Stir ¼ cup finely grated Parmesan cheese into the herb butter. The cheese adds a savory, umami depth that’s incredible. Just watch the salt—Parmesan is salty, so reduce the added salt to 1 teaspoon.
Make it Dairy-Free: Substitute the butter with a high-quality vegan butter or olive oil. If using olive oil, reduce the amount to ¾ cup and mix it with the herbs and garlic. The texture will be slightly different, but the flavor is still fantastic.
Smoked Turkey Version: If you have a smoker, this herb butter works beautifully. Smoke the turkey at 225°F for 6 to 8 hours, or until it reaches 165°F internally. The rosemary and garlic pair wonderfully with the smoky flavor. I did this last summer for a backyard party, and people were fighting over the leftovers.
Serving & Storage Suggestions
This turkey is the centerpiece of a meal, so how you serve it matters. Here’s what I recommend.
Serving Temperature: Serve the turkey warm, not hot. After resting, it should be around 140°F to 150°F, which is perfect. If it’s too hot, the meat will continue cooking and can dry out. If it’s too cold, the fat will start to solidify.
Presentation Tips: Arrange the carved turkey on a large platter. Fan out the breast slices, arrange the legs and thighs on the sides, and tuck fresh rosemary sprigs and orange slices around the edges. It looks stunning and makes your guests feel like they’re at a fancy restaurant.
What to Serve Alongside: This turkey pairs beautifully with classic sides like mashed potatoes, green bean casserole, roasted Brussels sprouts, and cranberry sauce. For a dinner party, I also like to serve a simple arugula salad with lemon vinaigrette to cut through the richness. A good bottle of Pinot Noir or Chardonnay rounds out the meal perfectly.
Storage Instructions: Leftover turkey should be cooled completely, then stored in an airtight container in the refrigerator. It will keep for 3 to 4 days. For longer storage, freeze the turkey in freezer-safe bags or containers for up to 3 months. Slice it before freezing so you can grab portions as needed.
Reheating Tips: To reheat without drying out the meat, place the turkey slices in a baking dish with a splash of broth or water. Cover with foil and warm in a 300°F oven for 10 to 15 minutes. You can also reheat in the microwave, but it won’t be as moist. For crispy skin, reheat in a skillet over medium heat with a little butter.
How Flavors Develop: Honestly, this turkey is even better the next day. The herbs and garlic continue to meld with the meat as it sits. I love making turkey sandwiches with leftover slices, a little cranberry sauce, and some fresh arugula on crusty bread. It’s almost worth roasting the turkey just for the leftovers.
Nutritional Information & Benefits
Turkey is a lean protein source that’s packed with nutrients. Here’s a rough estimate per 4-ounce serving of roasted turkey breast (without skin).
- Calories: Approximately 180–200
- Protein: 25–30 grams
- Fat: 8–10 grams (from the butter and natural fat)
- Carbohydrates: 0 grams
- Sodium: 350–400 mg (varies with added salt)
Health Benefits: Turkey is rich in B vitamins, particularly B6 and B12, which support energy metabolism and brain function. It’s also a good source of selenium, an antioxidant that supports thyroid health. The garlic in this recipe contains allicin, a compound linked to immune support and heart health. Rosemary is packed with antioxidants and has anti-inflammatory properties.
Dietary Considerations: This recipe is naturally gluten-free, low-carb, and keto-friendly if you skip the gravy made with flour. It’s also dairy-free if you use the olive oil variation. The main allergens are dairy (butter) and potentially garlic for those with sensitivities.
Personal Perspective: I love that this turkey feels indulgent but is actually quite healthy. The butter adds richness, but a serving is still reasonable. I serve it with plenty of vegetables and a light salad, and nobody feels deprived. It’s comfort food that doesn’t weigh you down.
Conclusion
This herb butter roasted turkey is the recipe I turn to whenever I want to impress guests and feed a crowd without stress. It’s simple enough for a weeknight dinner but elegant enough for a holiday feast. The garlic and rosemary infuse every bite with flavor, and the crispy skin is the kind of thing people remember.
What I love most about this recipe is how forgiving it is. Even if you forget to baste one round or the oven temp fluctuates a little, the herb butter keeps everything moist and delicious. It’s the kind of recipe that makes you look like a hero in the kitchen, even when you’re just following the steps.
I hope you try this for your next gathering. Customize it with your favorite herbs, play with the garlic amount, and make it your own. And when you do, come back and tell me how it went. I love hearing about your kitchen victories—and your happy guests.
Happy roasting, friend. You’ve got this.
Frequently Asked Questions
Can I use dried herbs instead of fresh?
You can, but the flavor won’t be as bright. If using dried, reduce the amount by half—dried herbs are more concentrated. For this recipe, I really recommend fresh rosemary and thyme. The texture and flavor are noticeably better.
Do I have to brine the turkey first?
No, you don’t need to brine. The herb butter keeps the meat moist and flavorful on its own. If you prefer a brined turkey, just reduce the added salt in the butter to 1 teaspoon to avoid over-salting.
Can I prepare the herb butter ahead of time?
Absolutely. You can make the herb butter up to 3 days in advance. Store it in an airtight container in the refrigerator. Let it soften at room temperature for about 30 minutes before spreading it on the turkey.
What if my turkey is larger or smaller than 12–14 pounds?
Adjust the roasting time accordingly. A general rule is 13 minutes per pound at 350°F after the initial 30-minute high-heat sear. So a 10-pound turkey will need about 2 hours total, while a 16-pound turkey will need closer to 3 ½ hours. Always use a meat thermometer to confirm doneness.
Can I use this herb butter on chicken instead?
Yes, this herb butter works beautifully on chicken. Use it on a whole roasting chicken or even chicken breasts. Reduce the roasting time to about 20 minutes per pound at 375°F. The garlic and rosemary flavor is just as amazing on chicken.
PrintPerfect Herb Butter Roasted Turkey with Garlic and Rosemary
This herb butter roasted turkey is the recipe I turn to whenever I want to impress guests and feed a crowd without stress. It’s simple enough for a weeknight dinner but elegant enough for a holiday feast.
- Prep Time: 30 minutes
- Cook Time: 2 hours 30 minutes
- Total Time: 3 hours
- Yield: 12 servings 1x
- Category: Main Course
- Cuisine: American
Ingredients
- 1 whole turkey (12–14 pounds), thawed if frozen
- 1 cup (2 sticks) unsalted butter, softened to room temperature
- 6 cloves garlic, minced
- 3 tablespoons fresh rosemary, finely chopped
- 1 tablespoon fresh thyme leaves
- 1 tablespoon fresh sage, finely chopped
- 2 teaspoons kosher salt
- 1 teaspoon black pepper, freshly ground
- 1 lemon, halved
- 1 onion, quartered
- 4 sprigs fresh rosemary (for garnish and cavity)
- 2 cups low-sodium chicken or turkey broth
Instructions
- Prep the turkey. Remove the turkey from its packaging. Take out the giblets and neck from the cavity—save them for stock or gravy if you like, or discard them. Pat the turkey completely dry with paper towels, inside and out. This is important. Moisture is the enemy of crispy skin, so dry it thoroughly. Place the turkey on a rimmed baking sheet or in your roasting pan.
- Make the herb butter. In a small bowl, combine the softened butter, minced garlic, chopped rosemary, thyme, sage, kosher salt, and black pepper. Mix until everything is evenly distributed. Taste a tiny bit—it should be savory and fragrant, with a clear garlic and rosemary presence. If it tastes flat, add another pinch of salt.
- Loosen the skin. This is the step that makes the recipe. Using your fingers, gently loosen the skin over the turkey breast and thighs. Start at the neck cavity and work your fingers under the skin, being careful not to tear it. You want to create pockets between the skin and the meat. Go slowly—if the skin tears, it’s not the end of the world, but it’s better to keep it intact.
- Spread the butter. Take about two-thirds of the herb butter and spread it directly onto the meat under the loosened skin. Use your fingers to distribute it evenly over the breast and thighs. Don’t just blob it in one spot—spread it so every bite gets flavor. Then rub the remaining butter all over the outside of the turkey, including the legs and wings. Be generous. Every inch of skin should have some butter on it.
- Stuff the cavity. Place the lemon halves, quartered onion, and a few sprigs of fresh rosemary inside the turkey cavity. Don’t pack it tight—you want air to circulate. The aromatics will steam gently from the inside, keeping the meat moist and adding subtle flavor.
- Truss the turkey. Tie the legs together with kitchen twine. Tuck the wing tips under the body so they don’t burn. Trussing isn’t just for looks—it helps the turkey cook evenly and keeps the legs from drying out.
- Season and rest overnight (optional but recommended). Place the turkey on a rack in your roasting pan. If you have time, refrigerate it uncovered for 8 to 24 hours. This dries out the skin even more, which means it will be extra crispy when it roasts. If you’re short on time, just let it sit at room temperature for 30 minutes while the oven preheats.
- Preheat and prep the pan. Preheat your oven to 425°F. Pour the 2 cups of broth into the bottom of the roasting pan. This will catch drippings and prevent them from burning. Place the turkey on the rack over the broth.
- Roast at high heat. Roast the turkey at 425°F for 30 minutes. This high initial temperature helps the skin start crisping and gives it that beautiful golden color. Don’t open the oven during this time—let the heat do its work.
- Reduce heat and continue roasting. After 30 minutes, reduce the oven temperature to 350°F. Continue roasting, basting every 30 minutes with the pan juices. Use a basting brush or a large spoon to drizzle the juices over the turkey. This keeps the meat moist and adds layers of flavor.
- Check temperature. Start checking the internal temperature after about 2 hours of total roasting time. Insert your meat thermometer into the thickest part of the thigh, away from the bone. You’re looking for 165°F. The breast should be around 160°F—it will continue cooking as it rests. A 12–14 pound turkey typically takes 2 ½ to 3 hours total.
- Tent if needed. If the skin is browning too quickly, loosely tent the turkey with aluminum foil. Don’t seal it tight—you want air to circulate. I usually tent mine about 30 minutes before it’s done to prevent over-browning.
- Rest the turkey. Once the turkey reaches the right temperature, remove it from the oven. Transfer it to a cutting board or platter, tent it loosely with foil, and let it rest for at least 20 to 30 minutes. This is crucial. Resting allows the juices to redistribute throughout the meat. If you carve too soon, all those juices will run out onto the cutting board, leaving you with dry turkey.
- Make gravy (optional but encouraged). While the turkey rests, pour the pan drippings into a fat separator or a glass measuring cup. Skim off the fat. You can use the drippings as a base for gravy—just whisk in a little flour or cornstarch slurry over medium heat until thickened. Season with salt and pepper to taste.
- Carve and serve. Carve the turkey and arrange it on a platter. Garnish with fresh rosemary sprigs and maybe some orange slices for color. Serve immediately with the gravy on the side.
Notes
Don’t skip the overnight rest in the fridge for crispy skin. Use a thermometer, not the pop-up timer. Baste with pan juices, not butter. Let the turkey come to room temperature before roasting. Don’t open the oven too often.
Nutrition
- Serving Size: 4 ounces
- Calories: 190
- Sodium: 375
- Fat: 9
- Saturated Fat: 5
- Protein: 27
Keywords: herb butter roasted turkey, garlic rosemary turkey, Thanksgiving turkey, holiday turkey, roasted turkey, turkey recipe


